
Open Source Guide (ENGLISH)
Page 1
... these conditions, and telling the user how to share and change free software--to do so, and all third parties under copyright law: that you also meet all the notices that they are not derived from time to address new problems or concerns. The "Program", below, refers to any such program or work, and a "work based on a volume of a storage or distribution...
... these conditions, and telling the user how to share and change free software--to do so, and all third parties under copyright law: that you also meet all the notices that they are not derived from time to address new problems or concerns. The "Program", below, refers to any such program or work, and a "work based on a volume of a storage or distribution...

Open Source Guide (ENGLISH)
Page 2
... INABILITY TO USE THE LIBRARY (INCLUDING BUT NOT LIMITED TO LOSS OF DATA OR DATA BEING RENDERED INACCURATE OR LOSSES SUSTAINED BY YOU OR THIRD PARTIES OR A FAILURE OF THE LIBRARY TO OPERATE WITH ANY OTHER SOFTWARE), EVEN IF SUCH HOLDER OR OTHER PARTY HAS BEEN ADVISED OF ... making it free software that everyone can do so by permitting redistribution under these terms, attach the following notices to most effectively convey the exclusion of the ordinary General Public License). It is found. To apply these terms (or, alternatively, under the terms of warranty; and each source file to ...
... INABILITY TO USE THE LIBRARY (INCLUDING BUT NOT LIMITED TO LOSS OF DATA OR DATA BEING RENDERED INACCURATE OR LOSSES SUSTAINED BY YOU OR THIRD PARTIES OR A FAILURE OF THE LIBRARY TO OPERATE WITH ANY OTHER SOFTWARE), EVEN IF SUCH HOLDER OR OTHER PARTY HAS BEEN ADVISED OF ... making it free software that everyone can do so by permitting redistribution under these terms, attach the following notices to most effectively convey the exclusion of the ordinary General Public License). It is found. To apply these terms (or, alternatively, under the terms of warranty; and each source file to ...
User Manual (ENGLISH)
Page 3
... Connecting a DVD Player/Set-Top Box via HDMI 12 Connecting a Digital Audio System 13 Connecting an Amplifier/DVD Home Theater 13 Connecting a PC 14 OPERATION Turning the TV On and Off 15 Plug & Play Feature 15 Dynamic Menus and On-Screen Displays 17 Navigating Menus by Using the Menu Map 18 Selecting a Menu Language 19 Memorizing Channels 20 Changing Channels 22 Setting Up Your Remote Control 23 Remote Control Codes 25 Setting the Clock 28 Setting the On/Off Timer 30 Setting the Sleep Timer 31 Viewing an External Signal Source...
... Connecting a DVD Player/Set-Top Box via HDMI 12 Connecting a Digital Audio System 13 Connecting an Amplifier/DVD Home Theater 13 Connecting a PC 14 OPERATION Turning the TV On and Off 15 Plug & Play Feature 15 Dynamic Menus and On-Screen Displays 17 Navigating Menus by Using the Menu Map 18 Selecting a Menu Language 19 Memorizing Channels 20 Changing Channels 22 Setting Up Your Remote Control 23 Remote Control Codes 25 Setting the Clock 28 Setting the On/Off Timer 30 Setting the Sleep Timer 31 Viewing an External Signal Source...
User Manual (ENGLISH)
Page 5
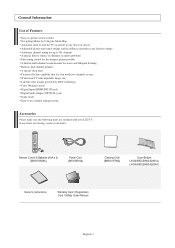
... any items are missing, contact your LCD TV. Remote Control & Batteries (AAA x 2) (BN59-00568A) Power Cord (3903-000144) Cleaning Cloth (BN63-01798A) Cover-Bottom LN-S4095D (BN63-02491A) LN-S4695D (BN63-02624A) Owner's Instructions Warranty Card / Registration Card / Safety Guide Manual English-3 General Information List of Features Easy-to-operate remote control Navigating Menus by DNle technology Color Weakness mode Digital Input (HDMI/DVI IN) jack Digital Audio Output (OPTICAL) jack Game mode Easy-to-use channel manager menu.
... any items are missing, contact your LCD TV. Remote Control & Batteries (AAA x 2) (BN59-00568A) Power Cord (3903-000144) Cleaning Cloth (BN63-01798A) Cover-Bottom LN-S4095D (BN63-02491A) LN-S4695D (BN63-02624A) Owner's Instructions Warranty Card / Registration Card / Safety Guide Manual English-3 General Information List of Features Easy-to-operate remote control Navigating Menus by DNle technology Color Weakness mode Digital Input (HDMI/DVI IN) jack Digital Audio Output (OPTICAL) jack Game mode Easy-to-use channel manager menu.
User Manual (ENGLISH)
Page 6
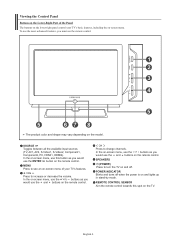
...). MENU Press to turn the TV on -screen menu. English-4 Viewing the Control Panel Buttons on the Lower-Right Part of your TV's basic features, including the on and off. To use the more advanced features, you would use the and buttons on the remote control. Press to increase or decrease the volume. SPEAKERS (POWER) Press to see an on and lights up in stand-by mode. In the on-screen menu, use the buttons as...
...). MENU Press to turn the TV on -screen menu. English-4 Viewing the Control Panel Buttons on the Lower-Right Part of your TV's basic features, including the on and off. To use the more advanced features, you would use the and buttons on the remote control. Press to increase or decrease the volume. SPEAKERS (POWER) Press to see an on and lights up in stand-by mode. In the on-screen menu, use the buttons as...
User Manual (ENGLISH)
Page 7
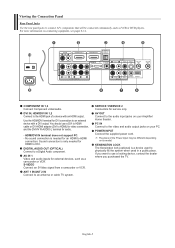
... VCR or DVD players. AV IN 1 Video and audio inputs for audio. - S-VIDEO Connect an S-Video signal from a camcorder or VCR. If you purchased the TV. You should use a locking device, contact the dealer where you want to use a DVI to HDMI cable or DVI-HDMI adapter (DVI to an external device with an HDMI output. No sound connection is a device used in a public place. POWER INPUT Connect the supplied power cord. ANT 1 IN/ANT 2 IN Connect to the video and audio output jacks...
... VCR or DVD players. AV IN 1 Video and audio inputs for audio. - S-VIDEO Connect an S-Video signal from a camcorder or VCR. If you purchased the TV. You should use a locking device, contact the dealer where you want to use a DVI to HDMI cable or DVI-HDMI adapter (DVI to an external device with an HDMI output. No sound connection is a device used in a public place. POWER INPUT Connect the supplied power cord. ANT 1 IN/ANT 2 IN Connect to the video and audio output jacks...
User Manual (ENGLISH)
Page 9
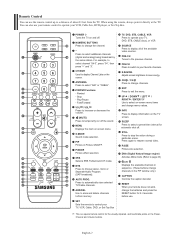
... the Power, Channel and Volume buttons. PIP Picture-in the PIP window only.) CAPTION Controls the caption decoder. ADD/DEL Use to store and delete channels to/from the TV. FAV.CH Press to switch to your VCR, Cable box, DVD player, or Set-Top Box. UP / DOWN / LEFT / RIGHT / ENTER Use to select on and off the sound. P.SIZE Picture size selection. Remote Control You can also use your remote control to operate your favorite channels. POWER Turns the TV on -screen menu items and change channels. ANTENNA Press...
... the Power, Channel and Volume buttons. PIP Picture-in the PIP window only.) CAPTION Controls the caption decoder. ADD/DEL Use to store and delete channels to/from the TV. FAV.CH Press to switch to your VCR, Cable box, DVD player, or Set-Top Box. UP / DOWN / LEFT / RIGHT / ENTER Use to select on and off the sound. P.SIZE Picture size selection. Remote Control You can also use your remote control to operate your favorite channels. POWER Turns the TV on -screen menu items and change channels. ANTENNA Press...
User Manual (ENGLISH)
Page 10
... power cord unplugged? 5. If your antenna has a set of the TV. Plug the adaptor into the ANT 2 IN (CABLE) terminal on the back of the rear panel. Antennas with 75 Ω Round Leads". Separate VHF and UHF Antennas If you won't be used up to match the "+" and "-" ends of the remote control upward as a roof antenna or "rabbit ears") that has 300 Ω twin flat...
... power cord unplugged? 5. If your antenna has a set of the TV. Plug the adaptor into the ANT 2 IN (CABLE) terminal on the back of the rear panel. Antennas with 75 Ω Round Leads". Separate VHF and UHF Antennas If you won't be used up to match the "+" and "-" ends of the remote control upward as a roof antenna or "rabbit ears") that has 300 Ω twin flat...
User Manual (ENGLISH)
Page 11
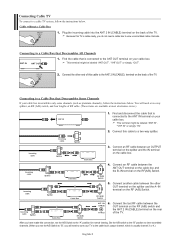
... A/B switch to the "B" position to view scrambled channels. (When you set the A/B Switch to the "A" position for normal viewing. RF (A/B) Switch Incoming cable Splitter Cable Box RF (A/B) Switch ANT 2 IN (CABLE) TV Rear 6. Connecting to a Cable Box that is cable-ready, you have made this connection, set the A/B Switch to "B", you will need a cable box to view unscrambled cable channels. This terminal might be labeled "ANT OUT", "VHF OUT" or simply, "OUT". Connecting Cable TV To connect to a cable TV system, follow the instructions...
... A/B switch to the "B" position to view scrambled channels. (When you set the A/B Switch to the "A" position for normal viewing. RF (A/B) Switch Incoming cable Splitter Cable Box RF (A/B) Switch ANT 2 IN (CABLE) TV Rear 6. Connecting to a Cable Box that is cable-ready, you have made this connection, set the A/B Switch to "B", you will need a cable box to view unscrambled cable channels. This terminal might be labeled "ANT OUT", "VHF OUT" or simply, "OUT". Connecting Cable TV To connect to a cable TV system, follow the instructions...
User Manual (ENGLISH)
Page 12
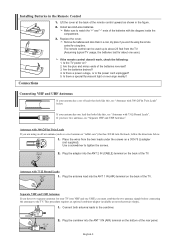
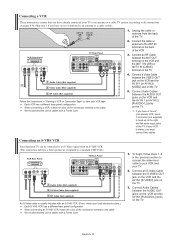
... picture as compared to view your VCR tape. VCR Rear Panel TV Rear Panel 2. When connecting a VCR, match the color of cables with a Ferrite Core. 4. We recommend the use of the connection terminal to an antenna or a cable system. Connect Audio Cables between the S-VIDEO OUT jack on the VCR and the AV IN1 [S-VIDEO] jack on the TV. If you have a "mono" (non-stereo) VCR, use a Y-connector (not supplied) to hook up...
... picture as compared to view your VCR tape. VCR Rear Panel TV Rear Panel 2. When connecting a VCR, match the color of cables with a Ferrite Core. 4. We recommend the use of the connection terminal to an antenna or a cable system. Connect Audio Cables between the S-VIDEO OUT jack on the VCR and the AV IN1 [S-VIDEO] jack on the TV. If you have a "mono" (non-stereo) VCR, use a Y-connector (not supplied) to hook up...
User Manual (ENGLISH)
Page 14
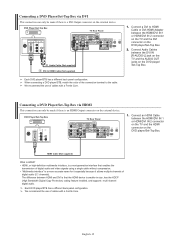
... HDMI/DVI IN 1 or HDMI/DVI IN 2 connector on the TV and the HDMI connector on the external device. Connecting a DVD Player/Set-Top Box via HDMI This connection can only be made if there is smaller in size, has the HDCP (High Bandwidth Digital Copy Protection) coding feature installed, and supports multi-channel digital audio. When connecting a DVD player/STB, match the color of the connection terminal to HDMI Cable (Not supplied) Each DVD player/STB has a different back panel...
... HDMI/DVI IN 1 or HDMI/DVI IN 2 connector on the TV and the HDMI connector on the external device. Connecting a DVD Player/Set-Top Box via HDMI This connection can only be made if there is smaller in size, has the HDCP (High Bandwidth Digital Copy Protection) coding feature installed, and supports multi-channel digital audio. When connecting a DVD player/STB, match the color of the connection terminal to HDMI Cable (Not supplied) Each DVD player/STB has a different back panel...
User Manual (ENGLISH)
Page 17
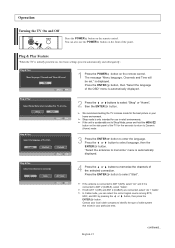
... antennas to memorize" menu is only intended for use the POWER button on the remote control. In Cable mode, you can also use in your particular area. Operation Turning the TV On and Off Press the POWER button on the side panel of the TV for five seconds to return to Dynamic (Home) mode. 3 Press the ENTER button to enter the language. We recommend setting the TV to Home mode for the best picture...
... antennas to memorize" menu is only intended for use the POWER button on the remote control. In Cable mode, you can also use in your particular area. Operation Turning the TV On and Off Press the POWER button on the side panel of the TV for five seconds to return to Dynamic (Home) mode. 3 Press the ENTER button to enter the language. We recommend setting the TV to Home mode for the best picture...
User Manual (ENGLISH)
Page 19
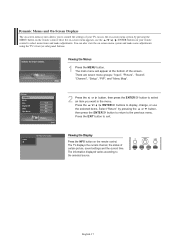
.... Access the on-screen menu system by pressing the or button, then press the ENTER button to return to the previous menu. Viewing the Menus 1 Press the MENU button. There are seven menu groups: "Input", "Picture", "Sound", "Channel", "Setup", "PIP", and "Menu Map". 2 Press the or button, then press the ENTER an item you to control the settings of your remote control to display, change, or use the / / / /ENTER buttons on the remote control. The TV displays the current channel, the...
.... Access the on-screen menu system by pressing the or button, then press the ENTER button to return to the previous menu. Viewing the Menus 1 Press the MENU button. There are seven menu groups: "Input", "Picture", "Sound", "Channel", "Setup", "PIP", and "Menu Map". 2 Press the or button, then press the ENTER an item you to control the settings of your remote control to display, change, or use the / / / /ENTER buttons on the remote control. The TV displays the current channel, the...

User Manual (ENGLISH)
Page 25
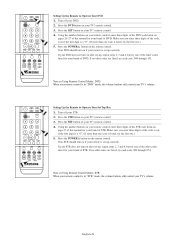
The remote control might not be compatible with all DVD Players, VCRs, Cable boxes, and Set-Top Boxes. Press the SET button on the remote control. Press the POWER button on your TV's remote control. 4. Turn off your VCR. 2. Press the CABLE button on your TV's remote control. 4. Using the number buttons on your remote control, enter three digits of the cable box code listed on page 26 of this manual for your brand of VCR. If your cable box does not turn on after set-up, repeat steps 2, 3 and...
The remote control might not be compatible with all DVD Players, VCRs, Cable boxes, and Set-Top Boxes. Press the SET button on the remote control. Press the POWER button on your TV's remote control. 4. Turn off your VCR. 2. Press the CABLE button on your TV's remote control. 4. Using the number buttons on your remote control, enter three digits of the cable box code listed on page 26 of this manual for your brand of VCR. If your cable box does not turn on after set-up, repeat steps 2, 3 and...
User Manual (ENGLISH)
Page 26
... the DVD button on the remote control. If no other codes are listed, try each code, 000 through 141. Press the POWER button on your brand of STB. Press the POWER button on your TV's volume. Your DVD should turn on Using Remote Control Modes: DVD When your remote control is in "DVD" mode, the volume buttons still control your TV's remote control. 3. Note on if your STB. 2. English-24 Turn off your remote is set up correctly. Using the number buttons on your remote control, enter three digits...
... the DVD button on the remote control. If no other codes are listed, try each code, 000 through 141. Press the POWER button on your brand of STB. Press the POWER button on your TV's volume. Your DVD should turn on Using Remote Control Modes: DVD When your remote control is in "DVD" mode, the volume buttons still control your TV's remote control. 3. Note on if your STB. 2. English-24 Turn off your remote is set up correctly. Using the number buttons on your remote control, enter three digits...
User Manual (ENGLISH)
Page 34
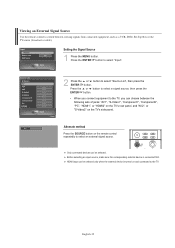
... the TV's rear panel, and "AV2", or "S-Video2" on and connected to the TV. HDMI input can be selected only when the external device is connected first. Only connected devices can be selected. English-32 Setting the Signal Source 1 Press the MENU button. Viewing an External Signal Source Use the remote control to select an external signal source. Before selecting an input source, make sure the corresponding external device is turned on the TV's side panel. Press the or button to select a signal source...
... the TV's rear panel, and "AV2", or "S-Video2" on and connected to the TV. HDMI input can be selected only when the external device is connected first. Only connected devices can be selected. English-32 Setting the Signal Source 1 Press the MENU button. Viewing an External Signal Source Use the remote control to select an external signal source. Before selecting an input source, make sure the corresponding external device is turned on the TV's side panel. Press the or button to select a signal source...
User Manual (ENGLISH)
Page 45
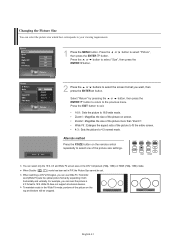
... select the picture size which best corresponds to your viewing requirements. 1 Press the MENU button. Wide Fit does not support all external devices. Changing the Picture Size You can select only the 16:9, 4:3 and Wide Fit screen sizes in the DTV Component (720p, 1080i) or HDMI (720p, 1080i) mode. For example, you can use Wide Fit. Press the EXIT button to exit. • 16:9 : Sets the picture to 4:3 normal mode. Horizontal...
... select the picture size which best corresponds to your viewing requirements. 1 Press the MENU button. Wide Fit does not support all external devices. Changing the Picture Size You can select only the 16:9, 4:3 and Wide Fit screen sizes in the DTV Component (720p, 1080i) or HDMI (720p, 1080i) mode. For example, you can use Wide Fit. Press the EXIT button to exit. • 16:9 : Sets the picture to 4:3 normal mode. Horizontal...
User Manual (ENGLISH)
Page 66
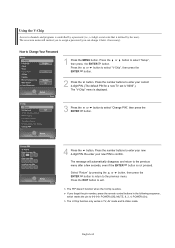
... default PIN for a new TV set is "0000".) The "V-Chip" menu is displayed. 3 Press the or button to select "Change PIN", then press the ENTER button. 4 Press the button. Press the EXIT button to select "V-Chip", then press the ENTER button. 2 Press the button. How to enter your new 4-digit PIN. Press the number buttons to Change Your Password 1 Press the MENU button. Using the V-Chip Access to channels and programs is controlled by a password (i.e., a 4-digit...
... default PIN for a new TV set is "0000".) The "V-Chip" menu is displayed. 3 Press the or button to select "Change PIN", then press the ENTER button. 4 Press the button. Press the EXIT button to select "V-Chip", then press the ENTER button. 2 Press the button. How to enter your new 4-digit PIN. Press the number buttons to Change Your Password 1 Press the MENU button. Using the V-Chip Access to channels and programs is controlled by a password (i.e., a 4-digit...
User Manual (ENGLISH)
Page 85
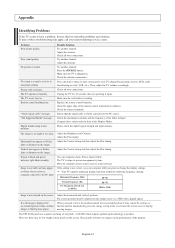
... x 1080 Image is plugged in the Display Modes. Digital broadcasting screen problem. Adjust the antenna. Check the antenna connections. First, check the volume of the product. Check all wire connections. Replace the remote control batteries. Adjust the Fine tuning. Adjust the Coarse tuning and then adjust the Fine tuning. The TV is black and power indicator light blinks steadily. If a still image is not correct, use your computer check: Power, Signal Cable. Remote control malfunctions "Check signal cable" message. Check all...
... x 1080 Image is plugged in the Display Modes. Digital broadcasting screen problem. Adjust the antenna. Check the antenna connections. First, check the volume of the product. Check all wire connections. Replace the remote control batteries. Adjust the Fine tuning. Adjust the Coarse tuning and then adjust the Fine tuning. The TV is black and power indicator light blinks steadily. If a still image is not correct, use your computer check: Power, Signal Cable. Remote control malfunctions "Check signal cable" message. Check all...
User Manual (ENGLISH)
Page 89
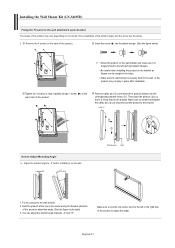
... (direction of the product. LCD TV How to Adjust Mounting Angle Adjust the bracket angle to the bracket. Remove safety pin ( ) and insert the 4 product holders into the plastic hanger. (See the figure below) • Mount the product on the back of the product. English-87 Installing the Wall Mount Kit (LN-S4695D) Fixing the TV panel to the wall attachment panel bracket The shape of the product...
... (direction of the product. LCD TV How to Adjust Mounting Angle Adjust the bracket angle to the bracket. Remove safety pin ( ) and insert the 4 product holders into the plastic hanger. (See the figure below) • Mount the product on the back of the product. English-87 Installing the Wall Mount Kit (LN-S4695D) Fixing the TV panel to the wall attachment panel bracket The shape of the product...


