User Manual (ENGLISH)
Page 3
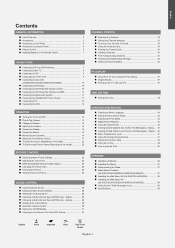
...Viewing the Control Panel 3 Viewing the Connection Panel 4 Remote Control 6 Installing Batteries in the Remote Control 7 CONNECTIONS Connecting VHF and UHF Antennas 7 Connecting Cable TV 8 Connecting a VCR 9 Connecting an S-VHS VCR 9 Connecting a Camcorder (LN-S3251D/LN-S3252D/LN-S4051D/LN-S4052D 10 Connecting a DVD Player 10 ... Digital Audio System 11 Connecting an Amplifier/DVD Home Theater 11 Connecting a PC 12 Connecting the iPod 12 OPERATION Turning the TV On and Off 13 Plug & Play Feature 13 Changing Channels 14 Adjusting the Volume 15 Viewing the Display 15 Viewing the ...
...Viewing the Control Panel 3 Viewing the Connection Panel 4 Remote Control 6 Installing Batteries in the Remote Control 7 CONNECTIONS Connecting VHF and UHF Antennas 7 Connecting Cable TV 8 Connecting a VCR 9 Connecting an S-VHS VCR 9 Connecting a Camcorder (LN-S3251D/LN-S3252D/LN-S4051D/LN-S4052D 10 Connecting a DVD Player 10 ... Digital Audio System 11 Connecting an Amplifier/DVD Home Theater 11 Connecting a PC 12 Connecting the iPod 12 OPERATION Turning the TV On and Off 13 Plug & Play Feature 13 Changing Channels 14 Adjusting the Volume 15 Viewing the Display 15 Viewing the ...
User Manual (ENGLISH)
Page 4
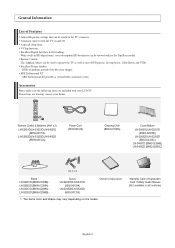
...A special sleep timer. Warranty Card / Registration Card / Safety Guide Manual (Not available in the TV's memory. Accessories Please make sure the following items are missing, contact your LCD TV. V-Chip function. Remote Control The supplied remote can be stored in all locations) English-2 SRS ...TruSurround XT - DNIe technology provides life-like clear images. Automatic timer to operate the TV as well as most DVD players, Set-top boxes, Cable Boxes and VCRs. General Information List of Features Adjustable picture settings...
...A special sleep timer. Warranty Card / Registration Card / Safety Guide Manual (Not available in the TV's memory. Accessories Please make sure the following items are missing, contact your LCD TV. V-Chip function. Remote Control The supplied remote can be stored in all locations) English-2 SRS ...TruSurround XT - DNIe technology provides life-like clear images. Automatic timer to operate the TV as well as most DVD players, Set-top boxes, Cable Boxes and VCRs. General Information List of Features Adjustable picture settings...
User Manual (ENGLISH)
Page 5
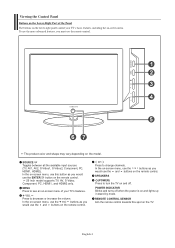
...-screen menu, use this spot on -screen menu. English-3 SOURCE Toggles between all the available input sources (TV, AV1, AV2, S-Video1, S-Video2, Component, PC, HDMI1, HDMI2). MENU Press to turn the TV on the remote control. Press to decrease or increase the volume. In the on-screen menu, use the ... and buttons on and lights up in stand-by mode. Viewing the Control Panel Buttons on the Lower-Right Part of your TV's basic features, including the on the TV. To use the more advanced features, you would use the remote control. The product color and shape may vary depending on...
...-screen menu, use this spot on -screen menu. English-3 SOURCE Toggles between all the available input sources (TV, AV1, AV2, S-Video1, S-Video2, Component, PC, HDMI1, HDMI2). MENU Press to turn the TV on the remote control. Press to decrease or increase the volume. In the on-screen menu, use the ... and buttons on and lights up in stand-by mode. Viewing the Control Panel Buttons on the Lower-Right Part of your TV's basic features, including the on the TV. To use the more advanced features, you would use the remote control. The product color and shape may vary depending on...
User Manual (ENGLISH)
Page 6
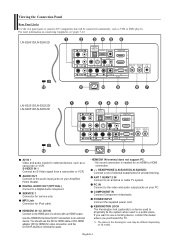
... Audio component. ANT 1 IN/ANT 2 IN Connect to the video and audio output jacks on your PC. PC IN Connect to an antenna or cable TV system. The place of external headphones for an HDMI to use the DVI to HDMI cable or DVI-HDMI adapter (DVI to the HDMI jack... to the audio input jacks on your Amplifier/ Home theater. KENSINGTON LOCK The Kensington lock (optional) is needed for private listening. If you purchased the TV. HDMI/DVI IN terminal does not support PC. - No sound connection is a device used in a public place. MP3 Link Connector for external devices, such as...
... Audio component. ANT 1 IN/ANT 2 IN Connect to the video and audio output jacks on your PC. PC IN Connect to an antenna or cable TV system. The place of external headphones for an HDMI to use the DVI to HDMI cable or DVI-HDMI adapter (DVI to the HDMI jack... to the audio input jacks on your Amplifier/ Home theater. KENSINGTON LOCK The Kensington lock (optional) is needed for private listening. If you purchased the TV. HDMI/DVI IN terminal does not support PC. - No sound connection is a device used in a public place. MP3 Link Connector for external devices, such as...

User Manual (ENGLISH)
Page 8
... to the previous channel. Press to select "AIR" or "CABLE". P.MODE Picture effect selection. AUTO PROG. SET Sets the remote to control your TV, VCR, Cable, DVD, or Set-Top Box This is a special remote control for 2-3 seconds before use. ANTENNA Press to select additional channels (...brightness to resume normal video. You can use the remote control up to a distance of the available video sources. POWER Turns the TV on the TV screen. INFO Press to display information on and off. Press again to save energy. P.SIZE Picture size selection. Remote Control You ...
... to the previous channel. Press to select "AIR" or "CABLE". P.MODE Picture effect selection. AUTO PROG. SET Sets the remote to control your TV, VCR, Cable, DVD, or Set-Top Box This is a special remote control for 2-3 seconds before use. ANTENNA Press to select additional channels (...brightness to resume normal video. You can use the remote control up to a distance of the available video sources. POWER Turns the TV on the TV screen. INFO Press to display information on and off. Press again to save energy. P.SIZE Picture size selection. Remote Control You ...
User Manual (ENGLISH)
Page 9
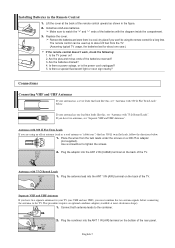
...two antennas, see "Antennas with 75 Ω Round Leads ANT 1 IN (AIR) 1. Antennas with the diagram inside the compartment. 3. Place the wires from the TV. (Assuming typical TV usage, the batteries last for about 23 feet from the twin leads under the screws on a 300-75 Ω adapter (not supplied). ANT 2 IN... ANT 2 IN (CABLE) terminal on the back of the rear panel. Separate VHF and UHF Antennas If you are using the remote control for your TV (one VHF and one year.) If the remote control doesn't work, check the following: 1. UHF VHF UHF VHF ANT 1 IN (AIR) 2. Replace the cover....
...two antennas, see "Antennas with 75 Ω Round Leads ANT 1 IN (AIR) 1. Antennas with the diagram inside the compartment. 3. Place the wires from the TV. (Assuming typical TV usage, the batteries last for about 23 feet from the twin leads under the screws on a 300-75 Ω adapter (not supplied). ANT 2 IN... ANT 2 IN (CABLE) terminal on the back of the rear panel. Separate VHF and UHF Antennas If you are using the remote control for your TV (one VHF and one year.) If the remote control doesn't work, check the following: 1. UHF VHF UHF VHF ANT 1 IN (AIR) 2. Replace the cover....

User Manual (ENGLISH)
Page 10
... connected to the ANT IN terminal on the RF(A/B) switch. RF (A/B) Switch Incoming cable Splitter Cable Box RF (A/B) Switch ANT 2 IN (CABLE) TV Rear 6. Connect the last RF cable between the other end of this cable to a two-way splitter. Connect an RF cable between an OUTPUT terminal... on the splitter and the IN terminal on the back of the TV. Incoming cable Splitter Incoming cable Splitter Cable Box 3. Cable without a Cable Box ANT 2 IN (CABLE) 1. Set the A/B switch to the "B" position to...
... connected to the ANT IN terminal on the RF(A/B) switch. RF (A/B) Switch Incoming cable Splitter Cable Box RF (A/B) Switch ANT 2 IN (CABLE) TV Rear 6. Connect the last RF cable between the other end of this cable to a two-way splitter. Connect an RF cable between an OUTPUT terminal... on the splitter and the IN terminal on the back of the TV. Incoming cable Splitter Incoming cable Splitter Cable Box 3. Cable without a Cable Box ANT 2 IN (CABLE) 1. Set the A/B switch to the "B" position to...

User Manual (ENGLISH)
Page 11
... (Not supplied) 2 S-Video Cable (Not supplied) 1 RF Cable (Not supplied) An S-Video cable is stereo, you have already connected your TV to an antenna or a cable TV system (according to view your TV. 2. Connect Audio Cables between the ANT OUT terminal on the VCR and the ANT 1 IN (AIR) or ANT 2 IN (CABLE... a Video Cable between the VIDEO OUT jack on the VCR and the AV IN 1 [VIDEO] jack on the TV. 4. Connecting an S-VHS VCR Your Samsung TV can be connected to the right and left audio input jacks of the VCR. 3. For 40 inch model, use a Y-connector (not supplied) to hook up ...
... (Not supplied) 2 S-Video Cable (Not supplied) 1 RF Cable (Not supplied) An S-Video cable is stereo, you have already connected your TV to an antenna or a cable TV system (according to view your TV. 2. Connect Audio Cables between the ANT OUT terminal on the VCR and the ANT 1 IN (AIR) or ANT 2 IN (CABLE... a Video Cable between the VIDEO OUT jack on the VCR and the AV IN 1 [VIDEO] jack on the TV. 4. Connecting an S-VHS VCR Your Samsung TV can be connected to the right and left audio input jacks of the VCR. 3. For 40 inch model, use a Y-connector (not supplied) to hook up ...
User Manual (ENGLISH)
Page 12
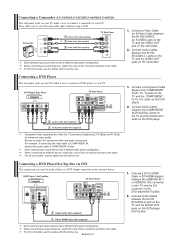
...the camcorder tapes without using a VCR Camcorder 1 S-Video Cable (Not supplied) or 1 Video Cable (Not supplied) 2 Audio Cable (Not supplied) TV Side Panel Each external input source device has a different back panel configuration. Connecting a Camcorder (LN-S3251D/LN-S3252D/LN-S4051D/LN-S4052D) The ... the audio cable to HDMI Cable (Not supplied) Each external input source device has a different back panel configuration. DVD Player / Set-Top Box TV Rear Panel 2 Audio Cable (Not supplied) 1 DVI to COMPONENT IN also. Connect a Video Cable (or S-Video Cable )between the COMPONENT IN...
...the camcorder tapes without using a VCR Camcorder 1 S-Video Cable (Not supplied) or 1 Video Cable (Not supplied) 2 Audio Cable (Not supplied) TV Side Panel Each external input source device has a different back panel configuration. Connecting a Camcorder (LN-S3251D/LN-S3252D/LN-S4051D/LN-S4052D) The ... the audio cable to HDMI Cable (Not supplied) Each external input source device has a different back panel configuration. DVD Player / Set-Top Box TV Rear Panel 2 Audio Cable (Not supplied) 1 DVI to COMPONENT IN also. Connect a Video Cable (or S-Video Cable )between the COMPONENT IN...

User Manual (ENGLISH)
Page 13
...level with the Amplifier's volume control. Connect Audio Cables between the HDMI/DVI 1 or HDMI/DVI 2 connector on the TV and the HDMI connector on your TV make it allows multiple channels of the connection terminal to an external device supporting 5.1CH. Connecting a DVD Player/Set-Top...) coding feature installed, and supports multi-channel digital audio. When a Digital Audio System is connected to the cable. DVD Player Rear Panel TV Rear Panel 1. For 40 inch model, use the cables with the ferrite core. Each external input source device has a different back panel configuration...
...level with the Amplifier's volume control. Connect Audio Cables between the HDMI/DVI 1 or HDMI/DVI 2 connector on the TV and the HDMI connector on your TV make it allows multiple channels of the connection terminal to an external device supporting 5.1CH. Connecting a DVD Player/Set-Top...) coding feature installed, and supports multi-channel digital audio. When a Digital Audio System is connected to the cable. DVD Player Rear Panel TV Rear Panel 1. For 40 inch model, use the cables with the ferrite core. Each external input source device has a different back panel configuration...
User Manual (ENGLISH)
Page 14
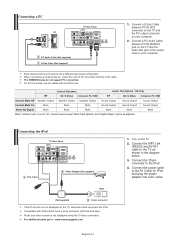
... 2 PC Audio Cable (Not supplied) 1 D-Sub Cable (Not supplied) 1. Connect a D-Sub Cable between PC IN [AUDIO] jack on the TV and the Audio Out jack of the connection terminal to "On", Sound menus except "Multi-Track Options" and "Digital Output" cannot be adjusted. For... later) Photo and video content is not displayed using the S-Video connection. Each external input source device has a different back panel configuration. Connecting the iPod TV Rear Panel 1 iPod Cable 3 Power Adaptor (Not supplied) iPod (Not supplied) 2 30-pin connector If the iPod menu is set to the cable....
... 2 PC Audio Cable (Not supplied) 1 D-Sub Cable (Not supplied) 1. Connect a D-Sub Cable between PC IN [AUDIO] jack on the TV and the Audio Out jack of the connection terminal to "On", Sound menus except "Multi-Track Options" and "Digital Output" cannot be adjusted. For... later) Photo and video content is not displayed using the S-Video connection. Each external input source device has a different back panel configuration. Connecting the iPod TV Rear Panel 1 iPod Cable 3 Power Adaptor (Not supplied) iPod (Not supplied) 2 30-pin connector If the iPod menu is set to the cable....

User Manual (ENGLISH)
Page 15
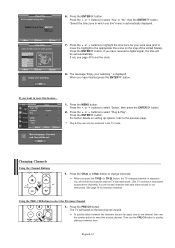
...is automatically displayed. 3. menu is displayed. If the antenna is initially powered on the remote control. English-13 Plug & Play Feature When the TV is connected to identify the type of the available channels. Press the POWER button on or off. Press the ENTER button to select "Start". Press...If both ANT 1 (AIR) and ANT 2 (CABLE) are stored, the Auto program menu reappears. Contact your particular area. 4. menu is complete. The TV will be set." After all of cable system that exists in your local cable company to ANT 1(AIR), select "Air" and if it has finished...
...is automatically displayed. 3. menu is displayed. If the antenna is initially powered on the remote control. English-13 Plug & Play Feature When the TV is connected to identify the type of the available channels. Press the POWER button on or off. Press the ENTER button to select "Start". Press...If both ANT 1 (AIR) and ANT 2 (CABLE) are stored, the Auto program menu reappears. Contact your particular area. 4. menu is complete. The TV will be set." After all of cable system that exists in your local cable company to ANT 1(AIR), select "Air" and if it has finished...
User Manual (ENGLISH)
Page 16
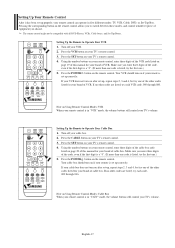
...16 to select "Yes" or "No", then the ENTER button. English-14 Changing Channels Using the Channel Buttons 1. is automatically displayed. 7. The TV will see channels that were either erased or not memorized. Press the or buttons to memorize channels. If you live" menu is displayed. If ... memorized at least three channels). Press the or buttons to select "Setup", then press the ENTER 2. You will be accessed in the TV mode. Then use the number button to the last channel viewed. You will switch to select the second channel. Press the or buttons ...
...16 to select "Yes" or "No", then the ENTER button. English-14 Changing Channels Using the Channel Buttons 1. is automatically displayed. 7. The TV will see channels that were either erased or not memorized. Press the or buttons to memorize channels. If you live" menu is displayed. If ... memorized at least three channels). Press the or buttons to select "Setup", then press the ENTER 2. You will be accessed in the TV mode. Then use the number button to the last channel viewed. You will switch to select the second channel. Press the or buttons ...

User Manual (ENGLISH)
Page 17
... the EXIT button to select one of certain audio-video settings. 1. The on the screen. Using Mute At any time, you can cut off . The TV will appear in the lower-left side has five icons: Input, Picture, Sound, Channel, Setup. 2. Viewing the Display The display identifies the current channel and...
... the EXIT button to select one of certain audio-video settings. 1. The on the screen. Using Mute At any time, you can cut off . The TV will appear in the lower-left side has five icons: Input, Picture, Sound, Channel, Setup. 2. Viewing the Display The display identifies the current channel and...

User Manual (ENGLISH)
Page 18
... Program", then press the ENTER button. 3. After all of signal source that is connected to the TV (i.e. English-16 There are three steps for both "off-air" (antenna) and cable channels. Memorizing the Channels Your TV can memorize and store all the available channels are stored, the "Auto Program" menu reappears. Storing...
... Program", then press the ENTER button. 3. After all of signal source that is connected to the TV (i.e. English-16 There are three steps for both "off-air" (antenna) and cable channels. Memorizing the Channels Your TV can memorize and store all the available channels are stored, the "Auto Program" menu reappears. Storing...
User Manual (ENGLISH)
Page 19
... listed, try each VCR code, 000 through 046. Setting Up Your Remote Control After it has been set up properly, your TV's remote control. 3. Your VCR should turn on your TV's remote control. 4. Press the SET button on after set-up, repeat steps 2, 3 and 4, but try each code, 000 ... Press the SET button on Using Remote Control Modes: Cable Box When your remote control is in "CATV" mode, the volume buttons still control your TV's volume. Turn off your VCR. 2. Make sure you enter three digits of cable box. Press the POWER button on the remote control. If no...
... listed, try each VCR code, 000 through 046. Setting Up Your Remote Control After it has been set up properly, your TV's remote control. 3. Your VCR should turn on your TV's remote control. 4. Press the SET button on after set-up, repeat steps 2, 3 and 4, but try each code, 000 ... Press the SET button on Using Remote Control Modes: Cable Box When your remote control is in "CATV" mode, the volume buttons still control your TV's volume. Turn off your VCR. 2. Make sure you enter three digits of cable box. Press the POWER button on the remote control. If no...

User Manual (ENGLISH)
Page 20
... listed for your brand of the other codes listed for your brand of DVD. Press the POWER button on the remote control. Note on your TV's volume. Using the number buttons on your remote control, enter three digits of the STB code listed on your STB. 2. Make sure you enter three... correctly. Your DVD should turn on page 20~21 of this manual for your remote is in "DVD" mode, the volume buttons still control your TV's remote control. 4. Press the POWER button on the remote control. If no other codes are listed, try each code, 000 through 141. Setting Up the...
... listed for your brand of the other codes listed for your brand of DVD. Press the POWER button on the remote control. Note on your TV's volume. Using the number buttons on your remote control, enter three digits of the STB code listed on your STB. 2. Make sure you enter three... correctly. Your DVD should turn on page 20~21 of this manual for your remote is in "DVD" mode, the volume buttons still control your TV's remote control. 4. Press the POWER button on the remote control. If no other codes are listed, try each code, 000 through 141. Setting Up the...

User Manual (ENGLISH)
Page 23
...139 072 073 096 097 098 099 101 076 075 102 032 063 040 073 103 076 121 SAMSUNG STB Product Ground wave STB Satellite STB CABLE STB STB DVD COMBO Satellite STB HDD COMBO Standard Code...Premium 014 STB Brand Code ALPHASTAR 023 ANAM 043 CHANNEL MASTER 018 034 CROSSDIGITAL 019 CHAPARRAL 035 DIRECT TV 015 016 017 019 022 045 060 061 062 065 066 067 068 DAEWOO 074 DISH NETWORK SYSTEM...PANASONIC PAYSAT PROSCAN RCA RADIOSHACK REALISTIC STAR TRAK STS SKY SKY LIFE SHACK STAR CHOICE SONY TOSHIBA ULTIMATE TV UNIDEN ZENITH English-21 Code 016 021 036 038 039 040 041 042 016 064 018 015 ...
...139 072 073 096 097 098 099 101 076 075 102 032 063 040 073 103 076 121 SAMSUNG STB Product Ground wave STB Satellite STB CABLE STB STB DVD COMBO Satellite STB HDD COMBO Standard Code...Premium 014 STB Brand Code ALPHASTAR 023 ANAM 043 CHANNEL MASTER 018 034 CROSSDIGITAL 019 CHAPARRAL 035 DIRECT TV 015 016 017 019 022 045 060 061 062 065 066 067 068 DAEWOO 074 DISH NETWORK SYSTEM...PANASONIC PAYSAT PROSCAN RCA RADIOSHACK REALISTIC STAR TRAK STS SKY SKY LIFE SHACK STAR CHOICE SONY TOSHIBA ULTIMATE TV UNIDEN ZENITH English-21 Code 016 021 036 038 039 040 041 042 016 064 018 015 ...

User Manual (ENGLISH)
Page 24
...the remote control to view an external signal source. When you connect equipment to the LCD, you can choose between the following sets of the TV. 26 inch model only supports AV, S-Video, Component, PC, HDMI1, and HDMI2. AV2/S-Video2 is turned on the model) Name the device...", "DVD", "D-VHS", "Cable STB", "HD STB", "Satellite STB", "PVR STB", "AV Receiver", "DVD Receiver", "GAME", "Camcorder", "DVD Combo", "PC", "VOD STB", or "TV" input source, then press the ENTER button. Press the or buttons to select "Edit Name", then press the ENTER button. 2. English-22 Press the or...
...the remote control to view an external signal source. When you connect equipment to the LCD, you can choose between the following sets of the TV. 26 inch model only supports AV, S-Video, Component, PC, HDMI1, and HDMI2. AV2/S-Video2 is turned on the model) Name the device...", "DVD", "D-VHS", "Cable STB", "HD STB", "Satellite STB", "PVR STB", "AV Receiver", "DVD Receiver", "GAME", "Camcorder", "DVD Combo", "PC", "VOD STB", or "TV" input source, then press the ENTER button. Press the or buttons to select "Edit Name", then press the ENTER button. 2. English-22 Press the or...
User Manual (ENGLISH)
Page 25
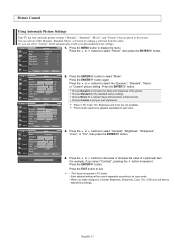
..., Movie, or Custom by making a selection from the menu. Or, you select "Contrast", pressing the button increases it. Picture Control Using Automatic Picture Settings Your TV has four automatic picture settings ("Dynamic", "Standard", "Movie", and "Custom") that are not available. Press the ENTER button to select "Contrast", "Brightness", "Sharpness", "Color", or...
..., Movie, or Custom by making a selection from the menu. Or, you select "Contrast", pressing the button increases it. Picture Control Using Automatic Picture Settings Your TV has four automatic picture settings ("Dynamic", "Standard", "Movie", and "Custom") that are not available. Press the ENTER button to select "Contrast", "Brightness", "Sharpness", "Color", or...


