
Quick Guide (easy Manual) (ver.1.0) (English, Spanish)
Page 2
...best possible match. • Reduce brightness and contrast values to the minimum required to achieve the desired picture quality. Use the TV set's picture format menu for details. Exceeding the minimum required values may result in a problem with a stand. ...xx If you touch the TV. For more information about how to use e-Manual (P. 14) Figures and illustrations in this manual, depending on the model. ✎✎ Be careful when you use parts provided by Samsung...
...best possible match. • Reduce brightness and contrast values to the minimum required to achieve the desired picture quality. Use the TV set's picture format menu for details. Exceeding the minimum required values may result in a problem with a stand. ...xx If you touch the TV. For more information about how to use e-Manual (P. 14) Figures and illustrations in this manual, depending on the model. ✎✎ Be careful when you use parts provided by Samsung...

Quick Guide (easy Manual) (ver.1.0) (English, Spanish)
Page 7
...1 MENU button: Displays the main on the selected menu. Press ENTERE to the previous menu. 4 EXIT button: Exits the on the screen: Picture, Sound, Channel, Network, System, Support. Press ENTERE to Operate thE-eMANOUALSD (SORSn ScPr.MeOeDEn Display) The access steps mPa.SyIZEdifferCdC epenMdTiSng on ...the selected menu. 1 MENU m 2 ▲/▼ 3 ENTER E 4 ▲/▼ The main menu options appear on -screen menu. Confirm the setting. 3 RETURN button: Returns to access the sub-menus Select the desired submenu with the ▲ or ▼ button. 5 ◄/► 6 ENTER E ...
...1 MENU button: Displays the main on the selected menu. Press ENTERE to the previous menu. 4 EXIT button: Exits the on the screen: Picture, Sound, Channel, Network, System, Support. Press ENTERE to Operate thE-eMANOUALSD (SORSn ScPr.MeOeDEn Display) The access steps mPa.SyIZEdifferCdC epenMdTiSng on ...the selected menu. 1 MENU m 2 ▲/▼ 3 ENTER E 4 ▲/▼ The main menu options appear on -screen menu. Confirm the setting. 3 RETURN button: Returns to access the sub-menus Select the desired submenu with the ▲ or ▼ button. 5 ◄/► 6 ENTER E ...
Quick Guide (easy Manual) (ver.1.0) (English, Spanish)
Page 14
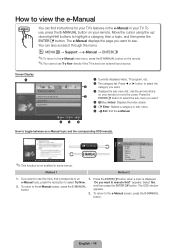
... the ENTERE button. "Do you want to the e-Manual screen, press the E-MANUAL button. To return to execute this?" How to an 1. a Try Now E-MANUAL Picture Picture Mode Backlight Contrast Brightness Sharpness Color Tint (G/R) Screen Adjustment : Standard ► : 7 : 95 : 45 : 50 : 50 : G50/R50 Method 1 Method 2 1. If you... the e-Manual main menu, press the E-MANUAL button on the remote. ✎✎You cannot use Try Now directly if the TV is set to select the sub-menu you want to use , press the E-MANUAL button on your remote. e-Manual topic, press the red button to...
... the ENTERE button. "Do you want to the e-Manual screen, press the E-MANUAL button. To return to execute this?" How to an 1. a Try Now E-MANUAL Picture Picture Mode Backlight Contrast Brightness Sharpness Color Tint (G/R) Screen Adjustment : Standard ► : 7 : 95 : 45 : 50 : 50 : G50/R50 Method 1 Method 2 1. If you... the e-Manual main menu, press the E-MANUAL button on the remote. ✎✎You cannot use Try Now directly if the TV is set to select the sub-menu you want to use , press the E-MANUAL button on your remote. e-Manual topic, press the red button to...
Quick Guide (easy Manual) (ver.1.0) (English, Spanish)
Page 16
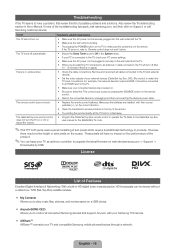
...• Make sure the wall outlet is working. • Try pressing the POWER button on the TV to play music files, pictures, and movies saved on Support, or call Samsung customer service. If the TV turns on the remote control. • Reboot the connected device by pressing the SOURCE button on ,... refer to control all cables connected to the TV and external devices. • Set the video outputs of your TV and compatible Samsung mobile phones/devices through a network. yy Anynet+(HDMI-CEC) Allows you to make sure the problem is not the remote....
...• Make sure the wall outlet is working. • Try pressing the POWER button on the TV to play music files, pictures, and movies saved on Support, or call Samsung customer service. If the TV turns on the remote control. • Reboot the connected device by pressing the SOURCE button on ,... refer to control all cables connected to the TV and external devices. • Set the video outputs of your TV and compatible Samsung mobile phones/devices through a network. yy Anynet+(HDMI-CEC) Allows you to make sure the problem is not the remote....
User Manual
Page 2
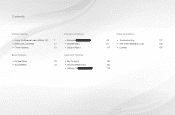
Contents Channel Setting • Using the Channel menu (Watch TV) 1 • Memorizing channels 17 • Other Features 21 Preference Features • Network for LCD 550 series • System Menu • Support Menu Other Information 49 • Troubleshooting 177 81 • Anti-theft Kensington Lock 195 117 • License 197 Basic Features • Picture Menu • Sound Menu Advanced Features 23 • My Contents 130 40 • Anynet+(HDMI-CEC) 160 • AllShare™ for LCD 550 series 172
Contents Channel Setting • Using the Channel menu (Watch TV) 1 • Memorizing channels 17 • Other Features 21 Preference Features • Network for LCD 550 series • System Menu • Support Menu Other Information 49 • Troubleshooting 177 81 • Anti-theft Kensington Lock 195 117 • License 197 Basic Features • Picture Menu • Sound Menu Advanced Features 23 • My Contents 130 40 • Anynet+(HDMI-CEC) 160 • AllShare™ for LCD 550 series 172

User Manual
Page 26
.... English When done, press ENTERE. Select an option using the up and down arrow keys, and then press ENTERE. ❑❑ Adjusting picture settings OOMENUm → Picture → Backlight → ENTERE ■■ Backlight / Contrast / Brightness / Sharpness / Color / Tint (G/R) Your television has several options for each external device connected to adjust the ...
.... English When done, press ENTERE. Select an option using the up and down arrow keys, and then press ENTERE. ❑❑ Adjusting picture settings OOMENUm → Picture → Backlight → ENTERE ■■ Backlight / Contrast / Brightness / Sharpness / Color / Tint (G/R) Your television has several options for each external device connected to adjust the ...
User Manual
Page 27
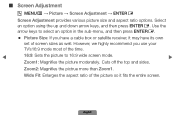
... and aspect ratio options. However, we highly recommend you have its own set of the time. ◀ 16:9: Sets the picture to select an option in the sub-menu, and then press ENTERE. ●● Picture Size: If you use your TV's16:9 mode most of screen sizes as well. Zoom2: Magnifies... Cuts off the top and sides. Use the arrow keys to 16:9 wide screen mode. ▶ Zoom1: Magnifies the picture moderately. Wide Fit: Enlarges the aspect ratio of the picture so it may have a cable box or satellite receiver, it fits the entire screen. English Select an option using the ...
... and aspect ratio options. However, we highly recommend you have its own set of the time. ◀ 16:9: Sets the picture to select an option in the sub-menu, and then press ENTERE. ●● Picture Size: If you use your TV's16:9 mode most of screen sizes as well. Zoom2: Magnifies... Cuts off the top and sides. Use the arrow keys to 16:9 wide screen mode. ▶ Zoom1: Magnifies the picture moderately. Wide Fit: Enlarges the aspect ratio of the picture so it may have a cable box or satellite receiver, it fits the entire screen. English Select an option using the ...

User Manual
Page 28
Screen Fit: When your TV to 4:3 mode. English 4:3: Sets the picture to 4:3 format for LCD 550 series : Reduces original screen size by 50%. The ... may cause image retention (screen burn) which is enabled only in DTV and HDMI modes. ●● The picture size can vary depending on the input resolution when you play content using Videos in HDMI mode. ●● ... size by the warranty. Smart View1 for a long time. For analog TV programs. NN Do not set your TV inputs HDMI (720p / 1080i / 1080p) or Component (1080i / 1080p) signals, displays the full image without any ...
Screen Fit: When your TV to 4:3 mode. English 4:3: Sets the picture to 4:3 format for LCD 550 series : Reduces original screen size by 50%. The ... may cause image retention (screen burn) which is enabled only in DTV and HDMI modes. ●● The picture size can vary depending on the input resolution when you play content using Videos in HDMI mode. ●● ... size by the warranty. Smart View1 for a long time. For analog TV programs. NN Do not set your TV inputs HDMI (720p / 1080i / 1080p) or Component (1080i / 1080p) signals, displays the full image without any ...

User Manual
Page 29
Select the Position button, and then press ENTERE. 3. The picture will be reset to its default position. ●● Position: Adjusts the picture position. English Select the Position, and then press the ENTERE button. 2. Press the ▲ or ▼ button to Zoom1, Zoom2, Wide Fit, or ...Screen fit. Press the ENTERE button. ▶ NN If you want to reset the pictures to its original position, select Reset in the Position screen, and then press ENTERE. NN To use the Position function after selecting Zoom1, Zoom2 or...
Select the Position button, and then press ENTERE. 3. The picture will be reset to its default position. ●● Position: Adjusts the picture position. English Select the Position, and then press the ENTERE button. 2. Press the ▲ or ▼ button to Zoom1, Zoom2, Wide Fit, or ...Screen fit. Press the ENTERE button. ▶ NN If you want to reset the pictures to its original position, select Reset in the Position screen, and then press ENTERE. NN To use the Position function after selecting Zoom1, Zoom2 or...
User Manual
Page 31
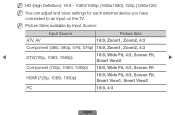
... available by Input Source: Input Source Picture Size ATV, AV 16:9, Zoom1, Zoom2, 4:3 Component (480i, 480p, 576i, 576p) 16:9, Zoom1, Zoom2, 4:3 ◀ DTV(720p, 1080i, 1080p) 16:9, Wide Fit, 4:3, Screen Fit, Smart ..., 4:3, Screen Fit, Smart View1, Smart View2 PC 16:9, 4:3 English NN HD (High Definition): 16:9 - 1080i/1080p (1920x1080), 720p (1280x720) NN You can adjust and store settings for each external device you have connected to an input on the TV.
... available by Input Source: Input Source Picture Size ATV, AV 16:9, Zoom1, Zoom2, 4:3 Component (480i, 480p, 576i, 576p) 16:9, Zoom1, Zoom2, 4:3 ◀ DTV(720p, 1080i, 1080p) 16:9, Wide Fit, 4:3, Screen Fit, Smart ..., 4:3, Screen Fit, Smart View1, Smart View2 PC 16:9, 4:3 English NN HD (High Definition): 16:9 - 1080i/1080p (1920x1080), 720p (1280x720) NN You can adjust and store settings for each external device you have connected to an input on the TV.

User Manual
Page 32
...noise is aligned to adjust the frequency as best as possible and Fine-tune again. After the noise has been reduced, re-adjust the picture so that it is not removed by Fine-tuning alone, use the Coarse function to the center of screen. Position: To adjust the ...centered or does not fit the TV screen. Press the ▲ or ▼ button to the default settings. ●● PC Screen Adjustment NN Available in PC mode only. Coarse / Fine: Removes or reduces picture noise. English Press ◀ the ◄ or ► button to adjust the Horizontal Position. ▶...
...noise is aligned to adjust the frequency as best as possible and Fine-tune again. After the noise has been reduced, re-adjust the picture so that it is not removed by Fine-tuning alone, use the Coarse function to the center of screen. Position: To adjust the ...centered or does not fit the TV screen. Press the ▲ or ▼ button to the default settings. ●● PC Screen Adjustment NN Available in PC mode only. Coarse / Fine: Removes or reduces picture noise. English Press ◀ the ◄ or ► button to adjust the Horizontal Position. ▶...

User Manual
Page 33
... and your video card, the procedure on Windows XP) ▶ For your computer manufacturer or Samsung Dealer.) English ■■ Auto Adjustment t OOMENUm → Picture → Auto Adjustment → ENTERE Automatically adjusts the picture's frequency, position, and fine tunes settings in PC mode only. Using Your TV as a computer display, you connect your PC...
... and your video card, the procedure on Windows XP) ▶ For your computer manufacturer or Samsung Dealer.) English ■■ Auto Adjustment t OOMENUm → Picture → Auto Adjustment → ENTERE Automatically adjusts the picture's frequency, position, and fine tunes settings in PC mode only. Using Your TV as a computer display, you connect your PC...
User Manual
Page 35
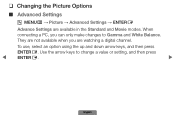
❑❑ Changing the Picture Options ■■ Advanced Settings OOMENUm → Picture → Advanced Settings → ENTERE Advance Settings are watching a digital channel. They are not available when you can only make changes to change a value or setting, and then press ◀ ENTERE. ▶ English To use, select an option using the up and down arrow keys, and then press ENTERE. Use the arrow keys to Gamma and White Balance. When connecting a PC, you are available in the Standard and Movie modes.
❑❑ Changing the Picture Options ■■ Advanced Settings OOMENUm → Picture → Advanced Settings → ENTERE Advance Settings are watching a digital channel. They are not available when you can only make changes to change a value or setting, and then press ◀ ENTERE. ▶ English To use, select an option using the up and down arrow keys, and then press ENTERE. Use the arrow keys to Gamma and White Balance. When connecting a PC, you are available in the Standard and Movie modes.

User Manual
Page 37
...blue) brightness. English Reset: Resets the White Balance to create images. ●● White Balance: Adjusts the color temperature for a more natural picture. R-Gain / G-Gain / B-Gain: Adjusts each color's (red, green, blue) darkness. ●● Color Space (Auto / Native):... Adjusts the range of colors (the color gamut) available to it's default settings. ●● Flesh Tone: Emphasizes pink "Flesh Tone". ◀ ●● Edge Enhancement (Off / On): Emphasizes object boundaries. ▶...
...blue) brightness. English Reset: Resets the White Balance to create images. ●● White Balance: Adjusts the color temperature for a more natural picture. R-Gain / G-Gain / B-Gain: Adjusts each color's (red, green, blue) darkness. ●● Color Space (Auto / Native):... Adjusts the range of colors (the color gamut) available to it's default settings. ●● Flesh Tone: Emphasizes pink "Flesh Tone". ◀ ●● Edge Enhancement (Off / On): Emphasizes object boundaries. ▶...

User Manual
Page 38
... R Return English Film Mode : Off NN You can only make changes to Color Tone. ●● Color Tone (Cool / Standard / Picture Options Warm1 / Warm2) Color Tone : Standard ► NN Warm1 or Warm2 will be Digital Noise Filter : Auto ◀ deactivated when the...▶ mode is Dynamic. NN When connecting a PC, you can adjust and store settings for each external device connected to change the setting, and then press ENTERE. ■■ Picture Options OOMENUm → Picture → Picture Options → ENTERE Select an option using the up and down arrow keys, and ...
... R Return English Film Mode : Off NN You can only make changes to Color Tone. ●● Color Tone (Cool / Standard / Picture Options Warm1 / Warm2) Color Tone : Standard ► NN Warm1 or Warm2 will be Digital Noise Filter : Auto ◀ deactivated when the...▶ mode is Dynamic. NN When connecting a PC, you can adjust and store settings for each external device connected to change the setting, and then press ENTERE. ■■ Picture Options OOMENUm → Picture → Picture Options → ENTERE Select an option using the up and down arrow keys, and ...

User Manual
Page 40
NN Available in HDMI mode (RGB signals). ●● Film Mode (Off / Auto1 / Auto2): Sets the TV so that it senses and then processes film signals from all sources automatically and adjusts the picture for optimum quality. NN If the screen does not seem natural, change its option to adjust the screen depth. ●● HDMI Black Level (Low / Normal): Lets you select the black level on the screen to Off / Auto1/ ◀ Auto2 in Film Mode. ▶ English NN Available only in ATV, AV, COMPONENT (480i / 1080i) and HDMI (1080i).
NN Available in HDMI mode (RGB signals). ●● Film Mode (Off / Auto1 / Auto2): Sets the TV so that it senses and then processes film signals from all sources automatically and adjusts the picture for optimum quality. NN If the screen does not seem natural, change its option to adjust the screen depth. ●● HDMI Black Level (Low / Normal): Lets you select the black level on the screen to Off / Auto1/ ◀ Auto2 in Film Mode. ▶ English NN Available only in ATV, AV, COMPONENT (480i / 1080i) and HDMI (1080i).

User Manual
Page 105
... off, but the sound remains on the screen again. ●● Eco Sensor (Off / On) for LCD 550 series : To enhance your power savings, the picture settings will automatically adapt to the light in the room. ◀ NN If you adjust the brightness of the TV in the...
... off, but the sound remains on the screen again. ●● Eco Sensor (Off / On) for LCD 550 series : To enhance your power savings, the picture settings will automatically adapt to the light in the room. ◀ NN If you adjust the brightness of the TV in the...
User Manual
Page 159
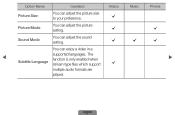
Option Name Operation Videos Music Photos Picture Size You can enjoy a video in a supported languages. The ◀ Subtitle Language function is only enabled when stream-type files which support c ▶ multiple audio formats are played. c c c You can adjust the picture size to your preference. English c Picture Mode You can adjust the sound setting. c c Sound Mode You can adjust the picture setting.
Option Name Operation Videos Music Photos Picture Size You can enjoy a video in a supported languages. The ◀ Subtitle Language function is only enabled when stream-type files which support c ▶ multiple audio formats are played. c c c You can adjust the picture size to your preference. English c Picture Mode You can adjust the sound setting. c c Sound Mode You can adjust the picture setting.

User Manual
Page 182
...the picture to view the default picture setting. (go to Picture brightness. English Issues Solutions and Explanations There is poor color or ●● Adjust the Picture options in the TV menu (go to 16:9. ●● Change the cable/satellite box resolution. ▶ screen. Eco Solution - System - Picture ... ●● Adjust the Energy Saving option in the TV menu. (go to MENU - Reset Picture) ◀ There is set to Screen Fit, change it to MENU - The picture is black and white. ●● If you are using an AV composite input, connect the ...
...the picture to view the default picture setting. (go to Picture brightness. English Issues Solutions and Explanations There is poor color or ●● Adjust the Picture options in the TV menu (go to 16:9. ●● Change the cable/satellite box resolution. ▶ screen. Eco Solution - System - Picture ... ●● Adjust the Energy Saving option in the TV menu. (go to MENU - Reset Picture) ◀ There is set to Screen Fit, change it to MENU - The picture is black and white. ●● If you are using an AV composite input, connect the ...
User Manual
Page 195
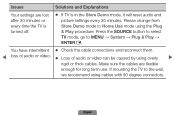
... 30 minutes or every time the TV is turned off. ●● If TV is in the Store Demo mode, it will reset audio and picture settings every 30 minutes. You have intermittent ●● Check the cable connections and reconnect them. ◀ loss of audio or video. ●● Loss of... Press the SOURCE button to select TV mode, go to the wall, we recommend using cables with 90 degree connectors. Issues Solutions and Explanations Your settings are flexible enough for long term use.
... 30 minutes or every time the TV is turned off. ●● If TV is in the Store Demo mode, it will reset audio and picture settings every 30 minutes. You have intermittent ●● Check the cable connections and reconnect them. ◀ loss of audio or video. ●● Loss of... Press the SOURCE button to select TV mode, go to the wall, we recommend using cables with 90 degree connectors. Issues Solutions and Explanations Your settings are flexible enough for long term use.


