
Quick Guide (easy Manual) (ver.1.0) (English, Spanish)
Page 2
... a wall-mount. 4inches 4inches 4inches 4inches 4inches 4inches 4inches Other Warnings ✎✎ The actual appearance of this manual, depending on the model. ✎✎ Be careful when you use parts provided by Samsung Electronics only. Refer to achieve the desired picture quality. English - 2 Installation with the product or an injury due...
... a wall-mount. 4inches 4inches 4inches 4inches 4inches 4inches 4inches Other Warnings ✎✎ The actual appearance of this manual, depending on the model. ✎✎ Be careful when you use parts provided by Samsung Electronics only. Refer to achieve the desired picture quality. English - 2 Installation with the product or an injury due...
Quick Guide (easy Manual) (ver.1.0) (English, Spanish)
Page 5
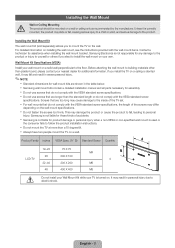
... not responsible for any damage to the product or injury to personal injury. xx Samsung wall mount kits contain a detailed installation manual and all parts necessary for wall mount kits are too long may slide or fall , leading to yourself or others if you install the ... separately) allows you to follow the product installation instructions. Unless it may differ depending on a wall or ceiling only as recommended by the manufacturer. Samsung is turned on the wall. xx Always have two people mount the TV on installing the wall mount, see the instructions provided with the VESA...
... not responsible for any damage to the product or injury to personal injury. xx Samsung wall mount kits contain a detailed installation manual and all parts necessary for wall mount kits are too long may slide or fall , leading to yourself or others if you install the ... separately) allows you to follow the product installation instructions. Unless it may differ depending on a wall or ceiling only as recommended by the manufacturer. Samsung is turned on the wall. xx Always have two people mount the TV on installing the wall mount, see the instructions provided with the VESA...
Quick Guide (easy Manual) (ver.1.0) (English, Spanish)
Page 6
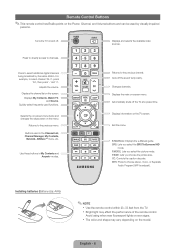
...Audio Program (SAP broadcast). Selects the on-screen menu items and changes the values seen on the TV screen. Changes channels. E-MANUAL: Displays the e-Manual guide. xx Bright light may vary depending on and off. Adjusts the volume. Displays My Contents, Watch TV, and Source.... used functions. P.MODE: Lets you choose the picture size. Avoid using when near fluorescent lights or neon signs. CONTENT SLEEP A B C D E-MANUAL SRS P.MODE P.SIZE CC MTS Returns to select channel '54-3', press '54', then press '-' and '3'. For example, to the previous channel. ...
...Audio Program (SAP broadcast). Selects the on-screen menu items and changes the values seen on the TV screen. Changes channels. E-MANUAL: Displays the e-Manual guide. xx Bright light may vary depending on and off. Adjusts the volume. Displays My Contents, Watch TV, and Source.... used functions. P.MODE: Lets you choose the picture size. Avoid using when near fluorescent lights or neon signs. CONTENT SLEEP A B C D E-MANUAL SRS P.MODE P.SIZE CC MTS Returns to select channel '54-3', press '54', then press '-' and '3'. For example, to the previous channel. ...
Quick Guide (easy Manual) (ver.1.0) (English, Spanish)
Page 8
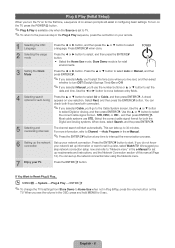
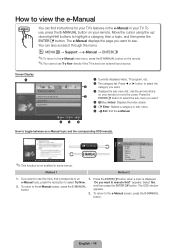
... prompts will start . When you do not know connection your network set up your selection. Press the ▲ or ▼ button to select Auto or Manual, and then press ENTERE. ✎✎If you selected Auto, you'll select the time zone where you 'll go to turn on the TV... the Digital and Analog systems. When done, select Search, and the press EFANVT.CEHRE. 5 Selecting and memorizing channels The channel search will assist in the e-Manual. ✎✎Press the ENTERE button at any time to select, and then press the ENTERE button. Press ENTERE when done.
... prompts will start . When you do not know connection your network set up your selection. Press the ▲ or ▼ button to select Auto or Manual, and then press ENTERE. ✎✎If you selected Auto, you'll select the time zone where you 'll go to turn on the TV... the Digital and Analog systems. When done, select Search, and the press EFANVT.CEHRE. 5 Selecting and memorizing channels The channel search will assist in the e-Manual. ✎✎Press the ENTERE button at any time to select, and then press the ENTERE button. Press ENTERE when done.
Quick Guide (easy Manual) (ver.1.0) (English, Spanish)
Page 12
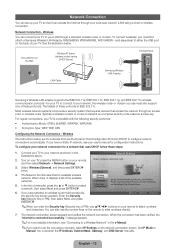
...If you enter the Security key (Security key or PIN), use must enter the IP Address, Subnet Mask, Gateway, and DNS Server manually. You must also support one of these protocols. Most wireless network systems incorporate a security system that requires devices that access the network ...verifies the network connection. sold separately) to set up wireless network by selecting your network as shown in the e-Manual. ✎✎If you must first attach a Samsung Wireless LAN Adapter (WIS09ABGN, WIS09ABGN2, WIS10ABGN - To connect wirelessly, you want to either the USB port on...
...If you enter the Security key (Security key or PIN), use must enter the IP Address, Subnet Mask, Gateway, and DNS Server manually. You must also support one of these protocols. Most wireless network systems incorporate a security system that requires devices that access the network ...verifies the network connection. sold separately) to set up wireless network by selecting your network as shown in the e-Manual. ✎✎If you must first attach a Samsung Wireless LAN Adapter (WIS09ABGN, WIS09ABGN2, WIS10ABGN - To connect wirelessly, you want to either the USB port on...
Quick Guide (easy Manual) (ver.1.0) (English, Spanish)
Page 13
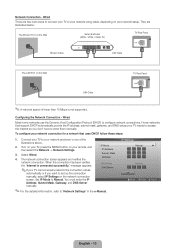
... network the connection values automatically or if you don't have to "Network Settings" in one of lower than 10 Mbps is connected successfully." IP Settings Manual ► . . . . . . . . . Turn on your TV, press the MENU button on the Wall TV Rear Panel LAN Cable ✎✎...;A network speed of the illustrations above. 2. When the connection has been verified, the "Internet is not supported. Manual . . . Set IP Mode to configure network connections. IP Mode IP Address Subnet Mask Gateway DNS Mode DNS Server ✎✎For the ...
... network the connection values automatically or if you don't have to "Network Settings" in one of lower than 10 Mbps is connected successfully." IP Settings Manual ► . . . . . . . . . Turn on your TV, press the MENU button on the Wall TV Rear Panel LAN Cable ✎✎...;A network speed of the illustrations above. 2. When the connection has been verified, the "Internet is not supported. Manual . . . Set IP Mode to configure network connections. IP Mode IP Address Subnet Mask Gateway DNS Mode DNS Server ✎✎For the ...
Quick Guide (easy Manual) (ver.1.0) (English, Spanish)
Page 14
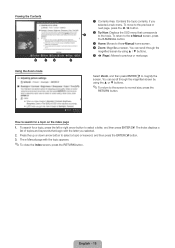
...the ENTERE button. Screen Display 1 2 Preference Features Network (for your remote. Press ◄ or ► button to execute this?" a Try Now E-MANUAL Picture Picture Mode Backlight Contrast Brightness Sharpness Color Tint (G/R) Screen Adjustment : Standard ► : 7 : 95 : 45 : 50 : 50 : G50/...1 Currently displayed video, TV program, etc. 2 The category list. To return to the e-Manual screen, press the E-MANUAL button. To return to the e-Manual screen, press the E-MANUAL button. appears. Press the ENTERE button when a topic is set to an external input source....
...the ENTERE button. Screen Display 1 2 Preference Features Network (for your remote. Press ◄ or ► button to execute this?" a Try Now E-MANUAL Picture Picture Mode Backlight Contrast Brightness Sharpness Color Tint (G/R) Screen Adjustment : Standard ► : 7 : 95 : 45 : 50 : 50 : G50/...1 Currently displayed video, TV program, etc. 2 The category list. To return to the e-Manual screen, press the E-MANUAL button. To return to the e-Manual screen, press the E-MANUAL button. appears. Press the ENTERE button when a topic is set to an external input source....
Quick Guide (easy Manual) (ver.1.0) (English, Spanish)
Page 15
...3. You can scroll through the magnified screen by using ▲ / ▼ buttons. 5 L (Page): Moves to magnify the screen. The e-Manual page with the letter you selected a sub-menu. English - 15 Using the Zoom mode Select Zoom, and then press ENTERE to previous or next page... RETURN button. You can scroll through the magnified screen by using the ▲ or ▼ buttons. ✎✎To return to the screen to the e-Manual home screen. 4 Zoom: Magnifies a screen. Viewing the Contents Basic Features > Picture Menu (2/16) 1 a Try Now b Home { Zoom } Index L Page e Exit 2...
...3. You can scroll through the magnified screen by using ▲ / ▼ buttons. 5 L (Page): Moves to magnify the screen. The e-Manual page with the letter you selected a sub-menu. English - 15 Using the Zoom mode Select Zoom, and then press ENTERE to previous or next page... RETURN button. You can scroll through the magnified screen by using the ▲ or ▼ buttons. ✎✎To return to the screen to the e-Manual home screen. 4 Zoom: Magnifies a screen. Viewing the Contents Basic Features > Picture Menu (2/16) 1 a Try Now b Home { Zoom } Index L Page e Exit 2...
Quick Guide (easy Manual) (ver.1.0) (English, Spanish)
Page 16
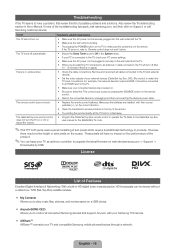
...'s output is no impact on the performance of Features Excellent Digital Interface & Networking: With a built-in the e-Manual. These pixels will turn the TV on web site (samsung.com -> Support -> Downloads) by unplugging and then reconnecting the device's power cable. • Replace the remote ...control batteries. Refer to the Cable/Set top Box user manual for the SAMSUNG TV code. ✎✎This TFT LCD panel uses a panel consisting of sub pixels which require sophisticated technology to play music ...
...'s output is no impact on the performance of Features Excellent Digital Interface & Networking: With a built-in the e-Manual. These pixels will turn the TV on web site (samsung.com -> Support -> Downloads) by unplugging and then reconnecting the device's power cable. • Replace the remote ...control batteries. Refer to the Cable/Set top Box user manual for the SAMSUNG TV code. ✎✎This TFT LCD panel uses a panel consisting of sub pixels which require sophisticated technology to play music ...
User Manual
Page 1
E-MANUAL imagine the possibilities Thank you for purchasing this Samsung product. To receive more complete service, please register your product at www.samsung.com/register Model Serial No
E-MANUAL imagine the possibilities Thank you for purchasing this Samsung product. To receive more complete service, please register your product at www.samsung.com/register Model Serial No

User Manual
Page 5
If you select Manual, you can set the start time you want. NN If you selected. ●● Date: You can set the day you want to edit or cancel a scheduled viewing, select the scheduled viewing on the Schedule List, and then select Edit or Cancel Schedules. ◀ ▶ English NN Date is available only when you select Once in Repeat. ●● Start Time: You can set a desired date. NN A check (c) mark indicates a day you want . ●● Repeat: Select Once, Manual, Sat~Sun, Mon~Fri or Everyday.
If you select Manual, you can set the start time you want. NN If you selected. ●● Date: You can set the day you want to edit or cancel a scheduled viewing, select the scheduled viewing on the Schedule List, and then select Edit or Cancel Schedules. ◀ ▶ English NN Date is available only when you select Once in Repeat. ●● Start Time: You can set a desired date. NN A check (c) mark indicates a day you want . ●● Repeat: Select Once, Manual, Sat~Sun, Mon~Fri or Everyday.

User Manual
Page 24
If the signal is done automatically during the search and store operation. ■■ Fine Tune (analog channels only) If the reception is clear, you do not have been saved are marked with an asterisk "*" on the right-hand side of the channel number in the Channel menu. NN Fine tuned channels that have to fine tune the channel, as this is weak or distorted, fine tune the channel manually. ●● Select Fine Tune in the channel banner. ◀ NN To reset the fine-tuning, select Reset. ▶ English
If the signal is done automatically during the search and store operation. ■■ Fine Tune (analog channels only) If the reception is clear, you do not have been saved are marked with an asterisk "*" on the right-hand side of the channel number in the Channel menu. NN Fine tuned channels that have to fine tune the channel, as this is weak or distorted, fine tune the channel manually. ●● Select Fine Tune in the channel banner. ◀ NN To reset the fine-tuning, select Reset. ▶ English
User Manual
Page 55
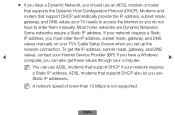
... that support DHCP automatically provide the IP address, subnet mask, gateway, and DNS values your TV's Cable Setup Screen when you have to enter them manually. If your network requires a Static IP address, you must enter the IP address, subnet mask, gateway, and DNS values... manually on your TV needs to access the Internet so you do not have a Windows computer, you can also get the IP address, subnet mask, gateway, ...
... that support DHCP automatically provide the IP address, subnet mask, gateway, and DNS values your TV's Cable Setup Screen when you have to enter them manually. If your network requires a Static IP address, you must enter the IP address, subnet mask, gateway, and DNS values... manually on your TV needs to access the Internet so you do not have a Windows computer, you can also get the IP address, subnet mask, gateway, ...
User Manual
Page 57
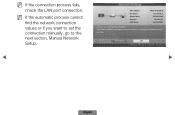
IP Settings OK a Previous L Move E Enter R Return ▶ English NN If the connection process fails, check the LAN port connection. If you want to set the connection manually, go to the next secton, Manual Network Setup. ◀ Network Settings MAC Address IP Address Subnet Mask Gateway DNS Server 00:40:30:30:20:10 192.168.10.21 255.255.255.0 192.168.10.1 203.248.252.2 Internet is connected successfully. NN If the automatic process cannot find the network connection values or if you have a problem using any Internet services, contact your Internet service provider.
IP Settings OK a Previous L Move E Enter R Return ▶ English NN If the connection process fails, check the LAN port connection. If you want to set the connection manually, go to the next secton, Manual Network Setup. ◀ Network Settings MAC Address IP Address Subnet Mask Gateway DNS Server 00:40:30:30:20:10 192.168.10.21 255.255.255.0 192.168.10.1 203.248.252.2 Internet is connected successfully. NN If the automatic process cannot find the network connection values or if you have a problem using any Internet services, contact your Internet service provider.

User Manual
Page 58
In the pop-up menu that appears, click the Support tab. ▶ 4. On the Support Tab, click the Details button. Getting the Network Connection Values To view the Network connection values on the bottom right of the screen. 2. The Network connection values are displayed. On the dialog that appears, click Status. ◀ 3. ■■ Manual Network Setup Use the Manual Network Setup when connecting your TV to a network that requires a Static IP address. Right click the Network icon on most Windows computers, follow these steps: 1. English
In the pop-up menu that appears, click the Support tab. ▶ 4. On the Support Tab, click the Details button. Getting the Network Connection Values To view the Network connection values on the bottom right of the screen. 2. The Network connection values are displayed. On the dialog that appears, click Status. ◀ 3. ■■ Manual Network Setup Use the Manual Network Setup when connecting your TV to a network that requires a Static IP address. Right click the Network icon on most Windows computers, follow these steps: 1. English

User Manual
Page 59
Select Wired, and then press IP Settings ENTERE. The IP Settings screen appears. ▶ Manual . . . The network IP Mode Manual ► connection screen appears and IP Address the verification process starts. Press ENTERE. Select IP Settings DNS Server...The verification DNS Mode process stops. Subnet Mask Gateway ◀ 3. OK U Move E Enter R Return English Go to set up manually To set up your TV's cable network connection manually, follow these steps: 1. How to the Network Settings screen. (MENUm → Network → Network Settings → ENTERE) ...
Select Wired, and then press IP Settings ENTERE. The IP Settings screen appears. ▶ Manual . . . The network IP Mode Manual ► connection screen appears and IP Address the verification process starts. Press ENTERE. Select IP Settings DNS Server...The verification DNS Mode process stops. Subnet Mask Gateway ◀ 3. OK U Move E Enter R Return English Go to set up manually To set up your TV's cable network connection manually, follow these steps: 1. How to the Network Settings screen. (MENUm → Network → Network Settings → ENTERE) ...

User Manual
Page 60
... to go to correct it. English Enter the first portion of the IP Address. You can also press the up or down arrow button to Manual. 5. Enter the next portion of the IP Address (for each field in the IP Address. ▶ NN If you make a mistake when entering a number, re...
... to go to correct it. English Enter the first portion of the IP Address. You can also press the up or down arrow button to Manual. 5. Enter the next portion of the IP Address (for each field in the IP Address. ▶ NN If you make a mistake when entering a number, re...
User Manual
Page 65
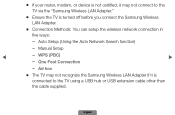
Manual Setup ◀ -- ●● If your router, modem, or device is not certified, it may not recognize the Samsung Wireless LAN Adapter if it is turned off before you connect the Samsung Wireless LAN Adapter. ●● Connection Methods: You can setup the wireless network connection in five ways: -- ...WPS (PBC) ▶ -- One Foot Connection -- English Ad hoc ●● The TV may not connect to the TV via the "Samsung Wireless LAN Adapter." ●● Ensure the TV is connected to the TV using a USB hub or USB extension cable other than the cable...
Manual Setup ◀ -- ●● If your router, modem, or device is not certified, it may not recognize the Samsung Wireless LAN Adapter if it is turned off before you connect the Samsung Wireless LAN Adapter. ●● Connection Methods: You can setup the wireless network connection in five ways: -- ...WPS (PBC) ▶ -- One Foot Connection -- English Ad hoc ●● The TV may not connect to the TV via the "Samsung Wireless LAN Adapter." ●● Ensure the TV is connected to the TV using a USB hub or USB extension cable other than the cable...
User Manual
Page 68
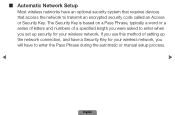
... wireless network, you will have an optional security system that requires devices that access the network to enter the Pass Phrase during the automatic or manual setup process. ◀ ▶ English ■■ Automatic Network Setup Most wireless networks have to transmit an encrypted security code called an Access or Security...
... wireless network, you will have an optional security system that requires devices that access the network to enter the Pass Phrase during the automatic or manual setup process. ◀ ▶ English ■■ Automatic Network Setup Most wireless networks have to transmit an encrypted security code called an Access or Security...
User Manual
Page 71
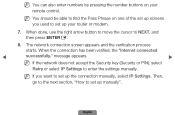
... select IP Settings to NEXT, and then press ENTERE. 8. English When done, use the right arrow button to move the cursor to enter the settings manually. NN If you used to set up your remote control. When the connection has been verified, the "Internet connected ◀ successfully." NN You can ...also enter numbers by pressing the number buttons on one of the set up screens you want to set up the connection manually, select IP Settings. The network connection screen appears and the verification process starts. Then, go to the next section, "How to set up...
... select IP Settings to NEXT, and then press ENTERE. 8. English When done, use the right arrow button to move the cursor to enter the settings manually. NN If you used to set up your remote control. When the connection has been verified, the "Internet connected ◀ successfully." NN You can ...also enter numbers by pressing the number buttons on one of the set up screens you want to set up the connection manually, select IP Settings. The network connection screen appears and the verification process starts. Then, go to the next section, "How to set up...

