
User Manual
Page 1
2010 Samsung TV F/W Upgrade Guide Samsung Electronics
2010 Samsung TV F/W Upgrade Guide Samsung Electronics
User Manual
Page 4
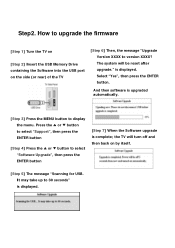
... be reset after upgrade." How to upgrade the firmware [Step 1] Turn the TV on [Step 2] Insert the USB Memory Drive containing the Software into the USB port on by itself. [Step 5] The message "Scanning for USB. Press the &#... the MENU button to 30 seconds" is displayed. is displayed. The system will turn off and then back on the side (or rear) of the TV [Step 6] Then, the message "Upgrade Version XXXX to select "Software Upgrade", then press the ENTER button [Step 7] When the Software upgrade is complete...
... be reset after upgrade." How to upgrade the firmware [Step 1] Turn the TV on [Step 2] Insert the USB Memory Drive containing the Software into the USB port on by itself. [Step 5] The message "Scanning for USB. Press the &#... the MENU button to 30 seconds" is displayed. is displayed. The system will turn off and then back on the side (or rear) of the TV [Step 6] Then, the message "Upgrade Version XXXX to select "Software Upgrade", then press the ENTER button [Step 7] When the Software upgrade is complete...
Quick Guide (easy Manual) (ver.1.0) (English)
Page 1
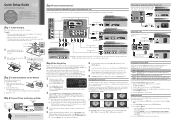
...Left or Right arrow buttons on your TV, call: 1-800-SAMSUNG (1-800-726-7864) For web support please visit: www.samsung.com/support 1-800-SAMSUNG (1-800-726-7864) Samsung Electronics America, Inc. 85 Challenger Road Ridgefield Park, NJ 07660-2112 Samsung Electronics Canada Inc. 55 Standish Court Mississauga...The connection method for the highest picture quality. After Plug & Play is running quickly. Press the Right arrow button on your new Samsung TV. Then press the ENTERE button. The following sizes are available: 16:9 Widescreen 4:3 Standard screen Wide Fit Zoom 1 Zoom 2 Screen ...
...Left or Right arrow buttons on your TV, call: 1-800-SAMSUNG (1-800-726-7864) For web support please visit: www.samsung.com/support 1-800-SAMSUNG (1-800-726-7864) Samsung Electronics America, Inc. 85 Challenger Road Ridgefield Park, NJ 07660-2112 Samsung Electronics Canada Inc. 55 Standish Court Mississauga...The connection method for the highest picture quality. After Plug & Play is running quickly. Press the Right arrow button on your new Samsung TV. Then press the ENTERE button. The following sizes are available: 16:9 Widescreen 4:3 Standard screen Wide Fit Zoom 1 Zoom 2 Screen ...
Quick Guide (easy Manual) (ver.1.0) (English)
Page 2
.... Selects the on-screen menu items and changes the values seen on the Wall Wireless IP sharer (AP having DHCP server) TV Side Panel Samsung Wireless LAN Adapter Network Connection - A source is offered by connecting it is a special remote control for a network that uses...the Network Setup menu, set Internet Protocol Setup and Network Setup DNS to the previous menu. Use the Direction button on your AP, Samsung TVs will reduce the battery usage time.) Returns to check Gateway : Internet connectivity. Select Network Test to check internet connectivity. ✎✎...
.... Selects the on-screen menu items and changes the values seen on the Wall Wireless IP sharer (AP having DHCP server) TV Side Panel Samsung Wireless LAN Adapter Network Connection - A source is offered by connecting it is a special remote control for a network that uses...the Network Setup menu, set Internet Protocol Setup and Network Setup DNS to the previous menu. Use the Direction button on your AP, Samsung TVs will reduce the battery usage time.) Returns to check Gateway : Internet connectivity. Select Network Test to check internet connectivity. ✎✎...
User Manual (user Manual) (ver.1.0) (English)
Page 1
...-7864) Web Site www.samsung.com U.S.A 1-800-SAMSUNG (726-7864) www.samsung.com Address Samsung Electronics Canada Inc., Customer Service 55 Standish Court Mississauga, Ontario L5R 4B2 Canada Samsung Electronics America, Inc. 85 Challenger Road Ridgefield Park, NJ 07660-2112 LCD TV user manual © 2010 Samsung Electronics Co., Ltd. BN68-02870A-04 imagine the possibilities Thank...
...-7864) Web Site www.samsung.com U.S.A 1-800-SAMSUNG (726-7864) www.samsung.com Address Samsung Electronics Canada Inc., Customer Service 55 Standish Court Mississauga, Ontario L5R 4B2 Canada Samsung Electronics America, Inc. 85 Challenger Road Ridgefield Park, NJ 07660-2112 LCD TV user manual © 2010 Samsung Electronics Co., Ltd. BN68-02870A-04 imagine the possibilities Thank...
User Manual (user Manual) (ver.1.0) (English)
Page 2
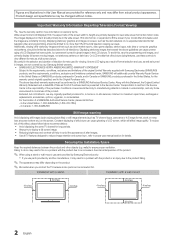
... stationary patterns or dark bars. The above described warranty repairs must be limited as TV channel logos, panorama or 4:3 image format, stock or news bars at screen bottom etc.) on SAMSUNG products purchased in the selection and duration of the screen width to no more than...requirements, conditions, exclusions and limitations of the product. ✎✎ When using a stand or wall-mount, use parts provided by a SAMSUNG Authorized Service Center. For the location of the purchaser. Failing to the Service Center. The images displayed on them should be presented to ...
... stationary patterns or dark bars. The above described warranty repairs must be limited as TV channel logos, panorama or 4:3 image format, stock or news bars at screen bottom etc.) on SAMSUNG products purchased in the selection and duration of the screen width to no more than...requirements, conditions, exclusions and limitations of the product. ✎✎ When using a stand or wall-mount, use parts provided by a SAMSUNG Authorized Service Center. For the location of the purchaser. Failing to the Service Center. The images displayed on them should be presented to ...
User Manual (user Manual) (ver.1.0) (English)
Page 3
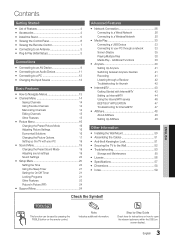
...Up AllShare 48 Other Information yy Installing the Wall Mount 50 yy Assembling the Cables 51 yy Anti-theft Kensington Lock 51 yy Securing the TV to the Wall 52 yy Troubleshooting 53 Storage and Maintenance 55 yy License 56 yy Specifications 57 yy Dimensions 58 yy Index 59 Check ...38 Media Play - TOOLS t This function can be used by Step Guide Check here for Anynet+ 42 yy Internet@TV 43 Getting Started with Internet@TV 43 Setting up the TV with your PC 19 yy Sound Menu 19 Changing the Preset Sound Mode 19 Adjusting sound settings 19 Sound Settings 20...
...Up AllShare 48 Other Information yy Installing the Wall Mount 50 yy Assembling the Cables 51 yy Anti-theft Kensington Lock 51 yy Securing the TV to the Wall 52 yy Troubleshooting 53 Storage and Maintenance 55 yy License 56 yy Specifications 57 yy Dimensions 58 yy Index 59 Check ...38 Media Play - TOOLS t This function can be used by Step Guide Check here for Anynet+ 42 yy Internet@TV 43 Getting Started with Internet@TV 43 Setting up the TV with your PC 19 yy Sound Menu 19 Changing the Preset Sound Mode 19 Adjusting sound settings 19 Sound Settings 20...
User Manual (user Manual) (ver.1.0) (English)
Page 4
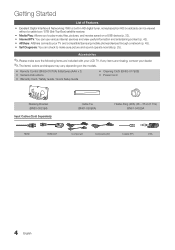
...Self Diagnosis: You can be viewed without a cable box / STB (Set-Top-Box) satellite receiver. yy AllShare: AllShare connects your LCD TV. Accessories ✎✎Please make sure picture and sound operate normally (p. 25). Getting Started List of Features yy Excellent Digital Interface & ...music files, pictures, and movies saved on the models. If any items are included with your TV and compatible Samsung mobile phones/devices through a network (p. 48). yy Internet@TV: You can use various internet services and view useful information and entertaining content (p. 43). yy...
...Self Diagnosis: You can be viewed without a cable box / STB (Set-Top-Box) satellite receiver. yy AllShare: AllShare connects your LCD TV. Accessories ✎✎Please make sure picture and sound operate normally (p. 25). Getting Started List of Features yy Excellent Digital Interface & ...music files, pictures, and movies saved on the models. If any items are included with your TV and compatible Samsung mobile phones/devices through a network (p. 48). yy Internet@TV: You can use various internet services and view useful information and entertaining content (p. 43). yy...
User Manual (user Manual) (ver.1.0) (English)
Page 5
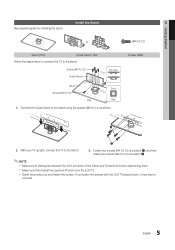
... (9EA) 2 1 2. Install the Stand or (M4 X L12) Stand (1EA) Guide Stand (1EA) Follow the steps below to connect the TV to one side. 5 English With your TV upright, connect the TV to distinguish between the front and back of the Stand and Guide Stand when assembling them. Fasten two screws (M4 X L12...) at position 1, and then fasten two screws (M4 X L12) at least two persons lift and move the LCD TV. xx Stand the product up and fasten the screws. Connect the Guide Stand to the Stand using five screws (M4 X L12) as shown. Screws (M4...
... (9EA) 2 1 2. Install the Stand or (M4 X L12) Stand (1EA) Guide Stand (1EA) Follow the steps below to connect the TV to one side. 5 English With your TV upright, connect the TV to distinguish between the front and back of the Stand and Guide Stand when assembling them. Fasten two screws (M4 X L12...) at position 1, and then fasten two screws (M4 X L12) at least two persons lift and move the LCD TV. xx Stand the product up and fasten the screws. Connect the Guide Stand to the Stand using five screws (M4 X L12) as shown. Screws (M4...
User Manual (user Manual) (ver.1.0) (English)
Page 6
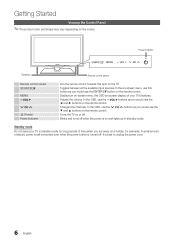
In the OSD, use the y buttons as you would use the ENTERE button on the TV. In the OSD, use the z buttons as you would use the ◄ and ► buttons on the remote control. Power Indicator Speakers Remote control sensor ... button is turned off . Toggles between all the available input sources. It is on the model. Turns the TV on a holiday, for long periods of your TV's features. Standby mode Do not leave your TV in standby mode. Getting Started Viewing the Control Panel ✎✎The product color and shape may vary...
In the OSD, use the y buttons as you would use the ENTERE button on the TV. In the OSD, use the z buttons as you would use the ◄ and ► buttons on the remote control. Power Indicator Speakers Remote control sensor ... button is turned off . Toggles between all the available input sources. It is on the model. Turns the TV on a holiday, for long periods of your TV's features. Standby mode Do not leave your TV in standby mode. Getting Started Viewing the Control Panel ✎✎The product color and shape may vary...

User Manual (user Manual) (ver.1.0) (English)
Page 7
... information on the menu. Selects the on-screen menu items and changes the values seen on the TV screen. 01 Getting Started Viewing the Remote Control ✎✎This is a special remote control for Samsung recorders that have the Anynet+ feature) MUTE PRE-CH CONTENT CH LIST MENU... @TV INTERNET TOOLS INFO RETURN EXIT A B CD MEDIA.P HOTAPPS MTS FAV.CH P.SIZE CC Returns to choose stereo,...
... information on the menu. Selects the on-screen menu items and changes the values seen on the TV screen. 01 Getting Started Viewing the Remote Control ✎✎This is a special remote control for Samsung recorders that have the Anynet+ feature) MUTE PRE-CH CONTENT CH LIST MENU... @TV INTERNET TOOLS INFO RETURN EXIT A B CD MEDIA.P HOTAPPS MTS FAV.CH P.SIZE CC Returns to choose stereo,...
User Manual (user Manual) (ver.1.0) (English)
Page 8
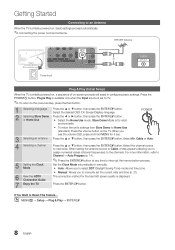
...Allows you see the volume OSD, press and hold MENU for retail POWER P IN environments. Getting Started Connecting to an Antenna When the TV is displayed. 7 Enjoy the TV. Select the channel source to Reset This Feature... OO MENUm → Setup → Plug & Play → ENTERE 8 English yy.../UHF Antenna Antenna Cable (Not Supplied) or Cable ANT OUT Power Input Plug & Play (Initial Setup) When the TV is initially powered on, a sequence of on the TV. Press the POWERP button. When setting the antenna source to Cable, a step appears allowing you to manually set to...
...Allows you see the volume OSD, press and hold MENU for retail POWER P IN environments. Getting Started Connecting to an Antenna When the TV is displayed. 7 Enjoy the TV. Select the channel source to Reset This Feature... OO MENUm → Setup → Plug & Play → ENTERE 8 English yy.../UHF Antenna Antenna Cable (Not Supplied) or Cable ANT OUT Power Input Plug & Play (Initial Setup) When the TV is initially powered on, a sequence of on the TV. Press the POWERP button. When setting the antenna source to Cable, a step appears allowing you to manually set to...
User Manual (user Manual) (ver.1.0) (English)
Page 9
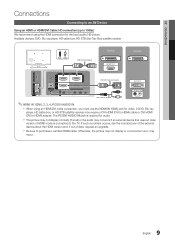
... of date, request an upgrade. A DVD, Blu-ray player, HD cable box, or HD STB satellite receiver may occur. 9 English xx Be sure to the TV. Otherwise, the picture may not display or a connection error may require a DVI-HDMI (DVI to HDMI) cable or DVI-HDMI (DVI to DVI Cable (Not...
... of date, request an upgrade. A DVD, Blu-ray player, HD cable box, or HD STB satellite receiver may occur. 9 English xx Be sure to the TV. Otherwise, the picture may not display or a connection error may require a DVI-HDMI (DVI to HDMI) cable or DVI-HDMI (DVI to DVI Cable (Not...

User Manual (user Manual) (ver.1.0) (English)
Page 11
...sold separately). xx When an audio amplifier is connected to an external device supporting 5.1 CH. When the TV is connected to the DIGITAL AUDIO OUT (OPTICAL) jack, decrease the volume of the TV and adjust the volume level with the amplifier's volume control. 11 English If you can hear sound output... from the TV's optical jack. 02 Connections Connecting to an Audio Device Using an Optical (Digital) or Audio (Analog) Cable Connection Available devices: Digital Audio System, ...
...sold separately). xx When an audio amplifier is connected to an external device supporting 5.1 CH. When the TV is connected to the DIGITAL AUDIO OUT (OPTICAL) jack, decrease the volume of the TV and adjust the volume level with the amplifier's volume control. 11 English If you can hear sound output... from the TV's optical jack. 02 Connections Connecting to an Audio Device Using an Optical (Digital) or Audio (Analog) Cable Connection Available devices: Digital Audio System, ...
User Manual (user Manual) (ver.1.0) (English)
Page 13
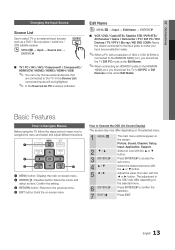
... ◄/► 6 ENTERE 7 EXITe The main menu options appear on the screen: Picture, Sound, Channel, Setup, Input, Application, Support. Press ENTERE to select TV or an external input sources such as a DVD / Blu-ray player / cable box / STB satellite receiver. Press ENTERE to Operate the OSD (On Screen Display...Name → ENTERE ■■ VCR / DVD / Cable STB / Satellite STB / PVR STB / AV Receiver / Game / Camcorder / PC / DVI PC / DVI Devices / TV / IPTV / Blu-ray / HD DVD / DMA: Name the device connected to the input jacks to DVI Devices mode under Edit Name. How to confirm the...
... ◄/► 6 ENTERE 7 EXITe The main menu options appear on the screen: Picture, Sound, Channel, Setup, Input, Application, Support. Press ENTERE to select TV or an external input sources such as a DVD / Blu-ray player / cable box / STB satellite receiver. Press ENTERE to Operate the OSD (On Screen Display...Name → ENTERE ■■ VCR / DVD / Cable STB / Satellite STB / PVR STB / AV Receiver / Game / Camcorder / PC / DVI PC / DVI Devices / TV / IPTV / Blu-ray / HD DVD / DMA: Name the device connected to the input jacks to DVI Devices mode under Edit Name. How to confirm the...
User Manual (user Manual) (ver.1.0) (English)
Page 14
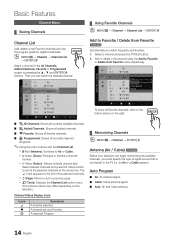
...9632;■ Programmed: Shows all currently reserved programs. ✎✎Using the color buttons with the Channel List xx Red (Antenna): Switches to the TV (i.e. The c mark appears to the left of signal source that is connected to Air or Cable. xx T (Tools): Displays the Channel List option.... ■■ Auto: Air and Cable antenna. 14 English xx k (Page): Move to Favorite Timer Viewing Channel Name Edit Select All * TV #10 * TV #11 Air Antenna B Zoom Select k Page T Tools To show all Favorite channels, click on the button shown on the situation.) Channel Status Display...
...9632;■ Programmed: Shows all currently reserved programs. ✎✎Using the color buttons with the Channel List xx Red (Antenna): Switches to the TV (i.e. The c mark appears to the left of signal source that is connected to Air or Cable. xx T (Tools): Displays the Channel List option.... ■■ Auto: Air and Cable antenna. 14 English xx k (Page): Move to Favorite Timer Viewing Channel Name Edit Select All * TV #10 * TV #11 Air Antenna B Zoom Select k Page T Tools To show all Favorite channels, click on the button shown on the situation.) Channel Status Display...
User Manual (user Manual) (ver.1.0) (English)
Page 15
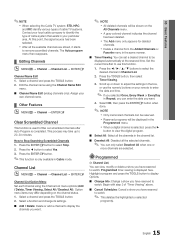
... Reserved programs will be displayed in the Programmed menu. 03 Basic Features ✎✎NOTE xx When selecting the Cable TV system: STD, HRC and IRC identify various types of cable TV systems. Contact your local cable company to select the desired channel in Channel List. 2. This process may differ depending on...
... Reserved programs will be displayed in the Programmed menu. 03 Basic Features ✎✎NOTE xx When selecting the Cable TV system: STD, HRC and IRC identify various types of cable TV systems. Contact your local cable company to select the desired channel in Channel List. 2. This process may differ depending on...
User Manual (user Manual) (ver.1.0) (English)
Page 16
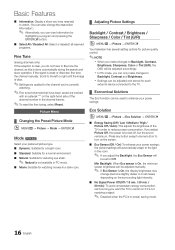
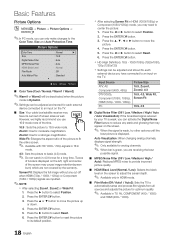
... MENUm → Picture → ENTERE Your television has several setting options for each external device connected to the TV. ¦¦ Economical Solutions The Eco Function can be set how long you want the TV to remain on if it's not receiving a signal. ✎✎ Disabled when the PC is in power... to the left or right until the image is clear. ✎✎Settings are marked with an asterisk "*" on the right-hand side of the TV in the room. ✎✎ If you select Picture Off, the screen is weak or distorted, fine tune the channel manually. Min Backlight: When Eco...
... MENUm → Picture → ENTERE Your television has several setting options for each external device connected to the TV. ¦¦ Economical Solutions The Eco Function can be set how long you want the TV to remain on if it's not receiving a signal. ✎✎ Disabled when the PC is in power... to the left or right until the image is clear. ✎✎Settings are marked with an asterisk "*" on the right-hand side of the TV in the room. ✎✎ If you select Picture Off, the screen is weak or distorted, fine tune the channel manually. Min Backlight: When Eco...
User Manual (user Manual) (ver.1.0) (English)
Page 17
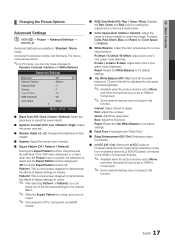
... is set to Movie and when the external input is not output. ✎✎ Only enabled in Standard / Movie mode) Compared to previous models, new Samsung TVs have a more natural picture. Pattern2: This is a test screen designed to demonstrate the affects of display settings on colors. ✎✎ After selecting Pattern1 or...
... is set to Movie and when the external input is not output. ✎✎ Only enabled in Standard / Movie mode) Compared to previous models, new Samsung TVs have a more natural picture. Pattern2: This is a test screen designed to demonstrate the affects of display settings on colors. ✎✎ After selecting Pattern1 or...
User Manual (user Manual) (ver.1.0) (English)
Page 18
... / High / Auto): Reduces MPEG noise to provide improved picture quality. ■■ HDMI Black Level (Normal / Low): Selects the black level on the TV. Press the ENTERE button to reset the picture to its own set of the time. xx After selecting Screen Fit in HDMI mode. ■■...screen. ✎✎ Available with HD 1080i / 720p signals in 16:9 mode. 4:3 : Sets the picture to basic (4:3) mode. ✎✎ Do not watch in TV, AV, COMPONENT (480i / 1080i) and HDMI (480i / 1080i). 18 English Press the ▲ or ▼ button to move the picture. 4. Screen Fit: Displays...
... / High / Auto): Reduces MPEG noise to provide improved picture quality. ■■ HDMI Black Level (Normal / Low): Selects the black level on the TV. Press the ENTERE button to reset the picture to its own set of the time. xx After selecting Screen Fit in HDMI mode. ■■...screen. ✎✎ Available with HD 1080i / 720p signals in 16:9 mode. 4:3 : Sets the picture to basic (4:3) mode. ✎✎ Do not watch in TV, AV, COMPONENT (480i / 1080i) and HDMI (480i / 1080i). 18 English Press the ▲ or ▼ button to move the picture. 4. Screen Fit: Displays...


