Samsung LN40A450C1 Research

View Results Below
Free Samsung LN40A450C1 manuals!
Problems with Samsung LN40A450C1?
Ask a Question
Free Samsung LN40A450C1 manuals!
Problems with Samsung LN40A450C1?
Ask a Question
Related Manual Pages

Related Videos

Samsung LN40A450C1
Duration: :46
Total Views: 218
Duration: :46
Total Views: 218
Similar Questions

Manual Please. How To Set Up Directv On This?
just got this tv and dont know how to hook it up to directv and my blue-ray.
just got this tv and dont know how to hook it up to directv and my blue-ray.
(Posted by whittlegirls 6 years ago)

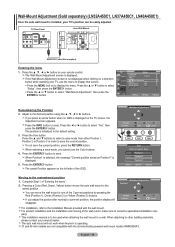
How Do I Remove The Base So I Can Mount The Tv On The Wall
(Posted by scottraugh 8 years ago)


Sip408d
hi can the SIP 408D( Samsung BN44-00197B),cause the screen to go white
hi can the SIP 408D( Samsung BN44-00197B),cause the screen to go white
(Posted by brunoj 10 years ago)
Samsung 40 Inc. Model Ln40a450c
THE TV DOESNT RESPOND IN REMOTE ONLY POWER I TRY TO PUT IN FACTORY SETTING BUT STILL DOESNT WORK PLS...
THE TV DOESNT RESPOND IN REMOTE ONLY POWER I TRY TO PUT IN FACTORY SETTING BUT STILL DOESNT WORK PLS...
(Posted by independence136 11 years ago)