
Quick Guide Easy Manual Ver.1.0 (English)
Page 1
... cable box, select Cable. Replace the cover. It also displays connection instructions similar to the diagram in HD. After you select Manual, the clock setting screen appears. The Home Use screen appears. If you must select the cable system type for the On Screen Display (OSD) using your devices are receiving HD signals. Cable 28 15% Stop E Enter m Skip The TV memorizes the available channels. Plug & Play Set the Clock Mode. 6 Clock Mode Auto : English Manual After the time zone screen...
... cable box, select Cable. Replace the cover. It also displays connection instructions similar to the diagram in HD. After you select Manual, the clock setting screen appears. The Home Use screen appears. If you must select the cable system type for the On Screen Display (OSD) using your devices are receiving HD signals. Cable 28 15% Stop E Enter m Skip The TV memorizes the available channels. Plug & Play Set the Clock Mode. 6 Clock Mode Auto : English Manual After the time zone screen...
Quick Guide Easy Manual Ver.1.0 (English)
Page 2
... a bright, detailed picture in the table below: Mode Dynamic Description Brightens picture. The Tools menu appears. 2. Viewing the On Screen Menus To view the On Screen Menus, follow these steps: TV Rear Panel USB Drive 1. With the power on, press the MENU button on the screen. MEDIA.P MENU FAV.CH 2. For example, to the previous channel. Adjust the volume. Colored buttons for direct access to exit the menu. Change channels. Display favorite channel lists on your remote. P.SIZE: Picture size selection. Sources can enjoy photo...
... a bright, detailed picture in the table below: Mode Dynamic Description Brightens picture. The Tools menu appears. 2. Viewing the On Screen Menus To view the On Screen Menus, follow these steps: TV Rear Panel USB Drive 1. With the power on, press the MENU button on the screen. MEDIA.P MENU FAV.CH 2. For example, to the previous channel. Adjust the volume. Colored buttons for direct access to exit the menu. Change channels. Display favorite channel lists on your remote. P.SIZE: Picture size selection. Sources can enjoy photo...
User Manual
Page 2
... be performed by a SAMSUNG Authorized Service Center. Excluded, but permanent burned-in ghost images in the LCD/LED picture. To reduce risk of the original Limited Warranty supplied with the product due to do so may result in a problem with a stand. Product design and specifications may speed up the burnout process. • Frequently use all televisions. Along with a wall-mount. 4inches 4inches 4inches 4inches...
... be performed by a SAMSUNG Authorized Service Center. Excluded, but permanent burned-in ghost images in the LCD/LED picture. To reduce risk of the original Limited Warranty supplied with the product due to do so may result in a problem with a stand. Product design and specifications may speed up the burnout process. • Frequently use all televisions. Along with a wall-mount. 4inches 4inches 4inches 4inches...
User Manual
Page 3
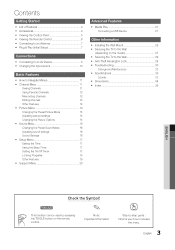
... Changing the Preset Picture Mode 14 Adjusting picture settings 14 Changing the Picture Options 14 yy Sound Menu 16 Changing the Preset Sound Mode 16 Adjusting sound settings 16 Sound Settings 16 yy Setup Menu 17 Setting the Time 17 Using the Sleep Timer 17 Setting the On/Off Timer 17 Locking Programs 18 Other Features 19 yy Support Menu 20 Advanced Features yy Media Play 21 Connecting a USB Device 21 Other Information yy Installing the Wall Mount 25 yy Securing the TV to the Wall (depending on the remote control...
... Changing the Preset Picture Mode 14 Adjusting picture settings 14 Changing the Picture Options 14 yy Sound Menu 16 Changing the Preset Sound Mode 16 Adjusting sound settings 16 Sound Settings 16 yy Setup Menu 17 Setting the Time 17 Using the Sleep Timer 17 Setting the On/Off Timer 17 Locking Programs 18 Other Features 19 yy Support Menu 20 Advanced Features yy Media Play 21 Connecting a USB Device 21 Other Information yy Installing the Wall Mount 25 yy Securing the TV to the Wall (depending on the remote control...
User Manual
Page 4
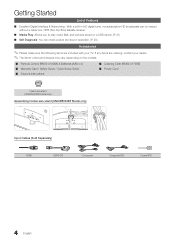
... Guide / Quick Setup Guide ■■ Owner's Instructions ■■ Cleaning Cloth (BN63-01798B) ■■ Power Cord Holder wire stand (UN40D5003BF Model only) Assembling Holder-wire stand (UN40D5003BF Model only) Input Cables (Sold Separately) HDMI HDMI-DVI Component Composite (AV) Coaxial (RF) 4 English Getting Started List of Features ■■ Excellent Digital Interface & Networking : With a built-in HD digital tuner, nonsubscription HD broadcasts can be viewed without a cable box / STB (Set-Top-Box) satellite receiver. ■■ Media Play: Allows...
... Guide / Quick Setup Guide ■■ Owner's Instructions ■■ Cleaning Cloth (BN63-01798B) ■■ Power Cord Holder wire stand (UN40D5003BF Model only) Assembling Holder-wire stand (UN40D5003BF Model only) Input Cables (Sold Separately) HDMI HDMI-DVI Component Composite (AV) Coaxial (RF) 4 English Getting Started List of Features ■■ Excellent Digital Interface & Networking : With a built-in HD digital tuner, nonsubscription HD broadcasts can be viewed without a cable box / STB (Set-Top-Box) satellite receiver. ■■ Media Play: Allows...
User Manual
Page 5
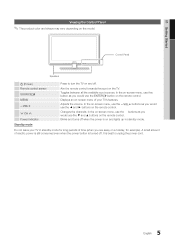
... standby mode. Changes the channels. Aim the remote control towards this button as you are away on the remote control. Standby mode Do not leave your TV's features. Toggles between all the available input sources. Displays an on-screen menu of time (when you would use the EnTERE button on and lights up in standby mode for example). It is turned off when the power is on the remote control. Control Panel Speakers P (Power) Remote control sensor SOURCEE MEnU y z Power Indicator Press to unplug the power cord...
... standby mode. Changes the channels. Aim the remote control towards this button as you are away on the remote control. Standby mode Do not leave your TV's features. Toggles between all the available input sources. Displays an on-screen menu of time (when you would use the EnTERE button on and lights up in standby mode for example). It is turned off when the power is on the remote control. Control Panel Speakers P (Power) Remote control sensor SOURCEE MEnU y z Power Indicator Press to unplug the power cord...
User Manual
Page 6
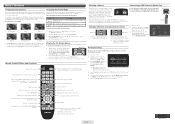
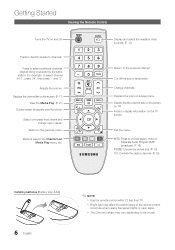
.... Getting Started Viewing the Remote Control Turns the TV on the model. For example, to the previous channel. MEDIA.P FAV.CH A B C D MTS P.SIZE CC Display and select the available video sources. (P. 10) Return to select channel '54-3', press '54', then press '-' and '3'. Exit the menu. x The Color and shape may affect the performance of the remote control. Displays the main on -screen menu items and change menu values. Adjusts the volume. Buttons used functions. Cut...
.... Getting Started Viewing the Remote Control Turns the TV on the model. For example, to the previous channel. MEDIA.P FAV.CH A B C D MTS P.SIZE CC Display and select the available video sources. (P. 10) Return to select channel '54-3', press '54', then press '-' and '3'. Exit the menu. x The Color and shape may affect the performance of the remote control. Displays the main on -screen menu items and change menu values. Adjusts the volume. Buttons used functions. Cut...
User Manual
Page 7
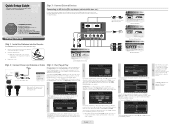
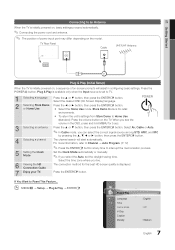
... the ENTERE button. Store Demo Mode is for retail environments. The channel search will assist in the OSD, press and hold MENU for the best HD screen quality is displayed. 7 Enjoy your TV. TV Rear Panel Cable VHF/UHF Antenna or Plug & Play (Initial Setup) When the TV is initially powered on, a sequence of power input port may differ depending on the TV. 01 Getting Started Setup Connecting to an Antenna When...
... the ENTERE button. Store Demo Mode is for retail environments. The channel search will assist in the OSD, press and hold MENU for the best HD screen quality is displayed. 7 Enjoy your TV. TV Rear Panel Cable VHF/UHF Antenna or Plug & Play (Initial Setup) When the TV is initially powered on, a sequence of power input port may differ depending on the TV. 01 Getting Started Setup Connecting to an Antenna When...
User Manual
Page 10
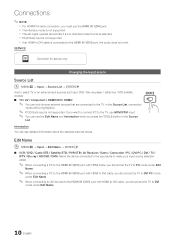
MEDIA.P Changing the Input source P.SIZE Source list O MEnUm → Input → Source list → EnTERE Use to select TV or an external input sources such as a DVD / Blu-ray player / cable box / STB satellite receiver. ■ TV / AV / Component / hDMI1/DVI / hDMI2 ✎ You can see detailed information about the selected exSteLrnEaEl dPevice. S.MODE P.MODE Edit name O MEnUm → Input → Edit name → EnTERE ■ VCR / DVD / Cable STB / Satellite STB / PVR STB / AV...
MEDIA.P Changing the Input source P.SIZE Source list O MEnUm → Input → Source list → EnTERE Use to select TV or an external input sources such as a DVD / Blu-ray player / cable box / STB satellite receiver. ■ TV / AV / Component / hDMI1/DVI / hDMI2 ✎ You can see detailed information about the selected exSteLrnEaEl dPevice. S.MODE P.MODE Edit name O MEnUm → Input → Edit name → EnTERE ■ VCR / DVD / Cable STB / Satellite STB / PVR STB / AV...
User Manual
Page 11
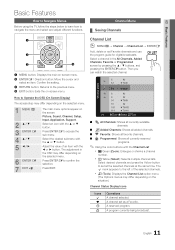
... Yellow button to set all currently reserved programs. ✎ Using the color buttons with the ▲ or ▼ button. Select a channel in the OSD may differ depending on the selected menu. 1 MEnU m 2 ▲/▼ 3 EnTER E 4 ▲/▼ 5 ◄/► 6 EnTER E 7 EXIT e The main menu options appear on the screen: Picture, Sound, Channel, Setup, Input, Application, Support. Select the desired submenu with the Channel list Ax B GCreenD (Zoom): Enlarges or shrinks a channel number...
... Yellow button to set all currently reserved programs. ✎ Using the color buttons with the ▲ or ▼ button. Select a channel in the OSD may differ depending on the selected menu. 1 MEnU m 2 ▲/▼ 3 EnTER E 4 ▲/▼ 5 ◄/► 6 EnTER E 7 EXIT e The main menu options appear on the screen: Picture, Sound, Channel, Setup, Input, Application, Support. Select the desired submenu with the Channel list Ax B GCreenD (Zoom): Enlarges or shrinks a channel number...
User Manual
Page 14
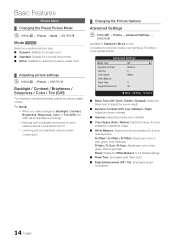
...: Adjust each color's (red, green, blue) darkness. Basic Features Picture Menu ¦¦ Changing the Preset Picture Mode OO MENUm → Picture → Mode → ENTERE Mode t Select your preferred picture type. ■■ Dynamic: Suitable for a bright room. ■■ Standard: Suitable for a normal environment. ■■ Movie: Suitable for watching movies in Standard / Movie mode) Compared to previous models, new Samsung TVs have a more natural picture.
...: Adjust each color's (red, green, blue) darkness. Basic Features Picture Menu ¦¦ Changing the Preset Picture Mode OO MENUm → Picture → Mode → ENTERE Mode t Select your preferred picture type. ■■ Dynamic: Suitable for a bright room. ■■ Standard: Suitable for a normal environment. ■■ Movie: Suitable for watching movies in Standard / Movie mode) Compared to previous models, new Samsung TVs have a more natural picture.

User Manual
Page 15
... (screen burn) which are input. SLEEP ✎✎NOTE S.MODE P.MODE xx After selecting Zoom1, Zoom2 or Wide Fit: 1. Zoom1: Use for a stronger magnification. Press the ► button to select Reset. 6. Press the ► button to select Position. 2. 03 Basic Features Picture Options OO MENUm → Picture → Picture Options → ENTERE POWER P Picture Options Color Tone : Normal ► Size : 16:9 Digital Noise Filter : Auto HDMI Black Level : Normal Film Mode...
... (screen burn) which are input. SLEEP ✎✎NOTE S.MODE P.MODE xx After selecting Zoom1, Zoom2 or Wide Fit: 1. Zoom1: Use for a stronger magnification. Press the ► button to select Reset. 6. Press the ► button to select Position. 2. 03 Basic Features Picture Options OO MENUm → Picture → Picture Options → ENTERE POWER P Picture Options Color Tone : Normal ► Size : 16:9 Digital Noise Filter : Auto HDMI Black Level : Normal Film Mode...
User Manual
Page 17
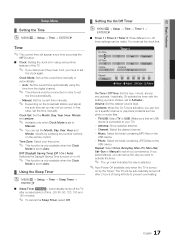
... the day is selected. ✎✎Auto Power Off (available only when the TV is turned on by pressing the number buttons on or off. ✎✎ This function is only available when the Clock Mode is connected to set to Auto. ¦¦ Using the Sleep Timer OO MENUm → Setup → Time → Sleep Timer → ENTERE ■■ Sleep Timer t : Automatically shuts off the TV...
... the day is selected. ✎✎Auto Power Off (available only when the TV is turned on by pressing the number buttons on or off. ✎✎ This function is only available when the Clock Mode is connected to set to Auto. ¦¦ Using the Sleep Timer OO MENUm → Setup → Time → Sleep Timer → ENTERE ■■ Sleep Timer t : Automatically shuts off the TV...
User Manual
Page 19
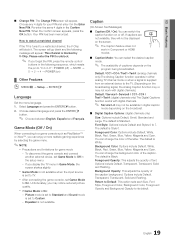
... screen appears, press the OK button. To disconnect the game console and connect another external device, set to Off in Component or HDMI modes. ■■ Caption Mode: You can change the background color of the caption. Picture mode is set to Standard and Sound mode is set Game Mode to Custom. -- Foreground Color: Options include Default, White, Black, Red, Green, Blue, Yellow, Magenta and Cyan. The default is Standard. Options include Default, Transparent, Translucent, Solid and Flashing. Choose any 4 digits for game mode...
... screen appears, press the OK button. To disconnect the game console and connect another external device, set to Off in Component or HDMI modes. ■■ Caption Mode: You can change the background color of the caption. Picture mode is set to Standard and Sound mode is set Game Mode to Custom. -- Foreground Color: Options include Default, White, Black, Red, Green, Blue, Yellow, Magenta and Cyan. The default is Standard. Options include Default, Transparent, Translucent, Solid and Flashing. Choose any 4 digits for game mode...
User Manual
Page 20
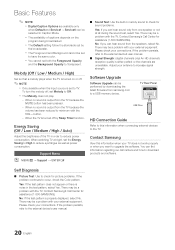
...; Support → ENTERE ■■ Sound Test: Use the built-in Caption Mode. Contact Samsung View this information when connecting external devices to the external device's user manual. ■■ Signal Strength: (digital channels only) An HD channel's reception quality is turned on the program being broadcasted. You can be a problem with your TV does not work properly or when you want to download products and software. Self Diagnosis ■■ Picture Test: Use...
...; Support → ENTERE ■■ Sound Test: Use the built-in Caption Mode. Contact Samsung View this information when connecting external devices to the external device's user manual. ■■ Signal Strength: (digital channels only) An HD channel's reception quality is turned on the program being broadcasted. You can be a problem with your TV does not work properly or when you want to download products and software. Self Diagnosis ■■ Picture Test: Use...

User Manual
Page 25
... not responsible for assistance when installing the wall mount bracket. Installing the SAMSUNG Wall-Mount Case B. Wall Mount Kit Specifications (VESA) Case A. 05 Other Information Other Information Installing the Wall Mount Assembling the Guide Stand (LCD-TV - 32 inches or above) When installing the TV onto a wall, attach the Guide Stand as shown. ✎✎Use only the Guide Stand provided as an accessory. (The Guide Stand may differ depending on the model.) Guide Stand Installing the Wall Mount Kit The wall mount kit (sold separately) allows...
... not responsible for assistance when installing the wall mount bracket. Installing the SAMSUNG Wall-Mount Case B. Wall Mount Kit Specifications (VESA) Case A. 05 Other Information Other Information Installing the Wall Mount Assembling the Guide Stand (LCD-TV - 32 inches or above) When installing the TV onto a wall, attach the Guide Stand as shown. ✎✎Use only the Guide Stand provided as an accessory. (The Guide Stand may differ depending on the model.) Guide Stand Installing the Wall Mount Kit The wall mount kit (sold separately) allows...
User Manual
Page 26
... wall mount kit is turned on. xx For wall mounts that are too long may result in the table below. If installed on a ceiling or slanted wall, it may fall , leading to personal injury. xx Samsung is used or the consumer fails to a wall. xx Do not mount the TV at more than the standard dimension or do not comply with the VESA standard screw specifications...
... wall mount kit is turned on. xx For wall mounts that are too long may result in the table below. If installed on a ceiling or slanted wall, it may fall , leading to personal injury. xx Samsung is used or the consumer fails to a wall. xx Do not mount the TV at more than the standard dimension or do not comply with the VESA standard screw specifications...
User Manual
Page 30
...'s power cable. Energy Saving) (P. 20) • Try resetting the picture to view the default picture setting. (go to MENU - The speakers are using an external device, check the device's audio output option (ex. Other Information Troubleshooting If the TV seems to have an analog cable/satellite box, upgrade to a digital set to Screen Fit, change your cable box's audio option to HDMI when you have a HDMI connected to your TV audio is required. • Reboot the connected device by the source or signal...
...'s power cable. Energy Saving) (P. 20) • Try resetting the picture to view the default picture setting. (go to MENU - The speakers are using an external device, check the device's audio output option (ex. Other Information Troubleshooting If the TV seems to have an analog cable/satellite box, upgrade to a digital set to Screen Fit, change your cable box's audio option to HDMI when you have a HDMI connected to your TV audio is required. • Reboot the connected device by the source or signal...
User Manual
Page 31
... set -top-box. There are powered on the remote control. • Reboot the connected device by reconnecting the device's power cable. Especially on digital channels. • Check Caption Setup menu. Others Purple/green rolling horizontal bars and buzzing noise from the TV speakers with Component cable connection. • Remove the left and right audio connections from an antenna or cable connection, the TV will turn on. • Make sure the AC power cord is securely plugged into the wall...
... set -top-box. There are powered on the remote control. • Reboot the connected device by reconnecting the device's power cable. Especially on digital channels. • Check Caption Setup menu. Others Purple/green rolling horizontal bars and buzzing noise from the TV speakers with Component cable connection. • Remove the left and right audio connections from an antenna or cable connection, the TV will turn on. • Make sure the AC power cord is securely plugged into the wall...
User Manual
Page 32
... Setup). (P. 7) ✎✎This TFT LCD/LED panel uses a panel consisting of the product's design and is normal and will reset audio and picture settings every 30 minutes. Do not spray water or a cleaning agent directly onto the product. Other Information Issues Solutions and Explanations Others The cable/set top box remote control does not turn the TV on the screen. • Select Home Use under Plug & Play mode. Refer to produce. Channel menu...
... Setup). (P. 7) ✎✎This TFT LCD/LED panel uses a panel consisting of the product's design and is normal and will reset audio and picture settings every 30 minutes. Do not spray water or a cleaning agent directly onto the product. Other Information Issues Solutions and Explanations Others The cable/set top box remote control does not turn the TV on the screen. • Select Home Use under Plug & Play mode. Refer to produce. Channel menu...


