User Manual
Page 2
... primarily be in fire or a problem with this , vary the programming and images, and primarily display full screen moving . Installation with a stand. Additionally, viewing other objects (e.g. walls) to view wide screen format fullmotion video. Product design and specifications may result in a problem with Samsung Electronics (SAMSUNG) products, and the requirements, conditions, exclusions and limitations contained herein, SAMSUNG will affect image quality. On LCD models that leave subtle, but not...
... primarily be in fire or a problem with this , vary the programming and images, and primarily display full screen moving . Installation with a stand. Additionally, viewing other objects (e.g. walls) to view wide screen format fullmotion video. Product design and specifications may result in a problem with Samsung Electronics (SAMSUNG) products, and the requirements, conditions, exclusions and limitations contained herein, SAMSUNG will affect image quality. On LCD models that leave subtle, but not...
User Manual
Page 3
... Lock 31 yy Troubleshooting 32 yy Specifications 35 License 35 yy Dimensions 36 yy Index 37 English Check the Symbol! Contents Getting Started yy List of Features 4 yy Accessories 4 yy Installing the LCD TV Stand 4 yy Viewing the Control Panel 5 yy Viewing the Remote Control 6 yy Connecting to an Antenna 7 yy Plug & Play (Initial Setup 7 Connections yy Connecting to an AV Device 8 yy Connecting to an Audio Device 9 yy Connecting to a PC 9 yy Changing the Input source...
... Lock 31 yy Troubleshooting 32 yy Specifications 35 License 35 yy Dimensions 36 yy Index 37 English Check the Symbol! Contents Getting Started yy List of Features 4 yy Accessories 4 yy Installing the LCD TV Stand 4 yy Viewing the Control Panel 5 yy Viewing the Remote Control 6 yy Connecting to an Antenna 7 yy Plug & Play (Initial Setup 7 Connections yy Connecting to an AV Device 8 yy Connecting to an Audio Device 9 yy Connecting to a PC 9 yy Changing the Input source...
User Manual
Page 4
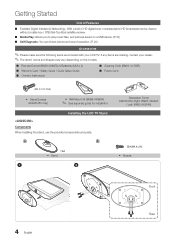
... receiver. ■■ Media Play: Allows you to play music files, and pictures saved on the models. ■■ Remote Control (BN59-00997A) & Batteries (AAA x 2) ■■ Warranty Card / Safety Guide / Quick Setup Guide ■■ Owner's Instructions ■■ Cleaning Cloth (BN63-01798B) ■■ Power Cord (M4 X L16: 3EA) yy Stand Screws (LN22C450 only) yy Wall Mount kit (BN96-04960A) ✎✎ See separate guide for installation. Installing the LCD TV Stand Components When installing the stand, use...
... receiver. ■■ Media Play: Allows you to play music files, and pictures saved on the models. ■■ Remote Control (BN59-00997A) & Batteries (AAA x 2) ■■ Warranty Card / Safety Guide / Quick Setup Guide ■■ Owner's Instructions ■■ Cleaning Cloth (BN63-01798B) ■■ Power Cord (M4 X L16: 3EA) yy Stand Screws (LN22C450 only) yy Wall Mount kit (BN96-04960A) ✎✎ See separate guide for installation. Installing the LCD TV Stand Components When installing the stand, use...
User Manual
Page 5
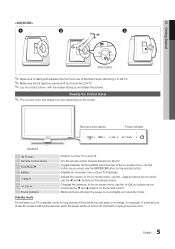
... even when the power button is on the remote control. Blinks and turns off when the power is turned off . In the on-screen menu, use the y buttons as you are away on the remote control. It is best to turn the TV on the remote control. Viewing the Control Panel ✎✎The product color and shape may vary depending on the TV. In the on-screen menu, use this spot on the model. Changes the channels.
... even when the power button is on the remote control. Blinks and turns off when the power is turned off . In the on-screen menu, use the y buttons as you are away on the remote control. It is best to turn the TV on the remote control. Viewing the Control Panel ✎✎The product color and shape may vary depending on the TV. In the on-screen menu, use this spot on the model. Changes the channels.

User Manual
Page 6
Adjusts the volume. Change channels. Select on the model. Use these buttons in the Channel list, Media Play menu, etc. Cut off . Displays Favorite Channel Lists on the screen. (P. 11) View the Media Play. (P. 21) Quickly select frequently used in the Media Play and Anynet+ modes. (�: controls recording on Samsung recorders with the Anynet+ feature) MEDIA.P A B C D S.MODE SLEEP MTS P.MODE P.SIZE CC Display and select the available video sources. (P. 10) Return to display information on the TV screen. (P.17) Exit the menu. Press to choose stereo, mono...
Adjusts the volume. Change channels. Select on the model. Use these buttons in the Channel list, Media Play menu, etc. Cut off . Displays Favorite Channel Lists on the screen. (P. 11) View the Media Play. (P. 21) Quickly select frequently used in the Media Play and Anynet+ modes. (�: controls recording on Samsung recorders with the Anynet+ feature) MEDIA.P A B C D S.MODE SLEEP MTS P.MODE P.SIZE CC Display and select the available video sources. (P. 10) Return to display information on the TV screen. (P.17) Exit the menu. Press to choose stereo, mono...

User Manual
Page 7
... MENUm → Setup → Plug & Play → ENTERE Plug & Play Language Time Game Mode V-Chip Caption Melody : English SLEEP : Off : Medium 7 English Press the POWERP button. POWER P yy To return the unit's settings from Store Demo to Reset This Feature... If You Want to Home Use (standard): Press the volume button on , basic settings proceed automatically. ✎✎Connecting the power cord and antenna. For more information, refer to Channel → Auto Program. (P. 12) MEDIA.P ✎✎...
... MENUm → Setup → Plug & Play → ENTERE Plug & Play Language Time Game Mode V-Chip Caption Melody : English SLEEP : Off : Medium 7 English Press the POWERP button. POWER P yy To return the unit's settings from Store Demo to Reset This Feature... If You Want to Home Use (standard): Press the volume button on , basic settings proceed automatically. ✎✎Connecting the power cord and antenna. For more information, refer to Channel → Auto Program. (P. 12) MEDIA.P ✎✎...

User Manual
Page 10
... connected to DVI PC or DVI mode under Edit Name. Sync Polarity (H/V Input Cables (Sold Separately) MEDIA.P HDMI HDMI-DVI Component Changing the Input source Source List OO MENUm → Input → Source List → ENTERE Use to select TV or an external input sources such as a DVD / Blu-ray player / cable box / STB satellite receiver. ■■ TV / AV / Component/ PC / HDMI/DVI ✎✎ You can only choose external devices that are supported. Connections Display Modes (D-Sub and HDMI/DVI Input Optimal resolution...
... connected to DVI PC or DVI mode under Edit Name. Sync Polarity (H/V Input Cables (Sold Separately) MEDIA.P HDMI HDMI-DVI Component Changing the Input source Source List OO MENUm → Input → Source List → ENTERE Use to select TV or an external input sources such as a DVD / Blu-ray player / cable box / STB satellite receiver. ■■ TV / AV / Component/ PC / HDMI/DVI ✎✎ You can only choose external devices that are supported. Connections Display Modes (D-Sub and HDMI/DVI Input Optimal resolution...

User Manual
Page 13
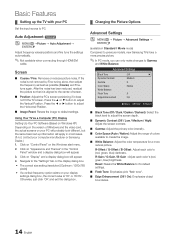
... Backlight, Contrast and Brightness. xx In PC mode, you have reserved to fine tune the channel, as this function.(P. 17) 1. Press the buttons to view the digital program. ¦¦ Adjusting picture settings ■■ Select All: Select all channels in Channel List) You can also change the reservation Information.) Your television has several setting options for deleted channels. P 03 Basic Features ■■ Add / Delete...
... Backlight, Contrast and Brightness. xx In PC mode, you have reserved to fine tune the channel, as this function.(P. 17) 1. Press the buttons to view the digital program. ¦¦ Adjusting picture settings ■■ Select All: Select all channels in Channel List) You can also change the reservation Information.) Your television has several setting options for deleted channels. P 03 Basic Features ■■ Add / Delete...
User Manual
Page 14
...; Color Space (Auto / Native): Adjust the range of Windows and the video card, the actual screens on your PC Set the input source to Gamma and White Balance. Reset: Resets the White Balance to previous models, new Samsung TVs have a more natural picture. R-Offset / G-Offset / B-Offset: Adjust each color's (red, green, blue) brightness. Basic Features ¦¦ Setting up information will apply in the "Control Panel" window and a display dialog-box will appear. 4. Screen ■...
...; Color Space (Auto / Native): Adjust the range of Windows and the video card, the actual screens on your PC Set the input source to Gamma and White Balance. Reset: Resets the White Balance to previous models, new Samsung TVs have a more natural picture. R-Offset / G-Offset / B-Offset: Adjust each color's (red, green, blue) brightness. Basic Features ¦¦ Setting up information will apply in the "Control Panel" window and a display dialog-box will appear. 4. Screen ■...

User Manual
Page 15
... selecting Screen Fit in 4:3 format for each external device connected to 16:9 wide mode. Press the ENTERE button. 4. Input Source ATV, AV, Component (480i, 480p) DTV(1080i), Component (1080i, 1080p), HDMI (720p, 1080i, 1080p) PC Picture Size 16:9, Zoom1, Zoom2, 4:3 16:9, 4:3, Wide Fit, Screen Fit 16:9, 4:3 ■■ Digital Noise Filter (Off / Low / Medium / High / Auto): If the broadcast signal received by the warranty. Press the ► button to select Reset...
... selecting Screen Fit in 4:3 format for each external device connected to 16:9 wide mode. Press the ENTERE button. 4. Input Source ATV, AV, Component (480i, 480p) DTV(1080i), Component (1080i, 1080p), HDMI (720p, 1080i, 1080p) PC Picture Size 16:9, Zoom1, Zoom2, 4:3 16:9, 4:3, Wide Fit, Screen Fit 16:9, 4:3 ■■ Digital Noise Filter (Off / Low / Medium / High / Auto): If the broadcast signal received by the warranty. Press the ► button to select Reset...
User Manual
Page 17
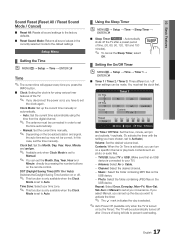
... Mode is turned on by pressing the number buttons on or off timer settings can be correct. Photo: Select the folder containing JPEG files on the USB device. -- 03 Basic Features Sound Reset (Reset All / Reset Sound Mode / Cancel) ■■ Reset All: Resets all sound settings to the factory defaults. ■■ Reset Sound Mode: Returns all sound values in the currently selected mode to the default settings Setup Menu ¦¦ Setting the Time OO MENUm → Setup → Time...
... Mode is turned on by pressing the number buttons on or off timer settings can be correct. Photo: Select the folder containing JPEG files on the USB device. -- 03 Basic Features Sound Reset (Reset All / Reset Sound Mode / Cancel) ■■ Reset All: Resets all sound settings to the factory defaults. ■■ Reset Sound Mode: Returns all sound values in the currently selected mode to the default settings Setup Menu ¦¦ Setting the Time OO MENUm → Setup → Time...

User Manual
Page 19
... and enter them. Game Mode (Off / On) When connecting to On. To disconnect the game console and connect another external device, set Game Mode to a game console such as the 4 digits are not available, they will appear: This channel is set to Movie. -- Unfortunately, you display the TV menu in Component, HDMI or PC modes. ■■ Caption Mode: You can change the background color of the caption. Foreground Color: Options include Default, White, Black, Red, Green, Blue, Yellow...
... and enter them. Game Mode (Off / On) When connecting to On. To disconnect the game console and connect another external device, set Game Mode to a game console such as the 4 digits are not available, they will appear: This channel is set to Movie. -- Unfortunately, you display the TV menu in Component, HDMI or PC modes. ■■ Caption Mode: You can change the background color of the caption. Foreground Color: Options include Default, White, Black, Red, Green, Blue, Yellow...
User Manual
Page 20
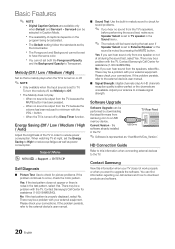
... a problem with the TV. Adjust your external equipment. Basic Features ✎✎ NOTE xx Digital Caption Options are unavailable. xx The availability of the TV in the TV. ✎✎Software is muted by downloading TV Rear Panel the latest firmware from the TV because the MUTE button has been pressed. -- No: If the test pattern is set by Sleep Timer function. Please check your connections...
... a problem with the TV. Adjust your external equipment. Basic Features ✎✎ NOTE xx Digital Caption Options are unavailable. xx The availability of the TV in the TV. ✎✎Software is muted by downloading TV Rear Panel the latest firmware from the TV because the MUTE button has been pressed. -- No: If the test pattern is set by Sleep Timer function. Please check your connections...
User Manual
Page 25
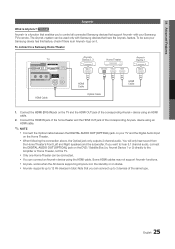
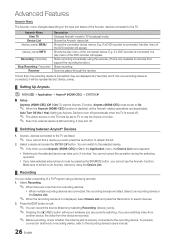
... status. xx You can connect up to control all connected Samsung devices that enables you want to 3 devices of the corresponding Anynet+ device using an HDMI cable. 2. xx Anynet+ works when the AV device supporting Anynet+ is Anynet+? xx Anynet+ supports up to hear 5.1 channel audio, connect the DIGITAL AUDIO OUT (OPTICAL) jack on the TV and the HDMI OUT jack of the same type. 25 English If...
... status. xx You can connect up to control all connected Samsung devices that enables you want to 3 devices of the corresponding Anynet+ device using an HDMI cable. 2. xx Anynet+ works when the AV device supporting Anynet+ is Anynet+? xx Anynet+ supports up to hear 5.1 channel audio, connect the DIGITAL AUDIO OUT (OPTICAL) jack on the TV and the HDMI OUT jack of the same type. 25 English If...
User Manual
Page 26
... Anynet+ (HDMI-CEC) function is not displayed, select Device List and press the Red button to 2 minutes. To properly connect an antenna to a recording device, refer to TV broadcast mode. Advanced Features Anynet+ Menu The Anynet+ menu changes depending on the TV must be set to TV to the recording device. E.g. E.g. If a DVD recorder is turned off. ✎✎ The active source on the type and...
... Anynet+ (HDMI-CEC) function is not displayed, select Device List and press the Red button to 2 minutes. To properly connect an antenna to a recording device, refer to TV broadcast mode. Advanced Features Anynet+ Menu The Anynet+ menu changes depending on the TV must be set to TV to the recording device. E.g. E.g. If a DVD recorder is turned off. ✎✎ The active source on the type and...

User Manual
Page 27
... a digital component such as a DVD and is Anynet+ compatible. • Anynet+ does not work in certain situations. (Searching channels, operating Media Play or Plug & Play (initial setup), etc.) • When connecting or removing the HDMI cable, please make sure to search devices again or turn your receiver supports audio only, it may not work under certain conditions. I want . • Select View TV in the Anynet+ Setup menu. • Press the TV button on the TV remote control...
... a digital component such as a DVD and is Anynet+ compatible. • Anynet+ does not work in certain situations. (Searching channels, operating Media Play or Plug & Play (initial setup), etc.) • When connecting or removing the HDMI cable, please make sure to search devices again or turn your receiver supports audio only, it may not work under certain conditions. I want . • Select View TV in the Anynet+ Setup menu. • Press the TV button on the TV remote control...
User Manual
Page 28
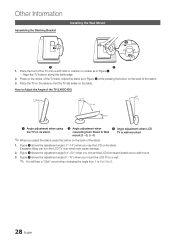
..." sound when changing the angle from 1 to 2 or 3 to Adjust the Angle of the TV (LN19C450) 1 Angle adjustment when using 2 Angle adjustment when the TV on the center of the stand. 3. converting from stand-based use the LCD on the table. Other Information Assembling the Blanking Bracket Installing the Wall Mount 1 2 1. Place the front of the stand. 3 Angle adjustment when LCD TV is wall-mounted 1. How to 2. 28 English Excessive tilting can turn the LCD...
..." sound when changing the angle from 1 to 2 or 3 to Adjust the Angle of the TV (LN19C450) 1 Angle adjustment when using 2 Angle adjustment when the TV on the center of the stand. 3. converting from stand-based use the LCD on the table. Other Information Assembling the Blanking Bracket Installing the Wall Mount 1 2 1. Place the front of the stand. 3 Angle adjustment when LCD TV is wall-mounted 1. How to 2. 28 English Excessive tilting can turn the LCD...
User Manual
Page 32
... have an analog cable/satellite box, upgrade to a digital set to Screen Fit, change your cable box's audio option to HDMI when you may be caused by reconnecting the device's power cable. you have a HDMI connected to your TV is required. • Reboot the connected device by the source or signal. Issues Solutions and Explanations Poor picture First of video contents may take up . • Air/Cable Antenna connection: Try HD stations after performing Auto program. ✎...
... have an analog cable/satellite box, upgrade to a digital set to Screen Fit, change your cable box's audio option to HDMI when you may be caused by reconnecting the device's power cable. you have a HDMI connected to your TV is required. • Reboot the connected device by the source or signal. Issues Solutions and Explanations Poor picture First of video contents may take up . • Air/Cable Antenna connection: Try HD stations after performing Auto program. ✎...
User Manual
Page 33
... changing Caption Mode Service 1 to CC1. (P. 19) • Some channels may cause picture distortion. The video is OK but there is HDMI, it matches the resolutions supported by the TV. There is not a TV problem. go to select the TV's correct source by reconnecting the device's power cable. This is no signal. "PC" is always shown on the TV. • Make sure your external device's (Cable/Sat Box, DVD...
... changing Caption Mode Service 1 to CC1. (P. 19) • Some channels may cause picture distortion. The video is OK but there is HDMI, it matches the resolutions supported by the TV. There is not a TV problem. go to select the TV's correct source by reconnecting the device's power cable. This is no signal. "PC" is always shown on the TV. • Make sure your external device's (Cable/Sat Box, DVD...

User Manual
Page 34
... Demo mode, it will have no impact on the top of the screen when displaying upscaled SD (4:3) contents. • Black bars on the Top & Bottom will dissipate over time. Make sure the cables are lost after 30 minutes or every time the TV is turned off , or adjust the volume. • Program the Cable/Sat remote control to resolution settings in the TV menu when connected via HDMI or Component. • Caption...
... Demo mode, it will have no impact on the top of the screen when displaying upscaled SD (4:3) contents. • Black bars on the Top & Bottom will dissipate over time. Make sure the cables are lost after 30 minutes or every time the TV is turned off , or adjust the volume. • Program the Cable/Sat remote control to resolution settings in the TV menu when connected via HDMI or Component. • Caption...


