User Manual (ENGLISH)
Page 3
... a Digital Audio System 13 Connecting an Amplifier/DVD Home Theater 13 Connecting a PC 14 OPERATION Turning the TV On and Off 15 Plug & Play Feature 15 Dynamic Menus and On-Screen Displays 17 Navigating Menus by Using the Menu Map 18 Selecting a Menu Language 19 Memorizing Channels 20 Changing ...Picture Settings 41 Changing the Picture Size 43 Using the Color Weakness Enhancement Feature 44 Digital Noise Reduction 45 DNIe (Digital Natural Image engine 46 Setting the Film Mode 47 Viewing Picture-In-Picture 48 Changing the Size of the Sub (PIP) Picture 49 Changing the Location of ...
... a Digital Audio System 13 Connecting an Amplifier/DVD Home Theater 13 Connecting a PC 14 OPERATION Turning the TV On and Off 15 Plug & Play Feature 15 Dynamic Menus and On-Screen Displays 17 Navigating Menus by Using the Menu Map 18 Selecting a Menu Language 19 Memorizing Channels 20 Changing ...Picture Settings 41 Changing the Picture Size 43 Using the Color Weakness Enhancement Feature 44 Digital Noise Reduction 45 DNIe (Digital Natural Image engine 46 Setting the Film Mode 47 Viewing Picture-In-Picture 48 Changing the Size of the Sub (PIP) Picture 49 Changing the Location of ...
User Manual (ENGLISH)
Page 6
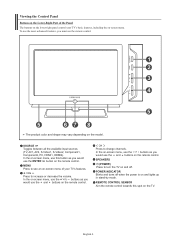
... buttons on the model. POWER INDICATOR Blinks and turns off . Viewing the Control Panel Buttons on the Lower-Right Part of your TV's basic features, including the on-screen menu. SPEAKERS (POWER) Press to increase or decrease the volume. To use the more advanced features, you would use the remote ...control. Press to see an on-screen menu of the Panel The buttons on the lower-right panel control your TV's features. English-4 In the on-screen menu, use the buttons as you must use the and buttons on and lights up ...
... buttons on the model. POWER INDICATOR Blinks and turns off . Viewing the Control Panel Buttons on the Lower-Right Part of your TV's basic features, including the on-screen menu. SPEAKERS (POWER) Press to increase or decrease the volume. To use the more advanced features, you would use the remote ...control. Press to see an on-screen menu of the Panel The buttons on the lower-right panel control your TV's features. English-4 In the on-screen menu, use the buttons as you must use the and buttons on and lights up ...
User Manual (ENGLISH)
Page 9
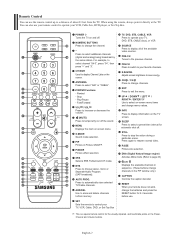
..., Cable, DVD, or Set-Top Box TV, DVD, STB, CABLE, VCR Press to page 46) CH Displays the available channels in sequence. (These buttons change channels in Picture ON/OFF. PRE-CH Tunes to save energy. E.SAVING Adjusts screen brightness to the previous channel. VCR/DVD Functions - When using the remote, always point...
..., Cable, DVD, or Set-Top Box TV, DVD, STB, CABLE, VCR Press to page 46) CH Displays the available channels in sequence. (These buttons change channels in Picture ON/OFF. PRE-CH Tunes to save energy. E.SAVING Adjusts screen brightness to the previous channel. VCR/DVD Functions - When using the remote, always point...
User Manual (ENGLISH)
Page 19
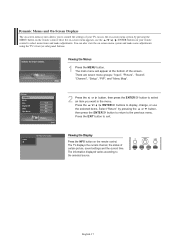
..., or use the / / / /ENTER buttons on the remote control. The TV displays the current channel, the status of the screen. You can also view the on the remote control. Dynamic Menus and On-Screen Displays The on-screen menu system allows you want in the menu. The main menu will appear...and the current time. Viewing the Menus 1 Press the MENU button. Once the on-screen menu appears, use the selected items. Select "Return" by pressing the MENU button on your TV. Access the on-screen menu system by pressing the or button, then press the ENTER button to return to control...
..., or use the / / / /ENTER buttons on the remote control. The TV displays the current channel, the status of the screen. You can also view the on the remote control. Dynamic Menus and On-Screen Displays The on-screen menu system allows you want in the menu. The main menu will appear...and the current time. Viewing the Menus 1 Press the MENU button. Once the on-screen menu appears, use the selected items. Select "Return" by pressing the MENU button on your TV. Access the on-screen menu system by pressing the or button, then press the ENTER button to return to control...

User Manual (ENGLISH)
Page 20
... buttons to the next page. Green button: Moves to exit. English-18 Navigating Menus by Using the Menu Map Using the Menu Map of the screen. 2 Press the or button to select "Menu Map", then press the ENTER button. Press the EXIT button to the previous page. The menu map will...
... buttons to the next page. Green button: Moves to exit. English-18 Navigating Menus by Using the Menu Map Using the Menu Map of the screen. 2 Press the or button to select "Menu Map", then press the ENTER button. Press the EXIT button to the previous page. The menu map will...

User Manual (ENGLISH)
Page 43
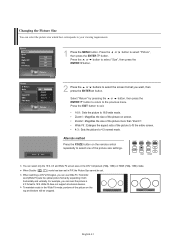
...'t operate in HDMI or 480p Component or higher modes. In PC mode, only the Contrast and Brightness can be adjusted while watching Digital TV. Press the then press the ENTER button. or button to select "Picture", 2 Press the or button to select a particular option (Contrast..., Brightness, Sharpness, Color, or Tint), then press the ENTER button. Customizing the Picture Settings You can use the on-screen menus to change the "Contrast", "Brightness", "Sharpness", "Color", "Tint", and "Color Tone" according to decrease or increase the value of a...
...'t operate in HDMI or 480p Component or higher modes. In PC mode, only the Contrast and Brightness can be adjusted while watching Digital TV. Press the then press the ENTER button. or button to select "Picture", 2 Press the or button to select a particular option (Contrast..., Brightness, Sharpness, Color, or Tint), then press the ENTER button. Customizing the Picture Settings You can use the on-screen menus to change the "Contrast", "Brightness", "Sharpness", "Color", "Tint", and "Color Tone" according to decrease or increase the value of a...
User Manual (ENGLISH)
Page 45
...or button to select "Picture", Press the or button to select "Size", then press the ENTER button. 2 Press the or buttons to select the screen format you can reset the picture in 4:3 format to your viewing requirements. 1 Press the MENU button. You can select the picture size which best... corresponds to 16:9. Changing the Picture Size You can select only the 16:9, 4:3 and Wide Fit screen sizes in the DTV Component (720p, 1080i) or HDMI (720p, 1080i) mode. When Double ( , ) mode has been set in PIP, the ...
...or button to select "Picture", Press the or button to select "Size", then press the ENTER button. 2 Press the or buttons to select the screen format you can reset the picture in 4:3 format to your viewing requirements. 1 Press the MENU button. You can select the picture size which best... corresponds to 16:9. Changing the Picture Size You can select only the 16:9, 4:3 and Wide Fit screen sizes in the DTV Component (720p, 1080i) or HDMI (720p, 1080i) mode. When Double ( , ) mode has been set in PIP, the ...

User Manual (ENGLISH)
Page 47
... to select "Off" or "On", then press the ENTER button. Select "Return" by your TV is weak, you can activate the Digital Noise Reduction feature to help reduce any static and ghosting that may appear on the screen. 1 Press the MENU button. English-45 Digital Noise Reduction If the broadcast signal received...
... to select "Off" or "On", then press the ENTER button. Select "Return" by your TV is weak, you can activate the Digital Noise Reduction feature to help reduce any static and ghosting that may appear on the screen. 1 Press the MENU button. English-45 Digital Noise Reduction If the broadcast signal received...

User Manual (ENGLISH)
Page 48
...function is not supported in the visual quality. 1 Press the MENU button. DNIe (Digital Natural Image engine) This TV includes the DNIe function so as to select "Off", "Demo", or "On" then press the ENTER button. ... and white enhancement. This function doesn't work when the Input Source is inactivated.) English-46 Press the EXIT button to the previous menu. Using this function, you can view the...,then press the ENTER button to return to exit. If you set the DNIe to on the screen, for demonstration purposes. If you set DNIe to Demo, you a more detailed image with the ...
...function is not supported in the visual quality. 1 Press the MENU button. DNIe (Digital Natural Image engine) This TV includes the DNIe function so as to select "Off", "Demo", or "On" then press the ENTER button. ... and white enhancement. This function doesn't work when the Input Source is inactivated.) English-46 Press the EXIT button to the previous menu. Using this function, you can view the...,then press the ENTER button to return to exit. If you set the DNIe to on the screen, for demonstration purposes. If you set DNIe to Demo, you a more detailed image with the ...
User Manual (ENGLISH)
Page 50
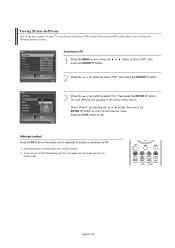
... the Picture-In-Picture (PIP) feature. If you to select "On", then press the ENTER The sub (PIP) picture appears in the corner of your TV is active. Activating the PIP 1 Press the MENU button. Alternate method Press the PIP button on again, then the mode will return to activate or... menu. Select "Return" by pressing the or button, then press the ENTER button to return to exit. The advanced PIP system allows you turn the TV off while watching and turn it on the remote control repeatedly to normal video. Viewing Picture-In-Picture One of the best features of the...
... the Picture-In-Picture (PIP) feature. If you to select "On", then press the ENTER The sub (PIP) picture appears in the corner of your TV is active. Activating the PIP 1 Press the MENU button. Alternate method Press the PIP button on again, then the mode will return to activate or... menu. Select "Return" by pressing the or button, then press the ENTER button to return to exit. The advanced PIP system allows you turn the TV off while watching and turn it on the remote control repeatedly to normal video. Viewing Picture-In-Picture One of the best features of the...

User Manual (ENGLISH)
Page 53
..." by pressing the or button, then press the ENTER button to return to exit. Setting the Blue Screen Mode If no signal is being received or the signal is very weak, a blue screen automatically replaces the noisy picture background. English-51 or button to select "Setup", 2 Press the or button.... 3 Press the or button to "Off". 1 Press the MENU button. If you wish to continue viewing the poor picture, you must set the "Blue Screen" mode to select "On" or "Off", then press the ENTER button. Freezing the Picture Press the STILL button to freeze a moving picture. (Normal sound...
..." by pressing the or button, then press the ENTER button to return to exit. Setting the Blue Screen Mode If no signal is being received or the signal is very weak, a blue screen automatically replaces the noisy picture background. English-51 or button to select "Setup", 2 Press the or button.... 3 Press the or button to "Off". 1 Press the MENU button. If you wish to continue viewing the poor picture, you must set the "Blue Screen" mode to select "On" or "Off", then press the ENTER button. Freezing the Picture Press the STILL button to freeze a moving picture. (Normal sound...

User Manual (ENGLISH)
Page 63
The Help appears at the top of the screen. 1 Press the MENU button. English-61 Special Features Setting the Function Help Displays Help on the menu functions. Select "Return" by pressing the or button, then press the ENTER button to return to select "Off" or "On", then press the ENTER button. or button to select "Setup", 2 Press the or button to select "Function Help", then press the ENTER button. 3 Press the or button to the previous menu. Press the then press the ENTER button. The Function Help default setting is On. Press the EXIT button to exit.
The Help appears at the top of the screen. 1 Press the MENU button. English-61 Special Features Setting the Function Help Displays Help on the menu functions. Select "Return" by pressing the or button, then press the ENTER button to return to select "Off" or "On", then press the ENTER button. or button to select "Setup", 2 Press the or button to select "Function Help", then press the ENTER button. 3 Press the or button to the previous menu. Press the then press the ENTER button. The Function Help default setting is On. Press the EXIT button to exit.

User Manual (ENGLISH)
Page 64
... select "Setup", 2 Press the or button to exit. Menu Transparency Level Adjusts the transparency of the TV in order to the previous menu. Select "Return" by pressing the or button, then press the ENTER.... Alternate method To select the Energy Saving setting you have made, press the E.SAVING button on the remote control. When watching TV at night, set the "Energy Saving " mode option to "High" to select level, then press the ENTER button. Press ...ENTER button. Using the Energy Saving Feature This feature adjusts the brightness of the menu screen. 1 Press the MENU button.
... select "Setup", 2 Press the or button to exit. Menu Transparency Level Adjusts the transparency of the TV in order to the previous menu. Select "Return" by pressing the or button, then press the ENTER.... Alternate method To select the Energy Saving setting you have made, press the E.SAVING button on the remote control. When watching TV at night, set the "Energy Saving " mode option to "High" to select level, then press the ENTER button. Press ...ENTER button. Using the Energy Saving Feature This feature adjusts the brightness of the menu screen. 1 Press the MENU button.
User Manual (ENGLISH)
Page 65
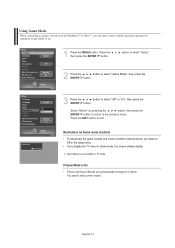
... the or button to select "Game Mode", then press the ENTER button. 3 Press the or button to exit. If Game Mode is not available in TV mode. You cannot select other modes. Press the EXIT button to select "Off" or "On", then press the ENTER button. Select "Return" by setting the... the ENTER button to return to the previous menu. Using Game Mode When connecting to a game console such as PlayStationTM or XboxTM, you display the TV menu in Game mode, the screen shakes slightly.
... the or button to select "Game Mode", then press the ENTER button. 3 Press the or button to exit. If Game Mode is not available in TV mode. You cannot select other modes. Press the EXIT button to select "Off" or "On", then press the ENTER button. Select "Return" by setting the... the ENTER button to return to the previous menu. Using Game Mode When connecting to a game console such as PlayStationTM or XboxTM, you display the TV menu in Game mode, the screen shakes slightly.
User Manual (ENGLISH)
Page 66
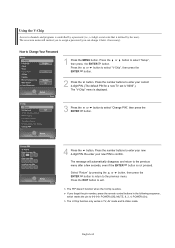
... (i.e., a 4-digit secret code that is defined by pressing the or button, then press the ENTER button to return to the previous menu. The on-screen menu will automatically disappear, and return to select "V-Chip", then press the ENTER button. 2 Press the button. Press the number buttons to enter your ...current 4-digit PIN. (The default PIN for a new TV set is "0000".) The "V-Chip" menu is displayed. 3 Press the or button to assign a password (you can change it later, if necessary). Re-enter...
... (i.e., a 4-digit secret code that is defined by pressing the or button, then press the ENTER button to return to the previous menu. The on-screen menu will automatically disappear, and return to select "V-Chip", then press the ENTER button. 2 Press the button. Press the number buttons to enter your ...current 4-digit PIN. (The default PIN for a new TV set is "0000".) The "V-Chip" menu is displayed. 3 Press the or button to assign a password (you can change it later, if necessary). Re-enter...

User Manual (ENGLISH)
Page 67
... How to the previous menu. Press the then press the ENTER button. or button to enter your current 4-digit PIN. (The default PIN for a new TV set is "0000".) The "V-Chip" menu is "On". (Pressing the or button will appear. Press the "V-Chip Lock". Press the EXIT button to select ...Press the number buttons to select To enable the V-Chip feature, press the ENTER button so that the "V-Chip Lock" field is displayed. 3 The "V-Chip" screen will alternate between "On" and "Off".) Press the ENTER button. English-65 or button to select "Setup", Press the or button to exit.
... How to the previous menu. Press the then press the ENTER button. or button to enter your current 4-digit PIN. (The default PIN for a new TV set is "0000".) The "V-Chip" menu is "On". (Pressing the or button will appear. Press the "V-Chip Lock". Press the EXIT button to select ...Press the number buttons to select To enable the V-Chip feature, press the ENTER button so that the "V-Chip Lock" field is displayed. 3 The "V-Chip" screen will alternate between "On" and "Off".) Press the ENTER button. English-65 or button to select "Setup", Press the or button to exit.

User Manual (ENGLISH)
Page 73
...the / / / buttons and the ENTER button to your current 4-digit PIN. (The default PIN for a new TV set the On-screen display to activate the appropriate restrictions for TV rating system. The default menu name and Downloadable U.S. The rating will appear in English only. Rating menu is not ...block certain categories that are indicated by pressing the or button, then press the ENTER button to return to select "Downloadable U.S. The locked TV ratings are more restrictive. Select "Return" by the symbol " ". English-71 It may take several seconds. Press the then press the...
...the / / / buttons and the ENTER button to your current 4-digit PIN. (The default PIN for a new TV set the On-screen display to activate the appropriate restrictions for TV rating system. The default menu name and Downloadable U.S. The rating will appear in English only. Rating menu is not ...block certain categories that are indicated by pressing the or button, then press the ENTER button to return to select "Downloadable U.S. The locked TV ratings are more restrictive. Select "Return" by the symbol " ". English-71 It may take several seconds. Press the then press the...

User Manual (ENGLISH)
Page 74
...are captions in the primary language that is intended to select "Caption", then press the ENTER button. The Caption feature only works in TV, AV and S-Video mode. The default is not sufficient. Text2 : Second Text Service. The availability of captions depends on the program ... button to return to the previous menu. CC3 : Secondary Synchronous Caption Service. Viewing Closed Captions (On-Screen Text Messages) Analog The Analog Caption function operates in either analog TV channel mode or external source mode. (Depending on the broadcasting signal, the Analog Caption function may be...
...are captions in the primary language that is intended to select "Caption", then press the ENTER button. The Caption feature only works in TV, AV and S-Video mode. The default is not sufficient. Text2 : Second Text Service. The availability of captions depends on the program ... button to return to the previous menu. CC3 : Secondary Synchronous Caption Service. Viewing Closed Captions (On-Screen Text Messages) Analog The Analog Caption function operates in either analog TV channel mode or external source mode. (Depending on the broadcasting signal, the Analog Caption function may be...

User Manual (ENGLISH)
Page 75
... "Service1 ~ Service6" can be selected in "Caption Mode". 5 Press the or button to select "Caption Mode", then press the ENTER button. Viewing Closed Captions (On-Screen Text Messages) Digital The Digital Captions function operates on digital channels. 1 Press the MENU button.
... "Service1 ~ Service6" can be selected in "Caption Mode". 5 Press the or button to select "Caption Mode", then press the ENTER button. Viewing Closed Captions (On-Screen Text Messages) Digital The Digital Captions function operates on digital channels. 1 Press the MENU button.
User Manual (ENGLISH)
Page 78
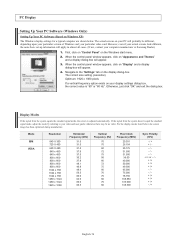
...video card. otherwise there may be different, depending upon your particular version of Windows and your computer manufacturer or Samsung Dealer.) 1. However, even if your videocard user guide; Navigate to your actual screens look different, the same basic set-up information will appear. 4. PC Display Setting Up Your PC Software ... 1024 x 768 1024 x 768 1024 x 768 1280 x 1024 1280 x 1024 1920 x 1080 Horizontal Frequency (kHz) 31.5 31.5 31.5 37.9 37.5 35.2 37.9 48.1 46.9 48.4 56.5 60.0 64.0 80.0 66.5 Vertical Frequency (Hz) 70 70 60 72 75 56 60 72 75 60 70 75 60 75 60 Pixel...
...video card. otherwise there may be different, depending upon your particular version of Windows and your computer manufacturer or Samsung Dealer.) 1. However, even if your videocard user guide; Navigate to your actual screens look different, the same basic set-up information will appear. 4. PC Display Setting Up Your PC Software ... 1024 x 768 1024 x 768 1024 x 768 1280 x 1024 1280 x 1024 1920 x 1080 Horizontal Frequency (kHz) 31.5 31.5 31.5 37.9 37.5 35.2 37.9 48.1 46.9 48.4 56.5 60.0 64.0 80.0 66.5 Vertical Frequency (Hz) 70 70 60 72 75 56 60 72 75 60 70 75 60 75 60 Pixel...


