
User Manual (ENGLISH)
Page 3
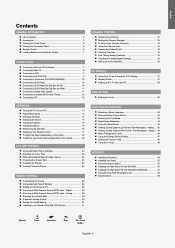
... Remote Control 7 CONNECTIONS Connecting VHF and UHF Antennas 7 Connecting Cable TV 8 Connecting a VCR 9 Connecting an S-VHS VCR 9 Connecting a Camcorder (LN-S3241D/LN-S4041D 10 Connecting a DVD Player 10 Connecting a DVD Player/Set-Top Box via DVI 10 Connecting a DVD Player/Set-Top Box via HDMI 11 Connecting ...a Digital Audio System 11 Connecting an Amplifier/DVD Home Theater 12 Connecting a PC 12 OPERATION Turning the TV On and Off...
... Remote Control 7 CONNECTIONS Connecting VHF and UHF Antennas 7 Connecting Cable TV 8 Connecting a VCR 9 Connecting an S-VHS VCR 9 Connecting a Camcorder (LN-S3241D/LN-S4041D 10 Connecting a DVD Player 10 Connecting a DVD Player/Set-Top Box via DVI 10 Connecting a DVD Player/Set-Top Box via HDMI 11 Connecting ...a Digital Audio System 11 Connecting an Amplifier/DVD Home Theater 12 Connecting a PC 12 OPERATION Turning the TV On and Off...
User Manual (ENGLISH)
Page 4
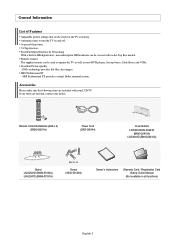
...English-2 SRS TruSurround XT - Remote Control & Batteries (AAA x 2) (BN59-00511A) Power Cord (3903-000144) Cover-Bottom LN-S2641D/LN-S3241D (BN63-02415A) LN-S4041D (BN63-02416A) Stand LN-S2641D (BN96-03192A) LN-S3241D (BN96-03191A) M4 X L16 Screw (6002-001294) Owner's Instructions Warranty Card / Registration Card /Safety Guide Manual (...Dolby surround system. If any items are included with no Set-Top Box needed. Remote Control The supplied remote can be used to turn the TV on and off. V-Chip function. A special sleep timer. Automatic timer to operate the TV as well as most DVD ...
...English-2 SRS TruSurround XT - Remote Control & Batteries (AAA x 2) (BN59-00511A) Power Cord (3903-000144) Cover-Bottom LN-S2641D/LN-S3241D (BN63-02415A) LN-S4041D (BN63-02416A) Stand LN-S2641D (BN96-03192A) LN-S3241D (BN96-03191A) M4 X L16 Screw (6002-001294) Owner's Instructions Warranty Card / Registration Card /Safety Guide Manual (...Dolby surround system. If any items are included with no Set-Top Box needed. Remote Control The supplied remote can be used to turn the TV on and off. V-Chip function. A special sleep timer. Automatic timer to operate the TV as well as most DVD ...
User Manual (ENGLISH)
Page 5
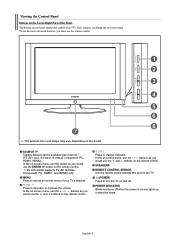
POWER INDICATOR Blinks and turns off . Viewing the Control Panel Buttons on the Lower-Right Part of your TV's basic features, including the on the remote control. The product color ... Panel The buttons on the lower-right panel control your TV's features. In the on and lights up in stand-by mode. MENU Press to turn the TV on and off when the power is on -screen menu, use the buttons as you would use the ENTER button on the remote...
POWER INDICATOR Blinks and turns off . Viewing the Control Panel Buttons on the Lower-Right Part of your TV's basic features, including the on the remote control. The product color ... Panel The buttons on the lower-right panel control your TV's features. In the on and lights up in stand-by mode. MENU Press to turn the TV on and off when the power is on -screen menu, use the buttons as you would use the ENTER button on the remote...
User Manual (ENGLISH)
Page 8
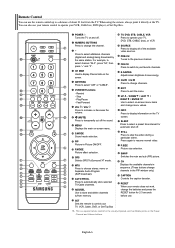
... automatically store selected TV/Cable channels. CH Displays the available channels in sequence. (These buttons change menu values. ANTENNA Press to the previous channel. POWER Turns the TV on the screen. Play/Pause - Remote Control You can also use your remote control to display Channel Lists on and off the sound...
... automatically store selected TV/Cable channels. CH Displays the available channels in sequence. (These buttons change menu values. ANTENNA Press to the previous channel. POWER Turns the TV on the screen. Play/Pause - Remote Control You can also use your remote control to display Channel Lists on and off the sound...
User Manual (ENGLISH)
Page 15
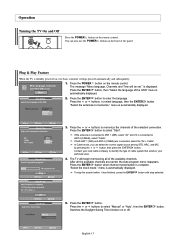
Operation Turning the TV On and Off Press the POWER button on the remote control. The message "Menu language, Channels and Time will begin memorizing all the ...
Operation Turning the TV On and Off Press the POWER button on the remote control. The message "Menu language, Channels and Time will begin memorizing all the ...
User Manual (ENGLISH)
Page 17
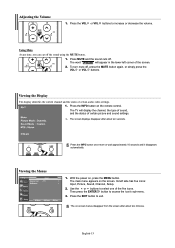
... settings. Press the VOL or VOL buttons to select one of certain audio-video settings. 1. Using Mute At any time, you can cut off . To turn mute off, press the MUTE button again, or simply press the VOL or VOL buttons. Use the or buttons to increase or decrease the volume...
... settings. Press the VOL or VOL buttons to select one of certain audio-video settings. 1. Using Mute At any time, you can cut off . To turn mute off, press the MUTE button again, or simply press the VOL or VOL buttons. Use the or buttons to increase or decrease the volume...

User Manual (ENGLISH)
Page 19
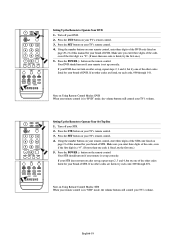
... if the first digit is a "0". (If more than one .) 5. If your cable box does not turn on page 19 of this manual for your TV's volume. English-17 Using the number buttons on your remote...is set up correctly. Note on if your TV's remote control. 3. If your VCR does not turn on Using Remote Control Modes: Cable Box When your remote control is set up correctly. If no ...Remote to Operate Your VCR 1. Press the POWER button on the remote control. Your cable box should turn on your cable box. 2. Using the number buttons on your remote control, enter three digits of the...
... if the first digit is a "0". (If more than one .) 5. If your cable box does not turn on page 19 of this manual for your TV's volume. English-17 Using the number buttons on your remote...is set up correctly. Note on if your TV's remote control. 3. If your VCR does not turn on Using Remote Control Modes: Cable Box When your remote control is set up correctly. If no ...Remote to Operate Your VCR 1. Press the POWER button on the remote control. Your cable box should turn on your cable box. 2. Using the number buttons on your remote control, enter three digits of the...
User Manual (ENGLISH)
Page 20
... POWER button on the remote control. Note on Using Remote Control Modes: STB When your TV's volume. Setting Up the Remote to Operate Your DVD 1. Turn off your TV's remote control. 4. Press the DVD button on your TV's remote control. 3. Press the SET button on your DVD. 2. Using the number ...after set up , repeat steps 2, 3 and 4, but try one of the other codes listed for your remote control is set -up correctly. Your STB should turn on your STB. 2. If no other codes are listed, try the first one of the other codes listed for your TV's volume. Press the STB...
... POWER button on the remote control. Note on Using Remote Control Modes: STB When your TV's volume. Setting Up the Remote to Operate Your DVD 1. Turn off your TV's remote control. 4. Press the DVD button on your TV's remote control. 3. Press the SET button on your DVD. 2. Using the number ...after set up , repeat steps 2, 3 and 4, but try one of the other codes listed for your remote control is set -up correctly. Your STB should turn on your STB. 2. If no other codes are listed, try the first one of the other codes listed for your TV's volume. Press the STB...
User Manual (ENGLISH)
Page 24
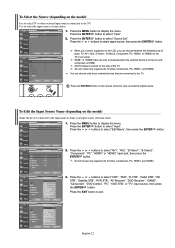
... to select the input source of jacks: TV, AV1, AV2, S-Video1, S-Video2, Component, PC, HDMI1, or HDMI2 on the TV's rear panel. AV2/S-Video2 is turned on and connected via HDMI. To Edit the Input Source Name (depending on the model) Name the device connected to the input jacks to the...
... to select the input source of jacks: TV, AV1, AV2, S-Video1, S-Video2, Component, PC, HDMI1, or HDMI2 on the TV's rear panel. AV2/S-Video2 is turned on and connected via HDMI. To Edit the Input Source Name (depending on the model) Name the device connected to the input jacks to the...
User Manual (ENGLISH)
Page 28
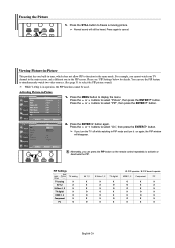
... 1. Normal sound will disappear. Press the ENTER button again. Press the STILL button to display the menu. If you turn it on the remote control repeatedly to function in PIP mode and turn the TV off while watching in the same mode. Press the MENU button to freeze a moving picture. Viewing Picture...
... 1. Normal sound will disappear. Press the ENTER button again. Press the STILL button to display the menu. If you turn it on the remote control repeatedly to function in PIP mode and turn the TV off while watching in the same mode. Press the MENU button to freeze a moving picture. Viewing Picture...
User Manual (ENGLISH)
Page 56
...the horizontal and vertical position. STB) with the data in . The TV won't turn on the keyboard. Adjust the antenna. Ensure that the monitor automatically goes into energy... is not centered on the screen. Adjust the Brightness and Contrast. On your nearest Samsung service center. Your TV supports multiscan display functions within the following frequency domain: Horizontal...bars appear to have no impact on the performance of sub pixels (LN-S2641D: 3,147,264, LN-S3241D: 3,147,264, LN-S4041D: 3,147,264) which require sophisticated technology to your computer utility ...
...the horizontal and vertical position. STB) with the data in . The TV won't turn on the keyboard. Adjust the antenna. Ensure that the monitor automatically goes into energy... is not centered on the screen. Adjust the Brightness and Contrast. On your nearest Samsung service center. Your TV supports multiscan display functions within the following frequency domain: Horizontal...bars appear to have no impact on the performance of sub pixels (LN-S2641D: 3,147,264, LN-S3241D: 3,147,264, LN-S4041D: 3,147,264) which require sophisticated technology to your computer utility ...
User Manual (ENGLISH)
Page 58
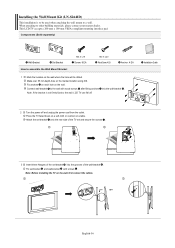
... Kit (LN-S2641D) This installation is not firmly fixed to the wall with screws . Note: Before installing the TV on the marked location using drill. Components (Sold separately) Wall-Bracket Set-Bracket How to a wall. Make over 35 mm-depth-hole on the wall, first connect the cables. Installation Guide 2 Turn the...
... Kit (LN-S2641D) This installation is not firmly fixed to the wall with screws . Note: Before installing the TV on the marked location using drill. Components (Sold separately) Wall-Bracket Set-Bracket How to a wall. Make over 35 mm-depth-hole on the wall, first connect the cables. Installation Guide 2 Turn the...
User Manual (ENGLISH)
Page 59
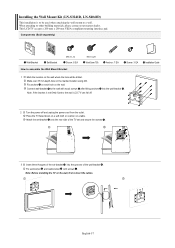
...hole will be used when attaching the wall mount to other building materials, please contact your nearest dealer. English-57 Installing the Wall Mount Kit (LN-S3241D, LN-S4041D) This installation is not firmly fixed to the wall with screws . When attaching to a wall. Components (Sold separately) Wall-Bracket Set-Bracket ...wood screws after fitting anchors into the grooves of the wall-bracket . Fix anchors on each hole on the wall. Installation Guide 2 Turn the power off . Connect wall-bracket to the wall, LCD TV can fall off and unplug the power cord from the outlet.
...hole will be used when attaching the wall mount to other building materials, please contact your nearest dealer. English-57 Installing the Wall Mount Kit (LN-S3241D, LN-S4041D) This installation is not firmly fixed to the wall with screws . When attaching to a wall. Components (Sold separately) Wall-Bracket Set-Bracket ...wood screws after fitting anchors into the grooves of the wall-bracket . Fix anchors on each hole on the wall. Installation Guide 2 Turn the power off . Connect wall-bracket to the wall, LCD TV can fall off and unplug the power cord from the outlet.
User Manual (ENGLISH)
Page 60
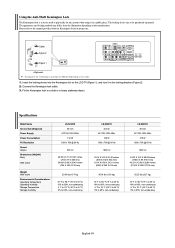
...104 °F (10 °C to 40 °C) 10% to 80%, non-condensing -4 °F to 113 °F (-20 °C to 45 °C) 5% to 95%, non-condensing LN-S4041D 40 inch AC110V-120V 60Hz 218 W 1360 x 768 @ 60 Hz 10W X 2 43.33 X 3.74 X 26.02 inches (1100.5 X 95 X 661 mm) 43.33 X 12.99... on its model. 1. Cable Figure 2 Figure 1 The place of the Kensington Lock may differ from the illustration depending on the LCD TV (Figure 1), and turn it in the locking direction (Figure 2). 2. Using the Anti-Theft Kensington Lock The Kensington lock is a device used to physically fix the system when using...
...104 °F (10 °C to 40 °C) 10% to 80%, non-condensing -4 °F to 113 °F (-20 °C to 45 °C) 5% to 95%, non-condensing LN-S4041D 40 inch AC110V-120V 60Hz 218 W 1360 x 768 @ 60 Hz 10W X 2 43.33 X 3.74 X 26.02 inches (1100.5 X 95 X 661 mm) 43.33 X 12.99... on its model. 1. Cable Figure 2 Figure 1 The place of the Kensington Lock may differ from the illustration depending on the LCD TV (Figure 1), and turn it in the locking direction (Figure 2). 2. Using the Anti-Theft Kensington Lock The Kensington lock is a device used to physically fix the system when using...


