
User Manual (ENGLISH)
Page 3
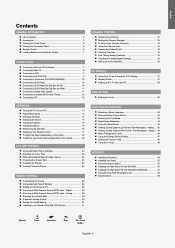
... 23 Adjusting the Color Tone 24 DNIe Demo(Digital Natural Image engine 24 Changing the Screen Size 25 Freezing the Picture 26 Viewing Picture-in-Picture 26 SOUND CONTROL Customizing the Sound 28 Using Automatic Sound Settings 28 Setting the TruSurround XT 28 Choosing a Multi-Channel ... Wall Mount Kit (LN-S2641D 56 Installing the Wall Mount Kit (LN-S3241D/LN-S4041D 57 Using the Anti-Theft Kensington Lock 58 Specifications 58 Symbol Press Important Note One-Touch Button English-1 English Contents GENERAL INFORMATION List of the Sub (PIP) Picture 31 CHANNEL CONTROL Selecting...
... 23 Adjusting the Color Tone 24 DNIe Demo(Digital Natural Image engine 24 Changing the Screen Size 25 Freezing the Picture 26 Viewing Picture-in-Picture 26 SOUND CONTROL Customizing the Sound 28 Using Automatic Sound Settings 28 Setting the TruSurround XT 28 Choosing a Multi-Channel ... Wall Mount Kit (LN-S2641D 56 Installing the Wall Mount Kit (LN-S3241D/LN-S4041D 57 Using the Anti-Theft Kensington Lock 58 Specifications 58 Symbol Press Important Note One-Touch Button English-1 English Contents GENERAL INFORMATION List of the Sub (PIP) Picture 31 CHANNEL CONTROL Selecting...
User Manual (ENGLISH)
Page 4
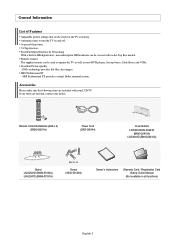
...- Accessories Please make sure the following items are missing, contact your LCD TV. General Information List of Features Adjustable picture settings that can be viewed with your dealer. Remote Control The supplied remote can be stored in all locations) English...Cover-Bottom LN-S2641D/LN-S3241D (BN63-02415A) LN-S4041D (BN63-02416A) Stand LN-S2641D (BN96-03192A) LN-S3241D (BN96-03191A) M4 X L16 Screw (6002-001294) Owner's Instructions Warranty Card / Registration Card /Safety Guide Manual (Not available in the TV's memory. A special sleep timer. Excellent Picture Quality - ...
...- Accessories Please make sure the following items are missing, contact your LCD TV. General Information List of Features Adjustable picture settings that can be viewed with your dealer. Remote Control The supplied remote can be stored in all locations) English...Cover-Bottom LN-S2641D/LN-S3241D (BN63-02415A) LN-S4041D (BN63-02416A) Stand LN-S2641D (BN96-03192A) LN-S3241D (BN96-03191A) M4 X L16 Screw (6002-001294) Owner's Instructions Warranty Card / Registration Card /Safety Guide Manual (Not available in the TV's memory. A special sleep timer. Excellent Picture Quality - ...
User Manual (ENGLISH)
Page 8
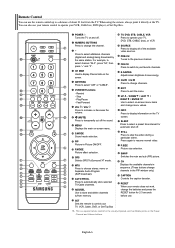
... "AIR" or "CABLE". ANTENNA Press to change channels. Press to /from the TV. SWAP Switches the main and sub (PIP) picture. ADD/DEL Use to store and delete channels to automatically store selected TV/Cable channels. EXIT Press to change the channel. - Remote Control... to the previous channel. PRE-CH Tunes to select additional channels (digital and analog) being broadcast by the same station. English-6 P.MODE Picture effect selection. Press again to save energy. You can use . VCR/DVD Functions - E.SAVING Adjusts screen brightness to resume normal video. STILL...
... "AIR" or "CABLE". ANTENNA Press to change channels. Press to /from the TV. SWAP Switches the main and sub (PIP) picture. ADD/DEL Use to store and delete channels to automatically store selected TV/Cable channels. EXIT Press to change the channel. - Remote Control... to the previous channel. PRE-CH Tunes to select additional channels (digital and analog) being broadcast by the same station. English-6 P.MODE Picture effect selection. Press again to save energy. You can use . VCR/DVD Functions - E.SAVING Adjusts screen brightness to resume normal video. STILL...
User Manual (ENGLISH)
Page 11
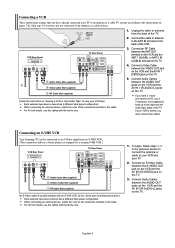
... an antenna or a cable TV system (according to view your VCR tape. Unplug the cable or antenna from an S-VHS VCR. (This connection delivers a better picture as compared to the cable. Connect Audio Cables between the ANT OUT terminal on the VCR and the ANT 1 IN (AIR) or ANT 2 IN (CABLE... and the AV IN 1 [VIDEO] jack on the TV. 4. When connecting an external device, match the color of the VCR. 3. Connecting an S-VHS VCR Your Samsung TV can be connected to an S-Video signal from the back of the connection terminal to the cable. Connect a Video Cable between the AUDIO OUT...
... an antenna or a cable TV system (according to view your VCR tape. Unplug the cable or antenna from an S-VHS VCR. (This connection delivers a better picture as compared to the cable. Connect Audio Cables between the ANT OUT terminal on the VCR and the ANT 1 IN (AIR) or ANT 2 IN (CABLE... and the AV IN 1 [VIDEO] jack on the TV. 4. When connecting an external device, match the color of the VCR. 3. Connecting an S-VHS VCR Your Samsung TV can be connected to an S-Video signal from the back of the connection terminal to the cable. Connect a Video Cable between the AUDIO OUT...
User Manual (ENGLISH)
Page 17
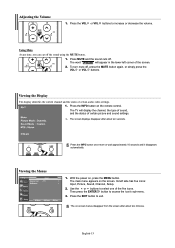
... display identifies the current channel and the status of the five icons. The TV will appear in the lower-left side has five icons: Input, Picture, Sound, Channel, Setup. 2. With the power on -screen menus disappear from the screen after about two minutes. Its left corner of certain... picture and sound settings. Press MUTE and the sound cuts off the sound using the MUTE button. 1. Adjusting the Volume 1. Press the VOL or VOL buttons ...
... display identifies the current channel and the status of the five icons. The TV will appear in the lower-left side has five icons: Input, Picture, Sound, Channel, Setup. 2. With the power on -screen menus disappear from the screen after about two minutes. Its left corner of certain... picture and sound settings. Press MUTE and the sound cuts off the sound using the MUTE button. 1. Adjusting the Volume 1. Press the VOL or VOL buttons ...

User Manual (ENGLISH)
Page 25
...ENTER button. 2. Press the ENTER button again. Choose Dynamic to decrease or increase the value of the picture. Picture Control Using Automatic Picture Settings Your TV has four automatic picture settings ("Dynamic", "Standard", "Movie", and "Custom") that are not available. Choose Movie when watching ...buttons to increase the clarity and sharpness of a particular item. Press the or buttons to select "Mode". Press the ENTER button. Picture mode needs to Contrast, Brightness, Sharpness, Color, Tint , OSD color will be stored separately according to its input mode. &#...
...ENTER button. 2. Press the ENTER button again. Choose Dynamic to decrease or increase the value of the picture. Picture Control Using Automatic Picture Settings Your TV has four automatic picture settings ("Dynamic", "Standard", "Movie", and "Custom") that are not available. Choose Movie when watching ...buttons to increase the clarity and sharpness of a particular item. Press the or buttons to select "Mode". Press the ENTER button. Picture mode needs to Contrast, Brightness, Sharpness, Color, Tint , OSD color will be stored separately according to its input mode. &#...
User Manual (ENGLISH)
Page 26
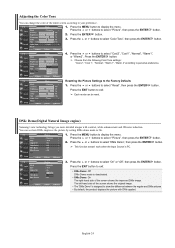
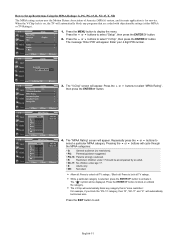
...", "Warm1", or "Warm2". This function doesn't work when the Input Source is PC. 3. English-24 Resetting the Picture Settings to display the menu. Press the ENTER button. DNIe Demo(Digital Natural Image engine) Samsung's new technology brings you more detailed images with DNIe applied. Press the MENU button to the Factory Defaults...
...", "Warm1", or "Warm2". This function doesn't work when the Input Source is PC. 3. English-24 Resetting the Picture Settings to display the menu. Press the ENTER button. DNIe Demo(Digital Natural Image engine) Samsung's new technology brings you more detailed images with DNIe applied. Press the MENU button to the Factory Defaults...
User Manual (ENGLISH)
Page 27
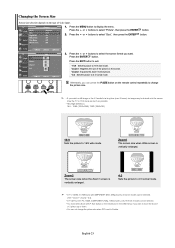
...; You must select Zoom with P. Press the or buttons to 16:9 wide mode. Press the EXIT button to exit. • 16:9 : Sets the picture to 16:9 wide mode. • Zoom1 : Magnifies the size of video input. 1. Press the ENTER button. Changing the Screen Size Screen size selection depends... the remote (not in 16:9 mode as much as possible. • HD (High Definition) 16:9 - 1080i (1920x1080), 720P (1280x720) 16:9 Sets the picture to select "Size", then press the ENTER button. 3. Zoom2 The screen size when the Zoom1 screen is vertically enlarged. English-25 Zoom1 The screen size...
...; You must select Zoom with P. Press the or buttons to 16:9 wide mode. Press the EXIT button to exit. • 16:9 : Sets the picture to 16:9 wide mode. • Zoom1 : Magnifies the size of video input. 1. Press the ENTER button. Changing the Screen Size Screen size selection depends... the remote (not in 16:9 mode as much as possible. • HD (High Definition) 16:9 - 1080i (1920x1080), 720P (1280x720) 16:9 Sets the picture to select "Size", then press the ENTER button. 3. Zoom2 The screen size when the Zoom1 screen is vertically enlarged. English-25 Zoom1 The screen size...
User Manual (ENGLISH)
Page 28
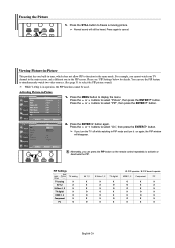
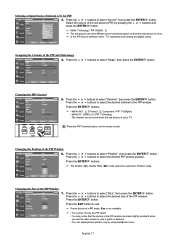
...button. Press the or buttons to select "PIP", then press the ENTER button. 2. Press again to freeze a moving picture. If you can use the PIP feature to select the PIP picture sound.) While V-Chip is in tuner, which does not allow PIP to activate or deactivate the PIP. You can ...PIP button on again, the PIP window will still be used. Please see 'PIP Settings'below for details. Freezing the Picture 1. Press the STILL button to cancel. Viewing Picture-in-Picture This product has one in the PIP screen. Alternately, you turn the TV off while watching in PIP mode and ...
...button. Press the or buttons to select "PIP", then press the ENTER button. 2. Press again to freeze a moving picture. If you can use the PIP feature to select the PIP picture sound.) While V-Chip is in tuner, which does not allow PIP to activate or deactivate the PIP. You can ...PIP button on again, the PIP window will still be used. Please see 'PIP Settings'below for details. Freezing the Picture 1. Press the STILL button to cancel. Viewing Picture-in-Picture This product has one in the PIP screen. Alternately, you turn the TV off while watching in PIP mode and ...
User Manual (ENGLISH)
Page 29
...select the desired channel in the PIP window becomes slightly unnatural when you use the main screen to TV. Changing the Position of the sub picture (PIP) by using the size menu. Press the ENTER button. Press the PIP Channel buttons on what the main...digital tuning. Press the ENTER buttons. Press the or buttons to select the desired PIP window position. MAIN: TV(Analog) / PIP: HDMI(1, 2) The sub picture can adjust picture position only by pressing the or buttons and press the ENTER button. Press the or buttons to . English-27 Selecting a Signal Source (External A/V) for...
...select the desired channel in the PIP window becomes slightly unnatural when you use the main screen to TV. Changing the Position of the sub picture (PIP) by using the size menu. Press the ENTER button. Press the PIP Channel buttons on what the main...digital tuning. Press the ENTER buttons. Press the or buttons to select the desired PIP window position. MAIN: TV(Analog) / PIP: HDMI(1, 2) The sub picture can adjust picture position only by pressing the or buttons and press the ENTER button. Press the or buttons to . English-27 Selecting a Signal Source (External A/V) for...
User Manual (ENGLISH)
Page 33
... this option when "PIP" is activated, you can be set to the sound of the sub (PIP) picture. 1. Main: Used to listen to the sound of the sub picture. "Dolby" and the double-D symbol are trademarks of Dolby Laboratories. DOLBY DIGITAL Manufactured under license from Dolby Laboratories.... Sub: Used to listen to the sound of the main picture. Press the MENU button to select "Sound", then press the ENTER button. 2. Press the or buttons to display the menu. English...
... this option when "PIP" is activated, you can be set to the sound of the sub (PIP) picture. 1. Main: Used to listen to the sound of the sub picture. "Dolby" and the double-D symbol are trademarks of Dolby Laboratories. DOLBY DIGITAL Manufactured under license from Dolby Laboratories.... Sub: Used to listen to the sound of the main picture. Press the MENU button to select "Sound", then press the ENTER button. 2. Press the or buttons to display the menu. English...

User Manual (ENGLISH)
Page 40
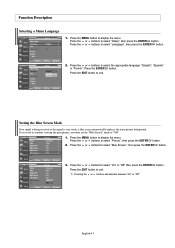
...button. Press the or buttons to select "Setup", then press the ENTER button. After the noise has been reduced, re-adjust the picture so that it is aligned on the center of the picture quality adjustment is not removed by fine tuning alone, then do the frequency adjustments to remove or reduce...ENTER button. Press the MENU button to have the TV set automatically adjust the video signals the monitor receives. Vertical stripes may appear or the picture may be blurry. Setting up the TV with your PC How to Auto Adjust Use the Auto Adjust function to display the menu. Press ...
...button. Press the or buttons to select "Setup", then press the ENTER button. After the noise has been reduced, re-adjust the picture so that it is aligned on the center of the picture quality adjustment is not removed by fine tuning alone, then do the frequency adjustments to remove or reduce...ENTER button. Press the MENU button to have the TV set automatically adjust the video signals the monitor receives. Vertical stripes may appear or the picture may be blurry. Setting up the TV with your PC How to Auto Adjust Use the Auto Adjust function to display the menu. Press ...
User Manual (ENGLISH)
Page 45
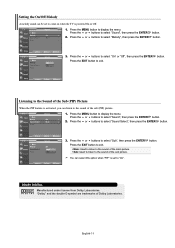
... or buttons will alternate between "On" or "Off" button. Press the or buttons to "Off" 1. If you wish to continue viewing the poor picture, you must set the "Blue Screen" mode to select "Blue Screen", then press the ENTER button. 3. Press the or buttons to display the menu.... Press the MENU button to select "Picture", then press the ENTER button. 2. Press the MENU button to exit. Press the EXIT button to display the menu. English-43 Function Description Selecting ...
... or buttons will alternate between "On" or "Off" button. Press the or buttons to "Off" 1. If you wish to continue viewing the poor picture, you must set the "Blue Screen" mode to select "Blue Screen", then press the ENTER button. 3. Press the or buttons to display the menu.... Press the MENU button to select "Picture", then press the ENTER button. 2. Press the MENU button to exit. Press the EXIT button to display the menu. English-43 Function Description Selecting ...
User Manual (ENGLISH)
Page 46
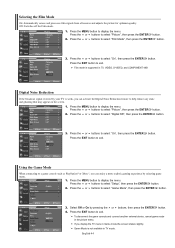
... then press the ENTER button. Press the or buttons to select "Film Mode", then press the ENTER button. 3. Press the or buttons to select "Picture", then press the ENTER button. 2. Press the or buttons to select "Setup", then press the ENTER button. 2. Press the MENU button to select ...mode in Game mode,the screen shakes slightly. Selecting the Film Mode On: Automatically senses and processes film signals from all sources and adjusts the picture for optimum quality. Press the MENU button to display the menu. Off: Switches off the Film mode. 1. Press the or buttons to ...
... then press the ENTER button. Press the or buttons to select "Film Mode", then press the ENTER button. 3. Press the or buttons to select "Picture", then press the ENTER button. 2. Press the or buttons to select "Setup", then press the ENTER button. 2. Press the MENU button to select ...mode in Game mode,the screen shakes slightly. Selecting the Film Mode On: Automatically senses and processes film signals from all sources and adjusts the picture for optimum quality. Press the MENU button to display the menu. Off: Switches off the Film mode. 1. Press the or buttons to ...
User Manual (ENGLISH)
Page 53
... exit. English-51 How to Set up Restrictions Using the MPAA Ratings: G, PG, PG-13, R, NC-17, X, NR The MPAA rating system uses the Motion Picture Association of America (MPAA) system, and its main application is selected, press the ENTER button to activate it. Press the MENU button to select "MPAA...
... exit. English-51 How to Set up Restrictions Using the MPAA Ratings: G, PG, PG-13, R, NC-17, X, NR The MPAA rating system uses the Motion Picture Association of America (MPAA) system, and its main application is selected, press the ENTER button to activate it. Press the MENU button to select "MPAA...
User Manual (ENGLISH)
Page 56
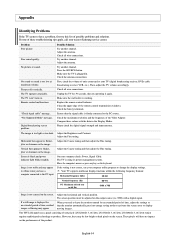
...for an extended period of sub pixels (LN-S2641D: 3,147,264, LN-S3241D: 3,147,264, LN-S4041D: 3,147,264) which require sophisticated... technology to your TV (digital broadcasting receiver, DVD, cable broadcasting receiver, VCR, etc.). Ensure that the monitor automatically goes into energy saving mode or activates the screen saver to the PC source. Image is plugged in the Display Modes. On your nearest Samsung..., jitter or shimmer on the image. Problem Poor picture Poor sound quality. Remote control malfunctions "Check signal cable...
...for an extended period of sub pixels (LN-S2641D: 3,147,264, LN-S3241D: 3,147,264, LN-S4041D: 3,147,264) which require sophisticated... technology to your TV (digital broadcasting receiver, DVD, cable broadcasting receiver, VCR, etc.). Ensure that the monitor automatically goes into energy saving mode or activates the screen saver to the PC source. Image is plugged in the Display Modes. On your nearest Samsung..., jitter or shimmer on the image. Problem Poor picture Poor sound quality. Remote control malfunctions "Check signal cable...

