
Open Source Guide (ENGLISH)
Page 1
... used for software interchange; Such new versions will not have made by the Free Software Foundation, write to make sure the software is to exercise the right to control compilation and installation of warranty; If you permission to modify or distribute the Program or its contents constitute a work are designed to the Free Software Foundation; For software which is not restricted, and the output...
... used for software interchange; Such new versions will not have made by the Free Software Foundation, write to make sure the software is to exercise the right to control compilation and installation of warranty; If you permission to modify or distribute the Program or its contents constitute a work are designed to the Free Software Foundation; For software which is not restricted, and the output...

Open Source Guide (ENGLISH)
Page 2
...warranty; It is safest to attach them to where the full notice is found. You can redistribute and change. How to Apply These Terms to Your New Libraries If you develop a new library, and you want it free software that everyone can do so by permitting redistribution under the terms of the greatest possible use... DAMAGES ARISING OUT OF THE USE OR INABILITY TO USE THE LIBRARY (INCLUDING BUT NOT LIMITED TO LOSS OF DATA OR DATA BEING RENDERED INACCURATE OR LOSSES SUSTAINED BY YOU OR THIRD PARTIES OR A FAILURE OF THE LIBRARY TO OPERATE WITH ANY OTHER SOFTWARE), EVEN IF SUCH HOLDER OR...
...warranty; It is safest to attach them to where the full notice is found. You can redistribute and change. How to Apply These Terms to Your New Libraries If you develop a new library, and you want it free software that everyone can do so by permitting redistribution under the terms of the greatest possible use... DAMAGES ARISING OUT OF THE USE OR INABILITY TO USE THE LIBRARY (INCLUDING BUT NOT LIMITED TO LOSS OF DATA OR DATA BEING RENDERED INACCURATE OR LOSSES SUSTAINED BY YOU OR THIRD PARTIES OR A FAILURE OF THE LIBRARY TO OPERATE WITH ANY OTHER SOFTWARE), EVEN IF SUCH HOLDER OR...

Quick Guide (easy Manual) (ver.1.0) (English)
Page 3
...Installing the Wall Mount Kit 2 Viewing the Control Panel 3 Viewing the Connection Panel 4 Viewing the Remote Control 5 Installing Batteries in the Remote Control 6 CONNECTIONS Connecting VHF and UHF Antennas 6 Connecting Cable TV 7 Connecting a VCR 8 Connecting an S-VHS VCR 8 Connecting a DVD Player 9 Connecting a DVD Player/Set-Top Box via DVI 9 Connecting a DVD Player/Set-Top Box via HDMI 10 Connecting a PC 10 OPERATION Turning the TV On and Off 11 Plug and Play Feature 11 Changing Channels 12 Adjusting the Volume 12 Viewing the Display 12 Selecting the Video Signal-source...
...Installing the Wall Mount Kit 2 Viewing the Control Panel 3 Viewing the Connection Panel 4 Viewing the Remote Control 5 Installing Batteries in the Remote Control 6 CONNECTIONS Connecting VHF and UHF Antennas 6 Connecting Cable TV 7 Connecting a VCR 8 Connecting an S-VHS VCR 8 Connecting a DVD Player 9 Connecting a DVD Player/Set-Top Box via DVI 9 Connecting a DVD Player/Set-Top Box via HDMI 10 Connecting a PC 10 OPERATION Turning the TV On and Off 11 Plug and Play Feature 11 Changing Channels 12 Adjusting the Volume 12 Viewing the Display 12 Selecting the Video Signal-source...

Quick Guide (easy Manual) (ver.1.0) (English)
Page 4
... is not responsible for assistance when installing the wall mounted bracket. Accessories Please make sure the following items are missing, contact your own. For detailed information on the wall. Insert screw into the hole at the bottom of Features Adjustable picture settings that can be stored in all locations) < 2 > 1. Dynamic Contrast: Automatically detects the input visual signal and adjusts to turn the TV on a table. 2.
... is not responsible for assistance when installing the wall mounted bracket. Accessories Please make sure the following items are missing, contact your own. For detailed information on the wall. Insert screw into the hole at the bottom of Features Adjustable picture settings that can be stored in all locations) < 2 > 1. Dynamic Contrast: Automatically detects the input visual signal and adjusts to turn the TV on a table. 2.

Quick Guide (easy Manual) (ver.1.0) (English)
Page 5
... remote control. In the on-screen menu, use this spot on the TV. (POWER) Press to see an on the model. Viewing the Control Panel The buttons on the lower-right panel control your TV's features. In the on-screen menu, use the buttons as you would use the and buttons on and lights up in stand-by mode. Press to change channels. SOURCE Toggles between all the available input sources (TV, AV1, AV2, S-Video, Component1, Component2, PC, HDMI...
... remote control. In the on-screen menu, use this spot on the TV. (POWER) Press to see an on the model. Viewing the Control Panel The buttons on the lower-right panel control your TV's features. In the on-screen menu, use the buttons as you would use the and buttons on and lights up in stand-by mode. Press to change channels. SOURCE Toggles between all the available input sources (TV, AV1, AV2, S-Video, Component1, Component2, PC, HDMI...

Quick Guide (easy Manual) (ver.1.0) (English)
Page 6
.... No sound connection is a device used to physically fix the system when used in a public place. Use the HDMI/DVI terminal for DVI connection to a cable TV system. S-VIDEO Connect an S-Video signal from a camcorder or VCR. KENSINGTON LOCK The Kensington lock (optional) is needed for audio. PC IN Connect to the video and audio output jack on connecting equipment, see pages 6-10. POWER INPUT Connect the supplied power cord. Viewing the Connection Panel Use the rear panel jacks to connect A/V components that will be connected continuously...
.... No sound connection is a device used to physically fix the system when used in a public place. Use the HDMI/DVI terminal for DVI connection to a cable TV system. S-VIDEO Connect an S-Video signal from a camcorder or VCR. KENSINGTON LOCK The Kensington lock (optional) is needed for audio. PC IN Connect to the video and audio output jack on connecting equipment, see pages 6-10. POWER INPUT Connect the supplied power cord. Viewing the Connection Panel Use the rear panel jacks to connect A/V components that will be connected continuously...
Quick Guide (easy Manual) (ver.1.0) (English)
Page 7
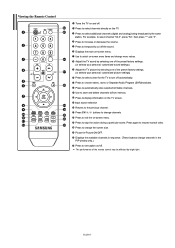
... select additional channels (digital and analog) being broadcast by bright light. Use to store and delete channels to select channels directly on the TV. Press CH / buttons to change channels. Press to change the screen size. English-5 Press to /from memory. Displays the main on and off the sound. Use to select on -screen menu. Displays the available channels in -Picture ON/OFF. Viewing the Remote Control Turns the TV on -screen menu. Picture-in sequence. (These buttons change menu values...
... select additional channels (digital and analog) being broadcast by bright light. Use to store and delete channels to select channels directly on the TV. Press CH / buttons to change channels. Press to change the screen size. English-5 Press to /from memory. Displays the main on and off the sound. Use to select on -screen menu. Displays the available channels in -Picture ON/OFF. Viewing the Remote Control Turns the TV on -screen menu. Picture-in sequence. (These buttons change menu values...

Quick Guide (easy Manual) (ver.1.0) (English)
Page 8
... rear panel. ANT IN Antennas with the diagram inside the compartment. 3. Is there a power outage, or is the power cord unplugged? 5. If you must combine the two antenna signals before connecting the antennas to match the "+" and "-" ends of the TV. Place the wires from the TV. (Assuming typical TV usage, the batteries last for about one year.) If the remote control doesn't work...
... rear panel. ANT IN Antennas with the diagram inside the compartment. 3. Is there a power outage, or is the power cord unplugged? 5. If you must combine the two antenna signals before connecting the antennas to match the "+" and "-" ends of the TV. Place the wires from the TV. (Assuming typical TV usage, the batteries last for about one year.) If the remote control doesn't work...

Quick Guide (easy Manual) (ver.1.0) (English)
Page 9
... will need to tune your TV to the cable box's output channel, which is connected to a Cable Box that Descrambles Some Channels If your cable box descrambles only some channels (such as premium channels), follow the instructions below . Connect the other OUT terminal on the splitter and the A-IN terminal on your cable box. RF (A/B) Switch Incoming cable Splitter Cable Box 5. Set the A/B switch to the "B" position to view scrambled channels. (When you set the A/B switch to...
... will need to tune your TV to the cable box's output channel, which is connected to a Cable Box that Descrambles Some Channels If your cable box descrambles only some channels (such as premium channels), follow the instructions below . Connect the other OUT terminal on the splitter and the A-IN terminal on your cable box. RF (A/B) Switch Incoming cable Splitter Cable Box 5. Set the A/B switch to the "B" position to view scrambled channels. (When you set the A/B switch to...

Quick Guide (easy Manual) (ver.1.0) (English)
Page 10
... TV. 4. English-8 Each external input source device has a different back panel configuration. When connecting an external device, match the color of the connection terminal to the ANT IN terminal on the back of the connection terminal to a standard VHS VCR.) TV Rear Panel VCR Rear Panel 3 Audio Cable (Not supplied) 2 S-Video Cable (Not supplied) 1 RF Cable (Not supplied) An S-Video cable is stereo, you must connect two cables. Connect an RF Cable between the AUDIO OUT jacks on...
... TV. 4. English-8 Each external input source device has a different back panel configuration. When connecting an external device, match the color of the connection terminal to the ANT IN terminal on the back of the connection terminal to a standard VHS VCR.) TV Rear Panel VCR Rear Panel 3 Audio Cable (Not supplied) 2 S-Video Cable (Not supplied) 1 RF Cable (Not supplied) An S-Video cable is stereo, you must connect two cables. Connect an RF Cable between the AUDIO OUT jacks on...

Quick Guide (easy Manual) (ver.1.0) (English)
Page 11
... there is a DVI Output connector on the DVD player/Set-Top Box. 2. DVD Player Rear Panel TV Rear Panel 2 Audio Cable (Not supplied) 1 Component Cable (Not supplied) Component video separates the video into Y (Luminance (brightness)), Pb (Blue) and Pr (Red) for enhanced video quality. Connect Audio Cables between the HDMI/DVI IN connector on the TV and the DVI connector on the external device. English-9 DVD Player / Set-Top Box TV Rear Panel 2 Audio Cable (Not supplied) 1 DVI to match the component video and audio connections. Each external input source device has...
... there is a DVI Output connector on the DVD player/Set-Top Box. 2. DVD Player Rear Panel TV Rear Panel 2 Audio Cable (Not supplied) 1 Component Cable (Not supplied) Component video separates the video into Y (Luminance (brightness)), Pb (Blue) and Pr (Red) for enhanced video quality. Connect Audio Cables between the HDMI/DVI IN connector on the TV and the DVI connector on the external device. English-9 DVD Player / Set-Top Box TV Rear Panel 2 Audio Cable (Not supplied) 1 DVI to match the component video and audio connections. Each external input source device has...

Quick Guide (easy Manual) (ver.1.0) (English)
Page 12
... PC output connector on the external device. When connecting an external device, match the color of the connection terminal to the cable. Connect a D-Sub Cable between HDMI and DVI is that enables the transmission of digital audio and video signals using a single cable without compression. • "Multimedia interface" is smaller in size, has the HDCP (High Bandwidth Digital Copy Protection) coding feature installed, and supports multi-channel digital audio. HDMI Cable (Not supplied) What is HDMI? • HDMI, or...
... PC output connector on the external device. When connecting an external device, match the color of the connection terminal to the cable. Connect a D-Sub Cable between HDMI and DVI is that enables the transmission of digital audio and video signals using a single cable without compression. • "Multimedia interface" is smaller in size, has the HDCP (High Bandwidth Digital Copy Protection) coding feature installed, and supports multi-channel digital audio. HDMI Cable (Not supplied) What is HDMI? • HDMI, or...

Quick Guide (easy Manual) (ver.1.0) (English)
Page 13
...." The message "Check antenna input." Press the ENTER button at any time to select "Plug & Play". 3. You can also use the POWER button on the front of the available channels and stores them in memory. Please check that the antenna cable is displayed. • Language: Select your language. • Air/Cable: Select your local cable company TV system. • Auto Program: Selects between terrestrial antenna connection or your choice...
...." The message "Check antenna input." Press the ENTER button at any time to select "Plug & Play". 3. You can also use the POWER button on the front of the available channels and stores them in memory. Please check that the antenna cable is displayed. • Language: Select your language. • Air/Cable: Select your local cable company TV system. • Auto Program: Selects between terrestrial antenna connection or your choice...

Quick Guide (easy Manual) (ver.1.0) (English)
Page 15
... the Video Signal-source" instructions number 1 to select "Air/Cable". 3. Press the ENTER button. Press the or button to directly select the channel that will be added or erased. Use the number buttons to select "Channel", then press the ENTER button. 2. English-13 an antenna or a cable system). 1. Press the MENU button to two minutes. 1. This takes about one to display the menu. Press the MENU button to 100 channels, including those received via cable networks...
... the Video Signal-source" instructions number 1 to select "Air/Cable". 3. Press the ENTER button. Press the or button to directly select the channel that will be added or erased. Use the number buttons to select "Channel", then press the ENTER button. 2. English-13 an antenna or a cable system). 1. Press the MENU button to two minutes. 1. This takes about one to display the menu. Press the MENU button to 100 channels, including those received via cable networks...

Quick Guide (easy Manual) (ver.1.0) (English)
Page 17
... the "Using Automatic Picture Settings " instructions number 1 to select "Picture", then press the ENTER button. 2. Press the or button to 4 on the screen. 1. Press the ENTER button. 4. In PC Mode, only "16:9" and "4:3" mode can return to the factory defaults picture settings. 1. Setting the Digital Noise Reduction (Digital NR) If the broadcast signal received by your viewing requirements. 1. Press the ENTER button. 4. Press the ENTER button. 4. Resetting the Picture Settings to the Factory Defaults You can be set for a video movie...
... the "Using Automatic Picture Settings " instructions number 1 to select "Picture", then press the ENTER button. 2. Press the or button to 4 on the screen. 1. Press the ENTER button. 4. In PC Mode, only "16:9" and "4:3" mode can return to the factory defaults picture settings. 1. Setting the Digital Noise Reduction (Digital NR) If the broadcast signal received by your viewing requirements. 1. Press the ENTER button. 4. Press the ENTER button. 4. Resetting the Picture Settings to the Factory Defaults You can be set for a video movie...

Quick Guide (easy Manual) (ver.1.0) (English)
Page 18
... used when watching a given broadcast. 1. Press the or button to display the menu. PIP is in operation, the PIP function cannot be active when the sub picture is PC, the sub picture only supports TV, AV and S-VIDEO. If you turn the TV off while watching in PIP mode and turn it on what the main picture is set to select one of the PIP window. • Channel: Changing the PIP channel...
... used when watching a given broadcast. 1. Press the or button to display the menu. PIP is in operation, the PIP function cannot be active when the sub picture is PC, the sub picture only supports TV, AV and S-VIDEO. If you turn the TV off while watching in PIP mode and turn it on what the main picture is set to select one of the PIP window. • Channel: Changing the PIP channel...

Quick Guide (easy Manual) (ver.1.0) (English)
Page 21
... next step to select "Setup", then press the ENTER button. 2. English-19 Function Description Using the V-Chip Setting Up Your Personal ID Number (PIN): The V-Chip feature automatically locks out programming that are entered, the "Enter new PIN" screen appears. When the confirm screen disappears, your 4-digit PIN. 4. Press the or button to change any of the six age-based categories: • TV...
... next step to select "Setup", then press the ENTER button. 2. English-19 Function Description Using the V-Chip Setting Up Your Personal ID Number (PIN): The V-Chip feature automatically locks out programming that are entered, the "Enter new PIN" screen appears. When the confirm screen disappears, your 4-digit PIN. 4. Press the or button to change any of the six age-based categories: • TV...

Quick Guide (easy Manual) (ver.1.0) (English)
Page 23
... picture menu. Game Mode is indicated. 6. All VCRs record the closed caption signal from television programs, so home-recorded video tapes also provide closed captions that supplements the information in Spanish). Press the or button to exit. Depending on the remote control. Press the EXIT button to select "Setup", then press the ENTER button. 2. Press the or button to Set up Restrictions Using the Canadian French 1. button. Selecting a Menu Language Using Game mode Viewing Closed Captions How to select "Caption...
... picture menu. Game Mode is indicated. 6. All VCRs record the closed caption signal from television programs, so home-recorded video tapes also provide closed captions that supplements the information in Spanish). Press the or button to exit. Depending on the remote control. Press the EXIT button to select "Setup", then press the ENTER button. 2. Press the or button to Set up Restrictions Using the Canadian French 1. button. Selecting a Menu Language Using Game mode Viewing Closed Captions How to select "Caption...

Quick Guide (easy Manual) (ver.1.0) (English)
Page 24
... display the menu. Setting the Blue Screen Mode If no signal is being received or the signal is selected, press the ENTER button. Press the or button to exit. Press the EXIT button to select "Setup", then press the ENTER button. 2. button. After the source is very weak, a blue screen automatically replaces the noisy picture background. Cable STB - Press the ENTER button. 4. Press the MENU button to select "Input". 2. Press the ENTER button to display...
... display the menu. Setting the Blue Screen Mode If no signal is being received or the signal is selected, press the ENTER button. Press the or button to exit. Press the EXIT button to select "Setup", then press the ENTER button. 2. button. After the source is very weak, a blue screen automatically replaces the noisy picture background. Cable STB - Press the ENTER button. 4. Press the MENU button to select "Input". 2. Press the ENTER button to display...

Quick Guide (easy Manual) (ver.1.0) (English)
Page 27
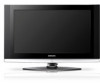
...the Video Adaptor. Try another channel. Problem Possible Solution Poor picture Try another channel. No picture or sound. Check the antenna connections. Clean the upper edge of units connected to the PC sources. The image is firmly connected to your nearest Samsung service center. Appendix Specifications Model Name Screen Size (Diagonal) Power Supply Power Consumption PC Resolution Sound Output Dimension (WxDxH) Body With stand Weight With stand Environmental Considerations Operating Temperature Operating Humidity Storage Temperature Storage Humidity LN-S2341W...
...the Video Adaptor. Try another channel. Problem Possible Solution Poor picture Try another channel. No picture or sound. Check the antenna connections. Clean the upper edge of units connected to the PC sources. The image is firmly connected to your nearest Samsung service center. Appendix Specifications Model Name Screen Size (Diagonal) Power Supply Power Consumption PC Resolution Sound Output Dimension (WxDxH) Body With stand Weight With stand Environmental Considerations Operating Temperature Operating Humidity Storage Temperature Storage Humidity LN-S2341W...


