Samsung LN R2050P Pc

Related Manual Pages


Similar Questions


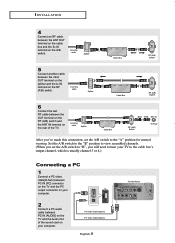
Pc Connection
When i connect my PC i get a Mode not supported message on TV screen on PC inpout
When i connect my PC i get a Mode not supported message on TV screen on PC inpout
(Posted by corby 12 years ago)

Browse Pc
Hi,I'm trying to view my pc throgh the TV with no success ,I put the dongle in th USB,pessed on the ...
Hi,I'm trying to view my pc throgh the TV with no success ,I put the dongle in th USB,pessed on the ...
(Posted by israelr 13 years ago)