

Open Source Guide (ENGLISH)
Page 1
... and to address new problems or concerns. These actions are not derived from the conditions of the Free Software Foundation's software and to any warranty; Each time you redistribute the Program (or any part thereof, to know their licenses terminated so long as a whole. It is believed to be similar in spirit to control compilation and installation of the rights...
... and to address new problems or concerns. These actions are not derived from the conditions of the Free Software Foundation's software and to any warranty; Each time you redistribute the Program (or any part thereof, to know their licenses terminated so long as a whole. It is believed to be similar in spirit to control compilation and installation of the rights...

Open Source Guide (ENGLISH)
Page 2
...change. IN NO EVENT UNLESS REQUIRED BY APPLICABLE LAW OR AGREED TO IN WRITING WILL ANY COPYRIGHT HOLDER, OR ANY OTHER PARTY WHO MAY MODIFY AND/OR REDISTRIBUTE THE LIBRARY AS PERMITTED ABOVE, BE LIABLE TO YOU FOR DAMAGES, INCLUDING ANY GENERAL, SPECIAL, INCIDENTAL OR CONSEQUENTIAL DAMAGES ARISING OUT OF THE USE... OR INABILITY TO USE THE LIBRARY (INCLUDING BUT NOT LIMITED TO LOSS OF DATA OR DATA BEING RENDERED INACCURATE OR LOSSES SUSTAINED BY YOU OR THIRD PARTIES OR A FAILURE OF THE LIBRARY TO OPERATE WITH ANY OTHER SOFTWARE... use to the public, we recommend making it free software ...
...change. IN NO EVENT UNLESS REQUIRED BY APPLICABLE LAW OR AGREED TO IN WRITING WILL ANY COPYRIGHT HOLDER, OR ANY OTHER PARTY WHO MAY MODIFY AND/OR REDISTRIBUTE THE LIBRARY AS PERMITTED ABOVE, BE LIABLE TO YOU FOR DAMAGES, INCLUDING ANY GENERAL, SPECIAL, INCIDENTAL OR CONSEQUENTIAL DAMAGES ARISING OUT OF THE USE... OR INABILITY TO USE THE LIBRARY (INCLUDING BUT NOT LIMITED TO LOSS OF DATA OR DATA BEING RENDERED INACCURATE OR LOSSES SUSTAINED BY YOU OR THIRD PARTIES OR A FAILURE OF THE LIBRARY TO OPERATE WITH ANY OTHER SOFTWARE... use to the public, we recommend making it free software ...
Quick Guide (easy Manual) (ver.1.0) (English)
Page 4
... All Channels . . .8 Connecting to a Cable Box that Descrambles Some Channels . .8 Connecting a PC 9 Connecting a VCR 10 Connecting an S-VHS VCR 11 Connecting a DVD Player 12 Chapter 3: Special Features Turning the TV On and Off 13 Changing Channels 13 Using the Channel Buttons 13 Using the PRE-CH Button to select the Previous Channel . .13 Adjusting the Volume 13 Using Mute 13 Viewing the Display 14 Viewing the Menus 14 Chapter 4: Operation Plug & Play Feature 15 Memorizing the Channels 16 Selecting the Video Signal-source...
... All Channels . . .8 Connecting to a Cable Box that Descrambles Some Channels . .8 Connecting a PC 9 Connecting a VCR 10 Connecting an S-VHS VCR 11 Connecting a DVD Player 12 Chapter 3: Special Features Turning the TV On and Off 13 Changing Channels 13 Using the Channel Buttons 13 Using the PRE-CH Button to select the Previous Channel . .13 Adjusting the Volume 13 Using Mute 13 Viewing the Display 14 Viewing the Menus 14 Chapter 4: Operation Plug & Play Feature 15 Memorizing the Channels 16 Selecting the Video Signal-source...
Quick Guide (easy Manual) (ver.1.0) (English)
Page 5
... Set up Your PC Software (Windows only 45 Adjusting the Screen Quality 46 Changing the Screen Position 47 To Initialize the Screen Position or Color Settings 48 How to Auto Adjust 49 Using Automatic Picture Settings 50 Customizing the Picture 51 Adjusting the Color Tone 52 Customizing the Color 53 Chapter 6: Troubleshooting Identifying Problems 54 Appendix Using the Anti-Theft Kensington Lock 56 Retractable Stand 57 Installing VESA compliant mounting devices 58 Installing the Wall Mount Kit 59 Display Mode 61 Using...
... Set up Your PC Software (Windows only 45 Adjusting the Screen Quality 46 Changing the Screen Position 47 To Initialize the Screen Position or Color Settings 48 How to Auto Adjust 49 Using Automatic Picture Settings 50 Customizing the Picture 51 Adjusting the Color Tone 52 Customizing the Color 53 Chapter 6: Troubleshooting Identifying Problems 54 Appendix Using the Anti-Theft Kensington Lock 56 Retractable Stand 57 Installing VESA compliant mounting devices 58 Installing the Wall Mount Kit 59 Display Mode 61 Using...
Quick Guide (easy Manual) (ver.1.0) (English)
Page 6
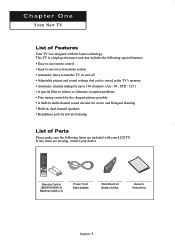
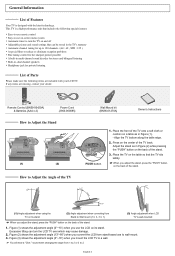
.... Remote Control (BN59-00429A) & Batteries (AAA x 2) Power Cord 3903-000085 Wall Mount kit BN96-01270A Owner's Instructions English-1 If any items are included with the latest technology. Chapter One YOUR NEW TV List of Parts Please make sure the following special features: • Easy-to-use remote control • Easy-to-use on-screen menu system • Automatic timer to turn the TV on and off • Adjustable picture and sound settings...
.... Remote Control (BN59-00429A) & Batteries (AAA x 2) Power Cord 3903-000085 Wall Mount kit BN96-01270A Owner's Instructions English-1 If any items are included with the latest technology. Chapter One YOUR NEW TV List of Parts Please make sure the following special features: • Easy-to-use remote control • Easy-to-use on-screen menu system • Automatic timer to turn the TV on and off • Adjustable picture and sound settings...
Quick Guide (easy Manual) (ver.1.0) (English)
Page 7
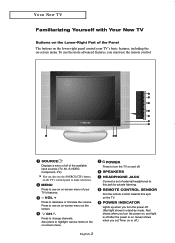
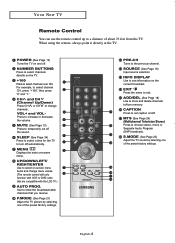
... the screen. SOURCE Displays a menu of all of your TV's basic features, including the on -screen menu of the available input sources (TV, AV, S-VIDEO, Component, PC). You can also use the remote control. VOL + Press to see an on -screen menu. Press to decrease or increase the volume. POWER INDICATOR Lights up when you turn the power on, and light is off . (Red light shows in stand-by mode, Red shows when you must use the SOURCE( ) button...
... the screen. SOURCE Displays a menu of all of your TV's basic features, including the on -screen menu of the available input sources (TV, AV, S-VIDEO, Component, PC). You can also use the remote control. VOL + Press to see an on -screen menu. Press to decrease or increase the volume. POWER INDICATOR Lights up when you turn the power on, and light is off . (Red light shows in stand-by mode, Red shows when you must use the SOURCE( ) button...
Quick Guide (easy Manual) (ver.1.0) (English)
Page 9
... broadcast/cable channels that are compatible with VCR or DVD units that you receive. MTS (See Page 24) (Multichannel Television Stereo) Press to the previous channel. CAPTION Press to set caption on -screen menu items and change channels. YOUR NEW TV Remote Control You can use the remote control up to a distance of about 23 feet from memory. CH and CH (Channel Up/Down) Press CH or CH to exit. P.MODE...
... broadcast/cable channels that are compatible with VCR or DVD units that you receive. MTS (See Page 24) (Multichannel Television Stereo) Press to the previous channel. CAPTION Press to set caption on -screen menu items and change channels. YOUR NEW TV Remote Control You can use the remote control up to a distance of about 23 feet from memory. CH and CH (Channel Up/Down) Press CH or CH to exit. P.MODE...
Quick Guide (easy Manual) (ver.1.0) (English)
Page 15
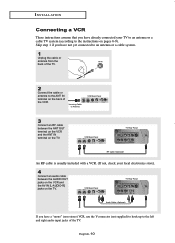
... yet connected to an antenna or a cable system. 1 Unplug the cable or antenna from the back of the TV. 2 Connect the cable or antenna to the left and right audio input jacks of the VCR. VCR Rear Panel TV Rear Panel Audio Cable If you have a "mono" (non-stereo) VCR, use the Y-connector (not supplied) to hook up to the ANT IN terminal on the TV. VCR Rear Panel TV Rear Panel RF Cable...
... yet connected to an antenna or a cable system. 1 Unplug the cable or antenna from the back of the TV. 2 Connect the cable or antenna to the left and right audio input jacks of the VCR. VCR Rear Panel TV Rear Panel Audio Cable If you have a "mono" (non-stereo) VCR, use the Y-connector (not supplied) to hook up to the ANT IN terminal on the TV. VCR Rear Panel TV Rear Panel RF Cable...
Quick Guide (easy Manual) (ver.1.0) (English)
Page 17
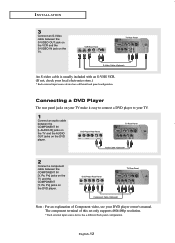
DVD Player Rear Panel TV Rear Panel Component Cable Note : For an explanation of this set only supports 480i/480p resolution. * Each external input source device has a different back panel configuration. English-12 DVD Player Rear Panel TV Rear Panel Audio Cable 2 Connect a component cable between the S-VIDEO OUT jack on the VCR and the S-VIDEO IN jack on the TV. I N S TA L L AT I O N 3 Connect an S-Video cable between the COMPONENT IN [Y, PB, PR] jacks on the TV and the COMPONENT [Y, PB, PR] jacks on...
DVD Player Rear Panel TV Rear Panel Component Cable Note : For an explanation of this set only supports 480i/480p resolution. * Each external input source device has a different back panel configuration. English-12 DVD Player Rear Panel TV Rear Panel Audio Cable 2 Connect a component cable between the S-VIDEO OUT jack on the VCR and the S-VIDEO IN jack on the TV. I N S TA L L AT I O N 3 Connect an S-Video cable between the COMPONENT IN [Y, PB, PR] jacks on the TV and the COMPONENT [Y, PB, PR] jacks on...
Quick Guide (easy Manual) (ver.1.0) (English)
Page 59
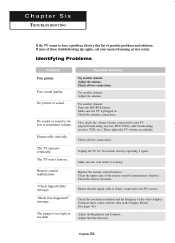
... another channel. Check the antenna connections. Press the SOURCE button. Adjust the Fine function. Identifying Problems Problem Possible Solution Poor picture Poor sound quality. Unplug the TV for 30 seconds, then try this list of units connected to your nearest Samsung service center. "Mode Not Supported!" Check the maximum resolution and the frequency of the remote control (transmission window). Try another channel. Adjust the antenna. Replace the remote control batteries. message. Adjust the antenna. Ensure that the signal cable...
... another channel. Check the antenna connections. Press the SOURCE button. Adjust the Fine function. Identifying Problems Problem Possible Solution Poor picture Poor sound quality. Unplug the TV for 30 seconds, then try this list of units connected to your nearest Samsung service center. "Mode Not Supported!" Check the maximum resolution and the frequency of the remote control (transmission window). Try another channel. Adjust the antenna. Replace the remote control batteries. message. Adjust the antenna. Ensure that the signal cable...
Quick Guide (easy Manual) (ver.1.0) (English)
Page 60
... utility program to change the display settings. If a still image is not correct, use your computer check: Power, Signal Cable (15-pin D-Sub) The TV is black and power indicator light blinks steadily. However, there may be few bright or dark pixels on the keyboard. Move the computer's mouse or press any key on the screen. When you need to produce. Note : The component terminal...
... utility program to change the display settings. If a still image is not correct, use your computer check: Power, Signal Cable (15-pin D-Sub) The TV is black and power indicator light blinks steadily. However, there may be few bright or dark pixels on the keyboard. Move the computer's mouse or press any key on the screen. When you need to produce. Note : The component terminal...
Quick Guide (easy Manual) (ver.1.0) (English)
Page 63
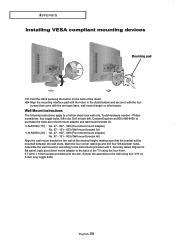
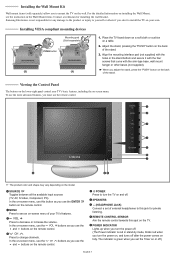
... APPENDIX Installing VESA compliant mounting devices Mounting pad Fold the stand pressing the button on the wall at the desired height, making sure that come with it with the four screws that the bracket will be mounted between the wall studs. Securely attach Ergotron's flat panel, triple pivot direct mount adapter to a hollow sheet-rock wall only. Secure the assembly to the instructions provided with the arm-type base, wall mount hanger...
... APPENDIX Installing VESA compliant mounting devices Mounting pad Fold the stand pressing the button on the wall at the desired height, making sure that come with it with the four screws that the bracket will be mounted between the wall studs. Securely attach Ergotron's flat panel, triple pivot direct mount adapter to a hollow sheet-rock wall only. Secure the assembly to the instructions provided with the arm-type base, wall mount hanger...
Quick Guide (easy Manual) (ver.1.0) (English)
Page 3
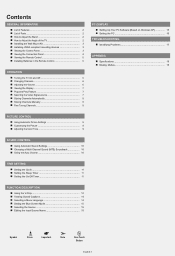
...mounting devices 3 Viewing the Control Panel 3 Viewing the Connection Panel 4 Viewing the Remote Control 5 Installing Batteries in the Remote Control 6 OPERATION Turning the TV On and Off 6 Changing Channels 6 Adjusting the Volume 6 Viewing the Display 7 Plug and Play Feature 7 Selecting the Video Signal-source 7 Storing Channels Automatically 8 Storing Channels Manually 8 Fine Tuning Channels 8 PC DISPLAY Setting Up Your PC Software (Based on Windows XP 15 Setting the PC 16 TROUBLESHOOTING Identifying Problems 17 APPENDIX Specifications 18 Display Modes 18 PICTURE CONTROL...
...mounting devices 3 Viewing the Control Panel 3 Viewing the Connection Panel 4 Viewing the Remote Control 5 Installing Batteries in the Remote Control 6 OPERATION Turning the TV On and Off 6 Changing Channels 6 Adjusting the Volume 6 Viewing the Display 7 Plug and Play Feature 7 Selecting the Video Signal-source 7 Storing Channels Automatically 8 Storing Channels Manually 8 Fine Tuning Channels 8 PC DISPLAY Setting Up Your PC Software (Based on Windows XP 15 Setting the PC 16 TROUBLESHOOTING Identifying Problems 17 APPENDIX Specifications 18 Display Modes 18 PICTURE CONTROL...
Quick Guide (easy Manual) (ver.1.0) (English)
Page 4
.... Remote Control (BN59-00429A) & Batteries (AAA x 2) Power Cord (3903-000085) How to Adjust the Stand (1) (2) How to Wall mount (1 3, 3 1) (3) Angle adjustment when LCD TV is designed with your dealer. Press on and off Adjustable picture and sound settings that the TV sits safely. Adjust the stand as in Figure (1). - You will hear a "Click " sound when changing the angle from stand-based use the LCD on its stand. (2) Angle adjustment when converting from Stand to Adjust the...
.... Remote Control (BN59-00429A) & Batteries (AAA x 2) Power Cord (3903-000085) How to Adjust the Stand (1) (2) How to Wall mount (1 3, 3 1) (3) Angle adjustment when LCD TV is designed with your dealer. Press on and off Adjustable picture and sound settings that the TV sits safely. Adjust the stand as in Figure (1). - You will hear a "Click " sound when changing the angle from stand-based use the LCD on its stand. (2) Angle adjustment when converting from Stand to Adjust the...
Quick Guide (easy Manual) (ver.1.0) (English)
Page 5
... input sources (TV, AV, S-Video, Component, PC). In the on-screen menu, use the buttons as you use the remote control. SPEAKERS (HEADPHONE JACK) Connect a set the Timer on the back of the stand. 3. The product color and shape may vary depending on the remote control. MENU Press to see the instruction in the stand bottom and secure it with the four screws that come with the arm-type base, wall mount hanger or other bases (not supplied). Installing the Wall Mount...
... input sources (TV, AV, S-Video, Component, PC). In the on-screen menu, use the buttons as you use the remote control. SPEAKERS (HEADPHONE JACK) Connect a set the Timer on the back of the stand. 3. The product color and shape may vary depending on the remote control. MENU Press to see the instruction in the stand bottom and secure it with the four screws that come with the arm-type base, wall mount hanger or other bases (not supplied). Installing the Wall Mount...

Quick Guide (easy Manual) (ver.1.0) (English)
Page 6
When connecting an external device, match the color of the connection terminal to your TV, make sure that power on the unit is turned off. LN-R1550P LN-R2050P Green Blue Red White Red Yellow White Red PC DVD Player Rear VCR Rear Whenever you connect an external device to the cable. English-4 Viewing the Connection Panel Use the rear panel jacks to connect an A/V component such as a VCR or a DVD player.
When connecting an external device, match the color of the connection terminal to your TV, make sure that power on the unit is turned off. LN-R1550P LN-R2050P Green Blue Red White Red Yellow White Red PC DVD Player Rear VCR Rear Whenever you connect an external device to the cable. English-4 Viewing the Connection Panel Use the rear panel jacks to connect an A/V component such as a VCR or a DVD player.

Quick Guide (easy Manual) (ver.1.0) (English)
Page 7
... the on-screen menu. Press CH / buttons to select channels over 100. Press to set caption on/off the sound. COMPONENT IN (480i/480p) Connect component video/audio. Press to change menu values. If you purchased the TV. Press to use a locking device, contact the dealer where you want to select channels directly on the TV. Use to store and delete channels to automatically store selected TV/Cable channels. Viewing the Remote Control Turns the...
... the on-screen menu. Press CH / buttons to select channels over 100. Press to set caption on/off the sound. COMPONENT IN (480i/480p) Connect component video/audio. Press to change menu values. If you purchased the TV. Press to use a locking device, contact the dealer where you want to select channels directly on the TV. Use to store and delete channels to automatically store selected TV/Cable channels. Viewing the Remote Control Turns the...
Quick Guide (easy Manual) (ver.1.0) (English)
Page 14
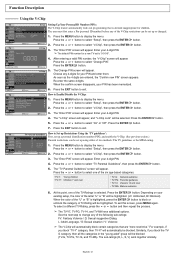
... Restrictions Using the 'TV guidelines': First, set up a personal identification number (PIN), and enable the V-Chip. (See previous section.) Parental restrictions can be set is highlighted, press the ENTER button to display the menu. Press the or button to select "TV Parental Guidelines", then press the ENTER button. 5. As soon as the 4 digits are "more restrictive." The "V-Chip" screen will appear, and "V-Chip Lock...
... Restrictions Using the 'TV guidelines': First, set up a personal identification number (PIN), and enable the V-Chip. (See previous section.) Parental restrictions can be set is highlighted, press the ENTER button to display the menu. Press the or button to select "TV Parental Guidelines", then press the ENTER button. 5. As soon as the 4 digits are "more restrictive." The "V-Chip" screen will appear, and "V-Chip Lock...

Quick Guide (easy Manual) (ver.1.0) (English)
Page 17
... 5. When the control panel window appears, click on the display dialog-box. Navigate to display the on the remote to make your computer manufacturer or Samsung Dealer.) 1. Otherwise, just click "OK" and exit the dialog box. button. DVD Combo - DHR - Selecting the Source You can also press the SOURCE button on -screen menu. You can select among external sources connected to continue viewing the poor picture, you must set -up information...
... 5. When the control panel window appears, click on the display dialog-box. Navigate to display the on the remote to make your computer manufacturer or Samsung Dealer.) 1. Otherwise, just click "OK" and exit the dialog box. button. DVD Combo - DHR - Selecting the Source You can also press the SOURCE button on -screen menu. You can select among external sources connected to continue viewing the poor picture, you must set -up information...

Quick Guide (easy Manual) (ver.1.0) (English)
Page 19
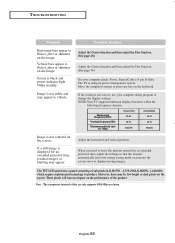
.... Compare these troubleshooting tips apply, call your TV (Digital broadcasting receiver, DTV, DVD, cable broadcasting receiver, VCR, etc.). The image is plugged in the Display Modes. If none of sub pixels (LN-R1550P - 2,359,296/LN-R2050P- 1,440,000) which require sophisticated technology to your nearest Samsung service center. Problem Possible Solution Poor picture Try another channel. Poor sound quality. Then, adjust the TV volume accordingly. The TV operates erratically. PC...
.... Compare these troubleshooting tips apply, call your TV (Digital broadcasting receiver, DTV, DVD, cable broadcasting receiver, VCR, etc.). The image is plugged in the Display Modes. If none of sub pixels (LN-R1550P - 2,359,296/LN-R2050P- 1,440,000) which require sophisticated technology to your nearest Samsung service center. Problem Possible Solution Poor picture Try another channel. Poor sound quality. Then, adjust the TV volume accordingly. The TV operates erratically. PC...


