
User Manual
Page 12
... Rear Switches from PC mode to Connecting Cables under Setup. Remote Control Sensor Aim the remote control towards this button for turning the LCD Display on the models equipped with an auto brightness sensor. Brightness Sensor (Optional) Automatically detects the surrounding brightness. Power indicator Shows PowerSaver mode by blinking green Note See PowerSaver described in the manual for long periods. The LCD Display 's configuration at the same time. Note For detailed information concerning cable connections, refer to Video mode...
... Rear Switches from PC mode to Connecting Cables under Setup. Remote Control Sensor Aim the remote control towards this button for turning the LCD Display on the models equipped with an auto brightness sensor. Brightness Sensor (Optional) Automatically detects the surrounding brightness. Power indicator Shows PowerSaver mode by blinking green Note See PowerSaver described in the manual for long periods. The LCD Display 's configuration at the same time. Note For detailed information concerning cable connections, refer to Video mode...

User Manual
Page 16
.... Changing the SOURCE is used functions. 15 DEL ton / GUIDE but- 5. + VOL 6. The "-" button is only allowed for this LCD Display. OFF 3. D.MENU 8. Adjusts the audio volume. POWER 2. SOURCE 7. Press the button to change the input signal SOURCE. This function does not work for external devices that are connected to select Digital channels. Use to quickly select frequently used to the LCD Display at the time. Introduction POWER OFF Number Buttons DEL + VOL - / GUIDE button SOURCE D.MENU TOOLS Up-Down Left-Right buttons INFO COLOR BUTTONS...
.... Changing the SOURCE is used functions. 15 DEL ton / GUIDE but- 5. + VOL 6. The "-" button is only allowed for this LCD Display. OFF 3. D.MENU 8. Adjusts the audio volume. POWER 2. SOURCE 7. Press the button to change the input signal SOURCE. This function does not work for external devices that are connected to select Digital channels. Use to quickly select frequently used to the LCD Display at the time. Introduction POWER OFF Number Buttons DEL + VOL - / GUIDE button SOURCE D.MENU TOOLS Up-Down Left-Right buttons INFO COLOR BUTTONS...
User Manual
Page 29
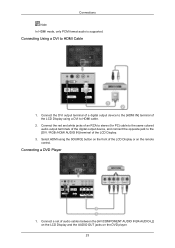
Select HDMI using a DVI to the [DVI / RGB /HDMI AUDIO IN] terminal of the LCD Display or on the remote control. Connect the red and white jacks of an RCA to stereo (for PC) cable to the same colored audio output terminals of the digital output device, and connect the opposite jack to HDMI cable. 2. Connections Note In HDMI mode, only PCM format audio is supported. Connect a set of the LCD Display using the SOURCE button on the DVD player. 23 Connecting Using a DVI to the [HDMI IN...
Select HDMI using a DVI to the [DVI / RGB /HDMI AUDIO IN] terminal of the LCD Display or on the remote control. Connect the red and white jacks of an RCA to stereo (for PC) cable to the same colored audio output terminals of the digital output device, and connect the opposite jack to HDMI cable. 2. Connections Note In HDMI mode, only PCM format audio is supported. Connect a set of the LCD Display using the SOURCE button on the DVD player. 23 Connecting Using a DVI to the [HDMI IN...

User Manual
Page 30
...]] port on the LCD Display and the PR, Y, PB jacks on the remote control. • Then, start the DVD Player with a DVD disc inserted. • A component cable is optional. • For an explanation of Component video, consult your Set Top Box owner's manual. 24 Note • Select Component for the connection to a DTV Set Top Box using the SOURCE button on the front of the LCD Display or...
...]] port on the LCD Display and the PR, Y, PB jacks on the remote control. • Then, start the DVD Player with a DVD disc inserted. • A component cable is optional. • For an explanation of Component video, consult your Set Top Box owner's manual. 24 Note • Select Component for the connection to a DTV Set Top Box using the SOURCE button on the front of the LCD Display or...

User Manual
Page 32
Prepare a blank disk and download the driver program file at the Internet web site shown here. Choose your monitor model in the model list, then click the "OK" button. 4. Internet web site : http://www.samsung.com/ Installing the Monitor Driver (Automatic) 1. Insert CD into the CD-ROM drive. 2. Click "Windows". 3. Using the Software Monitor Driver Note When prompted by the operating system for the operating system...
Prepare a blank disk and download the driver program file at the Internet web site shown here. Choose your monitor model in the model list, then click the "OK" button. 4. Internet web site : http://www.samsung.com/ Installing the Monitor Driver (Automatic) 1. Insert CD into the CD-ROM drive. 2. Click "Windows". 3. Using the Software Monitor Driver Note When prompted by the operating system for the operating system...

User Manual
Page 33
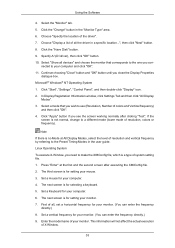
...-click on Samsung Monitor homepage. The monitor can be used as is deactivated, it will be posted on "Appearance and Personal- http://www.samsung.com/ Installing the Monitor Driver (Manual) Microsoft® Windows Vista™, Operating System 1. Click "Properties" in the "Monitor" tab. Click "Advanced Settings...". 5. Click (Start) and "Control Panel". ization". 3. If the "Properties" button is . 27 Click "Personalization" and then "Display Settings". 4. Insert your Manual CD into...
...-click on Samsung Monitor homepage. The monitor can be used as is deactivated, it will be posted on "Appearance and Personal- http://www.samsung.com/ Installing the Monitor Driver (Manual) Microsoft® Windows Vista™, Operating System 1. Click "Properties" in the "Monitor" tab. Click "Advanced Settings...". 5. Click (Start) and "Control Panel". ization". 3. If the "Properties" button is . 27 Click "Personalization" and then "Display Settings". 4. Insert your Manual CD into...

User Manual
Page 34
... Click "Update Driver..." and select the folder (for driver software" checkbox and click "Let me pick from a list of device drivers on Samsung Monitor homepage. 6. Click "Have Disk..." The certified driver will not damage your system. Using the Software If the message "Windows needs..." is under certifying MS logo, and this installation will be posted on my computer". 8. Note This monitor driver is displayed, as shown...
... Click "Update Driver..." and select the folder (for driver software" checkbox and click "Let me pick from a list of device drivers on Samsung Monitor homepage. 6. Click "Have Disk..." The certified driver will not damage your system. Using the Software If the message "Windows needs..." is under certifying MS logo, and this installation will be posted on my computer". 8. Note This monitor driver is displayed, as shown...

User Manual
Page 36
Click "Update Driver..." Select "Don't search, I will...", then click "Next" and then click "Have disk". 30 Click "Display" icon and choose the "Settings" tab then click "Advanced...". 4. then click "Next" button. 6. Insert CD into the CD-ROM drive. 2. Click the "Properties" button on the "Monitor" tab and select "Driver" tab. 5. and select "Install from a list or..." Click "Start" → "Control Panel", then click the "Appearance and Themes" icon. 3. Using the Software 1.
Click "Update Driver..." Select "Don't search, I will...", then click "Next" and then click "Have disk". 30 Click "Display" icon and choose the "Settings" tab then click "Advanced...". 4. then click "Next" button. 6. Insert CD into the CD-ROM drive. 2. Click the "Properties" button on the "Monitor" tab and select "Driver" tab. 5. and select "Install from a list or..." Click "Start" → "Control Panel", then click the "Appearance and Themes" icon. 3. Using the Software 1.

User Manual
Page 38
... disk" window. 2. How to install 1. Microsoft® Windows® Millennium Operating System 1. Double click the "Display" icon. 3. Double click the "Display" icon. 3. Click the "Open" button, then click "OK" button. 9. Click the "Finish" button, then the "Close" button. Using the Software 10. If you can choose a specific driver", then click "Next" and then click "Have disk". 7. Choose "OK" button on the "Next" button. 6. Click "Start", "Setting", "Control Panel". 2. Click "Start", "Setting", "Control Panel". 2. Choose "Monitor".
... disk" window. 2. How to install 1. Microsoft® Windows® Millennium Operating System 1. Double click the "Display" icon. 3. Double click the "Display" icon. 3. Click the "Open" button, then click "OK" button. 9. Click the "Finish" button, then the "Close" button. Using the Software 10. If you can choose a specific driver", then click "Next" and then click "Have disk". 7. Choose "OK" button on the "Next" button. 6. Click "Start", "Setting", "Control Panel". 2. Click "Start", "Setting", "Control Panel". 2. Choose "Monitor".
User Manual
Page 39
... you need to the Preset Timing Modes in the "Monitor Type" area. 6. Select a mode that corresponds to use (Resolution, Number of colors and Vertical frequency) and then click "OK". 4. Set a Keyboard for your monitor. 7. Click the "Change" button in the user guide. nected to a different mode (lower mode of system setting file. 1. If the screen is not normal, change to your monitor. (You can enter the frequency directly.) 8. Linux Operating System To execute X-Window...
... you need to the Preset Timing Modes in the "Monitor Type" area. 6. Select a mode that corresponds to use (Resolution, Number of colors and Vertical frequency) and then click "OK". 4. Set a Keyboard for your monitor. 7. Click the "Change" button in the user guide. nected to a different mode (lower mode of system setting file. 1. If the screen is not normal, change to your monitor. (You can enter the frequency directly.) 8. Linux Operating System To execute X-Window...

User Manual
Page 51
... change the PC Time. 2) On Time Setup - At On Time Setup, TV Source functions only for which the power status is ON. Set the Hour, Minute, AM/PM of On Time Setup, Status, Source, Volume of MagicInfo works only on TV model. Set the current time for Off Time Setup of the selected display. 4) Shows the On Time settings. 5) Shows the Off Time settings. The Input source of...
... change the PC Time. 2) On Time Setup - At On Time Setup, TV Source functions only for which the power status is ON. Set the Hour, Minute, AM/PM of On Time Setup, Status, Source, Volume of MagicInfo works only on TV model. Set the current time for Off Time Setup of the selected display. 4) Shows the On Time settings. 5) Shows the Off Time settings. The Input source of...
User Manual
Page 64
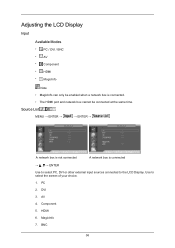
... connected. • The HDMI port and network box cannot be connected at the same time. Use to the LCD Display. AV 4. Component 5. Adjusting the LCD Display Input Available Modes • PC / DVI / BNC • AV • Component • HDMI • MagicInfo Note • MagicInfo can only be enabled when a network box is connected → , → ENTER Use to select PC, DVI or other external input sources connected to select the screen...
... connected. • The HDMI port and network box cannot be connected at the same time. Use to the LCD Display. AV 4. Component 5. Adjusting the LCD Display Input Available Modes • PC / DVI / BNC • AV • Component • HDMI • MagicInfo Note • MagicInfo can only be enabled when a network box is connected → , → ENTER Use to select PC, DVI or other external input sources connected to select the screen...
User Manual
Page 102
... to the MagicInfo Server Help. pletely shut off the AC power during an operation. • For pivoted LCD Displays, ticker transparency is not supported. • For pivoted LCD Displays, a screen resolution of shutting down since this may stop . • To access other sources, press the SOURCE button in the process of up external devices only if the LCD Display turns on a Windows screen, refer to 720*480...
... to the MagicInfo Server Help. pletely shut off the AC power during an operation. • For pivoted LCD Displays, ticker transparency is not supported. • For pivoted LCD Displays, a screen resolution of shutting down since this may stop . • To access other sources, press the SOURCE button in the process of up external devices only if the LCD Display turns on a Windows screen, refer to 720*480...

User Manual
Page 106
... after using the previous procedure, check your video controller and computer system; Contact a Service Center for problems that time. Turn on a black background when the LCD Display is working normally even though no video signal is functioning properly. Turn off both your computer and the LCD Display If your computer and the LCD Display. 2. Note Refer to change the screen resolution or stay in the Self-Test mode, the LED power indicator remains green and...
... after using the previous procedure, check your video controller and computer system; Contact a Service Center for problems that time. Turn on a black background when the LCD Display is working normally even though no video signal is functioning properly. Turn off both your computer and the LCD Display If your computer and the LCD Display. 2. Note Refer to change the screen resolution or stay in the Self-Test mode, the LED power indicator remains green and...
User Manual
Page 107
... Safe Mode, remove the Display Adaptor in the "Control Panel −> System −> Device Administrator" and then reboot the computer to the MagicInfo Troubleshooting section. Troubleshooting • Do not use acetone, benzene or thinner. (They may cause flaws or deformation of the screen surface.) • The user is responsible for any problems for assis- Check if the power cord and the video cables are listed. Q: The LCD Display screen flickers...
... Safe Mode, remove the Display Adaptor in the "Control Panel −> System −> Device Administrator" and then reboot the computer to the MagicInfo Troubleshooting section. Troubleshooting • Do not use acetone, benzene or thinner. (They may cause flaws or deformation of the screen surface.) • The user is responsible for any problems for assis- Check if the power cord and the video cables are listed. Q: The LCD Display screen flickers...

User Manual
Page 108
... the LCD Display. A: Turn on again after removing all accessories (video extension cable, etc.) A: Set the resolution and frequency to the Brightness, Contrast) 80 picture is not clear; Q: The picture image is securely connected. Q: The picture rolls vertically. A: Check if the signal cable is unstable and shakes. A: Check if the resolution and frequency set for the computer video card falls in the range supported by the LCD Display. A: Check the maximum resolution and the frequency of the video Adaptor. A: Ensure that the PC or video sources...
... the LCD Display. A: Turn on again after removing all accessories (video extension cable, etc.) A: Set the resolution and frequency to the Brightness, Contrast) 80 picture is not clear; Q: The picture image is securely connected. Q: The picture rolls vertically. A: Check if the signal cable is unstable and shakes. A: Check if the resolution and frequency set for the computer video card falls in the range supported by the LCD Display. A: Check the maximum resolution and the frequency of the video Adaptor. A: Ensure that the PC or video sources...

User Manual
Page 109
... port on the computer sound card or software program. A: The LCD Display is properly connected. Q: The screen is blank and it is inconsistent. Problems related to Audio Note Problems related to the appropriate levels. Troubleshooting Q: The screen color is blinking. Q: The color white is too high or too low. Problems related to the Remote Control Note Problems related to its power management system. Q: The Power Indicator blinks. A: If you pressing the MENU button, check the cable connection between the LCD Display...
... port on the computer sound card or software program. A: The LCD Display is properly connected. Q: The screen is blank and it is inconsistent. Problems related to Audio Note Problems related to the appropriate levels. Troubleshooting Q: The screen color is blinking. Q: The color white is too high or too low. Problems related to the Remote Control Note Problems related to its power management system. Q: The Power Indicator blinks. A: If you pressing the MENU button, check the cable connection between the LCD Display...
User Manual
Page 110
... Control Panel → Display → Settings. * Contact the video card manufacturer for details.) Q: How can be changed by reconfiguring the video card. Troubleshooting A: Check if the batteries are empty. A: Check if a special fluorescent or neon lamp is on . A: Check if the power is securely connected. Q: How can I play the video. A: Windows ME/2000: Set the resolution at the Control Panel → Display → Screen Saver. A: Disconnect the power cord and then clean the LCD Display with a soft cloth, using...
... Control Panel → Display → Settings. * Contact the video card manufacturer for details.) Q: How can be changed by reconfiguring the video card. Troubleshooting A: Check if the batteries are empty. A: Check if a special fluorescent or neon lamp is on . A: Check if the power is securely connected. Q: How can I play the video. A: Windows ME/2000: Set the resolution at the Control Panel → Display → Screen Saver. A: Disconnect the power cord and then clean the LCD Display with a soft cloth, using...

User Manual
Page 116
... as continuously changing video patterns. Information For a Better Display Adjust the computer resolution and screen injection rate (refresh rate) on screen if the best picture quality is not provided for TFTLCD. • Resolution: 1920 x 1080 • Vertical frequency (refresh rate): 60 Hz TFT-LCD panels manufactured by performing the "Auto Adjustment function" in this product are not satisfied with the picture quality, you can use the Fine/Coarse adjustment function. But the pixels of RED, GREEN, BLUE and WHITE color seem...
... as continuously changing video patterns. Information For a Better Display Adjust the computer resolution and screen injection rate (refresh rate) on screen if the best picture quality is not provided for TFTLCD. • Resolution: 1920 x 1080 • Vertical frequency (refresh rate): 60 Hz TFT-LCD panels manufactured by performing the "Auto Adjustment function" in this product are not satisfied with the picture quality, you can use the Fine/Coarse adjustment function. But the pixels of RED, GREEN, BLUE and WHITE color seem...

User Manual
Page 118
... (Black & White, Grey) Change the characters color periodically • Use Bright colors with little difference in use. • The best way to protect your monitor from Image retention is to turn the Power off, or set your PC or System to operate a Screen Saver program when you are not followed, it . Apply the Screen Scroll function on Product • Apply the Screen Scroll function - Cycle: Display moving image together...
... (Black & White, Grey) Change the characters color periodically • Use Bright colors with little difference in use. • The best way to protect your monitor from Image retention is to turn the Power off, or set your PC or System to operate a Screen Saver program when you are not followed, it . Apply the Screen Scroll function on Product • Apply the Screen Scroll function - Cycle: Display moving image together...


