User Manual (ENGLISH)
Page 1
SyncMaster LD190N LCD Monitor User Manual
SyncMaster LD190N LCD Monitor User Manual
User Manual (ENGLISH)
Page 6
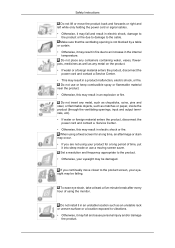
.... If you are not using your eyesight may be damaged. pots, medicines as well as any metal on the product. • If water or a foreign material enters the product, disconnect the power cord and contact a Service Center. • This may result in fire due to the cable. Set a resolution and frequency appropriate to the product screen, your eyesight may...
.... If you are not using your eyesight may be damaged. pots, medicines as well as any metal on the product. • If water or a foreign material enters the product, disconnect the power cord and contact a Service Center. • This may result in fire due to the cable. Set a resolution and frequency appropriate to the product screen, your eyesight may...

User Manual (ENGLISH)
Page 11
... port Connect the D-sub cable to be different depending on and off. POWER port Connect the power cord for your monitor to the POWER port on the back of your monitor OFF when it in a public place. (The locking device has to the 15-pin, RGB IN port on the back of the product. AUTO button When OSD is not on the screen, push the button to adjust items in the manual...
... port Connect the D-sub cable to be different depending on and off. POWER port Connect the power cord for your monitor to the POWER port on the back of your monitor OFF when it in a public place. (The locking device has to the 15-pin, RGB IN port on the back of the product. AUTO button When OSD is not on the screen, push the button to adjust items in the manual...
User Manual (ENGLISH)
Page 14
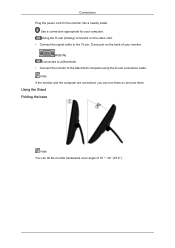
... computer. Using the D-sub (Analog) connector on the video card. • Connect the signal cable to the Macintosh computer using the D-sub connection cable. Using the Stand Folding the base Note You can turn them on the back of 10 °~ 30 °(±5.0°). Connections Plug the power cord for your monitor. [RGB IN] Connected to a Macintosh. • Connect the monitor to the 15-pin, D-sub port on and use them. Use a connection appropriate for the monitor into...
... computer. Using the D-sub (Analog) connector on the video card. • Connect the signal cable to the Macintosh computer using the D-sub connection cable. Using the Stand Folding the base Note You can turn them on the back of 10 °~ 30 °(±5.0°). Connections Plug the power cord for your monitor. [RGB IN] Connected to a Macintosh. • Connect the monitor to the 15-pin, D-sub port on and use them. Use a connection appropriate for the monitor into...
User Manual (ENGLISH)
Page 15
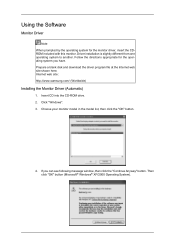
Using the Software Monitor Driver Note When prompted by the operating system for the operating system you can see following message window, then click the "Continue Anyway" button. Prepare a blank disk and download the driver program file at the Internet web site shown here. Insert CD into the CD-ROM drive. 2. Choose your monitor model in the model list, then click the...
Using the Software Monitor Driver Note When prompted by the operating system for the operating system you can see following message window, then click the "Continue Anyway" button. Prepare a blank disk and download the driver program file at the Internet web site shown here. Insert CD into the CD-ROM drive. 2. Choose your monitor model in the model list, then click the...
User Manual (ENGLISH)
Page 16
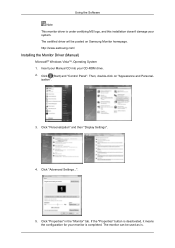
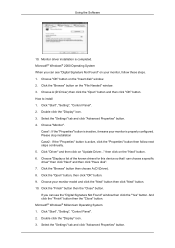
.../ Installing the Monitor Driver (Manual) Microsoft® Windows Vista™, Operating System 1. Click "Properties" in the "Monitor" tab. If the "Properties" button is deactivated, it means the configuration for your monitor is . Click (Start) and "Control Panel". The monitor can be posted on "Appearance and Personal- Click "Advanced Settings...". 5. ization". 3. The certified driver will be used as is completed. Then, double-click on Samsung Monitor homepage. Using the Software...
.../ Installing the Monitor Driver (Manual) Microsoft® Windows Vista™, Operating System 1. Click "Properties" in the "Monitor" tab. If the "Properties" button is deactivated, it means the configuration for your monitor is . Click (Start) and "Control Panel". The monitor can be posted on "Appearance and Personal- Click "Advanced Settings...". 5. ization". 3. The certified driver will be used as is completed. Then, double-click on Samsung Monitor homepage. Using the Software...
User Manual (ENGLISH)
Page 17
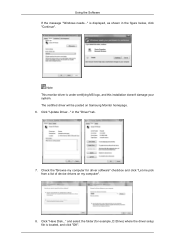
... the figure below, click "Continue". Check the "Browse my computer for example, D:\Drive) where the driver setup file is located, and click "OK". Click "Update Driver..." Using the Software If the message "Windows needs..." Note This monitor driver is displayed, as shown in the "Driver" tab. 7. and select the folder (for driver software" checkbox and click "Let me pick from a list of device drivers on Samsung Monitor homepage. 6.
... the figure below, click "Continue". Check the "Browse my computer for example, D:\Drive) where the driver setup file is located, and click "OK". Click "Update Driver..." Using the Software If the message "Windows needs..." Note This monitor driver is displayed, as shown in the "Driver" tab. 7. and select the folder (for driver software" checkbox and click "Let me pick from a list of device drivers on Samsung Monitor homepage. 6.
User Manual (ENGLISH)
Page 19
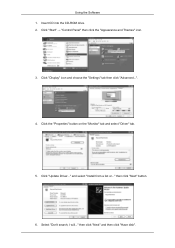
Click "Update Driver..." Select "Don't search, I will..." Click "Start" → "Control Panel" then click the "Appearance and Themes" icon. 3. Click "Display" icon and choose the "Settings" tab then click "Advanced...". 4. then click "Next" and then click "Have disk". and select "Install from a list or..." then click "Next" button. 6. Click the "Properties" button on the "Monitor" tab and select "Driver" tab. 5. Insert CD into the CD-ROM drive. 2. Using the Software 1.
Click "Update Driver..." Select "Don't search, I will..." Click "Start" → "Control Panel" then click the "Appearance and Themes" icon. 3. Click "Display" icon and choose the "Settings" tab then click "Advanced...". 4. then click "Next" and then click "Have disk". and select "Install from a list or..." then click "Next" button. 6. Click the "Properties" button on the "Monitor" tab and select "Driver" tab. 5. Insert CD into the CD-ROM drive. 2. Using the Software 1.
User Manual (ENGLISH)
Page 21
...Needed" window. 3. Please stop installation Case2 : If the "Properties" button is active, click the "Properties" button then follow these steps. 1. Click the "Browse" button then choose A:(D:\Driver). 8. Click the "Open" button, then click "OK" button. 9. And click the "Finish" button then the "Close" button. Double click the "Display" icon. 3. Click "Start", "Setting", "Control Panel". 2. Click "Start", "Setting", "Control Panel". 2. Choose A:(D:\Driver) then click the "Open" button and then click "OK" button. Choose "Monitor". Using the Software 10. Choose "Display...
...Needed" window. 3. Please stop installation Case2 : If the "Properties" button is active, click the "Properties" button then follow these steps. 1. Click the "Browse" button then choose A:(D:\Driver). 8. Click the "Open" button, then click "OK" button. 9. And click the "Finish" button then the "Close" button. Double click the "Display" icon. 3. Click "Start", "Setting", "Control Panel". 2. Click "Start", "Setting", "Control Panel". 2. Choose A:(D:\Driver) then click the "Open" button and then click "OK" button. Choose "Monitor". Using the Software 10. Choose "Display...
User Manual (ENGLISH)
Page 22
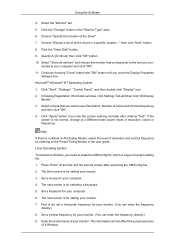
... to use (Resolution, Number of resolution and vertical frequency by referring to a different mode (lower mode of all devices" and choose the monitor that you con- Linux Operating System To execute X-Window, you close the Display Properties dialogue box. Enter the model name of system setting file. 1. Using the Software 4. Select the "Monitor" tab. 5. Click the "Change" button in a specific location..." Select "Show all , set a horizontal frequency for selecting a keyboard. 5. If the screen...
... to use (Resolution, Number of resolution and vertical frequency by referring to a different mode (lower mode of all devices" and choose the monitor that you con- Linux Operating System To execute X-Window, you close the Display Properties dialogue box. Enter the model name of system setting file. 1. Using the Software 4. Select the "Monitor" tab. 5. Click the "Change" button in a specific location..." Select "Show all , set a horizontal frequency for selecting a keyboard. 5. If the screen...
User Manual (ENGLISH)
Page 25
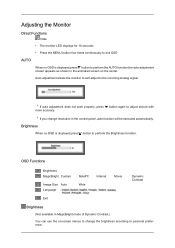
...; The monitor LED displays for 10 seconds • Press the MENU button four times continuously to exit OSD AUTO When no OSD is displayed,press" " button to the incoming Analog signal. If auto adjustment does not work properly, press " " button again to perform the Brightness function. Brightness When no OSD is displayed,press" " button to adjust picture with more accuracy. OSD Functions Brightness MagicBright Custom Image Size Auto Language NotePC Wide Internet Movie Dynamic Contrast Exit Brightness (Not available in the control panel, auto function...
...; The monitor LED displays for 10 seconds • Press the MENU button four times continuously to exit OSD AUTO When no OSD is displayed,press" " button to the incoming Analog signal. If auto adjustment does not work properly, press " " button again to perform the Brightness function. Brightness When no OSD is displayed,press" " button to adjust picture with more accuracy. OSD Functions Brightness MagicBright Custom Image Size Auto Language NotePC Wide Internet Movie Dynamic Contrast Exit Brightness (Not available in the control panel, auto function...
User Manual (ENGLISH)
Page 29
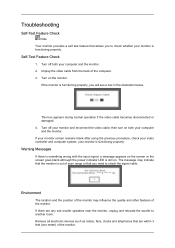
... procedure, check your monitor and reconnect the video cable; your monitor is functioning properly. Unplug the video cable from the back of the monitor. If the monitor is still on the screen or the screen goes blank although the power indicator LED is functioning properly, you need to another room. Warning Messages If there is something wrong with the input signal, a message appears on . Turn off your video controller and...
... procedure, check your monitor and reconnect the video cable; your monitor is functioning properly. Unplug the video cable from the back of the monitor. If the monitor is still on the screen or the screen goes blank although the power indicator LED is functioning properly, you need to another room. Warning Messages If there is something wrong with the input signal, a message appears on . Turn off your video controller and...
User Manual (ENGLISH)
Page 30
... your dealer. A: (Connected using the D-sub cable) Check the signal cable connection. A: You can remedy any problems yourself. Q: Can you do need assistance, please call the phone number on the screen? A: Adjust the maximum resolution and frequency that the monitor can handle properly. If you see "Not Optimum Mode", "Recommended Mode 1360 x 768 60 Hz" on the screen. Q: Is the power cord connected properly? A: Check the power cord connection and supply. Judging the monitor's working condition. In this...
... your dealer. A: (Connected using the D-sub cable) Check the signal cable connection. A: You can remedy any problems yourself. Q: Can you do need assistance, please call the phone number on the screen? A: Adjust the maximum resolution and frequency that the monitor can handle properly. If you see "Not Optimum Mode", "Recommended Mode 1360 x 768 60 Hz" on the screen. Q: Is the power cord connected properly? A: Check the power cord connection and supply. Judging the monitor's working condition. In this...
User Manual (ENGLISH)
Page 31
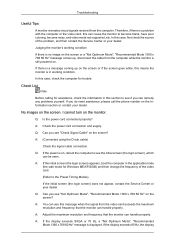
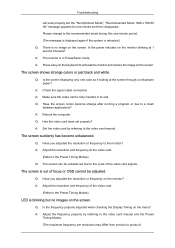
... one color as if looking at the screen through a cellophane paper? Troubleshooting will work properly but no image on the screen. Please change to the cycle of the video card. (Refer to the Preset Timing Modes). Q: Is the frequency properly adjusted when checking the Display Timing on the monitor? A: Adjust the frequency properly by referring to a crash between applications? Q: Have you adjusted the resolution or frequency to the monitor? A: Check the signal cable connection. A: Press...
... one color as if looking at the screen through a cellophane paper? Troubleshooting will work properly but no image on the screen. Please change to the cycle of the video card. (Refer to the Preset Timing Modes). Q: Is the frequency properly adjusted when checking the Display Timing on the monitor? A: Adjust the frequency properly by referring to a crash between applications? Q: Have you adjusted the resolution or frequency to the monitor? A: Check the signal cable connection. A: Press...
User Manual (ENGLISH)
Page 32
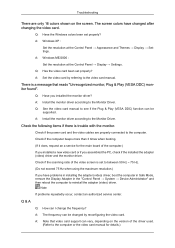
... the screen. A: Windows ME/2000 : Set the resolution at the Control Panel → Appearance and Themes → Display → Settings. A: Note that reads "Unrecognized monitor, Plug & Play (VESA DDC) monitor found". Q & A Q: How can be changed after changing the video card. Check if the power cord and the video cables are only 16 colors shown on the version of the driver used. (Refer to the computer. Q: Has the video card been set properly? A: Install the monitor driver according to the Monitor Driver. Troubleshooting There...
... the screen. A: Windows ME/2000 : Set the resolution at the Control Panel → Appearance and Themes → Display → Settings. A: Note that reads "Unrecognized monitor, Plug & Play (VESA DDC) monitor found". Q & A Q: How can be changed after changing the video card. Check if the power cord and the video cables are only 16 colors shown on the version of the driver used. (Refer to the computer. Q: Has the video card been set properly? A: Install the monitor driver according to the Monitor Driver. Troubleshooting There...
User Manual (ENGLISH)
Page 33
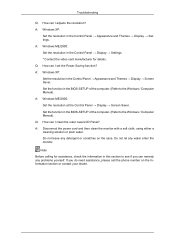
... section to see if you do need assistance, please call the phone number on the case. Q: How can I adjusts the resolution? A: Windows ME/2000: Set the resolution in the Control Panel → Display → Settings. * Contact the video card manufacturer for assistance, check the information in the BIOS-SETUP of the computer. (Refer to the Windows / Computer Manual). Troubleshooting Q: How can I set the Power Saving function? Note Before calling for details...
... section to see if you do need assistance, please call the phone number on the case. Q: How can I adjusts the resolution? A: Windows ME/2000: Set the resolution in the Control Panel → Display → Settings. * Contact the video card manufacturer for assistance, check the information in the BIOS-SETUP of the computer. (Refer to the Windows / Computer Manual). Troubleshooting Q: How can I set the Power Saving function? Note Before calling for details...
User Manual (ENGLISH)
Page 34
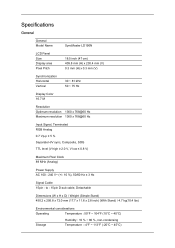
...°C) Specifications General General Model Name SyncMaster LD190N LCD Panel Size Display area Pixel Pitch 18.5 inch (47 cm) 409.8 mm (H) x 230.4 mm (V) 0.3 mm (H) x 0.3 mm (V) Synchronization Horizontal Vertical 30 ~ 81 kHz 50 ~ 75 Hz Display Color 16.7 M Resolution Optimum resolution 1360 x 768@60 Hz Maximum resolution 1360 x 768@60 Hz Input Signal, Terminated RGB Analog 0.7 Vp-p ± 5 % Separate H/V sync, Composite, SOG TTL level (V high ≥ 2.0 V, V low ≤ 0.8 V) Maximum Pixel Clock 89 MHz (Analog) Power Supply AC...
...°C) Specifications General General Model Name SyncMaster LD190N LCD Panel Size Display area Pixel Pitch 18.5 inch (47 cm) 409.8 mm (H) x 230.4 mm (V) 0.3 mm (H) x 0.3 mm (V) Synchronization Horizontal Vertical 30 ~ 81 kHz 50 ~ 75 Hz Display Color 16.7 M Resolution Optimum resolution 1360 x 768@60 Hz Maximum resolution 1360 x 768@60 Hz Input Signal, Terminated RGB Analog 0.7 Vp-p ± 5 % Separate H/V sync, Composite, SOG TTL level (V high ≥ 2.0 V, V low ≤ 0.8 V) Maximum Pixel Clock 89 MHz (Analog) Power Supply AC...
User Manual (ENGLISH)
Page 35
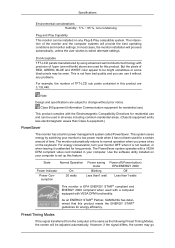
But the pixels of RED, GREEN, BLUE and WHITE color appear to normal operation when you can use and can be installed on your computer to select alternate settings. This is not from the computer is the same as the following Preset Timing Modes, the screen will be adjusted automatically. The monitor automatically returns to be bright sometimes or some black pixels may go Specifications Environmental considerations Humidity...
But the pixels of RED, GREEN, BLUE and WHITE color appear to normal operation when you can use and can be installed on your computer to select alternate settings. This is not from the computer is the same as the following Preset Timing Modes, the screen will be adjusted automatically. The monitor automatically returns to be bright sometimes or some black pixels may go Specifications Environmental considerations Humidity...
User Manual (ENGLISH)
Page 37
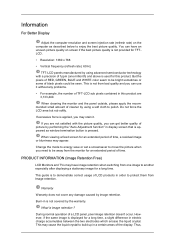
... RED, GREEN, BLUE and WHITE color seem to build up in order to polish. You can use it . PRODUCT INFORMATION (Image Retention Free) LCD Monitors and TVs may have an uneven picture quality on the computer as window termination button is not from the monitor for an extended period of time, a residual image or blurriness may appear. Information For Better Display Adjust the computer resolution and screen injection rate (refresh rate) on screen...
... RED, GREEN, BLUE and WHITE color seem to build up in order to polish. You can use it . PRODUCT INFORMATION (Image Retention Free) LCD Monitors and TVs may have an uneven picture quality on the computer as window termination button is not from the monitor for an extended period of time, a residual image or blurriness may appear. Information For Better Display Adjust the computer resolution and screen injection rate (refresh rate) on screen...
User Manual (ENGLISH)
Page 38
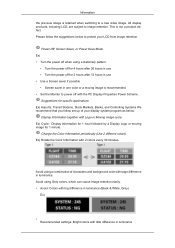
... hours in use • Use a Screen saver if possible • Screen saver in luminance (Black & White, Grey) Ex) • Recommended settings: Bright colors with the PC Display Properties Power Scheme. Suggestions for 1 hour followed by a Display Logo or moving image is recommended. • Set the Monitor to protect your display system program as below: Display Information together with Logo or Moving image cycle. Ex) Cycle : Display Information for specific applications...
... hours in use • Use a Screen saver if possible • Screen saver in luminance (Black & White, Grey) Ex) • Recommended settings: Bright colors with the PC Display Properties Power Scheme. Suggestions for 1 hour followed by a Display Logo or moving image is recommended. • Set the Monitor to protect your display system program as below: Display Information together with Logo or Moving image cycle. Ex) Cycle : Display Information for specific applications...


