User Manual
Page 4
... long period of features 6 ■Front & Top 6 ■Back & Bottom 7 ■Bottom / 5-function button 8 ■Self-timer lamp 8 ■Camera Status Lamp 8 ■Mode icon 9 ●Connecting to a Power Source 9 ●Inserting the memory card 10 ●Instructions on how to use the memory ...card 11 RECORDING ●LCD monitor indicator 13 ●Changing the recording mode 14 ■Selecting the [MODE] menu 14 ■Changing the recording mode 14 ●...
... long period of features 6 ■Front & Top 6 ■Back & Bottom 7 ■Bottom / 5-function button 8 ■Self-timer lamp 8 ■Camera Status Lamp 8 ■Mode icon 9 ●Connecting to a Power Source 9 ●Inserting the memory card 10 ●Instructions on how to use the memory ...card 11 RECORDING ●LCD monitor indicator 13 ●Changing the recording mode 14 ■Selecting the [MODE] menu 14 ■Changing the recording mode 14 ●...
User Manual
Page 5
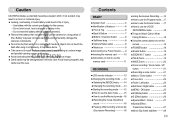
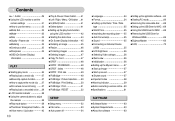
Contents ■+ / - button 29 ●Using the LCD monitor to set the camera settings 31 ■How to use the menu 32 ■Mode Set 33 ■Mode 33 ■Size 34 ■Quality / Frame rate 34 ■...;Movie clip capture function 37 ■How to capture the movie clip 37 ■On camera movie trimming 37 ■Playing back a recorded voice 38 ●LCD monitor indicator 38 ●Using the camera buttons to adjust the camera 38 ■Play mode button 38 ■Thumbnail / Enlargement button 39 ■Voice memo / Up...
Contents ■+ / - button 29 ●Using the LCD monitor to set the camera settings 31 ■How to use the menu 32 ■Mode Set 33 ■Mode 33 ■Size 34 ■Quality / Frame rate 34 ■...;Movie clip capture function 37 ■How to capture the movie clip 37 ■On camera movie trimming 37 ■Playing back a recorded voice 38 ●LCD monitor indicator 38 ●Using the camera buttons to adjust the camera 38 ■Play mode button 38 ■Thumbnail / Enlargement button 39 ■Voice memo / Up...
User Manual
Page 8
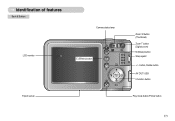
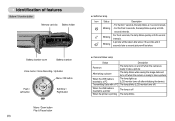
button, Delete button AV OUT/ USB 5 function button Play mode button/Printer button 《7》 Identification of features Back & Bottom Camera status lamp LCD monitor E (Effects) button Tripod socket Zoom W button (Thumbnail) Zoom T button (Digital zoom) M (Mode) button Strap eyelet + / -
button, Delete button AV OUT/ USB 5 function button Play mode button/Printer button 《7》 Identification of features Back & Bottom Camera status lamp LCD monitor E (Effects) button Tripod socket Zoom W button (Thumbnail) Zoom T button (Digital zoom) M (Mode) button Strap eyelet + / -
User Manual
Page 9
...taken after about 10 seconds and 2 Blinking seconds later a second picture will be taken. ■ Camera Status Lamp Status Description Power on After taking a picture The lamp turns on and off when the camera is ready to take a picture The lamp blinks while saving the image data and turns off when... the camera is ready to take a picture When the USB cable is The lamp lights up inserted to a PC (LCD monitor turns off after initializing the device) Transmitting Data with a PC The lamp blinks (LCD monitor turns off) When the USB cable is inserted...
...taken after about 10 seconds and 2 Blinking seconds later a second picture will be taken. ■ Camera Status Lamp Status Description Power on After taking a picture The lamp turns on and off when the camera is ready to take a picture The lamp blinks while saving the image data and turns off when... the camera is ready to take a picture When the USB cable is The lamp lights up inserted to a PC (LCD monitor turns off after initializing the device) Transmitting Data with a PC The lamp blinks (LCD monitor turns off) When the USB cable is inserted...
User Manual
Page 11
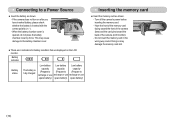
...the front of the memory card facing toward the front of the camera (lens) and the card pins toward the back of the camera (LCD monitor). - Do not insert the memory card in the wrong way... correct polarity (+ / -). - This may damage the memory card slot. 《10》 Turn off the camera's power before inserting the memory card. - Connecting to recharge or use recharge or use recharge or use spare battery...memory card ■ Insert the memory card as shown - If the camera does not turn on the LCD monitor. When the battery chamber cover is opened, do not press the battery chamber cover...
...the front of the memory card facing toward the front of the camera (lens) and the card pins toward the back of the camera (LCD monitor). - Do not insert the memory card in the wrong way... correct polarity (+ / -). - This may damage the memory card slot. 《10》 Turn off the camera's power before inserting the memory card. - Connecting to recharge or use recharge or use recharge or use spare battery...memory card ■ Insert the memory card as shown - If the camera does not turn on the LCD monitor. When the battery chamber cover is opened, do not press the battery chamber cover...
User Manual
Page 14
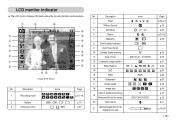
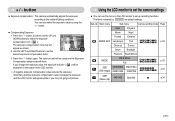
...Camera shake warning 11 Date / Time 12 Exposure compensation 13 White Balance 14 ISO 15 RGB 16 Sharpness 17 Image quality 18 Image size Number of available shots remaining 19 Remaining time (Movie clip / Voice recording) 20 Voice memo 21 Optical/ Digital Zoom bar/ Digital...~20 《13》 Description 1 Recording mode 2 Battery 3 Continuous shot Icons AEB Page p.15~18 p.10 p.35 No. LCD monitor indicator ■ The LCD monitor displays information about the shooting functions and selections. ① ⑳ ⑲ ② ⑱ ③ ⑰ &#...
...Camera shake warning 11 Date / Time 12 Exposure compensation 13 White Balance 14 ISO 15 RGB 16 Sharpness 17 Image quality 18 Image size Number of available shots remaining 19 Remaining time (Movie clip / Voice recording) 20 Voice memo 21 Optical/ Digital Zoom bar/ Digital...~20 《13》 Description 1 Recording mode 2 Battery 3 Continuous shot Icons AEB Page p.15~18 p.10 p.35 No. LCD monitor indicator ■ The LCD monitor displays information about the shooting functions and selections. ① ⑳ ⑲ ② ⑱ ③ ⑰ &#...

User Manual
Page 16
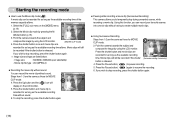
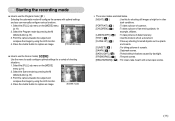
... the mode selection menu will display. 7. Select the Auto mode by using the LCD monitor. 4. To select the Auto, Program, Movie clip or Scene modes, press the Left / Right button. Point the camera towards the subject and compose the image by pressing the M (Mode) button (p.15). 3. Press the M (Mode)... an image clearly. ●Avoid obstructing the lens or the flash when you press the shutter button down half way, it means that the camera cannot focus on the subject. Press the shutter button to capture an image. [AUTO mode] AUTO Confirm:Mode/OK [Mode selection menu] [...
... the mode selection menu will display. 7. Select the Auto mode by using the LCD monitor. 4. To select the Auto, Program, Movie clip or Scene modes, press the Left / Right button. Point the camera towards the subject and compose the image by pressing the M (Mode) button (p.15). 3. Press the M (Mode)... an image clearly. ●Avoid obstructing the lens or the flash when you press the shutter button down half way, it means that the camera cannot focus on the subject. Press the shutter button to capture an image. [AUTO mode] AUTO Confirm:Mode/OK [Mode selection menu] [...
User Manual
Page 17
...user selectable) - To stop the recording, press the shutter button again. ■ Pausing while recording a movie clip (Successive Recording) This camera allows you wish to temporarily stop during unwanted scenes, while recording a movie clip. Press the shutter button and movie clips are listed below. ... clip] button is released. 4. Press the Pause button ( ) to resume the recording. 6. Point the camera towards the subject and compose the image by using the LCD monitor. 4. If you can record your favourite scenes into a movie clip without having to use the Movie clip...
...user selectable) - To stop the recording, press the shutter button again. ■ Pausing while recording a movie clip (Successive Recording) This camera allows you wish to temporarily stop during unwanted scenes, while recording a movie clip. Press the shutter button and movie clips are listed below. ... clip] button is released. 4. Press the Pause button ( ) to resume the recording. 6. Point the camera towards the subject and compose the image by using the LCD monitor. 4. If you can record your favourite scenes into a movie clip without having to use the Movie clip...
User Manual
Page 18
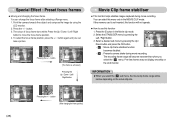
Select the [FULL] sub menu on the [MODE] menu (p.14). 2. Point the camera towards the subject and compose the image by using the LCD monitor. 4. Select the [FULL] sub menu on the [MODE] menu (p.14). 2. Press the shutter button to capture an image. ... the menu to easily configure optimal settings for small objects such as plants and insects. [SUNSET] ( ) : For taking pictures of shooting situations. 1. Point the camera towards the subject and compose the image by backlight. [FIREWORKS] ( ) : Firework scenes. [BEACH&SNOW] ( ) : For ocean, lake, beach and snowscape ...
Select the [FULL] sub menu on the [MODE] menu (p.14). 2. Point the camera towards the subject and compose the image by using the LCD monitor. 4. Select the [FULL] sub menu on the [MODE] menu (p.14). 2. Press the shutter button to capture an image. ... the menu to easily configure optimal settings for small objects such as plants and insects. [SUNSET] ( ) : For taking pictures of shooting situations. 1. Point the camera towards the subject and compose the image by backlight. [FIREWORKS] ( ) : Firework scenes. [BEACH&SNOW] ( ) : For ocean, lake, beach and snowscape ...

User Manual
Page 19
... surroundings are dark. Voice will be recorded if the shutter button is released. Taking a picture against the sun may appear on shooting conditions and camera settings. ■ When the Flash Off or Slow synchro mode is selected in flash (see page 23), spot metering (see page 35), or...will still be displayed on a solid surface or change to flash shot mode. ■ Shooting against the sun, please use a tripod, support the camera on the LCD monitor. If you wish to record a voice. - Press the shutter button once and voice is moving at high speed. - Lightly press the ...
... surroundings are dark. Voice will be recorded if the shutter button is released. Taking a picture against the sun may appear on shooting conditions and camera settings. ■ When the Flash Off or Slow synchro mode is selected in flash (see page 23), spot metering (see page 35), or...will still be displayed on a solid surface or change to flash shot mode. ■ Shooting against the sun, please use a tripod, support the camera on the LCD monitor. If you wish to record a voice. - Press the shutter button once and voice is moving at high speed. - Lightly press the ...
User Manual
Page 22
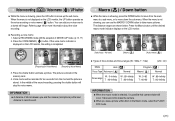
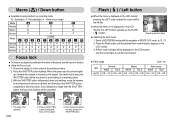
... W : 80~Infinity T : 80~Infinity INFORMATION ● When the macro mode is selected, it is stored. The picture is not displayed on the LCD monitor, the setting is completed. [Preparing for ten seconds from the main menu to a sub menu, or to move down the sub menu. INFORMATION &#... Macro ( ) / Down button ■ While the menu is showing, press the DOWN button to move from the moment the picture is possible that camera shake will occur. Press the Macro button until the desired macro mode indicator displays on the memory card. 4. Voice recording ( ) / Voice memo ( ...
... W : 80~Infinity T : 80~Infinity INFORMATION ● When the macro mode is selected, it is stored. The picture is not displayed on the LCD monitor, the setting is completed. [Preparing for ten seconds from the main menu to a sub menu, or to move down the sub menu. INFORMATION &#... Macro ( ) / Down button ■ While the menu is showing, press the DOWN button to move from the moment the picture is possible that camera shake will occur. Press the Macro button until the desired macro mode indicator displays on the memory card. 4. Voice recording ( ) / Voice memo ( ...
User Manual
Page 23
... the picture, use the focus lock function. ● Using the Focus Lock 1. When the green auto focus frame lights up, it means the camera is displayed on the LCD monitor, the LEFT button operates as desired, and then press the SHUTTER button completely to recompose your finger from the SHUTTER button, the...
... the picture, use the focus lock function. ● Using the Focus Lock 1. When the green auto focus frame lights up, it means the camera is displayed on the LCD monitor, the LEFT button operates as desired, and then press the SHUTTER button completely to recompose your finger from the SHUTTER button, the...
User Manual
Page 24
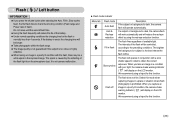
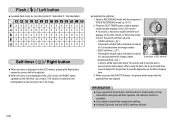
...conditions the charging time for this function. Select this mode when capturing images in a poorly lit condition, the camera shake warning indicator ( ) will display on the LCD monitor. The speck is , the less intense the flash will operate automatically. The intensity of the flash will ...in the captured image. When you capture an image in a place or situation where flash photography is dark, the camera flash will work automatically and will display on the LCD monitor. Flash ( ) / Left button INFORMATION ● If you press the shutter button after selecting the Auto, ...
...conditions the charging time for this function. Select this mode when capturing images in a poorly lit condition, the camera shake warning indicator ( ) will display on the LCD monitor. The speck is , the less intense the flash will operate automatically. The intensity of the flash will ...in the captured image. When you capture an image in a place or situation where flash photography is dark, the camera flash will work automatically and will display on the LCD monitor. Flash ( ) / Left button INFORMATION ● If you press the shutter button after selecting the Auto, ...
User Manual
Page 25
... Self-timer ( ) button. Press the SELF-TIMER button until the desired mode indicator displays on the LCD monitor. This function is used when the photographer would also like to prevent the camera from shaking. ● In Movie Clip mode, only the 10SEC self-timer will allow an interval of..., the self-timer function is cancelled. ● Use a tripod to be taken. A 10 second, 2 second or double self-timer icon appears on the LCD monitor. When using the flash, the 2-second self-timer may be taken after the specified time has elapsed. Flash ( ) / Left button ● Available ...
... Self-timer ( ) button. Press the SELF-TIMER button until the desired mode indicator displays on the LCD monitor. This function is used when the photographer would also like to prevent the camera from shaking. ● In Movie Clip mode, only the 10SEC self-timer will allow an interval of..., the self-timer function is cancelled. ● Use a tripod to be taken. A 10 second, 2 second or double self-timer icon appears on the LCD monitor. When using the flash, the 2-second self-timer may be taken after the specified time has elapsed. Flash ( ) / Left button ● Available ...
User Manual
Page 26
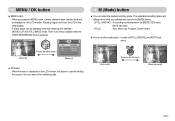
...is no menu available when the VOICE RECORDING mode is selected. [Menu off] [Pressing the MENU button] SIZE 3072x2304 2592x1944 2048x1536 1024x768 [Menu on the LCD monitor, this button is displayed on ] ■ OK button - M (Mode) button ■ You can be displayed when the followings are different ...from what you press the MENU button, a menu related to the sub menu or for shifting the cursor to each camera mode will return the LCD to use the mode button : In case of [STILL & MOVIE] and [AUTO] sub menu [Auto mode] [Pressing the M button] [Movie ...
...is no menu available when the VOICE RECORDING mode is selected. [Menu off] [Pressing the MENU button] SIZE 3072x2304 2592x1944 2048x1536 1024x768 [Menu on the LCD monitor, this button is displayed on ] ■ OK button - M (Mode) button ■ You can be displayed when the followings are different ...from what you press the MENU button, a menu related to the sub menu or for shifting the cursor to each camera mode will return the LCD to use the mode button : In case of [STILL & MOVIE] and [AUTO] sub menu [Auto mode] [Pressing the M button] [Movie ...
User Manual
Page 29
...menu by pressing the Up / Down button and press the OK button. - : Movie clip frame stabiliser function Stabilizer becomes disabled. - : Prevents camera shake during movie recording. Pre-view frames may not display smoothly on the movie clip size. Capture:SH Edit:+/- Press the + / - button again... How to move the focus frame position. 4. The recording frame range will be narrow depending on the LCD monitor. Capture:SH Edit:+/- Select the STABILISER menu by using the LCD monitor. 2. button Capture:SH Move: [The frame is not inserted, this menu only in the Movie...
...menu by pressing the Up / Down button and press the OK button. - : Movie clip frame stabiliser function Stabilizer becomes disabled. - : Prevents camera shake during movie recording. Pre-view frames may not display smoothly on the movie clip size. Capture:SH Edit:+/- Press the + / - button again... How to move the focus frame position. 4. The recording frame range will be narrow depending on the LCD monitor. Capture:SH Edit:+/- Select the STABILISER menu by using the LCD monitor. 2. button Capture:SH Move: [The frame is not inserted, this menu only in the Movie...
User Manual
Page 31
...fluorescent lighting. The value you to adjust the colours to the shooting condition. Select the CUSTOM ( ) menu of the camera so that the LCD monitor shows only white, and then press the SHUTTER button. 3. The user configured white balance will end. ● Using...button again. Fluorescent H : For shooting under tungsten (standard light bulb) lighting. AUTO : The camera automatically selects the appropriate white balance settings, depending on the LCD monitor. Place a sheet of white paper in front of the White Balance. 2. button ■ ...
...fluorescent lighting. The value you to adjust the colours to the shooting condition. Select the CUSTOM ( ) menu of the camera so that the LCD monitor shows only white, and then press the SHUTTER button. 3. The user configured white balance will end. ● Using...button again. Fluorescent H : For shooting under tungsten (standard light bulb) lighting. AUTO : The camera automatically selects the appropriate white balance settings, depending on the LCD monitor. Place a sheet of white paper in front of the White Balance. 2. button ■ ...
User Manual
Page 32
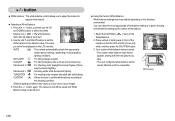
... recording functions. The value you may not get good pictures. Note that a positive exposure compensation value increases the exposure and the LCD monitor will close. button ■ Exposure compensation : This camera automatically adjusts the exposure according to set the desired exposure compensation factor. 3. Press the + / - Use the LEFT and RIGHT buttons to...
... recording functions. The value you may not get good pictures. Note that a positive exposure compensation value increases the exposure and the LCD monitor will close. button ■ Exposure compensation : This camera automatically adjusts the exposure according to set the desired exposure compensation factor. 3. Press the + / - Use the LEFT and RIGHT buttons to...
User Manual
Page 33
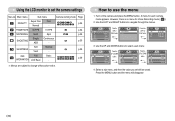
... the LEFT or RIGHT button. Select a sub menu, and then the value you set the camera settings Menu tab Main menu Sub menu Camera working mode Page Super Fine Fine QUALITY p.34 Normal - OSD Full INFORMATION LCD Save Basic - A menu for Voice Recording mode ( ). 2. Move: MODE SET Auto Program...MODE SET Auto Program Movie Night Portrait Set:OK Press the UP or DOWN button. Using the LCD monitor to set will disappear. 《32》 However, there is no menu for each camera mode appears. p.36 ※ Menus are subject to navigate through the menus. Turn on the...
... the LEFT or RIGHT button. Select a sub menu, and then the value you set the camera settings Menu tab Main menu Sub menu Camera working mode Page Super Fine Fine QUALITY p.34 Normal - OSD Full INFORMATION LCD Save Basic - A menu for Voice Recording mode ( ). 2. Move: MODE SET Auto Program...MODE SET Auto Program Movie Night Portrait Set:OK Press the UP or DOWN button. Using the LCD monitor to set will disappear. 《32》 However, there is no menu for each camera mode appears. p.36 ※ Menus are subject to navigate through the menus. Turn on the...
User Manual
Page 36
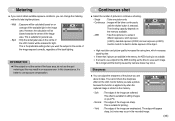
...for light. This is best to decide exposure of the object. ※ High resolution and picture quality increases file saving time, which increases stand-by camera shake may occur. Continuous shot ■ Select the number of pictures in different exposures: short exposure (-0.5EV), standard exposure (0.0EV) and over exposure...the captured image is not the centre of the focus area, do not use . : Only the rectangular area in the centre of the LCD monitor will be METERING Multi Spot biased towards the centre of the image area. This is longer and the blurring caused by time. ※...
...for light. This is best to decide exposure of the object. ※ High resolution and picture quality increases file saving time, which increases stand-by camera shake may occur. Continuous shot ■ Select the number of pictures in different exposures: short exposure (-0.5EV), standard exposure (0.0EV) and over exposure...the captured image is not the centre of the focus area, do not use . : Only the rectangular area in the centre of the LCD monitor will be METERING Multi Spot biased towards the centre of the image area. This is longer and the blurring caused by time. ※...


