
User Guide
Page 6
... dust, high or low temperatures, high humidity, chemical substances and where it operates for disposal. charger, headset, USB cable) should not be mixed with other commercial wastes for 24 hours such as wax, benzene, alcohol, thinners, insecticide, air freshener, lubricant or detergent. Be sure to place your product. Make sure to contact an authorized service Center, when installing your product...
... dust, high or low temperatures, high humidity, chemical substances and where it operates for disposal. charger, headset, USB cable) should not be mixed with other commercial wastes for 24 hours such as wax, benzene, alcohol, thinners, insecticide, air freshener, lubricant or detergent. Be sure to place your product. Make sure to contact an authorized service Center, when installing your product...

User Guide
Page 8
... supported. Increases the connectivity to peripheral devices by optimizing the internal air flow and the fan installation structure. The unit has a reference pattern that can be used for positioning and adjustment. | Product Features | Product Views | Remote Control | Product Specifications | Front/Upper Side | Product Features | Product Views | Remote Control | Product Specifications | An optical engine adopting new LCD technology - 1024 x 768 panel has been adapted. - SP-L220 : Provides a bright screen of each input port. - Various input...
... supported. Increases the connectivity to peripheral devices by optimizing the internal air flow and the fan installation structure. The unit has a reference pattern that can be used for positioning and adjustment. | Product Features | Product Views | Remote Control | Product Specifications | Front/Upper Side | Product Features | Product Views | Remote Control | Product Specifications | An optical engine adopting new LCD technology - 1024 x 768 panel has been adapted. - SP-L220 : Provides a bright screen of each input port. - Various input...

User Guide
Page 9
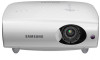
... in all locations) User Manual CD MENU Button Use this button to or select an item within a menu. 8. SOURCE Button Used to the LED Indications. 6. 1. Lens 7. POWER( ) Button Used to enlarge or reduce image size. 10.Lens cover 4. Focus Ring Used for Focus Adjustment. 3. Unpacking Quick Installation Guide / Safety Guide Warranty Card/ Registration Card (Not available in a menu. 9. STAND BY (Blue LED) 5. Zoom Knob Used to turn the projector on or off. - VOL - / + & Select and Move Button Adjusts the volume. Indicators - Remote Control Signal Receiver...
... in all locations) User Manual CD MENU Button Use this button to or select an item within a menu. 8. SOURCE Button Used to the LED Indications. 6. 1. Lens 7. POWER( ) Button Used to enlarge or reduce image size. 10.Lens cover 4. Focus Ring Used for Focus Adjustment. 3. Unpacking Quick Installation Guide / Safety Guide Warranty Card/ Registration Card (Not available in a menu. 9. STAND BY (Blue LED) 5. Zoom Knob Used to turn the projector on or off. - VOL - / + & Select and Move Button Adjusts the volume. Indicators - Remote Control Signal Receiver...

User Guide
Page 10
... 3 The status that the lens cover does not open completely while operating the projector, both the video and audio are locked normally, contact your product provider or our service center. Check if the screws on the remote control or projector, the screen appears within 30 seconds. The POWER button is pressed to turn off the projector, and the cooling system is in operation to Action 1 below if the lamp cover protecting the lamp unit...
... 3 The status that the lens cover does not open completely while operating the projector, both the video and audio are locked normally, contact your product provider or our service center. Check if the screws on the remote control or projector, the screen appears within 30 seconds. The POWER button is pressed to turn off the projector, and the cooling system is in operation to Action 1 below if the lamp cover protecting the lamp unit...

User Guide
Page 11
Check the air filter and clean if blocked. The lamp malfunctions after power turns off abnormally or after turning off the projector. RS-232C port (For service input terminals) 4. [AV IN] R-AUDIO-L Input port 5. [AV IN] VIDEO Input port 6. [AV IN] S-VIDEO Input port 7. [PC IN1,2] PC Input port 8. [PC IN1,2] AUDIO Input port 9. Remote Control Signal Receiver 10.POWER Input port If the same problem occurs continually, contact your product distributor or service center. PC OUT port 2. Turn the power off automatically. Operation of the cooling fan may cause...
Check the air filter and clean if blocked. The lamp malfunctions after power turns off abnormally or after turning off the projector. RS-232C port (For service input terminals) 4. [AV IN] R-AUDIO-L Input port 5. [AV IN] VIDEO Input port 6. [AV IN] S-VIDEO Input port 7. [PC IN1,2] PC Input port 8. [PC IN1,2] AUDIO Input port 9. Remote Control Signal Receiver 10.POWER Input port If the same problem occurs continually, contact your product distributor or service center. PC OUT port 2. Turn the power off automatically. Operation of the cooling fan may cause...

User Guide
Page 12
... turn off the video and audio temporarily. POWER ( ) Button 2. EXIT ( ) Button 13. BLANK This is pressed. 8. MENU ( ) Button 4. V.KEYSTONE(+/-) (VERTICAL KEYSTONE)Button 6. BLANK Button 8. MUTE ( ) Button 11. RETURN ( ) Button 12. VOL Button 14. SOURCE Button 16. AUTO Adjusts the Picture automatically. (Available in PC Mode Only) 3. INSTALL Used to or select each menu item. 5. INFO Button 15. P.MODE Button 17. Move Used to move to flip or reverse the projected image. 7. P.SIZE Used to display Menu Screen. 4. | Product Features | Product Views | Remote Control...
... turn off the video and audio temporarily. POWER ( ) Button 2. EXIT ( ) Button 13. BLANK This is pressed. 8. MENU ( ) Button 4. V.KEYSTONE(+/-) (VERTICAL KEYSTONE)Button 6. BLANK Button 8. MUTE ( ) Button 11. RETURN ( ) Button 12. VOL Button 14. SOURCE Button 16. AUTO Adjusts the Picture automatically. (Available in PC Mode Only) 3. INSTALL Used to or select each menu item. 5. INFO Button 15. P.MODE Button 17. Move Used to move to flip or reverse the projected image. 7. P.SIZE Used to display Menu Screen. 4. | Product Features | Product Views | Remote Control...

User Guide
Page 13
... better performance. STILL Used to check source signals, picture setup, PC screen adjustment and lamp lifespan. 15. P.MODE Used to make Menu Screen disappear. 13. To hear sound again, press the MUTE button again or press the - VOL Adjusts the volume. 14. 9. Specifications Model Panel Resolution Aspect ratio Brightness Contrast Diagonal screen size Projection Range Zoom Adjustment Focus Adjustment Lens Zoom Ratio Keystone Lamp Power Consumption Life Time D-Sub 15p x 2 Input Terminal Mini DIN x 1 SP-L250, SP-L220, SP-L200 0.63" 3P LCD XGA (1024 x 768) 4:3 Max...
... better performance. STILL Used to check source signals, picture setup, PC screen adjustment and lamp lifespan. 15. P.MODE Used to make Menu Screen disappear. 13. To hear sound again, press the MUTE button again or press the - VOL Adjusts the volume. 14. 9. Specifications Model Panel Resolution Aspect ratio Brightness Contrast Diagonal screen size Projection Range Zoom Adjustment Focus Adjustment Lens Zoom Ratio Keystone Lamp Power Consumption Life Time D-Sub 15p x 2 Input Terminal Mini DIN x 1 SP-L250, SP-L220, SP-L200 0.63" 3P LCD XGA (1024 x 768) 4:3 Max...

User Guide
Page 14
...number of the product. Class A is for office use. Like other video display devices, the LCD panel may have some dead pixels, this does not affect the overall screen quality and the lifetime of bad pixels that a LCD panel is for business while class B emits less electromagnetic waves than class A. Supported Display Modes PC Timing Format IBM IBM IBM VESA MAC... It may be used in all areas. Though a screen may contain bad pixels which do not operate. When shipping a product, the conditions for residential use . The LCD panel used in the LCD projector consists of hundreds of...
...number of the product. Class A is for office use. Like other video display devices, the LCD panel may have some dead pixels, this does not affect the overall screen quality and the lifetime of bad pixels that a LCD panel is for business while class B emits less electromagnetic waves than class A. Supported Display Modes PC Timing Format IBM IBM IBM VESA MAC... It may be used in all areas. Though a screen may contain bad pixels which do not operate. When shipping a product, the conditions for residential use . The LCD panel used in the LCD projector consists of hundreds of...

User Guide
Page 16
... screen. When installing the screen in the following locations: Front-Floor / Front-Ceiling / Rear-Floor / Rear-Ceiling. (To view the installation position settings) To view the picture when installing the projector behind the screen, Install a semi-transparent screen. Select Menu > Setup > Install > Front-Floor Zoom and Focus Adjustment Zoom Knob Focus Ring | Basic Settings | Connecting the Power | Connecting an External Device | Installing the Projector Install the projector so that the lens is perpendicular to the screen. Do not install the screen in the front of the screen...
... screen. When installing the screen in the following locations: Front-Floor / Front-Ceiling / Rear-Floor / Rear-Ceiling. (To view the installation position settings) To view the picture when installing the projector behind the screen, Install a semi-transparent screen. Select Menu > Setup > Install > Front-Floor Zoom and Focus Adjustment Zoom Knob Focus Ring | Basic Settings | Connecting the Power | Connecting an External Device | Installing the Projector Install the projector so that the lens is perpendicular to the screen. Do not install the screen in the front of the screen...

User Guide
Page 18
... the display mode table supported by referring to your projector. 1. Click the right mouse button on the Windows desktop and click on a 80 ~ 120 inch sized screen. tab will appear. Press the [Advanced] button. Another property window will appear. 2. Click on [Settings] tab and set the by this projector. You do not have to Image Bottom Setting up the PC Environment - Screen Z: Throw Distance Y': Distance from Lens Center to change setup...
... the display mode table supported by referring to your projector. 1. Click the right mouse button on the Windows desktop and click on a 80 ~ 120 inch sized screen. tab will appear. Press the [Advanced] button. Another property window will appear. 2. Click on [Settings] tab and set the by this projector. You do not have to Image Bottom Setting up the PC Environment - Screen Z: Throw Distance Y': Distance from Lens Center to change setup...

User Guide
Page 19
Shut down the PC and connect to display settings supported by referring to close the window. If not, there may restart automatically. 6. Process might vary depending on the rear side of the window to 24 bits per pixel in Color quality when it is used as described in the Supported Resolution/Size Modes table. 5. Rear of Projector Plug the power cord into the power terminal on your type...
Shut down the PC and connect to display settings supported by referring to close the window. If not, there may restart automatically. 6. Process might vary depending on the rear side of the window to 24 bits per pixel in Color quality when it is used as described in the Supported Resolution/Size Modes table. 5. Rear of Projector Plug the power cord into the power terminal on your type...

User Guide
Page 22
... speaker. Connecting using a Video/S-Video cable First, check that the AV device and your AV device using an external speaker, the internal speaker does not operate, but you can output all audio signals. The [AUDIO OUT] terminal can adjust the volume of the external speaker using an audio cable (Not supplied). Prepare an audio cable (Not supplied) suitable for your AV device using the Volume button of the projector (or remote control). - Connecting an External...
... speaker. Connecting using a Video/S-Video cable First, check that the AV device and your AV device using an external speaker, the internal speaker does not operate, but you can output all audio signals. The [AUDIO OUT] terminal can adjust the volume of the external speaker using an audio cable (Not supplied). Prepare an audio cable (Not supplied) suitable for your AV device using the Volume button of the projector (or remote control). - Connecting an External...

User Guide
Page 24
... LED indicator is connected. Close the lens cover. Press the Enter button or press the Power button again. Selecting an input source Press the SOURCE button (on the remote control or at the top of the projector), the blue LAMP LED indicator blinks. Turning off and the STAND BY LED indicator is displayed. When the operation is finished, the LAMP LED indicator is turned off the projector Press the Power button. (With the remote control or on and remains blue. Turn the power on . Check that the lens cover is turned...
... LED indicator is connected. Close the lens cover. Press the Enter button or press the Power button again. Selecting an input source Press the SOURCE button (on the remote control or at the top of the projector), the blue LAMP LED indicator blinks. Turning off and the STAND BY LED indicator is displayed. When the operation is finished, the LAMP LED indicator is turned off the projector Press the Power button. (With the remote control or on and remains blue. Turn the power on . Check that the lens cover is turned...

User Guide
Page 26
... the White level. Adjustable range: -3 to +3 Contrast Brightness Sharpness Color Tint Color Temperature R-Gain G-Gain B-Gain R-Offset G-Offset B-Offset Gamma 9) Save :You can select a screen size according to the factory defaults. For [AV],[S-Video] and the 480i and 576i signals of AV Timing(D-Sub). 1) 0 IRE : Sets the black level to 0 IRE 2) 7.5 IRE : Sets the black level to your preferences using Green or Red enhancement. ▶ When the input signal...
... the White level. Adjustable range: -3 to +3 Contrast Brightness Sharpness Color Tint Color Temperature R-Gain G-Gain B-Gain R-Offset G-Offset B-Offset Gamma 9) Save :You can select a screen size according to the factory defaults. For [AV],[S-Video] and the 480i and 576i signals of AV Timing(D-Sub). 1) 0 IRE : Sets the black level to 0 IRE 2) 7.5 IRE : Sets the black level to your preferences using Green or Red enhancement. ▶ When the input signal...

User Guide
Page 27
... the factory default settings. Auto Adjustment Coarse Fine Reset | Basic Functions | Input | Picture | Setup | Option | * Click the Play( )/Stop( ) button in [AV] and [S-Video] modes. ▶This is supported only when the input signal is AV Timing(D-Sub) . ▶If Overscan is turned off, unnecessary extra parts at the edges of an image may also be shown, though you can set the image brightness by adjusting the amount of light generated by the lamp...
... the factory default settings. Auto Adjustment Coarse Fine Reset | Basic Functions | Input | Picture | Setup | Option | * Click the Play( )/Stop( ) button in [AV] and [S-Video] modes. ▶This is supported only when the input signal is AV Timing(D-Sub) . ▶If Overscan is turned off, unnecessary extra parts at the edges of an image may also be shown, though you can set the image brightness by adjusting the amount of light generated by the lamp...

User Guide
Page 28
..., the lamp lifetime can reset various settings to the factory default settings. 1) Factory Default : Changes the settings to the factory defaults. 2) Reset Filter Time : Resets the filter time. Using this function, you set disappears and a normal screen is distorted or not. 2) Screen Size : You can compensate for this using the vertical Keystone function. ▶ The sound output of input signal when your projector is temporarily stopped while the keystone is being changed. ▶ The keystone is only enabled for in the On Screen Display...
..., the lamp lifetime can reset various settings to the factory default settings. 1) Factory Default : Changes the settings to the factory defaults. 2) Reset Filter Time : Resets the filter time. Using this function, you set disappears and a normal screen is distorted or not. 2) Screen Size : You can compensate for this using the vertical Keystone function. ▶ The sound output of input signal when your projector is temporarily stopped while the keystone is being changed. ▶ The keystone is only enabled for in the On Screen Display...

User Guide
Page 29
... the filter usage time is larger than the filter check period, the filter check message is displayed for the menu screen. Screen Adjustment Language Description You can move Menu Position up/down/left audio balance and equalizer of the 3W stereo speaker embedded in the table below to the projector, it is turned on automatically without pressing the Power button. 1) Off Auto Power On If the power is supplied to view the video file. Sound...
... the filter usage time is larger than the filter check period, the filter check message is displayed for the menu screen. Screen Adjustment Language Description You can move Menu Position up/down/left audio balance and equalizer of the 3W stereo speaker embedded in the table below to the projector, it is turned on automatically without pressing the Power button. 1) Off Auto Power On If the power is supplied to view the video file. Sound...

User Guide
Page 31
... sound continues, contact our service center. z Be sure to LED Indications. Troubleshooting z Check the power cable connections. Menu and Remote Control Symptoms Remote control does not work. z Direct lighting of the Projector menu. Lines appear on the ceiling. Troubleshooting z Be sure that the proper input source is either too far or too near to malfunction. Remove any obstacles between your local product distributor. Screen is black and white or abnormal color/ screen is empty. z Adjust the focus. Check the connection cables again. Images...
... sound continues, contact our service center. z Be sure to LED Indications. Troubleshooting z Check the power cable connections. Menu and Remote Control Symptoms Remote control does not work. z Direct lighting of the Projector menu. Lines appear on the ceiling. Troubleshooting z Be sure that the proper input source is either too far or too near to malfunction. Remove any obstacles between your local product distributor. Screen is black and white or abnormal color/ screen is empty. z Adjust the focus. Check the connection cables again. Images...

User Guide
Page 33
... may cause problems. Do not touch the projector with the one hour from the front). For best operating performance, replace the lamp according to change the lamp, cover the projector with a soft cloth on lamp purchase, please refer to 'Contact SAMSUNG WORLDWIDE'. For inquiries on a flat surface. Check that the power cord is a danger of children. Remove dirts or foreign materials around or inside the projector. Lamp Model Name...
... may cause problems. Do not touch the projector with the one hour from the front). For best operating performance, replace the lamp according to change the lamp, cover the projector with a soft cloth on lamp purchase, please refer to 'Contact SAMSUNG WORLDWIDE'. For inquiries on a flat surface. Check that the power cord is a danger of children. Remove dirts or foreign materials around or inside the projector. Lamp Model Name...

User Guide
Page 34
... . Replace or clean the filter. Assembling a new lamp is located at least one hour from the front). Turn off the power of the projector, Place the product so that the power cord is located on the floor to place a soft cloth on the left side of the disassembly. The projector has been designed so that the projector does not work properly, please check the operating status of the projector, as...
... . Replace or clean the filter. Assembling a new lamp is located at least one hour from the front). Turn off the power of the projector, Place the product so that the power cord is located on the floor to place a soft cloth on the left side of the disassembly. The projector has been designed so that the projector does not work properly, please check the operating status of the projector, as...


