User Manual
Page 2
.... (Thisis only availablewith SAMSUNGTV's that improvesupon existing Dolby Pro Logic. DTS (Digital Theater Systems) DTS is connected to the USB port of the Home Theater. The HT-Z520/HT-TZ522/HT-TZ525 will automaticallyshut off after 20 minutes in Stop mode for 5 minutes, the Samsung logo appears on an MP3 player, digital camera or USB memory stick by...
.... (Thisis only availablewith SAMSUNGTV's that improvesupon existing Dolby Pro Logic. DTS (Digital Theater Systems) DTS is connected to the USB port of the Home Theater. The HT-Z520/HT-TZ522/HT-TZ525 will automaticallyshut off after 20 minutes in Stop mode for 5 minutes, the Samsung logo appears on an MP3 player, digital camera or USB memory stick by...
User Manual
Page 6
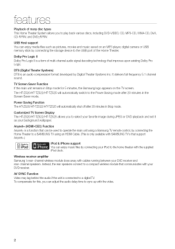
... Panel 12 Display 13 Rear Panel REMOTE CONTROL 14 Tour of the Remote Control 16 Setting the Remote Control CONNECTIONS i , BEFORE USING YOUR HOME THEATER 18 Connecting the Speakers 24 Connecting the Rear Speakers to the Wireless Receiving Amplifier 26 Connecting the Video Out to your TV 27 Connecting the...29 BD Wise 30 HDMI Function 31 Connecting an iPod 33 Connecting Audio from External Components 35 Connecting the FM Antenna 36 Before using your home theater / PLAYBACK Jf 37 Disc Playback 38 MP3/WMA-CD playback 39 JPEG File Playback 40 DivX Playback 42 Using the Playback Function 50 ...
... Panel 12 Display 13 Rear Panel REMOTE CONTROL 14 Tour of the Remote Control 16 Setting the Remote Control CONNECTIONS i , BEFORE USING YOUR HOME THEATER 18 Connecting the Speakers 24 Connecting the Rear Speakers to the Wireless Receiving Amplifier 26 Connecting the Video Out to your TV 27 Connecting the...29 BD Wise 30 HDMI Function 31 Connecting an iPod 33 Connecting Audio from External Components 35 Connecting the FM Antenna 36 Before using your home theater / PLAYBACK Jf 37 Disc Playback 38 MP3/WMA-CD playback 39 JPEG File Playback 40 DivX Playback 42 Using the Playback Function 50 ...

User Manual
Page 18
... position, facing inwards (about 2,5 to turn off the power and disconnect the power cord. conn cton This section involves various methods of connecting the Digital Home Theater to other . Selecting the Listening Position The listening position should be sure to 3 times the distance of the center speakers. Place them about 60 to...
... position, facing inwards (about 2,5 to turn off the power and disconnect the power cord. conn cton This section involves various methods of connecting the Digital Home Theater to other . Selecting the Listening Position The listening position should be sure to 3 times the distance of the center speakers. Place them about 60 to...
User Manual
Page 23
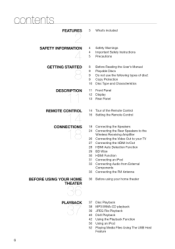
...back of children so as to the back of the Wireless Receivingmodule. • Make surethe colors of the subwoofer speaker. HT-Z520 Front Speaker(R) Center Speaker Front Speaker (L) HT-TZ522/TZ525 Center Speaker I Black Red Speaker Subwoo_r Stand Front Speaker (R) Subwoofer Front Speaker (L) * To connect the rear... the connecting plugs for the rearspeakers to prevent them from your TV set . 23 Keep the subwoofer speaker out of reach of the Home Theater,and then releasethe tab. Do not hang the subwoofer on the back of the speaker. 2, Insert the black wire into the black ...
...back of children so as to the back of the Wireless Receivingmodule. • Make surethe colors of the subwoofer speaker. HT-Z520 Front Speaker(R) Center Speaker Front Speaker (L) HT-TZ522/TZ525 Center Speaker I Black Red Speaker Subwoo_r Stand Front Speaker (R) Subwoofer Front Speaker (L) * To connect the rear... the connecting plugs for the rearspeakers to prevent them from your TV set . 23 Keep the subwoofer speaker out of reach of the Home Theater,and then releasethe tab. Do not hang the subwoofer on the back of the speaker. 2, Insert the black wire into the black ...
User Manual
Page 26
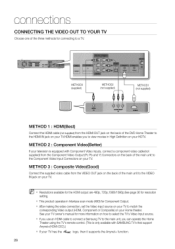
...TVto match the corresponding Video output (HDMI,Component or Composite) on your Home theater. See your TV owner's manualfor more information on how to select the W's Video Input source. ,_ Ifyou use an HDMI cable to connect a Samsung TV to the main unit, you to view movies in Interlace scan...T_. connectons CONNECTING THE VIDEO OUT TO YOUR TV Choose one of the DVD Home Theater to the HDMI IN jack on your TV:.HDMIenables you can operate the Home Theater using the W's remote control. (Thisis only availablewith SAMSUNG W's that support Anynet+(HDMl-OEC).) If your TV has the W,j,&e_logo, ...
...TVto match the corresponding Video output (HDMI,Component or Composite) on your Home theater. See your TV owner's manualfor more information on how to select the W's Video Input source. ,_ Ifyou use an HDMI cable to connect a Samsung TV to the main unit, you to view movies in Interlace scan...T_. connectons CONNECTING THE VIDEO OUT TO YOUR TV Choose one of the DVD Home Theater to the HDMI IN jack on your TV:.HDMIenables you can operate the Home Theater using the W's remote control. (Thisis only availablewith SAMSUNG W's that support Anynet+(HDMl-OEC).) If your TV has the W,j,&e_logo, ...
User Manual
Page 28
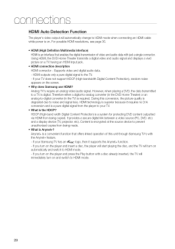
...the disc, and the TV will turn on . Using HDMI, the DVD Home Theater transmits a digital video and audio signal and displays a vivid picture on the screen. • Why does Samsung use HDMI? If your TV does not support HDCP (High-bandwidth DigitalContent ...Protection), random noise appears on a TV having an HDMI input jack. • HDMI connection description HDMI connector - Therefore either a digital-to-analog converter (in the DVD Home Theater) or an analog-to-digital converter (in the TV) is a system...
...the disc, and the TV will turn on . Using HDMI, the DVD Home Theater transmits a digital video and audio signal and displays a vivid picture on the screen. • Why does Samsung use HDMI? If your TV does not support HDCP (High-bandwidth DigitalContent ...Protection), random noise appears on a TV having an HDMI input jack. • HDMI connection description HDMI connector - Therefore either a digital-to-analog converter (in the DVD Home Theater) or an analog-to-digital converter (in the TV) is a system...
User Manual
Page 29
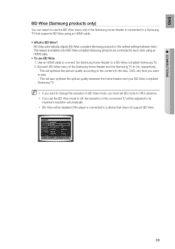
... want to change the resolutionin BD Wise mode, you must set the BD Wise mode to off, the resolution of the Samsung home theater and the Samsung TV to the optimal settingsbetweenthem. This feature is enabledonly if BD Wise-compliantSamsungproducts areconnected to eachother usingan HDMI cable. • ...To use the BD Wise menu only if the Samsung home theater is connected to a Samsung TV that does not support BD Wise. 29 This will optimize the picture quality according to the content (Inthe disc...
... want to change the resolutionin BD Wise mode, you must set the BD Wise mode to off, the resolution of the Samsung home theater and the Samsung TV to the optimal settingsbetweenthem. This feature is enabledonly if BD Wise-compliantSamsungproducts areconnected to eachother usingan HDMI cable. • ...To use the BD Wise menu only if the Samsung home theater is connected to a Samsung TV that does not support BD Wise. 29 This will optimize the picture quality according to the content (Inthe disc...
User Manual
Page 30
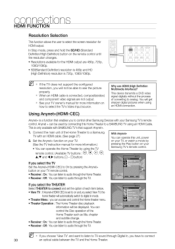
... an HDMI connection. Connect the main unit of converting to a Samsung TV with an HDMI cable. (See page 27) 2. If you have to control other Samsung Deviceswith your Samsung TV's remote control. This device transmits a DVD video signal digitally without the process of the Home Theater to analog. Using Anynet+(HDMI-CEC) Anynet+ is 720p...
... an HDMI connection. Connect the main unit of converting to a Samsung TV with an HDMI cable. (See page 27) 2. If you have to control other Samsung Deviceswith your Samsung TV's remote control. This device transmits a DVD video signal digitally without the process of the Home Theater to analog. Using Anynet+(HDMI-CEC) Anynet+ is 720p...

User Manual
Page 31
.... Adjust the volume to a moderate level before disconnecting the iPod docking cable. When the unit is for audio iPod, V iPod is powered on the DVD home theater. 2. The mode switches as follows : DVD/CD "_ D-IN "_ AUX 1 "_ AUX 2 "_HDMI IN "_ USB "_ A iPod "_ V iPod "_ TUNER. As the cable ports...unit will charge your TV view iPod video. Make sure to connect the dock connector so that the label "SAMSUNG" faces upward. (supplied) 31 For iPod operation with this Home Theater, see next page). You must have the VIDEO output connected to your iPod's battery. Connect the iPod dock...
.... Adjust the volume to a moderate level before disconnecting the iPod docking cable. When the unit is for audio iPod, V iPod is powered on the DVD home theater. 2. The mode switches as follows : DVD/CD "_ D-IN "_ AUX 1 "_ AUX 2 "_HDMI IN "_ USB "_ A iPod "_ V iPod "_ TUNER. As the cable ports...unit will charge your TV view iPod video. Make sure to connect the dock connector so that the label "SAMSUNG" faces upward. (supplied) 31 For iPod operation with this Home Theater, see next page). You must have the VIDEO output connected to your iPod's battery. Connect the iPod dock...
User Manual
Page 33
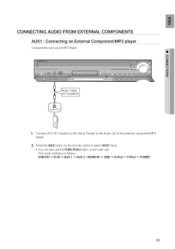
The mode switches as an MP3 Player player 1, Connect AUX IN 1 (Audio)on the Home Theater to select AUXl input. • You can also use the FUNCTION button on the remote control to the Audio Out of the external component!MP3 player. 2. CONNECTING AUDIO FROM EXTERNAL COMPONENTS AUX1 • Connecting an External Component/MP3 Components such as follows : DVD/CD _ D-IN _ AUX 1 _ AUX 2 _HDMI IN _ USB _ A iPod _ V iPod _ TUNER. 33 Press the AUX button on the main unit.
The mode switches as an MP3 Player player 1, Connect AUX IN 1 (Audio)on the Home Theater to select AUXl input. • You can also use the FUNCTION button on the remote control to the Audio Out of the external component!MP3 player. 2. CONNECTING AUDIO FROM EXTERNAL COMPONENTS AUX1 • Connecting an External Component/MP3 Components such as follows : DVD/CD _ D-IN _ AUX 1 _ AUX 2 _HDMI IN _ USB _ A iPod _ V iPod _ TUNER. 33 Press the AUX button on the main unit.
User Manual
Page 34
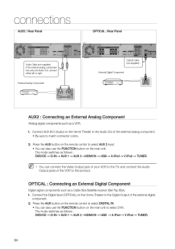
...Analog signal components such as follows : DVD/CD _ D-IN _ AUX 1 _ AUX 2 _HDMI IN _ USB _ A iPod _ V iPod _ TUNER. 34 Connect the Digital Input (OPTICAL)on the Home Theater to select AUX 2 input. • You can also use the FUNCTION button on the remote control to the Digital Output of the VCR to select... D-IN. Connect AUX IN 2 (Audio) on the Home Theater to the Audio Out of the external analog component. • Be sure to match connector colors. 2, Press the AUX button on the main unit.
...Analog signal components such as follows : DVD/CD _ D-IN _ AUX 1 _ AUX 2 _HDMI IN _ USB _ A iPod _ V iPod _ TUNER. 34 Connect the Digital Input (OPTICAL)on the Home Theater to select AUX 2 input. • You can also use the FUNCTION button on the remote control to the Digital Output of the VCR to select... D-IN. Connect AUX IN 2 (Audio) on the Home Theater to the Audio Out of the external analog component. • Be sure to match connector colors. 2, Press the AUX button on the main unit.

User Manual
Page 36
Pressthe SOURCE button to select VIDEO mode on your TV. Ii Pi OWER _ _i!{i}!!!!i_}!iill_}i}i:iiZ3i 36 Press the "IV button to set the remote to TV mode. ;_i_i_ _-'__ 5, Pressthe POWER button to enable DVD/CD playback. 4. beforeLAnSa VOLAhrome theater k_/ _/ TheDVDHomeTheater'sremotecanbeusedto controlSamsungTV's. 1, Plugthe mainunit'spowercord intothe AO powersupply, 2, Pressthe DVD RECEIVER button to operate the DVD Home Theater. 3, Pressthe FUNCTION button on the main unit or DVD button on the remote to turn on your Samsung TV with this remote. 6.
Pressthe SOURCE button to select VIDEO mode on your TV. Ii Pi OWER _ _i!{i}!!!!i_}!iill_}i}i:iiZ3i 36 Press the "IV button to set the remote to TV mode. ;_i_i_ _-'__ 5, Pressthe POWER button to enable DVD/CD playback. 4. beforeLAnSa VOLAhrome theater k_/ _/ TheDVDHomeTheater'sremotecanbeusedto controlSamsungTV's. 1, Plugthe mainunit'spowercord intothe AO powersupply, 2, Pressthe DVD RECEIVER button to operate the DVD Home Theater. 3, Pressthe FUNCTION button on the main unit or DVD button on the remote to turn on your Samsung TV with this remote. 6.

User Manual
Page 50
...The Music categories appear. 5. Albums : To play by artist. W _, The categorylistmay differ,dependingon the iPod model. Pressthe A,T buttons on the DVD home theater. 2. Artists :To play and pressthe ENTER button. • The music will be toggledin the orderof USB -_ A iPod -_ V iPod. 4....Pressthe PORTbuttonon the remote controlto selectA iPod mode. • Ifthe iPod playerisconnectedto the hometheater system,eachtime you pressthe the PORTbutton,it will be displayed according to the home theatersystem. 1. You can enjoy playback of the current file. Davback I J USING ...
...The Music categories appear. 5. Albums : To play by artist. W _, The categorylistmay differ,dependingon the iPod model. Pressthe A,T buttons on the DVD home theater. 2. Artists :To play and pressthe ENTER button. • The music will be toggledin the orderof USB -_ A iPod -_ V iPod. 4....Pressthe PORTbuttonon the remote controlto selectA iPod mode. • Ifthe iPod playerisconnectedto the hometheater system,eachtime you pressthe the PORTbutton,it will be displayed according to the home theatersystem. 1. You can enjoy playback of the current file. Davback I J USING ...
User Manual
Page 51
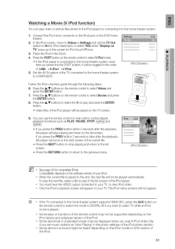
...player. _ You must have the VIDEO output connected to your iPod. _ When the current file is connected to the home theater system, each time you press the the PORT button, it to the home theater system. 1. Follow the iPod onscreen guide through the following steps. \ 6. Pressthe A,V buttons on the TV screen. 9, ... the softwareversionof your TV to view iPod video. _ Only the iPod's playback screen will not appear. _ Ifthe TV connected to the home theater system supports HDMI CEC, press the AUX button on the remote control to switch the mode to DIGITALIN if you want to watch TV while...
...player. _ You must have the VIDEO output connected to your iPod. _ When the current file is connected to the home theater system, each time you press the the PORT button, it to the home theater system. 1. Follow the iPod onscreen guide through the following steps. \ 6. Pressthe A,V buttons on the TV screen. 9, ... the softwareversionof your TV to view iPod video. _ Only the iPod's playback screen will not appear. _ Ifthe TV connected to the home theater system supports HDMI CEC, press the AUX button on the remote control to switch the mode to DIGITALIN if you want to watch TV while...
User Manual
Page 52
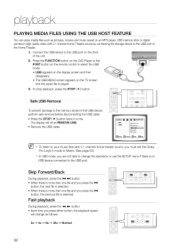
...select the USB mode. • USB appears on the display screen and then disappears. • The USB MENU screen appears on the front of the Home Theater. 1. Skip Forward/Back During playback, press the 1_41,1_b1u_t1ton. • When there is more than one file and you press the ),*1 button, ...USB device, perform safe removal before disconnecting the USB cable. • Press the STOP ( • ) button twice in high quality video with 5.1 channel home theater sound, you must set the Dolby Pro Logic II mode to Matrix. (See page 63) _ In USB mode, you press either button, the playback speed...
...select the USB mode. • USB appears on the display screen and then disappears. • The USB MENU screen appears on the front of the Home Theater. 1. Skip Forward/Back During playback, press the 1_41,1_b1u_t1ton. • When there is more than one file and you press the ),*1 button, ...USB device, perform safe removal before disconnecting the USB cable. • Press the STOP ( • ) button twice in high quality video with 5.1 channel home theater sound, you must set the Dolby Pro Logic II mode to Matrix. (See page 63) _ In USB mode, you press either button, the playback speed...
User Manual
Page 53
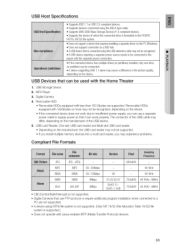
... FAT 16/32 (FileAllocation Table 16/32) file system is not supported. • Digital Cameras that use PTP protocol or require additional program installation when connected to supply power so that it can work properly. Removable HDD • Removable HDDs equipped with the Home Theater 1. DivX .MP3 .WMA ,WMV 80-384kbps 56-128kbps...
... FAT 16/32 (FileAllocation Table 16/32) file system is not supported. • Digital Cameras that use PTP protocol or require additional program installation when connected to supply power so that it can work properly. Removable HDD • Removable HDDs equipped with the Home Theater 1. DivX .MP3 .WMA ,WMV 80-384kbps 56-128kbps...

User Manual
Page 62
... press the ENTER button. • ON • Both video and audio signals are transmitted over the HDMI connection cable, and audio is output through the home theater speakers only. Press the Cursor A,• button to Audio and then press the ENTER button. 3. Pressthe RETURN button to return to exit the setup screen...
... press the ENTER button. • ON • Both video and audio signals are transmitted over the HDMI connection cable, and audio is output through the home theater speakers only. Press the Cursor A,• button to Audio and then press the ENTER button. 3. Pressthe RETURN button to return to exit the setup screen...

User Manual
Page 67
.... • SLEEP will be adjusted. To confirm the sleep timer setting, press the SLEEP button. • The remaining time before the Home Theater will shut itself off is pressed, the front display's brightness will shut itself off . Press the MUTE button. • MUTE appears in...as follows : SLP10 _ SLP20 _ SLP30 _ SLP60 _ SLP90 _ SLP120 SLP150 _ OFF. ADJUSTING DISPLAY BRIGHTNESS You can set the time that the Home Theater will be displayed. convertent fLAncotn SLEEP TIMER FUNCTION You can adjust the brightness of the display on the display. Press the DIMMER button. • Each...
.... • SLEEP will be adjusted. To confirm the sleep timer setting, press the SLEEP button. • The remaining time before the Home Theater will shut itself off is pressed, the front display's brightness will shut itself off . Press the MUTE button. • MUTE appears in...as follows : SLP10 _ SLP20 _ SLP30 _ SLP60 _ SLP90 _ SLP120 SLP150 _ OFF. ADJUSTING DISPLAY BRIGHTNESS You can set the time that the Home Theater will be displayed. convertent fLAncotn SLEEP TIMER FUNCTION You can adjust the brightness of the display on the display. Press the DIMMER button. • Each...
User Manual
Page 70
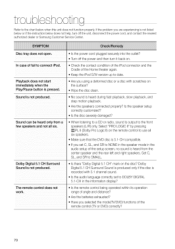
...operated within its operation range of angle and distance? • Are the batteries exhausted? • Have you selected the mode(TV/DVD)functions of the Home theater again. • Keep the iPod SAN version up to date. • Are you are experiencing is not listed below or if the instruction below when... into the outlet? • Turn off the power and then turn off the unit, disconnect the power cord, and contact the nearest authorized dealer or Samsung Customer Service Center. Set C, SL, and SR to SMALL. • Is there "Dolby Digital 5.1 CH" mark on the remote control to use all six....
...operated within its operation range of angle and distance? • Are the batteries exhausted? • Have you selected the mode(TV/DVD)functions of the Home theater again. • Keep the iPod SAN version up to date. • Are you are experiencing is not listed below or if the instruction below when... into the outlet? • Turn off the power and then turn off the unit, disconnect the power cord, and contact the nearest authorized dealer or Samsung Customer Service Center. Set C, SL, and SR to SMALL. • Is there "Dolby Digital 5.1 CH" mark on the remote control to use all six....


