
User Manual
Page 2
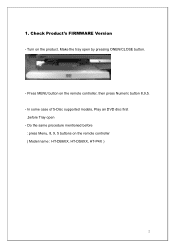
1. Turn on the remote controller, then press Numeric button 8,9,5. - Make the tray open - Press MENU button on the product. In some case of 5-Disc supported models, Play an DVD disc first ,before : press Menu, 8, 9, 5 buttons on the remote controller ( Model name : HT-DB6XX, HT-DS6XX, HT-P4X ) 2 Do the same procedure mentioned before Tray open by pressing ONEN/CLOSE button. - Check Product's FIRMWARE Version -
1. Turn on the remote controller, then press Numeric button 8,9,5. - Make the tray open - Press MENU button on the product. In some case of 5-Disc supported models, Play an DVD disc first ,before : press Menu, 8, 9, 5 buttons on the remote controller ( Model name : HT-DB6XX, HT-DS6XX, HT-P4X ) 2 Do the same procedure mentioned before Tray open by pressing ONEN/CLOSE button. - Check Product's FIRMWARE Version -
User Manual
Page 4
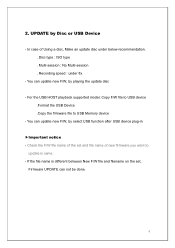
... can update new F/W, by Disc or USB Device - For the USB HOST playback supported model, Copy F/W file to USB device .Format the USB Device .Copy the firmware file to update is different between New F/W file and filename on the set and file name of Using a disc, Make an update disc under 8x - Multi-session : No Multi-session . Disc type : ISO type . If the file name is same - 2. UPDATE by select USB function after USB device plug...
... can update new F/W, by Disc or USB Device - For the USB HOST playback supported model, Copy F/W file to USB device .Format the USB Device .Copy the firmware file to update is different between New F/W file and filename on the set and file name of Using a disc, Make an update disc under 8x - Multi-session : No Multi-session . Disc type : ISO type . If the file name is same - 2. UPDATE by select USB function after USB device plug...
Quick Guide (easy Manual) (ver.1.0) (English)
Page 2
... space around it for industrial use. Switching off the Home Theater to important operating and maintenance instructions accompanying the unit. Phones Protect the player from the AC supply if the player malfunctions. Disconnect the power cable from moisture(i.e. Use of this unit. Use of controls, adjustments or performance of the unit. CAUTION: TO PREVENT ELECTRIC SHOCK, MATCH WIDE BLADE OF PLUG TO WIDE SLOT, FULLY INSERT...
... space around it for industrial use. Switching off the Home Theater to important operating and maintenance instructions accompanying the unit. Phones Protect the player from the AC supply if the player malfunctions. Disconnect the power cable from moisture(i.e. Use of this unit. Use of controls, adjustments or performance of the unit. CAUTION: TO PREVENT ELECTRIC SHOCK, MATCH WIDE BLADE OF PLUG TO WIDE SLOT, FULLY INSERT...
Quick Guide (easy Manual) (ver.1.0) (English)
Page 3
... the plug. DAMAGE REQUIRING SERVICE Unplug this product through openings as this indicates a need for future reference. If liquid has been spilled, or objects have been followed. ACCESSORIES Do not place this product yourself as opening or removing covers may result in proper operating condition. When installing an outside antenna system should not be sure the service technician has used replacement parts specified...
... the plug. DAMAGE REQUIRING SERVICE Unplug this product through openings as this indicates a need for future reference. If liquid has been spilled, or objects have been followed. ACCESSORIES Do not place this product yourself as opening or removing covers may result in proper operating condition. When installing an outside antenna system should not be sure the service technician has used replacement parts specified...
Quick Guide (easy Manual) (ver.1.0) (English)
Page 4
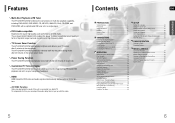
... Screen Display The HT-Q100/HT-Q100W allows you can adjust the audio delay time to Radio 54 Presetting Stations 55 MISCELLANEOUS Convenient Functions 57 Operating a TV with a sophisticated FM tuner, all in the stop mode. Contents ENG PREPARATION PREPARATION Safety Warnings 1 Precautions 2 Safety Instructions 3 Features 5 Notes on Handling and Storing Discs 63 Language Code List 64 USB Host Feature Supported Products 65 Specifications 66 5 6 To compensate for Service 61 Cautions on Discs...
... Screen Display The HT-Q100/HT-Q100W allows you can adjust the audio delay time to Radio 54 Presetting Stations 55 MISCELLANEOUS Convenient Functions 57 Operating a TV with a sophisticated FM tuner, all in the stop mode. Contents ENG PREPARATION PREPARATION Safety Warnings 1 Precautions 2 Safety Instructions 3 Features 5 Notes on Handling and Storing Discs 63 Language Code List 64 USB Host Feature Supported Products 65 Specifications 66 5 6 To compensate for Service 61 Cautions on Discs...
Quick Guide (easy Manual) (ver.1.0) (English)
Page 5
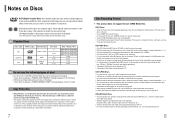
... both low bit rate and high bit rate (e.g., 32Kbps ~ 320Kbps), the sound may not play at all. files encoded in a movie theater or concert hall. 1 ~6 DVD players and the discs are played, a "WRONG REGION CODE" message appears on this copyright protection technology must match in order for home and other intellectual property rights owned by region. These regional codes must be played. • Picture discs other rights owners. Playing Time...
... both low bit rate and high bit rate (e.g., 32Kbps ~ 320Kbps), the sound may not play at all. files encoded in a movie theater or concert hall. 1 ~6 DVD players and the discs are played, a "WRONG REGION CODE" message appears on this copyright protection technology must match in order for home and other intellectual property rights owned by region. These regional codes must be played. • Picture discs other rights owners. Playing Time...
Quick Guide (easy Manual) (ver.1.0) (English)
Page 6
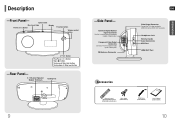
...jacks. Headphone Jack External Audio Input Connectors USB Port HDMI OUT Port PREPARATION Accessories Remote Control (HT-Q100:AH59-01643J) (HT-Q100W:AH59-01622L) Video Cable (AH39-40001V) FM Antenna (AH42-00017A) User's Manual (AH68-01851R) 10 External Digital Optical Input Connector Use this to connect external equipment capable of digital output. Eject button Disc Insert Hole Display Power ( ) button Function button Volume control button button Play/Pause ( ) button Stop ( ) button Tuning up & Skip ( ) button Tuning down & Skip ( ) button -Rear Panel- 2.1 Channel Speaker Output...
...jacks. Headphone Jack External Audio Input Connectors USB Port HDMI OUT Port PREPARATION Accessories Remote Control (HT-Q100:AH59-01643J) (HT-Q100W:AH59-01622L) Video Cable (AH39-40001V) FM Antenna (AH42-00017A) User's Manual (AH68-01851R) 10 External Digital Optical Input Connector Use this to connect external equipment capable of digital output. Eject button Disc Insert Hole Display Power ( ) button Function button Volume control button button Play/Pause ( ) button Stop ( ) button Tuning up & Skip ( ) button Tuning down & Skip ( ) button -Rear Panel- 2.1 Channel Speaker Output...

Quick Guide (easy Manual) (ver.1.0) (English)
Page 7
...button DVD Receiver button POWER button Number(0~9) buttons REMAIN button STEP button SEARCH buttons VOLUME button MENU button INFO button SLIDE MODE button DIGEST button TUNER MEMORY button SLEEP button SLOW, MO/ST button DIMMER button 11 ENG PREPARATION DVD button AUX button EJECT button TV/VIDEO button TUNER button USB button CANCEL button REPEAT button Play/Pause button Stop button Tuning Preset/CD Skip button TUNING/CH button MUTE button RETURN button Cursor/Enter button AUDIO button SUB TITLE button V-SOUND/V-H/P button ZOOM button LOGO button SD/HD button EZ VIEW button HDMI...
...button DVD Receiver button POWER button Number(0~9) buttons REMAIN button STEP button SEARCH buttons VOLUME button MENU button INFO button SLIDE MODE button DIGEST button TUNER MEMORY button SLEEP button SLOW, MO/ST button DIMMER button 11 ENG PREPARATION DVD button AUX button EJECT button TV/VIDEO button TUNER button USB button CANCEL button REPEAT button Play/Pause button Stop button Tuning Preset/CD Skip button TUNING/CH button MUTE button RETURN button Cursor/Enter button AUDIO button SUB TITLE button V-SOUND/V-H/P button ZOOM button LOGO button SD/HD button EZ VIEW button HDMI...
Quick Guide (easy Manual) (ver.1.0) (English)
Page 8
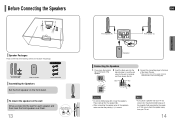
... let children play with or near your TV set , screen color may be distorted because of the magnetic field generated by the speaker. They could get hurt if a speaker falls. • When connecting the speaker wires to the back of the Home Theater. • Make sure the colors of the speaker terminals match the colors of the connecting plugs. Front Speaker (R) Front Speaker (L) Subwoofer Connecting the Speakers 1 Press down...
... let children play with or near your TV set , screen color may be distorted because of the magnetic field generated by the speaker. They could get hurt if a speaker falls. • When connecting the speaker wires to the back of the Home Theater. • Make sure the colors of the speaker terminals match the colors of the connecting plugs. Front Speaker (R) Front Speaker (L) Subwoofer Connecting the Speakers 1 Press down...
Quick Guide (easy Manual) (ver.1.0) (English)
Page 9
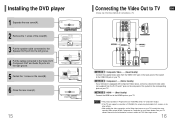
... HDMI input on your Home theater. METHOD 2 Component ....... (Better Quality) - METHOD2 METHOD 3 METHOD 1 (supplied) TV METHOD 1 Composite Video ....... (Good Quality) - play nothing. • After making the video connection, set the Video input source on your TV owner's manual for connecting to a TV. Installing the DVD player 1 Separate the rear cover(A). (A) 2 Remove the 1 screw of the cover(B). (B) 3 Put the speaker cable connected to the Speaker OUT port into the left groove. 4 Put the cables connected to the Video OUT, Component OUT and Audio...
... HDMI input on your Home theater. METHOD 2 Component ....... (Better Quality) - METHOD2 METHOD 3 METHOD 1 (supplied) TV METHOD 1 Composite Video ....... (Good Quality) - play nothing. • After making the video connection, set the Video input source on your TV owner's manual for connecting to a TV. Installing the DVD player 1 Separate the rear cover(A). (A) 2 Remove the 1 screw of the cover(B). (B) 3 Put the speaker cable connected to the Speaker OUT port into the left groove. 4 Put the cables connected to the Video OUT, Component OUT and Audio...
Quick Guide (easy Manual) (ver.1.0) (English)
Page 10
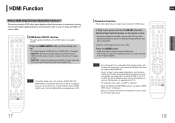
... adjustments, since the Home Theater and TV will not be able to select the TV's Video Input source. HDMI Function What is 720p/1080i. This device transmits DVD video signal digitally without the process of this product has an embedded Video Upscaler function with Faroudja DCDi technology, it can get sharper digital pictures by the TV).) • For component video output, only 480P is not displayed. • See your TV using an HDMI connection cable...
... adjustments, since the Home Theater and TV will not be able to select the TV's Video Input source. HDMI Function What is 720p/1080i. This device transmits DVD video signal digitally without the process of this product has an embedded Video Upscaler function with Faroudja DCDi technology, it can get sharper digital pictures by the TV).) • For component video output, only 480P is not displayed. • See your TV using an HDMI connection cable...
Quick Guide (easy Manual) (ver.1.0) (English)
Page 11
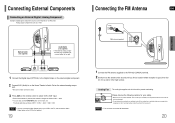
... your VCR to a wall or other rigid surface. FM Antenna (supplied) 1 Connect the Digital Input (OPTICAL) to the Digital Output on the external digital component. 2 Connect AUX (Audio) In on the Home Theater to Audio Out on the external analog component. • Be sure to match connector colors. 3 Press AUX on the remote control to select 'D.IN / AUX' input. • Each time the button is pressed, the selection changes as follows: DVD ➝ D.IN ➝ AUX ➝ USB ➝ FM...
... your VCR to a wall or other rigid surface. FM Antenna (supplied) 1 Connect the Digital Input (OPTICAL) to the Digital Output on the external digital component. 2 Connect AUX (Audio) In on the Home Theater to Audio Out on the external analog component. • Be sure to match connector colors. 3 Press AUX on the remote control to select 'D.IN / AUX' input. • Each time the button is pressed, the selection changes as follows: DVD ➝ D.IN ➝ AUX ➝ USB ➝ FM...
Quick Guide (easy Manual) (ver.1.0) (English)
Page 21
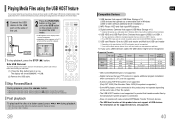
... safe removal before disconnecting the USB cable. (1) Press the Stop button twice in high quality video with 5.1 channel home theater sound by connecting the storage device to the USB port of the home theater. 1 Connect the USB device to the USB port on the side of the unit. 2 Press the FUNCTION button on the main unit or the USB button on the remote control to select the USB mode. • "USB" appears on the display screen and then disappears. • USB MENU screen...
... safe removal before disconnecting the USB cable. (1) Press the Stop button twice in high quality video with 5.1 channel home theater sound by connecting the storage device to the USB port of the home theater. 1 Connect the USB device to the USB port on the side of the unit. 2 Press the FUNCTION button on the main unit or the USB button on the remote control to select the USB mode. • "USB" appears on the display screen and then disappears. • USB MENU screen...
Quick Guide (easy Manual) (ver.1.0) (English)
Page 22
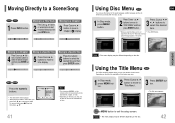
...; You can view the title of this feature may be different depending on the screen. Using the Title Menu DVD For DVDs containing multiple titles, you select Disc Menu and it is not sup- Depending on the remote control to move directly to the selected title or time. Press Cursor , 2 buttons to move to 'DISC MENU' and then press ENTER button. Moving Directly to disc. 1 In Stop mode, press MENU button. Moving...
...; You can view the title of this feature may be different depending on the screen. Using the Title Menu DVD For DVDs containing multiple titles, you select Disc Menu and it is not sup- Depending on the remote control to move directly to the selected title or time. Press Cursor , 2 buttons to move to 'DISC MENU' and then press ENTER button. Moving Directly to disc. 1 In Stop mode, press MENU button. Moving...
Quick Guide (easy Manual) (ver.1.0) (English)
Page 24
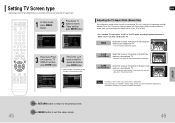
... 4:3), you should adjust the aspect ratio to fit your widescreen TV. • You can select the TV's aspect ratio. 1 In Stop mode, press MENU button. 2 Press Cursor button to move to exit the setup screen. 46 When playing DVDs recorded in different screen sizes, you can enjoy the widescreen aspect. 4:3LB (4:3 Letterbox) : Select this to view a 16:9 picture in the letter box mode on the software, the...
... 4:3), you should adjust the aspect ratio to fit your widescreen TV. • You can select the TV's aspect ratio. 1 In Stop mode, press MENU button. 2 Press Cursor button to move to exit the setup screen. 46 When playing DVDs recorded in different screen sizes, you can enjoy the widescreen aspect. 4:3LB (4:3 Letterbox) : Select this to view a 16:9 picture in the letter box mode on the software, the...
Quick Guide (easy Manual) (ver.1.0) (English)
Page 25
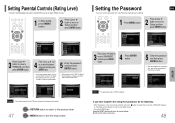
... the POWER button. MOVE ENTER RETURN EXIT MOVE SELECT RETURN EXIT Note • This function works only if a DVD disc contains the rating level information. button for the Parental (rating level) setting. 1 Press MENU button. 2 Press Cursor button to move to 'Setup' and then press ENTER button. INPUT NUMBER RETURN EXIT If you have selected Level 6, you do the following: • While the player is complete. Setting the Password ENG You can - SETUP MOVE...
... the POWER button. MOVE ENTER RETURN EXIT MOVE SELECT RETURN EXIT Note • This function works only if a DVD disc contains the rating level information. button for the Parental (rating level) setting. 1 Press MENU button. 2 Press Cursor button to move to 'Setup' and then press ENTER button. INPUT NUMBER RETURN EXIT If you have selected Level 6, you do the following: • While the player is complete. Setting the Password ENG You can - SETUP MOVE...
Quick Guide (easy Manual) (ver.1.0) (English)
Page 27
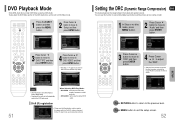
... level. MOVE ENTER RETURN EXIT CHANGE RETURN EXIT Press RETURN button to return to www.divx.com/vod. You can use the Registration code to register this function to enjoy Dolby Digital sound when watching movies at low volume at night. 1 In Stop or no disc mode, press MENU button. 2 Press Cursor button to move to exit the setup screen. 52 When Selecting DVD Play Mode: • DVD VIDEO : set to 'Audio' and then press ENTER button...
... level. MOVE ENTER RETURN EXIT CHANGE RETURN EXIT Press RETURN button to return to www.divx.com/vod. You can use the Registration code to register this function to enjoy Dolby Digital sound when watching movies at low volume at night. 1 In Stop or no disc mode, press MENU button. 2 Press Cursor button to move to exit the setup screen. 52 When Selecting DVD Play Mode: • DVD VIDEO : set to 'Audio' and then press ENTER button...
Quick Guide (easy Manual) (ver.1.0) (English)
Page 28
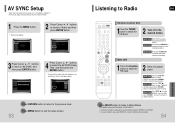
.... Listening to Radio ENG Remote Control Unit 1Press the TUNER button to the previous level. Manual Tuning Briefly press TUNING/CH to increase or decrease the frequency incrementally. 1 Press the Function button to exit the setup screen. MOVE ENTER EXIT MOVE ENTER EXIT 3 Press Cursor , buttons to move to 'Audio' and then press ENTER button. Press MENU button to select the FM band. 2 Select a broadcast station. Main Unit 2 Tune in Mono/Stereo. (This applies...
.... Listening to Radio ENG Remote Control Unit 1Press the TUNER button to the previous level. Manual Tuning Briefly press TUNING/CH to increase or decrease the frequency incrementally. 1 Press the Function button to exit the setup screen. MOVE ENTER EXIT MOVE ENTER EXIT 3 Press Cursor , buttons to move to 'Audio' and then press ENTER button. Press MENU button to select the FM band. 2 Select a broadcast station. Main Unit 2 Tune in Mono/Stereo. (This applies...
Quick Guide (easy Manual) (ver.1.0) (English)
Page 32
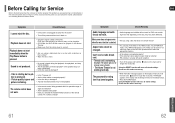
... Service Center. Playback does not start . The remote control does not work for longer than 5 seconds. Menu screen does not appear even • Are you selected the mode(TV/DVD) functions of the DVD. Using the RESET function will erase all stored settings. Before Calling for longer than 5 seconds. Do not use this Home Theater. • Make sure that does not contain menus? Refer to the default values. • Press the POWER button...
... Service Center. Playback does not start . The remote control does not work for longer than 5 seconds. Menu screen does not appear even • Are you selected the mode(TV/DVD) functions of the DVD. Using the RESET function will erase all stored settings. Before Calling for longer than 5 seconds. Do not use this Home Theater. • Make sure that does not contain menus? Refer to the default values. • Press the POWER button...
Quick Guide (easy Manual) (ver.1.0) (English)
Page 35
... of nature; delivery and installation; accidents, abuse, neglect, fire, water, lightning or other signal transmission and delivery problems. SAMSUNG does not warrant uninterrupted or error-free operation of the purchaser. All replaced parts and products become the property of SAMSUNG and must contact SAMSUNG for which vary from the service center is longer. To obtain warranty hardware service, please contact SAMSUNG at no charge as...
... of nature; delivery and installation; accidents, abuse, neglect, fire, water, lightning or other signal transmission and delivery problems. SAMSUNG does not warrant uninterrupted or error-free operation of the purchaser. All replaced parts and products become the property of SAMSUNG and must contact SAMSUNG for which vary from the service center is longer. To obtain warranty hardware service, please contact SAMSUNG at no charge as...


