
Open Source Guide (ENGLISH)
Page 2
IN NO EVENT UNLESS REQUIRED BY APPLICABLE LAW OR AGREED TO IN WRITING WILL ANY COPYRIGHT HOLDER, OR ANY OTHER PARTY WHO MAY MODIFY AND/OR REDISTRIBUTE THE LIBRARY AS PERMITTED ABOVE, BE LIABLE TO YOU FOR DAMAGES, INCLUDING ANY GENERAL, SPECIAL, INCIDENTAL OR CONSEQUENTIAL DAMAGES ARISING OUT OF THE USE OR INABILITY TO USE THE LIBRARY (INCLUDING BUT NOT LIMITED TO LOSS OF DATA OR DATA BEING RENDERED INACCURATE OR LOSSES SUSTAINED BY YOU OR THIRD PARTIES OR A FAILURE OF THE LIBRARY TO OPERATE WITH ANY OTHER SOFTWARE), EVEN IF SUCH HOLDER OR OTHER PARTY HAS BEEN ADVISED OF THE POSSIBILITY OF SUCH...
IN NO EVENT UNLESS REQUIRED BY APPLICABLE LAW OR AGREED TO IN WRITING WILL ANY COPYRIGHT HOLDER, OR ANY OTHER PARTY WHO MAY MODIFY AND/OR REDISTRIBUTE THE LIBRARY AS PERMITTED ABOVE, BE LIABLE TO YOU FOR DAMAGES, INCLUDING ANY GENERAL, SPECIAL, INCIDENTAL OR CONSEQUENTIAL DAMAGES ARISING OUT OF THE USE OR INABILITY TO USE THE LIBRARY (INCLUDING BUT NOT LIMITED TO LOSS OF DATA OR DATA BEING RENDERED INACCURATE OR LOSSES SUSTAINED BY YOU OR THIRD PARTIES OR A FAILURE OF THE LIBRARY TO OPERATE WITH ANY OTHER SOFTWARE), EVEN IF SUCH HOLDER OR OTHER PARTY HAS BEEN ADVISED OF THE POSSIBILITY OF SUCH...
Safety Guide (ENGLISH)
Page 1
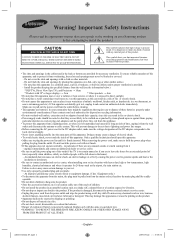
...plug out of time (especially when children, elderly or disabled people will prevent damage to the set due to lightning and power line surges. • Before connecting the AC power cord to...to deteriorate. • Be sure to contact an authorized service center, when installing your Samsung product before cleaning. • This appratus use any internal part of this apparatus. &#...power plug when pulling the plug from the wall (see the information below.) * DLP TVs, Direct View Type TVs, and Projectors → 10cm * Products with this appratus does not operate normally - ...
...plug out of time (especially when children, elderly or disabled people will prevent damage to the set due to lightning and power line surges. • Before connecting the AC power cord to...to deteriorate. • Be sure to contact an authorized service center, when installing your Samsung product before cleaning. • This appratus use any internal part of this apparatus. &#...power plug when pulling the plug from the wall (see the information below.) * DLP TVs, Direct View Type TVs, and Projectors → 10cm * Products with this appratus does not operate normally - ...
Safety Guide (ENGLISH)
Page 7
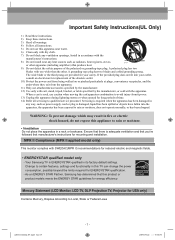
...supply cord or plug is damaged, liquid has been spilled or objects have fallen into your safety. Your Samsung TV is required when the apparatus has been damaged in its factory default settings. Important Safety Instructions(UL Only) 1) Read these instructions. 2) Keep these instructions. 3) Heed all warnings....settings and functionality in fire or electric shock hazard, do not expose this apparatus during lightning storms or when unused for long periods of the polarized or grounding-type plug. Change to Local, State or Federal Laws AA68-03242L-07.indd Sec1:7 - 7 - 2009-09-22 5:06:50...
...supply cord or plug is damaged, liquid has been spilled or objects have fallen into your safety. Your Samsung TV is required when the apparatus has been damaged in its factory default settings. Important Safety Instructions(UL Only) 1) Read these instructions. 2) Keep these instructions. 3) Heed all warnings....settings and functionality in fire or electric shock hazard, do not expose this apparatus during lightning storms or when unused for long periods of the polarized or grounding-type plug. Change to Local, State or Federal Laws AA68-03242L-07.indd Sec1:7 - 7 - 2009-09-22 5:06:50...
User Manual (ENGLISH)
Page 4
...Troubleshooting 66 ■ Installing the Wall Mount Kit 67 ■ How to the Sound of Screen Burn 54 ■ Setting the Function Help 54 ■ Wall- Digital....50 ■ Viewing Closed Captions (On-Screen Text Messages) - Analog.. 36 ■ Automatic Volume Control 36 ■ Selecting... Noise Amplifier 42 PC DISPLAY ■ Using Your TV as a Computer (PC) Display 43 ■ Display Modes 43 ■ Setting up the TV with your PC 44 ■ Setting the Home Theater PC 45 TIME SETTING ■ Setting the Time 46 FUNCTION DESCRIPTION ■ Selecting a Menu Language ...
...Troubleshooting 66 ■ Installing the Wall Mount Kit 67 ■ How to the Sound of Screen Burn 54 ■ Setting the Function Help 54 ■ Wall- Digital....50 ■ Viewing Closed Captions (On-Screen Text Messages) - Analog.. 36 ■ Automatic Volume Control 36 ■ Selecting... Noise Amplifier 42 PC DISPLAY ■ Using Your TV as a Computer (PC) Display 43 ■ Display Modes 43 ■ Setting up the TV with your PC 44 ■ Setting the Home Theater PC 45 TIME SETTING ■ Setting the Time 46 FUNCTION DESCRIPTION ■ Selecting a Menu Language ...
User Manual (ENGLISH)
Page 5
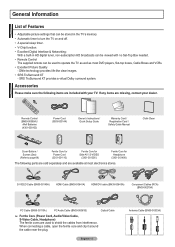
...001305 ) Ferrite Core for Headphone (3301-001456) The following items are missing, contact your TV. SRS TruSurround XT provides a virtual Dolby surround system. If any items are included with no Set-Top Box needed. • Remote Control The supplied remote can be used to shield ...core and clip it around the cable near the plug. General Information List of Features • Adjustable picture settings that can be stored in the TV's memory. • Automatic timer to turn the TV on and off. • A special sleep timer. • V-Chip function. • Excellent Digital ...
...001305 ) Ferrite Core for Headphone (3301-001456) The following items are missing, contact your TV. SRS TruSurround XT provides a virtual Dolby surround system. If any items are included with no Set-Top Box needed. • Remote Control The supplied remote can be used to shield ...core and clip it around the cable near the plug. General Information List of Features • Adjustable picture settings that can be stored in the TV's memory. • Automatic timer to turn the TV on and off. • A special sleep timer. • V-Chip function. • Excellent Digital ...
User Manual (ENGLISH)
Page 7
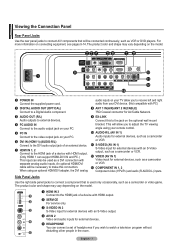
... using your DVI device. (Not compatible with PC) 8 ANT 1 IN(AIR)/ANT 2 IN(CABLE) 75Ω Coaxial connector for external devices. 5 HEADPHONE You can connect a set of a device with HDMI output. (Only HDMI 1 can support HDMI-DVI IN and PC.) This input can also be used only occasionally, such as a camcorder... devices. 4 PC AUDIO IN Connect to the audio output jack on your PC. 5 PC IN Connect to the video output jack on your TV allow you to adjust the TV viewing angle using an optional HDMI/DVI adapter, the DVI analog audio inputs on your PC. 6 DVI IN (HDMI 1) (AUDIO-R/L) Connect to...
... using your DVI device. (Not compatible with PC) 8 ANT 1 IN(AIR)/ANT 2 IN(CABLE) 75Ω Coaxial connector for external devices. 5 HEADPHONE You can connect a set of a device with HDMI output. (Only HDMI 1 can support HDMI-DVI IN and PC.) This input can also be used only occasionally, such as a camcorder... devices. 4 PC AUDIO IN Connect to the audio output jack on your PC. 5 PC IN Connect to the video output jack on your TV allow you to adjust the TV viewing angle using an optional HDMI/DVI adapter, the DVI analog audio inputs on your PC. 6 DVI IN (HDMI 1) (AUDIO-R/L) Connect to...
User Manual (ENGLISH)
Page 8
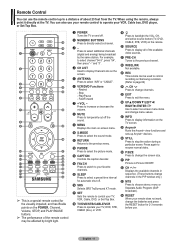
...mode. # CAPTION Controls the caption decoder. $ FAV.CH Press to switch to your TV, DVD, STB, CABLE (box), or VCR. ( Press to backlight the VOL, CH, and active source button (TV, DVD, CABLE, STB, VCR) on Samsung recorders. (Refer to page 64) d CH Press to choose stereo, mono or ... additional channels (digital and analog) being broadcast by bright light. 1 POWER Turns the TV on and off . ^ SRS Selects SRS TruSurround XT mode. & SET Sets the remote to control your TV, VCR, Cable, DVD, or Set-Top Box. * TV/DVD/STB/CABLE/VCR Press to operate your favorite channels. % SLEEP Press to select ...
...mode. # CAPTION Controls the caption decoder. $ FAV.CH Press to switch to your TV, DVD, STB, CABLE (box), or VCR. ( Press to backlight the VOL, CH, and active source button (TV, DVD, CABLE, STB, VCR) on Samsung recorders. (Refer to page 64) d CH Press to choose stereo, mono or ... additional channels (digital and analog) being broadcast by bright light. 1 POWER Turns the TV on and off . ^ SRS Selects SRS TruSurround XT mode. & SET Sets the remote to control your TV, VCR, Cable, DVD, or Set-Top Box. * TV/DVD/STB/CABLE/VCR Press to operate your favorite channels. % SLEEP Press to select ...
User Manual (ENGLISH)
Page 9
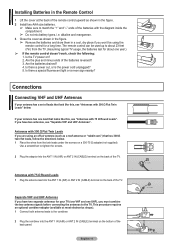
... VHF and UHF Antennas If you are using the remote control for your antenna has a set of leads that looks like this , see "Separate VHF and UHF Antennas". Is the TV power on the back of the TV. Are the batteries drained? 4. Use a screwdriver to tighten the screws. 2 Plug the adaptor into ... types, i.e. Is there a special fluorescent light or a neon sign nearby? Antennas with 300 Ω Flat Twin Leads" below . 1 Place the wires from the TV. (Assuming typical TV usage, the batteries last for about one UHF), you won't be used up to about 23 feet (7m) from the twin leads under the...
... VHF and UHF Antennas If you are using the remote control for your antenna has a set of leads that looks like this , see "Separate VHF and UHF Antennas". Is the TV power on the back of the TV. Are the batteries drained? 4. Use a screwdriver to tighten the screws. 2 Plug the adaptor into ... types, i.e. Is there a special fluorescent light or a neon sign nearby? Antennas with 300 Ω Flat Twin Leads" below . 1 Place the wires from the TV. (Assuming typical TV usage, the batteries last for about one UHF), you won't be used up to about 23 feet (7m) from the twin leads under the...

User Manual (ENGLISH)
Page 10
... A/B switch to the "B" position to view scrambled channels. (When you set the A/B switch to "B", you have made this cable to the ANT 2 IN(CABLE) terminal on the RF (A/B) switch. Connecting Cable TV To connect to a cable TV system, follow the instructions below . ANT IN ANT OUT 2 Connect the other OUT ... splitter and the A-IN terminal on the back of this connection, set the A/B switch to the "A" position for normal viewing. ANT IN ➢ This terminal might be labeled "ANT IN", "VHF IN" or simply, "IN". 2 Connect this TV is cable-ready, you do not need a cable box to view...
... A/B switch to the "B" position to view scrambled channels. (When you set the A/B switch to "B", you have made this cable to the ANT 2 IN(CABLE) terminal on the RF (A/B) switch. Connecting Cable TV To connect to a cable TV system, follow the instructions below . ANT IN ANT OUT 2 Connect the other OUT ... splitter and the A-IN terminal on the back of this connection, set the A/B switch to the "A" position for normal viewing. ANT IN ➢ This terminal might be labeled "ANT IN", "VHF IN" or simply, "IN". 2 Connect this TV is cable-ready, you do not need a cable box to view...

User Manual (ENGLISH)
Page 12
... to COMPONENT IN also. ➢ Each DVD Player/Set-Top box has a different back panel configuration. ➢ When connecting a DVD Player/Set-Top box, match the color of the connection terminal to the cable. DVD Player / Set-Top Box TV Rear Panel 2 Connect Audio Cables between the COMPONENT IN...(or COMPONENT IN 2 [Y, PB, PR]) jacks on the TV and the COMPONENT OUT [Y, PB, PR] jacks on the DVD Player/ Set-Top Box. Connecting a Camcorder The side panel jacks on your TV make it easy to connect a camcorder to your TV. Camcorder TV Side Panel 1 S-Video Cable(Not supplied) or 1 Video ...
... to COMPONENT IN also. ➢ Each DVD Player/Set-Top box has a different back panel configuration. ➢ When connecting a DVD Player/Set-Top box, match the color of the connection terminal to the cable. DVD Player / Set-Top Box TV Rear Panel 2 Connect Audio Cables between the COMPONENT IN...(or COMPONENT IN 2 [Y, PB, PR]) jacks on the TV and the COMPONENT OUT [Y, PB, PR] jacks on the DVD Player/ Set-Top Box. Connecting a Camcorder The side panel jacks on your TV make it easy to connect a camcorder to your TV. Camcorder TV Side Panel 1 S-Video Cable(Not supplied) or 1 Video ...

User Manual (ENGLISH)
Page 13
... between the DVI IN (HDMI 1) [R-AUDIO-L] jack on the TV and the AUDIO OUT jacks on the DVD Player/Set-Top Box. DVD Player / Set-Top Box TV Rear Panel 2 Audio Cable (Not supplied) 1 HDMI/DVI Cable (Not supplied) ➢ Each DVD Player/Set-Top box has a different back panel configuration. ➢ When ... box, match the color of the connection terminal to the cable. ➢ When connecting via HDMI/DVI. DVD Player / Set-Top Box TV Rear Panel 1 HDMI Cable (Not supplied) What is HDMI? • HDMI, or high-definition multimedia interface, is an interface that the HDMI device is ...
... between the DVI IN (HDMI 1) [R-AUDIO-L] jack on the TV and the AUDIO OUT jacks on the DVD Player/Set-Top Box. DVD Player / Set-Top Box TV Rear Panel 2 Audio Cable (Not supplied) 1 HDMI/DVI Cable (Not supplied) ➢ Each DVD Player/Set-Top box has a different back panel configuration. ➢ When ... box, match the color of the connection terminal to the cable. ➢ When connecting via HDMI/DVI. DVD Player / Set-Top Box TV Rear Panel 1 HDMI Cable (Not supplied) What is HDMI? • HDMI, or high-definition multimedia interface, is an interface that the HDMI device is ...
User Manual (ENGLISH)
Page 14
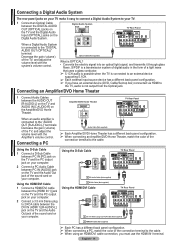
.../DVI Cable (Not supplied) ➢ Each PC has a different back panel configuration. ➢ When connecting a PC, match the color of the TV, and adjust the volume level with the Amplifier's volume control. Connecting an Amplifier/DVD Home Theater 1 Connect Audio Cables between the DIGITAL AUDIO OUT ...(OPTICAL) jacks on the TV and the Digital Audio Input (OPTICAL) jacks on your computer. Cable/Set-top box) connected via HDMI to the TV, audio is connected to the "DIGITAL AUDIO OUT (OPTICAL)" terminal: Decrease the gain...
.../DVI Cable (Not supplied) ➢ Each PC has a different back panel configuration. ➢ When connecting a PC, match the color of the TV, and adjust the volume level with the Amplifier's volume control. Connecting an Amplifier/DVD Home Theater 1 Connect Audio Cables between the DIGITAL AUDIO OUT ...(OPTICAL) jacks on the TV and the Digital Audio Input (OPTICAL) jacks on your computer. Cable/Set-top box) connected via HDMI to the TV, audio is connected to the "DIGITAL AUDIO OUT (OPTICAL)" terminal: Decrease the gain...
User Manual (ENGLISH)
Page 15
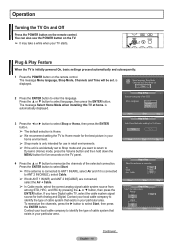
... ▲ or ▼ button to enter the language. The message Menu language, Shop Mode, Channels and Time will be set to Shop mode and you have Digital cable TV, select the cable system signal source for five seconds on the remote control. Contact your particular area. Press the ▲ ...English Spanish French Move Enter Skip Plug & Play Select Home Mode when installing this TV at home. You can also use in your home environment. ➢ Shop mode is Home. ➢ We recommend setting the TV to Home mode for use the POWER button on the remote control. Plug & Play...
... ▲ or ▼ button to enter the language. The message Menu language, Shop Mode, Channels and Time will be set to Shop mode and you have Digital cable TV, select the cable system signal source for five seconds on the remote control. Contact your particular area. Press the ▲ ...English Spanish French Move Enter Skip Plug & Play Select Home Mode when installing this TV at home. You can also use in your home environment. ➢ Shop mode is Home. ➢ We recommend setting the TV to Home mode for use the POWER button on the remote control. Plug & Play...
User Manual (ENGLISH)
Page 16
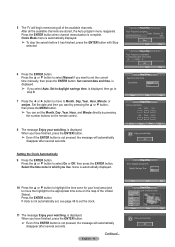
... finished, press the ENTER button. ➢ Even if the ENTER button is not pressed, the message will automatically disappear after several seconds. Set current date and time. Plug & Play Auto Program in which you have finished, press the ENTER button. ➢ Even if the ENTER... button is displayed. 5 The TV will begin memorizing all the available channels are stored, the Auto program menu reappears. After all of the United States). is not pressed, the...
... finished, press the ENTER button. ➢ Even if the ENTER button is not pressed, the message will automatically disappear after several seconds. Set current date and time. Plug & Play Auto Program in which you have finished, press the ENTER button. ➢ Even if the ENTER... button is displayed. 5 The TV will begin memorizing all the available channels are stored, the Auto program menu reappears. After all of the United States). is not pressed, the...
User Manual (ENGLISH)
Page 17
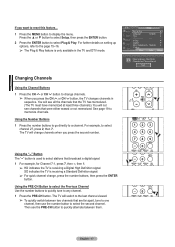
...erased or not memorized. Then use the PRE-CH button to select the second channel. For further details on setting up options, refer to select stations that the TV has memorized. (The TV must have memorized at least three channels). Using the PRE-CH Button to select the Previous Channel Use the... "-" Button The "-" button is used to the page 15~16. ➢ The Plug & Play feature is receiving a Digital High Definition signal. You will be set. Press the ▲ or ▼ button to select Setup, then press the ENTER button. 2 Press the ENTER button to any channel. 1 Press the PRE-...
...erased or not memorized. Then use the PRE-CH button to select the second channel. For further details on setting up options, refer to select stations that the TV has memorized. (The TV must have memorized at least three channels). Using the PRE-CH Button to select the Previous Channel Use the... "-" Button The "-" button is used to the page 15~16. ➢ The Plug & Play feature is receiving a Digital High Definition signal. You will be set. Press the ▲ or ▼ button to select Setup, then press the ENTER button. 2 Press the ENTER button to any channel. 1 Press the PRE-...
User Manual (ENGLISH)
Page 18
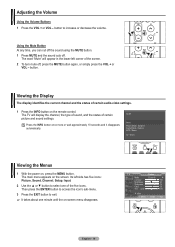
...the five icons. Adjusting the Volume Using the Volume Buttons 1 Press the VOL + or VOL - The TV will appear in the lower-left side has five icons: Picture, Sound, Channel, Setup, Input. 2 ... the volume. FAV.CH T V Picture Mode Contrast Brightness Sharpness Color Tint G 50 : Dynamic ► 100 45 75 55 R 50 ▼ More Move Enter Exit English - 18 RETURN FAV.CH Using the Mute...Menus 1 With the power on the screen. Its left corner of certain audio-video settings. 1 Press the INFO button on -screen menu disappears. button. button to exit. ➢ It ...
...the five icons. Adjusting the Volume Using the Volume Buttons 1 Press the VOL + or VOL - The TV will appear in the lower-left side has five icons: Picture, Sound, Channel, Setup, Input. 2 ... the volume. FAV.CH T V Picture Mode Contrast Brightness Sharpness Color Tint G 50 : Dynamic ► 100 45 75 55 R 50 ▼ More Move Enter Exit English - 18 RETURN FAV.CH Using the Mute...Menus 1 With the power on the screen. Its left corner of certain audio-video settings. 1 Press the INFO button on -screen menu disappears. button. button to exit. ➢ It ...

User Manual (ENGLISH)
Page 20
...the POWER button on the remote control allows you to Operate Your VCR 1 Turn off your brand of cable box. If your TV's remote control. RETURN FAV.CH Setting Up the Remote to switch between these modes, and control whichever piece of equipment you enter three digits of the code, even...choose. ➢ The remote control might not be compatible with all DVD Players, VCRs, Cable boxes, and Set-Top Boxes. RETURN 2 Press the CABLE button on your TV's remote control. 3 Press the SET button on your cable box does not turn on page 22 of this manual for your brand of VCR.
...the POWER button on the remote control allows you to Operate Your VCR 1 Turn off your brand of cable box. If your TV's remote control. RETURN FAV.CH Setting Up the Remote to switch between these modes, and control whichever piece of equipment you enter three digits of the code, even...choose. ➢ The remote control might not be compatible with all DVD Players, VCRs, Cable boxes, and Set-Top Boxes. RETURN 2 Press the CABLE button on your TV's remote control. 3 Press the SET button on your cable box does not turn on page 22 of this manual for your brand of VCR.

User Manual (ENGLISH)
Page 21
...STB. RETURN 2 Press the STB button on your TV's remote control. 3 Press the SET button on Using Remote Control Modes: DVD When your remote control is set -up , repeat steps 2, 3 and 4, but try the first one of the other codes listed for your TV's remote control. FAV.CH Note on your brand.... If your STB does not turn on the remote control. Setting Up the Remote to Operate Your Set Top Box 1 Turn off your DVD. 2 Press the DVD button on your TV's remote control. 3 Press the SET button on your TV's remote control. 4 Using the number buttons on your remote control, enter three ...
...STB. RETURN 2 Press the STB button on your TV's remote control. 3 Press the SET button on Using Remote Control Modes: DVD When your remote control is set -up , repeat steps 2, 3 and 4, but try the first one of the other codes listed for your TV's remote control. FAV.CH Note on your brand.... If your STB does not turn on the remote control. Setting Up the Remote to Operate Your Set Top Box 1 Turn off your DVD. 2 Press the DVD button on your TV's remote control. 3 Press the SET button on your TV's remote control. 4 Using the number buttons on your remote control, enter three ...

User Manual (ENGLISH)
Page 23
... 038 039 025 030 019 023 028 026 003 022 027 037 044 019 021 023 028 004 018 020 044 014 022 040 003 SAMSUNG SET-TOP BOX Product Ground wave STB Satellite STB CABLE STB STB DVD COMBO Satellite STB HDD COMBO Standard Code 001 002 003 004 008 009... MOTOROLA MACOM MITSUBISHI NEXT LEVEL PHILIPS PRIMESTAR PANASONIC PAYSAT PROSCAN RCA RADIOSHACK REALISTIC STS STAR TRAK SKY SKY LIFE SHACK STAR CHOICE SONY TOSHIBA ULTIMATE TV UNIDEN ZENITH Code 044 073 016 021 036 038 039 040 041 042 016 064 018 015 047 048 064 015 016 017 021 033...
... 038 039 025 030 019 023 028 026 003 022 027 037 044 019 021 023 028 004 018 020 044 014 022 040 003 SAMSUNG SET-TOP BOX Product Ground wave STB Satellite STB CABLE STB STB DVD COMBO Satellite STB HDD COMBO Standard Code 001 002 003 004 008 009... MOTOROLA MACOM MITSUBISHI NEXT LEVEL PHILIPS PRIMESTAR PANASONIC PAYSAT PROSCAN RCA RADIOSHACK REALISTIC STS STAR TRAK SKY SKY LIFE SHACK STAR CHOICE SONY TOSHIBA ULTIMATE TV UNIDEN ZENITH Code 044 073 016 021 036 038 039 040 041 042 016 064 018 015 047 048 064 015 016 017 021 033...
User Manual (ENGLISH)
Page 25
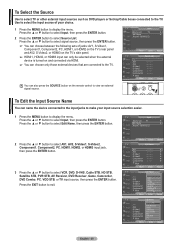
... other external input sources such as DVD players or Set-top/Cable boxes connected to select Source List. Press the ▲ or ▼ button to select Input, then press the ENTER button. 2 Press the ENTER button to the TV. To Edit the Input Source Name You can only ... Anynet+ (HDMI-CEC) Move Enter Return T V Source List TV AV1 AV2 S-Video1 S-Video2 Component1 Component2 ▼ More Move Enter Return You can also press the SOURCE button on and connected via HDMI. ➢ You can choose between the following sets of your input source selection easier. 1 Press the MENU button...
... other external input sources such as DVD players or Set-top/Cable boxes connected to select Source List. Press the ▲ or ▼ button to select Input, then press the ENTER button. 2 Press the ENTER button to the TV. To Edit the Input Source Name You can only ... Anynet+ (HDMI-CEC) Move Enter Return T V Source List TV AV1 AV2 S-Video1 S-Video2 Component1 Component2 ▼ More Move Enter Return You can also press the SOURCE button on and connected via HDMI. ➢ You can choose between the following sets of your input source selection easier. 1 Press the MENU button...


