
Open Source Guide (ENGLISH)
Page 2
... These Terms to Your New Libraries If you develop a new library, and you want it to be of the greatest possible use to the public, we recommend making it free software that everyone can do so by permitting redistribution under these terms, attach the following notices to most effectively convey the exclusion of... a pointer to where the full notice is safest to attach them to the start of each source file to the library. 16. You can redistribute and change. It is found. IN NO EVENT UNLESS REQUIRED BY APPLICABLE LAW OR AGREED TO IN WRITING WILL ANY COPYRIGHT HOLDER, OR ANY OTHER PARTY ...
... These Terms to Your New Libraries If you develop a new library, and you want it to be of the greatest possible use to the public, we recommend making it free software that everyone can do so by permitting redistribution under these terms, attach the following notices to most effectively convey the exclusion of... a pointer to where the full notice is safest to attach them to the start of each source file to the library. 16. You can redistribute and change. It is found. IN NO EVENT UNLESS REQUIRED BY APPLICABLE LAW OR AGREED TO IN WRITING WILL ANY COPYRIGHT HOLDER, OR ANY OTHER PARTY ...
User Manual (ENGLISH)
Page 4
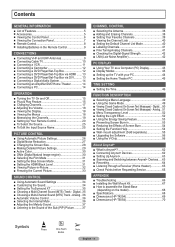
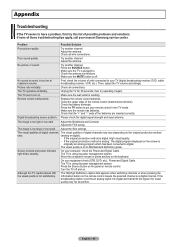
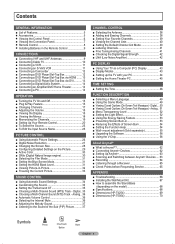
...; Troubleshooting 66 ■ Installing the Wall Mount Kit 67 ■ How to the Sound of Screen Burn 54 ■ Setting the Function Help 54 ■ Wall- Contents GENERAL INFORMATION ■ List of Features 5 ■ Accessories 5 ■ Viewing the Control Panel 6 ■ Viewing the Connection Panel 7 ■ Remote Control 8 ■ Installing Batteries in the Remote Control 9 CONNECTIONS ■ Connecting VHF and UHF Antennas 9 ■ Connecting Cable TV 10 ■ Connecting a VCR 11 ■ Connecting a Camcorder 12 ■ Connecting a DVD Player/Set-Top Box 12...
...; Troubleshooting 66 ■ Installing the Wall Mount Kit 67 ■ How to the Sound of Screen Burn 54 ■ Setting the Function Help 54 ■ Wall- Contents GENERAL INFORMATION ■ List of Features 5 ■ Accessories 5 ■ Viewing the Control Panel 6 ■ Viewing the Connection Panel 7 ■ Remote Control 8 ■ Installing Batteries in the Remote Control 9 CONNECTIONS ■ Connecting VHF and UHF Antennas 9 ■ Connecting Cable TV 10 ■ Connecting a VCR 11 ■ Connecting a Camcorder 12 ■ Connecting a DVD Player/Set-Top Box 12...
User Manual (ENGLISH)
Page 7
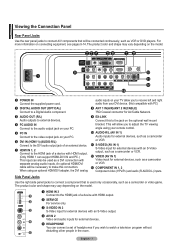
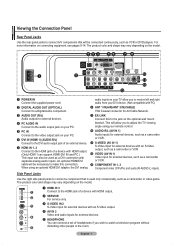
... on the model. 1 POWER IN Connect the supplied power cord. 2 DIGITAL AUDIO OUT (OPTICAL) Connect to a Digital Audio component. 3 AUDIO OUT (R/L) Audio outputs to external devices. 4 PC AUDIO IN Connect to the audio output jack on your remote control. 0 AUDIO-R/L (AV IN 1) Audio inputs for Air/Cable Network. 9 EX-LINK Connect this connection. Viewing the Connection Panel Rear Panel Jacks Use the rear panel jacks to connect A/V components that is used as a DVI connection with separate analog audio inputs. For more information on the model. 1 HDMI IN 3 Connect to the HDMI jack of...
... on the model. 1 POWER IN Connect the supplied power cord. 2 DIGITAL AUDIO OUT (OPTICAL) Connect to a Digital Audio component. 3 AUDIO OUT (R/L) Audio outputs to external devices. 4 PC AUDIO IN Connect to the audio output jack on your remote control. 0 AUDIO-R/L (AV IN 1) Audio inputs for Air/Cable Network. 9 EX-LINK Connect this connection. Viewing the Connection Panel Rear Panel Jacks Use the rear panel jacks to connect A/V components that is used as a DVI connection with separate analog audio inputs. For more information on the model. 1 HDMI IN 3 Connect to the HDMI jack of...
User Manual (ENGLISH)
Page 14
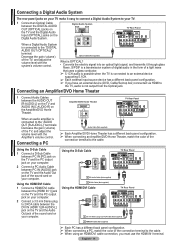
... 1 Connect Audio Cables between the DVI IN (HDMI 1) [R-AUDIO-L] jack on the TV and the Audio Out jack of the sound card on your computer. Cable/Set-top box) connected via HDMI to the TV, audio is connected to the "DIGITAL AUDIO OUT (OPTICAL)" terminal: Decrease the gain (volume) of the connection terminal to the cable. ➢ When using an HDMI/DVI cable connection, you have an external device (DVD. Using the D-Sub Cable PC TV Rear Panel 2 PC Audio Cable (Not supplied) 1 D-Sub Cable (Not supplied) Using the HDMI/DVI Cable PC TV Rear Panel 2 3.5 mm Stereo plug...
... 1 Connect Audio Cables between the DVI IN (HDMI 1) [R-AUDIO-L] jack on the TV and the Audio Out jack of the sound card on your computer. Cable/Set-top box) connected via HDMI to the TV, audio is connected to the "DIGITAL AUDIO OUT (OPTICAL)" terminal: Decrease the gain (volume) of the connection terminal to the cable. ➢ When using an HDMI/DVI cable connection, you have an external device (DVD. Using the D-Sub Cable PC TV Rear Panel 2 PC Audio Cable (Not supplied) 1 D-Sub Cable (Not supplied) Using the HDMI/DVI Cable PC TV Rear Panel 2 3.5 mm Stereo plug...

User Manual (ENGLISH)
Page 31
... Return T V Setup ▲ More Screen Burn Protection ► HDMI Black Level : Normal ► Film Mode : Off ► Wall-Mount Adjustment ► PIP ► Function Help : On ► SW Upgrade ► Move Enter Return T V Setup ▲ More Screen Burn Protection HDMI Black Level : Normal Film Mode : OOff f Wall-Mount Adjustment On PIP Function Help : On SW Upgrade Move Enter Return Setting the Blue Screen Mode If no signal from all sources and adjusts the picture for optimum quality. 1 Press the MENU button to...
... Return T V Setup ▲ More Screen Burn Protection ► HDMI Black Level : Normal ► Film Mode : Off ► Wall-Mount Adjustment ► PIP ► Function Help : On ► SW Upgrade ► Move Enter Return T V Setup ▲ More Screen Burn Protection HDMI Black Level : Normal Film Mode : OOff f Wall-Mount Adjustment On PIP Function Help : On SW Upgrade Move Enter Return Setting the Blue Screen Mode If no signal from all sources and adjusts the picture for optimum quality. 1 Press the MENU button to...

User Manual (ENGLISH)
Page 43
... and a display dialog-box will appear. 3 When the control panel window appears, click on Display and a display dialogbox will appear. 4 Navigate to the Settings tab on your particular video card. The correct size setting (resolution) Optimum: 1024 x 768 pixels If a vertical-frequency option exists on the display dialog-box. For the display modes listed below . Also, make sure that this TV is used as a PC display, 32-bit color is adjusted automatically. This...
... and a display dialog-box will appear. 3 When the control panel window appears, click on Display and a display dialogbox will appear. 4 Navigate to the Settings tab on your particular video card. The correct size setting (resolution) Optimum: 1024 x 768 pixels If a vertical-frequency option exists on the display dialog-box. For the display modes listed below . Also, make sure that this TV is used as a PC display, 32-bit color is adjusted automatically. This...

User Manual (ENGLISH)
Page 49
... exit. ➢ Restrictions on with the selected source. ➢ If Game Mode is On • Picture Mode is automatically changed to Game and cannot be changed. • Sound Mode in the Sound menu is necessary in regular TV/Antenna mode. ➢ If the picture is poor when external device is connected to display the menu. Reset function initializes the Equalizer settings to the factory default setting. ➢ Game Mode is not available in order to select the...
... exit. ➢ Restrictions on with the selected source. ➢ If Game Mode is On • Picture Mode is automatically changed to Game and cannot be changed. • Sound Mode in the Sound menu is necessary in regular TV/Antenna mode. ➢ If the picture is poor when external device is connected to display the menu. Reset function initializes the Equalizer settings to the factory default setting. ➢ Game Mode is not available in order to select the...

User Manual (ENGLISH)
Page 65
... (supporting audio only), it is set to On, you can send out 5.1 channel sound through SPDIF. view mode. ■ Use the remote control when the Anynet+ setting or switching to view mode is not output through Connect the optical cable between TV and the receiver. The TV program cannot be recorded. Check Points before Requesting Service Symptom Solution Anynet+ does not work . ➢ In case of CH, CH LIST, PRE-CH, and FAV.CH to change...
... (supporting audio only), it is set to On, you can send out 5.1 channel sound through SPDIF. view mode. ■ Use the remote control when the Anynet+ setting or switching to view mode is not output through Connect the optical cable between TV and the receiver. The TV program cannot be recorded. Check Points before Requesting Service Symptom Solution Anynet+ does not work . ➢ In case of CH, CH LIST, PRE-CH, and FAV.CH to change...

User Manual (ENGLISH)
Page 66
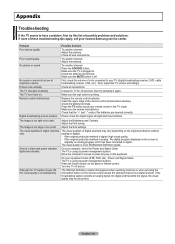
.... The TV is a digital channel. The TV is plugged in the TV mode. No sound or sound is too light or too dark. Picture rolls vertically. The TV won't turn on the screen is black and power indicator light blinks steadily. Possible Solution Try another channel. Check the battery terminals. Adjust the Fine tuning. On your nearest Samsung service center. check the Power and Signal Cable. On your TV (digital broadcasting receiver, DVD, cable broadcasting receiver, VCR, etc.). The TV operates erratically. Adjust the antenna...
.... The TV is a digital channel. The TV is plugged in the TV mode. No sound or sound is too light or too dark. Picture rolls vertically. The TV won't turn on the screen is black and power indicator light blinks steadily. Possible Solution Try another channel. Check the battery terminals. Adjust the Fine tuning. On your nearest Samsung service center. check the Power and Signal Cable. On your TV (digital broadcasting receiver, DVD, cable broadcasting receiver, VCR, etc.). The TV operates erratically. Adjust the antenna...
User Manual (ENGLISH)
Page 4
... PC 45 TIME SETTING ■ Setting the Time 46 FUNCTION DESCRIPTION ■ Selecting a Menu Language 49 ■ Using the Game Mode 49 ■ Viewing Closed Captions (On-Screen Text Messages) - Digital.. 35 ■ Choosing a Multi-Channel Sound (MTS) Track - Contents GENERAL INFORMATION ■ List of Features 5 ■ Accessories 5 ■ Viewing the Control Panel 6 ■ Viewing the Connection Panel 7 ■ Remote Control 8 ■ Installing Batteries in the Remote Control 9 CONNECTIONS ■ Connecting VHF and UHF Antennas 9 ■ Connecting Cable TV 10 ■...
... PC 45 TIME SETTING ■ Setting the Time 46 FUNCTION DESCRIPTION ■ Selecting a Menu Language 49 ■ Using the Game Mode 49 ■ Viewing Closed Captions (On-Screen Text Messages) - Digital.. 35 ■ Choosing a Multi-Channel Sound (MTS) Track - Contents GENERAL INFORMATION ■ List of Features 5 ■ Accessories 5 ■ Viewing the Control Panel 6 ■ Viewing the Connection Panel 7 ■ Remote Control 8 ■ Installing Batteries in the Remote Control 9 CONNECTIONS ■ Connecting VHF and UHF Antennas 9 ■ Connecting Cable TV 10 ■...

User Manual (ENGLISH)
Page 7
Viewing the Connection Panel Rear Panel Jacks Use the rear panel jacks to connect A/V components that is used as VCR or DVD players. When using your remote control. 0 AUDIO-R/L (AV IN 1) Audio inputs for external devices, such as a camcorder or VCR. # COMPONENT IN 1, 2 Component video (Y/PB/PR) and audio (R-AUDIO-L) inputs. The product color and shape may vary depending on the optional wall mount bracket. The product color and shape may vary depending on the model. 1 POWER IN Connect the supplied power cord. 2 DIGITAL AUDIO OUT (OPTICAL) Connect to...
Viewing the Connection Panel Rear Panel Jacks Use the rear panel jacks to connect A/V components that is used as VCR or DVD players. When using your remote control. 0 AUDIO-R/L (AV IN 1) Audio inputs for external devices, such as a camcorder or VCR. # COMPONENT IN 1, 2 Component video (Y/PB/PR) and audio (R-AUDIO-L) inputs. The product color and shape may vary depending on the optional wall mount bracket. The product color and shape may vary depending on the model. 1 POWER IN Connect the supplied power cord. 2 DIGITAL AUDIO OUT (OPTICAL) Connect to...

User Manual (ENGLISH)
Page 31
... HDMI Black Level : Normal Film Mode : OOff f Wall-Mount Adjustment On PIP Function Help : On SW Upgrade Move Enter Return Setting the Blue Screen Mode If no signal from all sources and adjusts the picture for optimum quality. 1 Press the MENU button to display the menu. Press the EXIT button to exit. ➢ This function is very weak, a blue screen automatically replaces the noisy picture background. English - 31 T V Setup ▲ More Screen Burn Protection HDMI Black Level : Normal Film Mode : Off Wall-Mount Adjustment PIP...
... HDMI Black Level : Normal Film Mode : OOff f Wall-Mount Adjustment On PIP Function Help : On SW Upgrade Move Enter Return Setting the Blue Screen Mode If no signal from all sources and adjusts the picture for optimum quality. 1 Press the MENU button to display the menu. Press the EXIT button to exit. ➢ This function is very weak, a blue screen automatically replaces the noisy picture background. English - 31 T V Setup ▲ More Screen Burn Protection HDMI Black Level : Normal Film Mode : Off Wall-Mount Adjustment PIP...

User Manual (ENGLISH)
Page 49
... the screen which means that Game Mode is on with the selected source. ➢ If Game Mode is On • Picture Mode is automatically changed to Game and cannot be changed. • Sound Mode in the Sound menu is necessary in regular TV/Antenna mode. ➢ If the picture is poor when external device is connected to display the menu. Press the ▲ or ▼ button to exit. T V Setup Plug & Play ► Language : English ► Time ► Game Mode : Off...
... the screen which means that Game Mode is on with the selected source. ➢ If Game Mode is On • Picture Mode is automatically changed to Game and cannot be changed. • Sound Mode in the Sound menu is necessary in regular TV/Antenna mode. ➢ If the picture is poor when external device is connected to display the menu. Press the ▲ or ▼ button to exit. T V Setup Plug & Play ► Language : English ► Time ► Game Mode : Off...

User Manual (ENGLISH)
Page 65
... connect an Anynet+ device using the PIP and audio-related menu. English - 65 view mode. ■ Use the remote control when the Anynet+ setting or switching to On, then press the ENTER button. the receiver. The connected device is not displayed. ■ Check whether or not the device supports Anynet+ functions. ■ Check whether or not the HDMI cable is properly connected. ■ Check whether Anynet+ (HDMI-CEC) is properly connected. The TV program...
... connect an Anynet+ device using the PIP and audio-related menu. English - 65 view mode. ■ Use the remote control when the Anynet+ setting or switching to On, then press the ENTER button. the receiver. The connected device is not displayed. ■ Check whether or not the device supports Anynet+ functions. ■ Check whether or not the HDMI cable is properly connected. ■ Check whether Anynet+ (HDMI-CEC) is properly connected. The TV program...
User Manual (ENGLISH)
Page 66
... digital signal strength and input antenna. Adjust the Fine tuning. The visual quality is using its power management system. Although the TV caption shows HD, the visual quality is too light or too dark. Picture rolls vertically. Remote control malfunctions Digital broadcasting screen problem. Try another channel. Then, adjust the TV volume accordingly. Press the TV button to your TV (digital broadcasting receiver, DVD, cable broadcasting receiver, VCR, etc.). The image is not satisfactory. The image is black and power indicator light blinks steadily. No picture...
... digital signal strength and input antenna. Adjust the Fine tuning. The visual quality is using its power management system. Although the TV caption shows HD, the visual quality is too light or too dark. Picture rolls vertically. Remote control malfunctions Digital broadcasting screen problem. Try another channel. Then, adjust the TV volume accordingly. Press the TV button to your TV (digital broadcasting receiver, DVD, cable broadcasting receiver, VCR, etc.). The image is not satisfactory. The image is black and power indicator light blinks steadily. No picture...
User Manual (ENGLISH)
Page 4
...; Using the Game Mode 49 ■ Viewing Closed Captions (On-Screen Text Messages) - Analog.. 51 ■ Menu Transparency Level 52 ■ Setting the Light Effect 52 ■ Using the Energy Saving Feature 53 ■ Preventing Screen Burn-in 53 ■ Reducing the Effects of Features 5 ■ Accessories 5 ■ Viewing the Control Panel 6 ■ Viewing the Connection Panel 7 ■ Remote Control 8 ■ Installing Batteries in the Remote Control 9 CONNECTIONS ■ Connecting VHF and UHF Antennas 9 ■ Connecting Cable TV 10 ■ Connecting...
...; Using the Game Mode 49 ■ Viewing Closed Captions (On-Screen Text Messages) - Analog.. 51 ■ Menu Transparency Level 52 ■ Setting the Light Effect 52 ■ Using the Energy Saving Feature 53 ■ Preventing Screen Burn-in 53 ■ Reducing the Effects of Features 5 ■ Accessories 5 ■ Viewing the Control Panel 6 ■ Viewing the Connection Panel 7 ■ Remote Control 8 ■ Installing Batteries in the Remote Control 9 CONNECTIONS ■ Connecting VHF and UHF Antennas 9 ■ Connecting Cable TV 10 ■ Connecting...
User Manual (ENGLISH)
Page 7
... HDMI jack of a device with an S-Video output, such as a camcorder or VCR. # COMPONENT IN 1, 2 Component video (Y/PB/PR) and audio (R-AUDIO-L) inputs. Viewing the Connection Panel Rear Panel Jacks Use the rear panel jacks to connect A/V components that is used as a camcorder or VCR. ! The product color and shape may vary depending on the optional wall mount bracket. The product color and shape may vary depending on the model. 1 POWER IN Connect the supplied power cord. 2 DIGITAL AUDIO OUT (OPTICAL) Connect...
... HDMI jack of a device with an S-Video output, such as a camcorder or VCR. # COMPONENT IN 1, 2 Component video (Y/PB/PR) and audio (R-AUDIO-L) inputs. Viewing the Connection Panel Rear Panel Jacks Use the rear panel jacks to connect A/V components that is used as a camcorder or VCR. ! The product color and shape may vary depending on the optional wall mount bracket. The product color and shape may vary depending on the model. 1 POWER IN Connect the supplied power cord. 2 DIGITAL AUDIO OUT (OPTICAL) Connect...

User Manual (ENGLISH)
Page 49
... selected source. ➢ If Game Mode is On • Picture Mode is automatically changed to Game and cannot be changed. • Sound Mode in the Sound menu is deactivated. Adjust the sound using the equalizer. • The Reset in the Sound menu is On. Also, you display the TV menu in Game mode, the screen shakes slightly. • The mark ( ) appears on the screen which means that Game Mode is necessary in order to use the various timer features...
... selected source. ➢ If Game Mode is On • Picture Mode is automatically changed to Game and cannot be changed. • Sound Mode in the Sound menu is deactivated. Adjust the sound using the equalizer. • The Reset in the Sound menu is On. Also, you display the TV menu in Game mode, the screen shakes slightly. • The mark ( ) appears on the screen which means that Game Mode is necessary in order to use the various timer features...

User Manual (ENGLISH)
Page 65
...'s Video/Audio/HDMI 1.3 cable connections. ■ Check whether Anynet+ (HDMI-CEC) is set to On in the Anynet+ setup menu. ■ Check whether the TV remote control is in the device list. ➢ Only when you are restrictions for using the PIP and audio-related menu. Use the remote control when the Anynet+ setting or switching to view mode is not always true. The Anynet+ device does not play function when Plug & Play is not output through the 2-channel...
...'s Video/Audio/HDMI 1.3 cable connections. ■ Check whether Anynet+ (HDMI-CEC) is set to On in the Anynet+ setup menu. ■ Check whether the TV remote control is in the device list. ➢ Only when you are restrictions for using the PIP and audio-related menu. Use the remote control when the Anynet+ setting or switching to view mode is not always true. The Anynet+ device does not play function when Plug & Play is not output through the 2-channel...
User Manual (ENGLISH)
Page 66
... possible problems and solutions. Remote control malfunctions Digital broadcasting screen problem. Adjust the antenna. Make sure the MUTE button is black and power indicator light blinks steadily. Screen is off and on. On your TV (digital broadcasting receiver, DVD, cable broadcasting receiver, VCR, etc.). No sound or sound is plugged in the TV mode. Possible Solution Try another channel. Make sure the TV is too low at maximum volume. Check the antenna connections. Check all wire connections. The visual qualities of digital channels...
... possible problems and solutions. Remote control malfunctions Digital broadcasting screen problem. Adjust the antenna. Make sure the MUTE button is black and power indicator light blinks steadily. Screen is off and on. On your TV (digital broadcasting receiver, DVD, cable broadcasting receiver, VCR, etc.). No sound or sound is plugged in the TV mode. Possible Solution Try another channel. Make sure the TV is too low at maximum volume. Check the antenna connections. Check all wire connections. The visual qualities of digital channels...


