
User Manual (ENGLISH)
Page 4
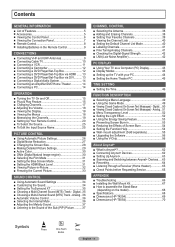
...9632; Viewing the Control Panel 6 ■ Viewing the Connection Panel 7 ■ Remote Control 8 ■ Installing Batteries in the Remote Control 9 CONNECTIONS ■ Connecting VHF and UHF Antennas 9 ■ Connecting Cable TV 10 ■ Connecting a VCR 11 ■ Connecting a Camcorder 12 ■ Connecting...■ Dimensions (HP-T4254 69 ■ Dimensions (HP-T5054 70 Symbols Press One-Touch Button ➢ Note English - 4 Digital....50 ■ Viewing Closed Captions (On-Screen Text Messages) - Digital.. 35 ■ Choosing a Multi-Channel Sound (MTS) Track - ...
...9632; Viewing the Control Panel 6 ■ Viewing the Connection Panel 7 ■ Remote Control 8 ■ Installing Batteries in the Remote Control 9 CONNECTIONS ■ Connecting VHF and UHF Antennas 9 ■ Connecting Cable TV 10 ■ Connecting a VCR 11 ■ Connecting a Camcorder 12 ■ Connecting...■ Dimensions (HP-T4254 69 ■ Dimensions (HP-T5054 70 Symbols Press One-Touch Button ➢ Note English - 4 Digital....50 ■ Viewing Closed Captions (On-Screen Text Messages) - Digital.. 35 ■ Choosing a Multi-Channel Sound (MTS) Track - ...
User Manual (ENGLISH)
Page 5
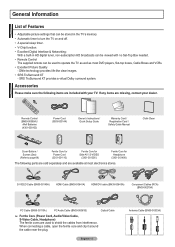
...Power Cord, Audio/Video Cable, S-Video Cable, Headphone) The ferrite cores are included with no Set-Top Box needed. • Remote Control The supplied remote can be used to shield the cables from interference. DNIe technology provides life-like clear images. • SRS TruSurround XT - ...English - 5 Antenna Cable (BN39-00333A) Accessories Please make sure the following parts are sold separately and are missing, contact your TV....
...Power Cord, Audio/Video Cable, S-Video Cable, Headphone) The ferrite cores are included with no Set-Top Box needed. • Remote Control The supplied remote can be used to shield the cables from interference. DNIe technology provides life-like clear images. • SRS TruSurround XT - ...English - 5 Antenna Cable (BN39-00333A) Accessories Please make sure the following parts are sold separately and are missing, contact your TV....
User Manual (ENGLISH)
Page 6
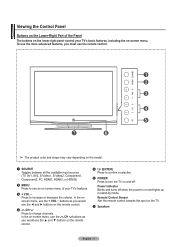
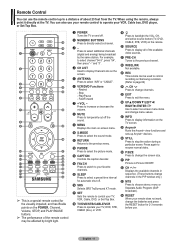
Viewing the Control Panel Buttons on the Lower-Right Part of your TV's basic features, including the on the TV. 7 Speakers English - 6 Remote Control Sensor Aim the remote control towards this spot on -screen menu. Press to change channels. In the on-screen menu, use the CH buttons as you would use...lights up in stand-by mode. To use the more advanced features, you would use the ▲ and ▼ buttons on the remote control. 5 (ENTER) Press to confirm a selection. 6 POWER Press to turn the TV on -screen menu of the Panel The buttons on the lower-right panel control your...
Viewing the Control Panel Buttons on the Lower-Right Part of your TV's basic features, including the on the TV. 7 Speakers English - 6 Remote Control Sensor Aim the remote control towards this spot on -screen menu. Press to change channels. In the on-screen menu, use the CH buttons as you would use...lights up in stand-by mode. To use the more advanced features, you would use the ▲ and ▼ buttons on the remote control. 5 (ENTER) Press to confirm a selection. 6 POWER Press to turn the TV on -screen menu of the Panel The buttons on the lower-right panel control your...
User Manual (ENGLISH)
Page 7
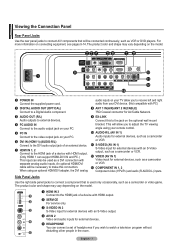
... Video input for external devices, such as a camcorder or VCR. # COMPONENT IN 1, 2 Component video (Y/PB/PR) and audio (R-AUDIO-L) inputs. When using your remote control. 0 AUDIO-R/L (AV IN 1) Audio inputs for external devices, such as a camcorder or VCR. ! Side Panel Jacks Use the right side panel jacks to ... to the jack on connecting equipment, see pages 9-14. English - 7 The product color and shape may vary depending on your TV allow you to adjust the TV viewing angle using an optional HDMI/DVI adapter, the DVI analog audio inputs on the model. 1 HDMI IN 3 Connect to the...
... Video input for external devices, such as a camcorder or VCR. # COMPONENT IN 1, 2 Component video (Y/PB/PR) and audio (R-AUDIO-L) inputs. When using your remote control. 0 AUDIO-R/L (AV IN 1) Audio inputs for external devices, such as a camcorder or VCR. ! Side Panel Jacks Use the right side panel jacks to ... to the jack on connecting equipment, see pages 9-14. English - 7 The product color and shape may vary depending on your TV allow you to adjust the TV viewing angle using an optional HDMI/DVI adapter, the DVI analog audio inputs on the model. 1 HDMI IN 3 Connect to the...
User Manual (ENGLISH)
Page 8
... Audio Program (SAP broadcast). l CH / Displays the available channels in sequence. (These buttons change menu values. When using the remote, always point it directly at the TV. Press to increase or decrease the volume. 8 MUTE Press to temporarily cut off . ^ SRS Selects SRS TruSurround XT mode. ... Channel, Volume, STOP, and PLAY/PAUSE buttons. ➢ The performance of about 23 feet from the TV. f UP▲/DOWN▼/LEFT◄/ RIGHT►/ENTER Use to select on Samsung recorders. (Refer to page 64) d CH Press to operate your remote does not work, change channels.
... Audio Program (SAP broadcast). l CH / Displays the available channels in sequence. (These buttons change menu values. When using the remote, always point it directly at the TV. Press to increase or decrease the volume. 8 MUTE Press to temporarily cut off . ^ SRS Selects SRS TruSurround XT mode. ... Channel, Volume, STOP, and PLAY/PAUSE buttons. ➢ The performance of about 23 feet from the TV. f UP▲/DOWN▼/LEFT◄/ RIGHT►/ENTER Use to select on Samsung recorders. (Refer to page 64) d CH Press to operate your remote does not work, change channels.
User Manual (ENGLISH)
Page 9
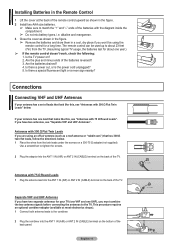
...a set of the back panel. Antennas with the diagram inside the compartment. ➢ Do not mix battery types, i.e. Is the TV power on the back of the remote control upward as shown in the figure. ➢ Remove the batteries and store them in a cool, dry place if you have two...special fluorescent light or a neon sign nearby? This procedure requires an optional combiner-adaptor (available at the back of the TV. Separate VHF and UHF Antennas If you are using the remote control for a long time. Connections Connecting VHF and UHF Antennas If your antenna has one year.) ➢ If ...
...a set of the back panel. Antennas with the diagram inside the compartment. ➢ Do not mix battery types, i.e. Is the TV power on the back of the remote control upward as shown in the figure. ➢ Remove the batteries and store them in a cool, dry place if you have two...special fluorescent light or a neon sign nearby? This procedure requires an optional combiner-adaptor (available at the back of the TV. Separate VHF and UHF Antennas If you are using the remote control for a long time. Connections Connecting VHF and UHF Antennas If your antenna has one year.) ➢ If ...
User Manual (ENGLISH)
Page 15
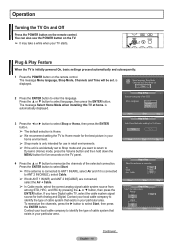
...displayed. i Menu language, Shop Mode, Channels and Time will be set to Shop mode and you have Digital cable TV, select the cable system signal source for five seconds on the remote control. is automatically displayed. 3 Press the ◄ or ► button to select Shop or Home, then press... the ENTER button. ➢ The default selection is Home. ➢ We recommend setting the TV to Home mode for use the POWER button...
...displayed. i Menu language, Shop Mode, Channels and Time will be set to Shop mode and you have Digital cable TV, select the cable system signal source for five seconds on the remote control. is automatically displayed. 3 Press the ◄ or ► button to select Shop or Home, then press... the ENTER button. ➢ The default selection is Home. ➢ We recommend setting the TV to Home mode for use the POWER button...
User Manual (ENGLISH)
Page 16
Press the ▲ or ▼ button to the appropriate time zone on the remote control. 8 The message Enjoy your watching. is displayed. OK Enter Skip Plug & Play Select the clock mode. OK Setting the Clock Automatically 9 Press... you have finished, press the ENTER button. ➢ Even if the ENTER button is not pressed, the message will automatically disappear after several seconds. 5 The TV will automatically disappear after several seconds. Air : 9 , Cable : 5. Press the ▲ or ▼ button to daylight savings time. Move Adjust Enter Skip i ...
Press the ▲ or ▼ button to the appropriate time zone on the remote control. 8 The message Enjoy your watching. is displayed. OK Enter Skip Plug & Play Select the clock mode. OK Setting the Clock Automatically 9 Press... you have finished, press the ENTER button. ➢ Even if the ENTER button is not pressed, the message will automatically disappear after several seconds. 5 The TV will automatically disappear after several seconds. Air : 9 , Cable : 5. Press the ▲ or ▼ button to daylight savings time. Move Adjust Enter Skip i ...
User Manual (ENGLISH)
Page 18
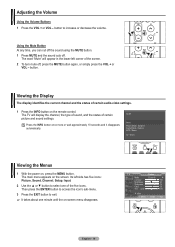
...the MENU button. FAV.CH T V Picture Mode Contrast Brightness Sharpness Color Tint G 50 : Dynamic ► 100 45 75 55 R 50 ▼ More Move Enter Exit English - 18 RETURN FAV.CH Using the Mute ... status of certain picture and sound settings. button to select one minute until the on the remote control. Then press the ENTER button to access the icon's sub-menu. 3 Press the EXIT... button to exit. ➢ It takes about one of the screen. 2 To turn mute off . The TV will appear in the lower-left side has five icons: Picture, Sound, Channel, Setup, Input. 2 Use the...
...the MENU button. FAV.CH T V Picture Mode Contrast Brightness Sharpness Color Tint G 50 : Dynamic ► 100 45 75 55 R 50 ▼ More Move Enter Exit English - 18 RETURN FAV.CH Using the Mute ... status of certain picture and sound settings. button to select one minute until the on the remote control. Then press the ENTER button to access the icon's sub-menu. 3 Press the EXIT... button to exit. ➢ It takes about one of the screen. 2 To turn mute off . The TV will appear in the lower-left side has five icons: Picture, Sound, Channel, Setup, Input. 2 Use the...
User Manual (ENGLISH)
Page 19
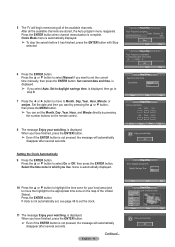
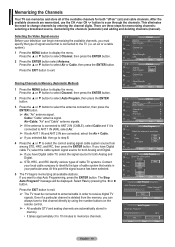
... among STD, HRC, and IRC, then press the ENTER button. The Stop Auto Program? Select Yes by using the number buttons on the remote control. ➢ • All available DTV and analog channels are memorized, use the CH or CH button to that exists in memory. ...connected to select the correct analog signal cable system source from the memory, you can begin memorizing the available channels, you have Digital cable TV, select the signal source for memorizing channels: selecting a broadcast source, memorizing the channels (automatic) and adding and deleting channels (manual). Analog...
... among STD, HRC, and IRC, then press the ENTER button. The Stop Auto Program? Select Yes by using the number buttons on the remote control. ➢ • All available DTV and analog channels are memorized, use the CH or CH button to that exists in memory. ...connected to select the correct analog signal cable system source from the memory, you can begin memorizing the available channels, you have Digital cable TV, select the signal source for memorizing channels: selecting a broadcast source, memorizing the channels (automatic) and adding and deleting channels (manual). Analog...

User Manual (ENGLISH)
Page 20
...If more than one code is listed, try the first one.) 5 Press the POWER button on the remote control. Setting Up the Remote to Operate Your VCR 1 Turn off your TV's volume. Setting Up the Remote to switch between these modes, and control whichever piece of cable box. Make sure you enter three digits... you to Operate Your Cable Box 1 Turn off your VCR. 2 Press the VCR button on your TV's remote control. 3 Press the SET button on your TV's remote control. 4 Using the number buttons on your remote control, enter three digits of the VCR code listed on page 22 of this manual for your...
...If more than one code is listed, try the first one.) 5 Press the POWER button on the remote control. Setting Up the Remote to Operate Your VCR 1 Turn off your TV's volume. Setting Up the Remote to switch between these modes, and control whichever piece of cable box. Make sure you enter three digits... you to Operate Your Cable Box 1 Turn off your VCR. 2 Press the VCR button on your TV's remote control. 3 Press the SET button on your TV's remote control. 4 Using the number buttons on your remote control, enter three digits of the VCR code listed on page 22 of this manual for your...

User Manual (ENGLISH)
Page 21
... buttons still control your TV's volume. Your STB should turn on if your remote is in DVD mode, the volume buttons still control your TV's volume. RETURN 2 Press the STB button on your TV's remote control. 3 Press the SET button on Using Remote Control Modes: STB When your remote control is set up ... Operate Your Set Top Box 1 Turn off your DVD. 2 Press the DVD button on your TV's remote control. 3 Press the SET button on your TV's remote control. 4 Using the number buttons on your remote control, enter three digits of the DVD code listed on page 24 of this manual for your ...
... buttons still control your TV's volume. Your STB should turn on if your remote is in DVD mode, the volume buttons still control your TV's volume. RETURN 2 Press the STB button on your TV's remote control. 3 Press the SET button on Using Remote Control Modes: STB When your remote control is set up ... Operate Your Set Top Box 1 Turn off your DVD. 2 Press the DVD button on your TV's remote control. 3 Press the SET button on your TV's remote control. 4 Using the number buttons on your remote control, enter three digits of the DVD code listed on page 24 of this manual for your ...
User Manual (ENGLISH)
Page 25
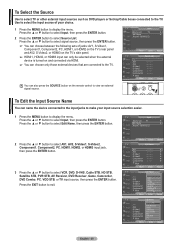
... via HDMI. ➢ You can also press the SOURCE button on the remote control to display the menu. T V Input Source List : TV ► Edit Name ► Anynet+ (HDMI-CEC) Move Enter Return T V Source List TV AV1 AV2 S-Video1 S-Video2 Component1 Component2 ▼ More Move Enter Return You...Edit the Input Source Name You can name the device connected to the input jacks to make your choice. 1 Press the MENU button to the TV. Move Enter Return T V Edit Name AV1 AV2 S-Video1 S-Video2 Component1 Component2 ▼ More Move Enter Return T V Edit Name AV1 AV2...
... via HDMI. ➢ You can also press the SOURCE button on the remote control to display the menu. T V Input Source List : TV ► Edit Name ► Anynet+ (HDMI-CEC) Move Enter Return T V Source List TV AV1 AV2 S-Video1 S-Video2 Component1 Component2 ▼ More Move Enter Return You...Edit the Input Source Name You can name the device connected to the input jacks to make your choice. 1 Press the MENU button to the TV. Move Enter Return T V Edit Name AV1 AV2 S-Video1 S-Video2 Component1 Component2 ▼ More Move Enter Return T V Edit Name AV1 AV2...
User Manual (ENGLISH)
Page 26
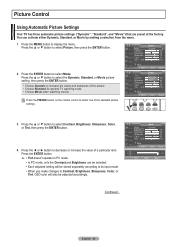
...the ENTER button. 2 Press the ENTER button to increase the clarity and sharpness of the picture. • Choose Standard for general TV watching mode. • Choose Movie when watching movies. OSD color will be adjusted accordingly. Press the ▲ or ▼ button... T V Mode Mode : Dynamic Contrast 100 Brightness 45 Sharpness 75 Color 55 Tint G 50 R 50 ▼ More Move Enter Return Contrast Move Adjust 100 Return Continued... Press the P.MODE button on the remote control to Contrast, Brightness, Sharpness, Color, or Tint. Press the ENTER button. ➢...
...the ENTER button. 2 Press the ENTER button to increase the clarity and sharpness of the picture. • Choose Standard for general TV watching mode. • Choose Movie when watching movies. OSD color will be adjusted accordingly. Press the ▲ or ▼ button... T V Mode Mode : Dynamic Contrast 100 Brightness 45 Sharpness 75 Color 55 Tint G 50 R 50 ▼ More Move Enter Return Contrast Move Adjust 100 Return Continued... Press the P.MODE button on the remote control to Contrast, Brightness, Sharpness, Color, or Tint. Press the ENTER button. ➢...

User Manual (ENGLISH)
Page 28
...; In COMPONENT(720p, 1080i) or HDMI(720p, 1080i) mode, 16:9, 4:3 and Wide Fit can not change the picture size. Press the P.SIZE button on the remote control to 16:9. Wide Fit Enlarges the aspect ratio of the picture to fit the entire screen. 4:3 Sets the picture to display the menu. Press...; Just Scan : Use this function to see the full image without any cutoff when DTV or HDMI 720p/1080i signals are input. ➢ • In TV, VIDEO, S-VIDEO, and COMPONENT(480i, 480p) modes, all external devices (DVD, VCR etc.).
...; In COMPONENT(720p, 1080i) or HDMI(720p, 1080i) mode, 16:9, 4:3 and Wide Fit can not change the picture size. Press the P.SIZE button on the remote control to 16:9. Wide Fit Enlarges the aspect ratio of the picture to fit the entire screen. 4:3 Sets the picture to display the menu. Press...; Just Scan : Use this function to see the full image without any cutoff when DTV or HDMI 720p/1080i signals are input. ➢ • In TV, VIDEO, S-VIDEO, and COMPONENT(480i, 480p) modes, all external devices (DVD, VCR etc.).

User Manual (ENGLISH)
Page 32
...select PIP, then press the ENTER button. 2 Press the ENTER button again. For example, you use the PIP feature to simultaneously watch one TV channel in the main screen, and a different one built-in tuner, which does not allow PIP to function in the PIP window becomes slightly... Move Enter Return T V PIP Size Position Channel PIP : OOfff : On : : DTV Air 3 - 0 Press the PIP button on the remote control to activate or deactivate the PIP. ➢ Analog TV signals can use the main picture to the Component 1, 2, PC and HDMI 1, 2, 3 jacks on again, the PIP window will disappear.
...select PIP, then press the ENTER button. 2 Press the ENTER button again. For example, you use the PIP feature to simultaneously watch one TV channel in the main screen, and a different one built-in tuner, which does not allow PIP to function in the PIP window becomes slightly... Move Enter Return T V PIP Size Position Channel PIP : OOfff : On : : DTV Air 3 - 0 Press the PIP button on the remote control to activate or deactivate the PIP. ➢ Analog TV signals can use the main picture to the Component 1, 2, PC and HDMI 1, 2, 3 jacks on again, the PIP window will disappear.

User Manual (ENGLISH)
Page 33
Changing the PIP Channel 5 Press the ▲ or ▼ button to TV. T V PIP Size Position Channel PIP : On : : : DTV Air 3 - 0 Move Enter Return T V PIP Size ... press the ENTER button. ➢ In Double Window ( be heard. Changing the Position of the remote to select the desired channel in the PIP window, then press the ENTER button. ➢ The ... Window ( ) or Double Wide ( ) mode, the screen size or alignment may slightly differ depending on the remote control to cancel. ➢ To prevent screen burn-in, this function will still be selected. ) and Double Wide...
Changing the PIP Channel 5 Press the ▲ or ▼ button to TV. T V PIP Size Position Channel PIP : On : : : DTV Air 3 - 0 Move Enter Return T V PIP Size ... press the ENTER button. ➢ In Double Window ( be heard. Changing the Position of the remote to select the desired channel in the PIP window, then press the ENTER button. ➢ The ... Window ( ) or Double Wide ( ) mode, the screen size or alignment may slightly differ depending on the remote control to cancel. ➢ To prevent screen burn-in, this function will still be selected. ) and Double Wide...

User Manual (ENGLISH)
Page 34
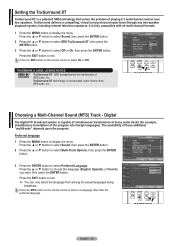
...: OCfuf stom Internal Mute : Off Sound Select : Main Reset Move Enter Return RETURN FAV.CH Press the S.MODE button on the remote control to select one of the standard sound settings. T V Sound Mode : Custom Equalizer SRS TruSurround XT : Off Multi-Track Options...; Choose Custom to recall your personalized sound settings. 1 Press the MENU button to display the menu. Sound Control Using Automatic Sound Settings Your TV has automatic sound settings ("Standard", "Music", "Movie", "Speech", and "Custom") that is automatically switched to the Custom mode. Press the ...
...: OCfuf stom Internal Mute : Off Sound Select : Main Reset Move Enter Return RETURN FAV.CH Press the S.MODE button on the remote control to select one of the standard sound settings. T V Sound Mode : Custom Equalizer SRS TruSurround XT : Off Multi-Track Options...; Choose Custom to recall your personalized sound settings. 1 Press the MENU button to display the menu. Sound Control Using Automatic Sound Settings Your TV has automatic sound settings ("Standard", "Music", "Movie", "Speech", and "Custom") that is automatically switched to the Custom mode. Press the ...
User Manual (ENGLISH)
Page 35
... French) you want, then press the ENTER button. Press the ▲ or ▼ button to display the menu. Press the MTS button on the remote control to exit. ➢ You can only select the language from SRS Labs, Inc. TruSurround XT technology is capable of simultaneous transmission of many audio...a compelling, virtual surround sound experience through any two-speaker playback system, including internal television speakers. Press the EXIT button to exit. Digital The digital-TV broadcast system is incorporated under license from among the actual languages being broadcast.
... French) you want, then press the ENTER button. Press the ▲ or ▼ button to display the menu. Press the MTS button on the remote control to exit. ➢ You can only select the language from SRS Labs, Inc. TruSurround XT technology is capable of simultaneous transmission of many audio...a compelling, virtual surround sound experience through any two-speaker playback system, including internal television speakers. Press the EXIT button to exit. Digital The digital-TV broadcast system is incorporated under license from among the actual languages being broadcast.
User Manual (ENGLISH)
Page 36
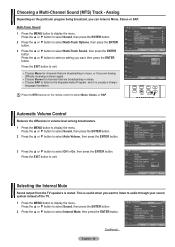
.... • Choose Mono for channels that are broadcasting in mono, or if you want to listen to audio through your sound system instead of the TV. 1 Press the MENU button to the Separate Audio Program, which is usually a foreign- T V Sound Mode : Custom Equalizer SRS TruSurround XT : Off...: Main Reset Move Enter Return Selecting the Internal Mute Sound output from the TV speakers is useful when you can listen to select Multi-Track Sound, then press the ENTER button. Analog Depending on the remote control to select Off or On, then press the ENTER button. Press the ...
.... • Choose Mono for channels that are broadcasting in mono, or if you want to listen to audio through your sound system instead of the TV. 1 Press the MENU button to the Separate Audio Program, which is usually a foreign- T V Sound Mode : Custom Equalizer SRS TruSurround XT : Off...: Main Reset Move Enter Return Selecting the Internal Mute Sound output from the TV speakers is useful when you can listen to select Multi-Track Sound, then press the ENTER button. Analog Depending on the remote control to select Off or On, then press the ENTER button. Press the ...


