
Owners Instructions
Page 2
...8226; Do not place the PDP on a rack or bookcase, ensure that there is adequate ventilation and that unauthorized recording of copyrighted TV programs is present inside part of cable entry as practical. copyright laws. It is provided to call CATV system installer's attention to Article.... • Operate your PDP. • Keep the safety and operating instructions for ventilation to overturn. • Provide ventilation for choosing Samsung! TO PREVENT DAMAGE WHICH MAY RESULT IN FIRE OR ELECTRIC SHOCK HAZARD, DO NOT EXPOSE THIS APPLIANCE TO RAIN OR MOISTURE. 2 Thank You...
...8226; Do not place the PDP on a rack or bookcase, ensure that there is adequate ventilation and that unauthorized recording of copyrighted TV programs is present inside part of cable entry as practical. copyright laws. It is provided to call CATV system installer's attention to Article.... • Operate your PDP. • Keep the safety and operating instructions for ventilation to overturn. • Provide ventilation for choosing Samsung! TO PREVENT DAMAGE WHICH MAY RESULT IN FIRE OR ELECTRIC SHOCK HAZARD, DO NOT EXPOSE THIS APPLIANCE TO RAIN OR MOISTURE. 2 Thank You...
Owners Instructions
Page 3
...with similar configuration. If you make sure the voltage rating of the computer convenience outlet is connected to Identify and Resolve Radio/TV Interference Problems helpful. However, there is damaged - Government Printing Office, Washington, DC 20402, Stock Number 004-000-00345-4 ...making the connection, make adjustments yourself, adjust only those that are designed to radio communications. The party responsible for long periods of Samsung 3351 Michelson Drive, Suite #290, Irvine, CA92612 USA 5 Pay particular attention to cords at plugs, convenience receptacles, and the...
...with similar configuration. If you make sure the voltage rating of the computer convenience outlet is connected to Identify and Resolve Radio/TV Interference Problems helpful. However, there is damaged - Government Printing Office, Washington, DC 20402, Stock Number 004-000-00345-4 ...making the connection, make adjustments yourself, adjust only those that are designed to radio communications. The party responsible for long periods of Samsung 3351 Michelson Drive, Suite #290, Irvine, CA92612 USA 5 Pay particular attention to cords at plugs, convenience receptacles, and the...
Owners Instructions
Page 4
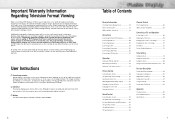
... images displayed on them should primarily be in the wide screen 16:9 ratio format,or expanded to fill the screen if your Samsung limited warranty. Displaying stationary graphics and images on screen, such as the dark side-bars on nonexpanded standard format television video and...Information Your New Plasma Display Panel 10 Remote Control Buttons 12 Wall Installation Instructions 14 Connections Connecting VHF and UHF Antennas 20 Connecting Cable TV 20 Connecting Speakers 22 Connecting a VCR 24 Connecting a Camcorder 25 Connecting a DVD Player 26 Connecting a DTV Receiver 27 Operation ...
... images displayed on them should primarily be in the wide screen 16:9 ratio format,or expanded to fill the screen if your Samsung limited warranty. Displaying stationary graphics and images on screen, such as the dark side-bars on nonexpanded standard format television video and...Information Your New Plasma Display Panel 10 Remote Control Buttons 12 Wall Installation Instructions 14 Connections Connecting VHF and UHF Antennas 20 Connecting Cable TV 20 Connecting Speakers 22 Connecting a VCR 24 Connecting a Camcorder 25 Connecting a DVD Player 26 Connecting a DTV Receiver 27 Operation ...
Owners Instructions
Page 6
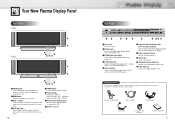
...Antenna Cable Speaker Cables Power Cord Ferrite Cores; 3EA (HPN5039) Owner's Instructions 11 Also used to select or adjust items on the on your TV, check to make sure that you have unpacked your PC. ¨S-Video Input jacks Connect S-Video/audio signals from external sources such VCRs or... button Press to the Sub-woofer speaker jack. ˝ Power Input jack Connect the supplied power cord. Your New Plasma Display Panel Front Panel HPN5039 HPN6339 Œ SOURCE button Press to display all the parts shown here. Checking Accessories Once you have all of a DVD player or Set-Top Box....
...Antenna Cable Speaker Cables Power Cord Ferrite Cores; 3EA (HPN5039) Owner's Instructions 11 Also used to select or adjust items on the on your TV, check to make sure that you have unpacked your PC. ¨S-Video Input jacks Connect S-Video/audio signals from external sources such VCRs or... button Press to the Sub-woofer speaker jack. ˝ Power Input jack Connect the supplied power cord. Your New Plasma Display Panel Front Panel HPN5039 HPN6339 Œ SOURCE button Press to display all the parts shown here. Checking Accessories Once you have all of a DVD player or Set-Top Box....
Owners Instructions
Page 7
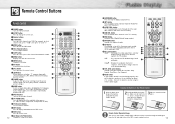
...PIP window. Re-insert the batteries and try using the remote control again. Remote Control Operation Range. SET button Used during set up of this Samsung remote control, so that it will work compatibly with other devices (VCR, cable box, DVD) ÷ PIP control buttons SWAP : Exchanges ...the screen size. ˇ Number buttons ¨ +100 button Press to select channels over 100. SIZE : Press to add or delete channels in the TV's memory. ≠ DNIe button Activates DNIe (Digital Natural Image engine). - CAPTION button Controls the caption decoder. - Make sure to open the battery ...
...PIP window. Re-insert the batteries and try using the remote control again. Remote Control Operation Range. SET button Used during set up of this Samsung remote control, so that it will work compatibly with other devices (VCR, cable box, DVD) ÷ PIP control buttons SWAP : Exchanges ...the screen size. ˇ Number buttons ¨ +100 button Press to select channels over 100. SIZE : Press to add or delete channels in the TV's memory. ≠ DNIe button Activates DNIe (Digital Natural Image engine). - CAPTION button Controls the caption decoder. - Make sure to open the battery ...

Owners Instructions
Page 10
PLASMA DISPLAY PANEL Connections Connecting VHF and UHF Antennas 20 Connecting Cable TV 20 Connecting Speakers 22 Connecting a VCR 24 Connecting a Camcorder 25 Connecting a DVD Player 26 Connecting a DTV Receiver 27
PLASMA DISPLAY PANEL Connections Connecting VHF and UHF Antennas 20 Connecting Cable TV 20 Connecting Speakers 22 Connecting a VCR 24 Connecting a Camcorder 25 Connecting a DVD Player 26 Connecting a DTV Receiver 27
Owners Instructions
Page 11
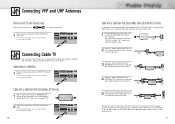
This terminal might be labeled "ANT IN", "VHF IN", or simply, "IN". Connecting Cable TV You can connect different cable systems to the cable box's output channel, which you can buy from your antenna looks like this cable to the ... "OUT". 2 Connect the cable to the VHF/UHF terminal on the PDP. Cable without a cable box, and cable with 75-ohm Round Leads If your Samsung dealer or any electronics store). 1 Find and disconnect the cable that is usually channel 3 or 4.) 21 Connect this : it has 75-ohm round leads. 1 Plug...
This terminal might be labeled "ANT IN", "VHF IN", or simply, "IN". Connecting Cable TV You can connect different cable systems to the cable box's output channel, which you can buy from your antenna looks like this cable to the ... "OUT". 2 Connect the cable to the VHF/UHF terminal on the PDP. Cable without a cable box, and cable with 75-ohm Round Leads If your Samsung dealer or any electronics store). 1 Find and disconnect the cable that is usually channel 3 or 4.) 21 Connect this : it has 75-ohm round leads. 1 Plug...
Owners Instructions
Page 13
... you can use an S-Video cable.) Videotape Playback: 1. Press the UP or DOWN button to attenuate undesired signals. Turn on your PDP, and press the TV/VIDEO button on the remote control. 2. Turn on your PDP, and press the...
... you can use an S-Video cable.) Videotape Playback: 1. Press the UP or DOWN button to attenuate undesired signals. Turn on your PDP, and press the TV/VIDEO button on the remote control. 2. Turn on your PDP, and press the...

Owners Instructions
Page 14
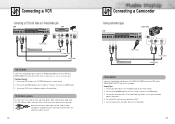
...DVD player, insert a DVD disc and press the Play button. • For an explanation of Component video, see your PDP, and press the TV/VIDEO button on your DTV receiver owner's instructions. 27 Turn on the remote control. 2. Press the UP or DOWN button to select "COMPONENT1" or ...ENTER button. 3. To Watch DTV: 1. Turn on your DTV receiver. • For an explanation of Component video, see your PDP, and press the TV/VIDEO button on your DVD owner's instructions. 26 Watching DTV PDP Connecting a DTV Receiver (480p, 720p, 1080i) This PDP displays the optimum picture in...
...DVD player, insert a DVD disc and press the Play button. • For an explanation of Component video, see your PDP, and press the TV/VIDEO button on your DTV receiver owner's instructions. 27 Turn on the remote control. 2. Press the UP or DOWN button to select "COMPONENT1" or ...ENTER button. 3. To Watch DTV: 1. Turn on your DTV receiver. • For an explanation of Component video, see your PDP, and press the TV/VIDEO button on your DVD owner's instructions. 26 Watching DTV PDP Connecting a DTV Receiver (480p, 720p, 1080i) This PDP displays the optimum picture in...
Owners Instructions
Page 16
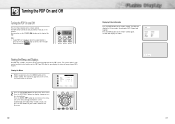
... on the front of your PDP's features. Your PDP also lets you will be ready to use it convenient and fast to check if the TV mode has been chosen ( ). The PDP will display the Picture mode, Sound mode, MTS, Signal and Caption. Viewing the Menus 1 With the power on, press...
... on the front of your PDP's features. Your PDP also lets you will be ready to use it convenient and fast to check if the TV mode has been chosen ( ). The PDP will display the Picture mode, Sound mode, MTS, Signal and Caption. Viewing the Menus 1 With the power on, press...
Owners Instructions
Page 17
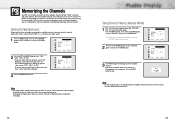
... button to an antenna, leave "Ant" displayed. Scan Channel STD 0 Off Move Select Menu Note • STD, HRC and IRC identify various types of cable TV systems. Contact your local cable company to identify the type of signal source that exists in memory. Scan Channel Ant 0 Off Move Select Menu 2 Press...
... button to an antenna, leave "Ant" displayed. Scan Channel STD 0 Off Move Select Menu Note • STD, HRC and IRC identify various types of cable TV systems. Contact your local cable company to identify the type of signal source that exists in memory. Scan Channel Ant 0 Off Move Select Menu 2 Press...
Owners Instructions
Page 19
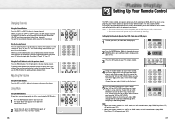
...no other codes listed for your brand of the screen. 2 To turn on STB made by Samsung. The TV will not see all DVD Players, VCRs, Cable boxes. Using Mute Using the MUTE Buttons At ...000 through 089 (or Cable box: 000 through 077, DVD player: 000 through 008). The TV will appear in four different modes :TV, VCR, Cable or DVD. The word "Mute" will switch to the last channel viewed. ...) should turn on if your remote is displayed on LED screen). 3 Press the SET button on your TV's remote control. 4 Using the number buttons on your remote control, enter three digits of the VCR (or...
...no other codes listed for your brand of the screen. 2 To turn on STB made by Samsung. The TV will not see all DVD Players, VCRs, Cable boxes. Using Mute Using the MUTE Buttons At ...000 through 089 (or Cable box: 000 through 077, DVD player: 000 through 008). The TV will appear in four different modes :TV, VCR, Cable or DVD. The word "Mute" will switch to the last channel viewed. ...) should turn on if your remote is displayed on LED screen). 3 Press the SET button on your TV's remote control. 4 Using the number buttons on your remote control, enter three digits of the VCR (or...

Owners Instructions
Page 23
... if you have not connected any equipment to the PDP's respective input jacks. 4 Press the MENU button to exit. PIP Settings Main screen PIP screen TV TV O Video O S-Video O Component 1 O Component 2 O PC O DVI O O : PIP and Swap Operate X : PIP doesn't Operate Video S-Video Component 1 Component 2 PC DVI O O O O O O X O O O O O O X O O O O O O X X X X O O X ...alternate between "On" and "Off." Select Source Swap Size Locate Ant/CATV Channel Move PIP On TV Large Select Ant Ant 5 Menu 3 Press the LEFT or RIGHT button to access the PIP mode...
... if you have not connected any equipment to the PDP's respective input jacks. 4 Press the MENU button to exit. PIP Settings Main screen PIP screen TV TV O Video O S-Video O Component 1 O Component 2 O PC O DVI O O : PIP and Swap Operate X : PIP doesn't Operate Video S-Video Component 1 Component 2 PC DVI O O O O O O X O O O O O O X O O O O O O X X X X O O X ...alternate between "On" and "Off." Select Source Swap Size Locate Ant/CATV Channel Move PIP On TV Large Select Ant Ant 5 Menu 3 Press the LEFT or RIGHT button to access the PIP mode...
Owners Instructions
Page 24
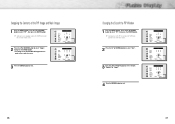
... under the cover of the PIP Image and Main Image 1 Press the MENU button. Select Source Swap Size Locate Ant/CATV Channel Move PIP On TV Large Ant Ant 5 Select Menu 2 Press the UP or DOWN button to exit. 46 Changing the Size of the remote control. Select Source Swap Size... the "SIZE" button under the cover of the PIP Window 1 Press the MENU button. Select Source Swap Size Locate Ant/CATV Channel Move PIP On TV Large Enter Ant Ant 5 Menu 3 Press the MENU button to select "Swap", then press the ENTER button. • The image in the PIP window will...
... under the cover of the PIP Image and Main Image 1 Press the MENU button. Select Source Swap Size Locate Ant/CATV Channel Move PIP On TV Large Ant Ant 5 Select Menu 2 Press the UP or DOWN button to exit. 46 Changing the Size of the remote control. Select Source Swap Size... the "SIZE" button under the cover of the PIP Window 1 Press the MENU button. Select Source Swap Size Locate Ant/CATV Channel Move PIP On TV Large Enter Ant Ant 5 Menu 3 Press the MENU button to select "Swap", then press the ENTER button. • The image in the PIP window will...

Owners Instructions
Page 25
... the LEFT or RIGHT button to exit. Select Source Swap Size Locate Ant/CATV Channel Move PIP On TV Large Ant Ant 5 Select Menu Select Source Swap Size Locate Ant/CATV Channel Move PIP On TV Large STD STD 5 Select Menu Select Source Swap Size Locate Ant/CATV Channel Move PIP On... Swap Size Locate Ant/CATV Channel Move PIP On TV Large Ant Ant 5 Select Menu Select Source Swap Size Locate Ant/CATV Channel Move PIP On TV Large Select Ant Ant 5 Menu Select Source Swap Size Locate Ant/CATV Channel Move PIP On TV Large Select Ant Ant 5 Menu 48 Changing the PIP...
... the LEFT or RIGHT button to exit. Select Source Swap Size Locate Ant/CATV Channel Move PIP On TV Large Ant Ant 5 Select Menu Select Source Swap Size Locate Ant/CATV Channel Move PIP On TV Large STD STD 5 Select Menu Select Source Swap Size Locate Ant/CATV Channel Move PIP On... Swap Size Locate Ant/CATV Channel Move PIP On TV Large Ant Ant 5 Select Menu Select Source Swap Size Locate Ant/CATV Channel Move PIP On TV Large Select Ant Ant 5 Menu Select Source Swap Size Locate Ant/CATV Channel Move PIP On TV Large Select Ant Ant 5 Menu 48 Changing the PIP...
Owners Instructions
Page 26
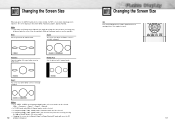
.... Wide Sets the picture to wide screen. Panorama Zoom1 The screen size when Wide screen is vertically enlarged. Normal Zoom1 Up/Down Notes • In TV, VIDEO, S-VIDEO and Component(480i) modes, all screen modes can be selected. (Wide ➝ Panorama ➝ Zoom1 ➝ Zoom2 ➝ Normal). • In PC/DVI...
.... Wide Sets the picture to wide screen. Panorama Zoom1 The screen size when Wide screen is vertically enlarged. Normal Zoom1 Up/Down Notes • In TV, VIDEO, S-VIDEO and Component(480i) modes, all screen modes can be selected. (Wide ➝ Panorama ➝ Zoom1 ➝ Zoom2 ➝ Normal). • In PC/DVI...

Owners Instructions
Page 29
... 4 Press the MENU button to exit. • Choose Stereo for channels that are broadcasting in stereo. • Choose Mono for channels that are broadcasting in TV mode only. 56 Using the Auto Volume Each broadcasting station has its own signal conditions, which is usually a foreign-language translation. Press the UP or...
... 4 Press the MENU button to exit. • Choose Stereo for channels that are broadcasting in stereo. • Choose Mono for channels that are broadcasting in TV mode only. 56 Using the Auto Volume Each broadcasting station has its own signal conditions, which is usually a foreign-language translation. Press the UP or...
Owners Instructions
Page 32
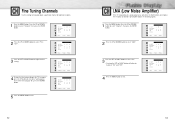
... Air / CATV Auto Program Fine Tune LNA Ch. Scan Channel Air +3 Off Add/Erase Adjust Menu 62 LNA (Low Noise Amplifier) If the TV is operating in the TV's memory, press the UP button.(A star iconwill appear.) To reset the fine tuning to "0", press the DOWN button. 5 Press the MENU button to...
... Air / CATV Auto Program Fine Tune LNA Ch. Scan Channel Air +3 Off Add/Erase Adjust Menu 62 LNA (Low Noise Amplifier) If the TV is operating in the TV's memory, press the UP button.(A star iconwill appear.) To reset the fine tuning to "0", press the DOWN button. 5 Press the MENU button to...

Owners Instructions
Page 34
... compatible system, without the usual setup hassles and confusion. It allows you to pages 66 and 67 for use with your PDP, and press the TV/VIDEO button on your display. Connecting to a PC Connection to select "PC", then press the ENTER button. 3. Turn on the remote control. 2. Press the UP...
... compatible system, without the usual setup hassles and confusion. It allows you to pages 66 and 67 for use with your PDP, and press the TV/VIDEO button on your display. Connecting to a PC Connection to select "PC", then press the ENTER button. 3. Turn on the remote control. 2. Press the UP...

Owners Instructions
Page 35
...N N N/P P P P P N N P P N P Notes: • When this PDP is used as stripes) might appear different. (and depending on your particular video card. However, this TV is connected to PC, there are "resolution" and "colors". The correct settings for a typical computer are shown below shows all cases. (If not, contact your... computer manufacturer or Samsung Dealer.) On the windows screen, select in the display dialogbox. However, the actual screens on the screen when the PC power ...
...N N N/P P P P P N N P P N P Notes: • When this PDP is used as stripes) might appear different. (and depending on your particular video card. However, this TV is connected to PC, there are "resolution" and "colors". The correct settings for a typical computer are shown below shows all cases. (If not, contact your... computer manufacturer or Samsung Dealer.) On the windows screen, select in the display dialogbox. However, the actual screens on the screen when the PC power ...


