User Manual (ENGLISH)
Page 4
...84 Checking the Digital-Signal Strength 85 LNA (Low Noise Amplifier 86 4 Table of Contents General Information Your New Plasma Display Panel 8 Remote Control Buttons 11 Wall Installation Instructions 13 How to assemble the Stand-Base 17 Connections Connecting VHF and UHF Antennas... a DTV Receiver (480p, 720p, 1080i 26 Connecting to HDMI (High Definition Multimedia Interface) (480p, 720p, 1080i) ..27 Connecting a Digital TV Set-Top Box (480p, 720p, 1080i 28 Connecting a Digital Audio System 29 Connecting to an Analog Amplifier 30 Picture Control Changing the Picture Standard...
...84 Checking the Digital-Signal Strength 85 LNA (Low Noise Amplifier 86 4 Table of Contents General Information Your New Plasma Display Panel 8 Remote Control Buttons 11 Wall Installation Instructions 13 How to assemble the Stand-Base 17 Connections Connecting VHF and UHF Antennas... a DTV Receiver (480p, 720p, 1080i 26 Connecting to HDMI (High Definition Multimedia Interface) (480p, 720p, 1080i) ..27 Connecting a Digital TV Set-Top Box (480p, 720p, 1080i 28 Connecting a Digital Audio System 29 Connecting to an Analog Amplifier 30 Picture Control Changing the Picture Standard...
User Manual (ENGLISH)
Page 7
PLASMA DISPLAY PANEL General Information Your New Plasma Display Panel 8 Remote Control Buttons 11 Wall Installation Instructions 13 How to assemble the Stand-Base 17
PLASMA DISPLAY PANEL General Information Your New Plasma Display Panel 8 Remote Control Buttons 11 Wall Installation Instructions 13 How to assemble the Stand-Base 17
User Manual (ENGLISH)
Page 8
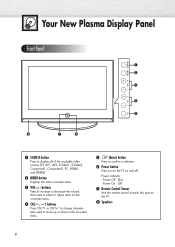
... Power On : Off ∏ Remote Control Sensor Aim the remote control towards this spot on -screen menu. ˇ VOL +, - Power indicator - " Speakers 8 Also used to select or adjust items on the on-screen menu. ¨ CH( , ) buttons Press CH or CH to turn the TV on -screen menu. ˆ...in the on and off. buttons Press to display all of the available video sources (TV, AV1, AV2, S-Video1, S-Video2, Component1, Component2, PC, HDMI1, and HDMI2). ´ MENU button Displays the main on the TV. Your New Plasma Display Panel Front Panel Œ ´ ˇ ¨ ˆ " ∏...
... Power On : Off ∏ Remote Control Sensor Aim the remote control towards this spot on -screen menu. ˇ VOL +, - Power indicator - " Speakers 8 Also used to select or adjust items on the on-screen menu. ¨ CH( , ) buttons Press CH or CH to turn the TV on -screen menu. ˆ...in the on and off. buttons Press to display all of the available video sources (TV, AV1, AV2, S-Video1, S-Video2, Component1, Component2, PC, HDMI1, and HDMI2). ´ MENU button Displays the main on the TV. Your New Plasma Display Panel Front Panel Œ ´ ˇ ¨ ˆ " ∏...
User Manual (ENGLISH)
Page 9
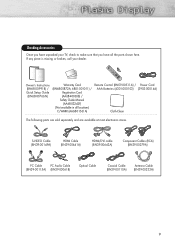
...00115A) (BN39-00061B) Optical Cable Coaxial Cable (BN39-00110A) Antenna Cable (BN39-00333A) 9 If any piece is missing or broken, call your TV, check to make sure that you have unpacked your dealer. Owner's Instructions (BN68-00991B) / Quick Setup Guide (BN68-00766N) Warranty Card (... Guide Manual (AA68-03242F) (Not available in all the parts shown here. Checking Accessories Once you have all locations) C/WARR (AA68-01561A) Remote Control (BN59-00511A) / Power Cord AAA Batteries (4301-000103) (3903-000144) Cloth-Clean The following parts are sold separately and are available ...
...00115A) (BN39-00061B) Optical Cable Coaxial Cable (BN39-00110A) Antenna Cable (BN39-00333A) 9 If any piece is missing or broken, call your TV, check to make sure that you have unpacked your dealer. Owner's Instructions (BN68-00991B) / Quick Setup Guide (BN68-00766N) Warranty Card (... Guide Manual (AA68-03242F) (Not available in all the parts shown here. Checking Accessories Once you have all locations) C/WARR (AA68-01561A) Remote Control (BN59-00511A) / Power Cord AAA Batteries (4301-000103) (3903-000144) Cloth-Clean The following parts are sold separately and are available ...
User Manual (ENGLISH)
Page 11
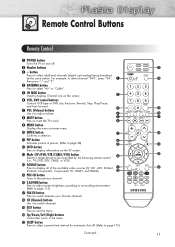
button Press to select additional channels (digital and analog) being broadcast by the Samsung remote control (i.e., TV, DVD, STB, CABLE, or VCR). Ú SOURCE button Press to display all of the available video sources (TV, AV1, AV2, S-Video1, S-Video2, Component1, Component2, PC, HDMI1, and HDMI2). Æ ...63743; INFO button Press to display information on the TV screen. Ò Mode (TV/DVD/STB/CABLE/VCR) button Selects a target device to be controlled by the same station. Remote Control Buttons Remote Control Œ POWER button Turns the TV on and off . (Refer to page 101) Continued...
button Press to select additional channels (digital and analog) being broadcast by the Samsung remote control (i.e., TV, DVD, STB, CABLE, or VCR). Ú SOURCE button Press to display all of the available video sources (TV, AV1, AV2, S-Video1, S-Video2, Component1, Component2, PC, HDMI1, and HDMI2). Æ ...63743; INFO button Press to display information on the TV screen. Ò Mode (TV/DVD/STB/CABLE/VCR) button Selects a target device to be controlled by the same station. Remote Control Buttons Remote Control Œ POWER button Turns the TV on and off . (Refer to page 101) Continued...
User Manual (ENGLISH)
Page 12
...Picture size. (Refer to page 68) - alkaline and manganese. 3 Close the cover as shown in the figure. ˛ P.MODE button Adjust the TV picture by selecting one of the preset factory settings (or select your personal, customized picture settings). (Refer to page 53) ◊ S.MODE button ... PIP control buttons SWAP: Interchange the main and sub picture. Re-insert the batteries and try using the remote control again. ≥ SET button Used during set up of this Samsung remote control, so that it will work compatibly with the diagram inside the compartment. •Do not mix battery ...
...Picture size. (Refer to page 68) - alkaline and manganese. 3 Close the cover as shown in the figure. ˛ P.MODE button Adjust the TV picture by selecting one of the preset factory settings (or select your personal, customized picture settings). (Refer to page 53) ◊ S.MODE button ... PIP control buttons SWAP: Interchange the main and sub picture. Re-insert the batteries and try using the remote control again. ≥ SET button Used during set up of this Samsung remote control, so that it will work compatibly with the diagram inside the compartment. •Do not mix battery ...
User Manual (ENGLISH)
Page 31
PLASMA DISPLAY PANEL Operation Turning the TV On and Off 32 Viewing the Menus and Displays 36 Memorizing the Channels 37 Setting Up Your Remote Control 41 Viewing an External Signal Source 48
PLASMA DISPLAY PANEL Operation Turning the TV On and Off 32 Viewing the Menus and Displays 36 Memorizing the Channels 37 Setting Up Your Remote Control 41 Viewing an External Signal Source 48
User Manual (ENGLISH)
Page 32
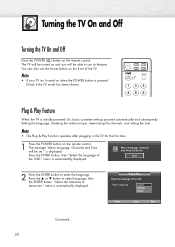
... of the TV. The TV will be turned on and you will be able to memorize." You can also use its features. The message "Menu language, Channels and Time will be set . "Select the antennas to use the Power button on the remote control. Note • If your TV isn't turned... on the remote control. i Menu language, Channels and Time will be set ." Plug & Play Feature When the TV is automatically displayed. Press the ▲ or ▼ button to enter the...
... of the TV. The TV will be turned on and you will be able to memorize." You can also use its features. The message "Menu language, Channels and Time will be set . "Select the antennas to use the Power button on the remote control. Note • If your TV isn't turned... on the remote control. i Menu language, Channels and Time will be set ." Plug & Play Feature When the TV is automatically displayed. Press the ▲ or ▼ button to enter the...
User Manual (ENGLISH)
Page 34
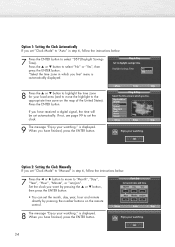
... time zone in step 6, follow the instructions below . 7 Press the œ or √ button to move the highlight to the appropriate time zone on the remote control. 8 The message "Enjoy your watching." is displayed. Plug & Play Set to select "No" or "Yes", then press the ENTER button. OK Option 2: Setting the...
... time zone in step 6, follow the instructions below . 7 Press the œ or √ button to move the highlight to the appropriate time zone on the remote control. 8 The message "Enjoy your watching." is displayed. Plug & Play Set to select "No" or "Yes", then press the ENTER button. OK Option 2: Setting the...
User Manual (ENGLISH)
Page 36
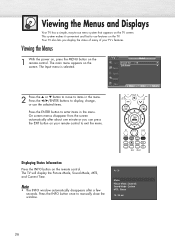
... Stereo 12 : 00 am 36 Note • The INFO window automatically disappears after about one minute or you display the status of many of your remote control to exit the menu. Press the INFO button once to manually close the window. The main menu appears on your..., MTS, and Current Time. Viewing the Menus 1 With the power on, press the MENU button on the remote control. Move Enter Return Displaying Status Information Press the INFO button on the remote control. TV Input Source List : TV √ Edit Name √ 2 Press the ▲ or ▼ button to move to items in...
... Stereo 12 : 00 am 36 Note • The INFO window automatically disappears after about one minute or you display the status of many of your remote control to exit the menu. Press the INFO button once to manually close the window. The main menu appears on your..., MTS, and Current Time. Viewing the Menus 1 With the power on, press the MENU button on the remote control. Move Enter Return Displaying Status Information Press the INFO button on the remote control. TV Input Source List : TV √ Edit Name √ 2 Press the ▲ or ▼ button to move to items in...
User Manual (ENGLISH)
Page 37
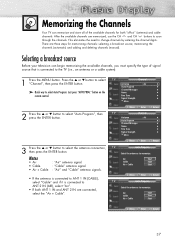
... three steps for both ANT 1 IN and ANT 2 IN are memorized, use the CH and CH buttons to the TV (i.e., an antenna or a cable system). 1 Press the MENU button. button on the remote control. 2 Press the ▲ or ▼ button to select "Auto Program", then press the ENTER button. 3 ...Press the ▲ or ▼ button to change channels by entering the channel digits. Air Start Cable Start Air + Cable Start Move Enter Return TV Auto Program Select the...
... three steps for both ANT 1 IN and ANT 2 IN are memorized, use the CH and CH buttons to the TV (i.e., an antenna or a cable system). 1 Press the MENU button. button on the remote control. 2 Press the ▲ or ▼ button to select "Auto Program", then press the ENTER button. 3 ...Press the ▲ or ▼ button to change channels by entering the channel digits. Air Start Cable Start Air + Cable Start Move Enter Return TV Auto Program Select the...
User Manual (ENGLISH)
Page 38
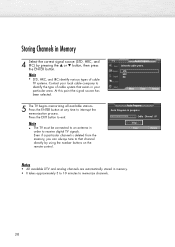
...3 to 10 minutes to exit. Storing Channels in Memory 4 Select the correct signal source (STD, HRC, and IRC) by using the number buttons on the remote control. Note • STD, HRC, and IRC identify various types of cable system that channel directly by pressing the ▲ or ▼ button, then press... the ENTER button. Note • The TV must be connected to an antenna in progress. Press the ENTER button at any time to that exists in your particular area.
...3 to 10 minutes to exit. Storing Channels in Memory 4 Select the correct signal source (STD, HRC, and IRC) by using the number buttons on the remote control. Note • STD, HRC, and IRC identify various types of cable system that channel directly by pressing the ▲ or ▼ button, then press... the ENTER button. Note • The TV must be connected to an antenna in progress. Press the ENTER button at any time to that exists in your particular area.
User Manual (ENGLISH)
Page 41
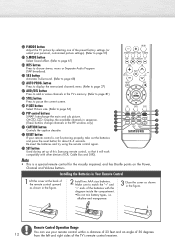
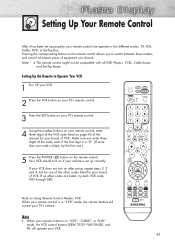
... allows you to Operate Your VCR 1 Turn off your VCR. 2 Press the VCR button on your TV's remote control. 3 Press the SET button on your TV's remote control. 4 Using the number buttons on your remote control, enter three digits of the VCR code listed on if your VCR. 41 Your VCR should turn on the... brand of the code, even if the first digit is a "0". (If more than one code is in five different modes: TV, VCR, Cable, DVD, or Set-Top Box. Note • When your remote control is listed, try the first one.) 5 Press the POWER ( ) button on after set up , repeat steps 2, 3 and 4, but...
... allows you to Operate Your VCR 1 Turn off your VCR. 2 Press the VCR button on your TV's remote control. 3 Press the SET button on your TV's remote control. 4 Using the number buttons on your remote control, enter three digits of the VCR code listed on if your VCR. 41 Your VCR should turn on the... brand of the code, even if the first digit is a "0". (If more than one code is in five different modes: TV, VCR, Cable, DVD, or Set-Top Box. Note • When your remote control is listed, try the first one.) 5 Press the POWER ( ) button on after set up , repeat steps 2, 3 and 4, but...
User Manual (ENGLISH)
Page 42
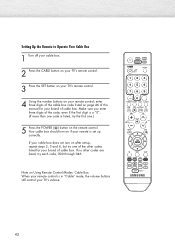
... Operate Your Cable Box 1 Turn off your cable box. 2 Press the CABLE button on your TV's remote control. 3 Press the SET button on your TV's remote control. 4 Using the number buttons on your remote control, enter three digits of the cable box code listed on page 46 of this manual for your cable box does... not turn on if your TV's volume. 42 If no other codes listed for your brand of...
... Operate Your Cable Box 1 Turn off your cable box. 2 Press the CABLE button on your TV's remote control. 3 Press the SET button on your TV's remote control. 4 Using the number buttons on your remote control, enter three digits of the cable box code listed on page 46 of this manual for your cable box does... not turn on if your TV's volume. 42 If no other codes listed for your brand of...

User Manual (ENGLISH)
Page 43
... set up , repeat steps 2, 3 and 4, but try each code, 000 through 141. Note on the remote control. If your DVD does not turn on if your remote is in "DVD" mode, the volume buttons still control your TV's volume. 43 If no other codes listed for your brand of DVD. Setting Up the... Remote to Operate Your DVD 1 Turn off your DVD. 2 Press the DVD button on your TV's remote control. 3 Press the SET button on your TV's remote control. 4 Using the number buttons on your remote control, enter three digits of the DVD code listed on page...
... set up , repeat steps 2, 3 and 4, but try each code, 000 through 141. Note on the remote control. If your DVD does not turn on if your remote is in "DVD" mode, the volume buttons still control your TV's volume. 43 If no other codes listed for your brand of DVD. Setting Up the... Remote to Operate Your DVD 1 Turn off your DVD. 2 Press the DVD button on your TV's remote control. 3 Press the SET button on your TV's remote control. 4 Using the number buttons on your remote control, enter three digits of the DVD code listed on page...
User Manual (ENGLISH)
Page 44
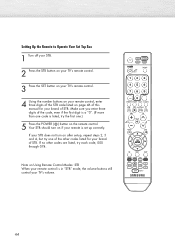
... does not turn on if your TV's volume. 44 If no other codes listed for your brand of STB. Setting Up the Remote to Operate Your Set Top Box 1 Turn off your STB. 2 Press the STB button on your TV's remote control. 3 Press the SET button on your TV's remote control. 4 Using the number buttons... on your remote control, enter three digits of the STB code listed on page 46 of this manual for your brand of STB....
... does not turn on if your TV's volume. 44 If no other codes listed for your brand of STB. Setting Up the Remote to Operate Your Set Top Box 1 Turn off your STB. 2 Press the STB button on your TV's remote control. 3 Press the SET button on your TV's remote control. 4 Using the number buttons... on your remote control, enter three digits of the STB code listed on page 46 of this manual for your brand of STB....
User Manual (ENGLISH)
Page 48
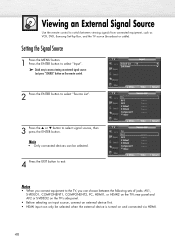
... via HDMI. 48 Setting the Signal Source 1 Press the MENU button. Move Enter Return TV Source List TV AV1 AV2 S-Video1 S-Video2 Component1 † More Move Enter Return TV Source List TV AV1 AV2 S-Video1 S-Video2 Component1 † More Move Enter Return Notes • When ... be selected when the external device is turned on the remote control. Viewing an External Signal Source Use the remote control to the TV, you can choose between viewing signals from connected equipment, such as VCR, DVD, Samsung Set-Top Box, and the TV source (broadcast or cable).
... via HDMI. 48 Setting the Signal Source 1 Press the MENU button. Move Enter Return TV Source List TV AV1 AV2 S-Video1 S-Video2 Component1 † More Move Enter Return TV Source List TV AV1 AV2 S-Video1 S-Video2 Component1 † More Move Enter Return Notes • When ... be selected when the external device is turned on the remote control. Viewing an External Signal Source Use the remote control to the TV, you can choose between viewing signals from connected equipment, such as VCR, DVD, Samsung Set-Top Box, and the TV source (broadcast or cable).

User Manual (ENGLISH)
Page 52
... viewing requirements. 1 Press the MENU button. TV Mode Mode Contrast Brightness Sharpness Color Tint G 50 Color Tone Reset : Dynamic √ 100 45 75 55 R 50 : Cool1 √ Move Enter Return 3 Press the ENTER button. TV Mode Mode Contrast Brightness Sharpness Color Tint G 50 Color Tone Reset : DDyynnaammiicc Standa1rd00 Movie 45 Custom75... : Off √ : Off √ Move Enter Return 2 Press the ENTER button again to access the picture setting: Just press "P.MODE" button on the remote control. TV Mode Size Digital NR ➤ Quick way to select "Mode".
... viewing requirements. 1 Press the MENU button. TV Mode Mode Contrast Brightness Sharpness Color Tint G 50 Color Tone Reset : Dynamic √ 100 45 75 55 R 50 : Cool1 √ Move Enter Return 3 Press the ENTER button. TV Mode Mode Contrast Brightness Sharpness Color Tint G 50 Color Tone Reset : DDyynnaammiicc Standa1rd00 Movie 45 Custom75... : Off √ : Off √ Move Enter Return 2 Press the ENTER button again to access the picture setting: Just press "P.MODE" button on the remote control. TV Mode Size Digital NR ➤ Quick way to select "Mode".

User Manual (ENGLISH)
Page 53
... HDMI or any Component mode. • The Tint cannot be adjusted while watching Digital TV. • In PC mode, only the Contrast and Brightness can use the on the remote control. 2 Press the ENTER button to decrease or increase the value of a particular ...75 55 R 50 : Cool1 √ Move Enter Return TV Mode Mode Contrast Brightness Sharpness Color Tint G 50 Color Tone Reset : DDyynnaammiicc Standa1rd00 Movie 45 Custom75 55 R 50 : Cool1 Move Enter Return TV Mode Mode Contrast Brightness Sharpness Color Tint G 50 Color Tone Reset : Custom √ 80 50 50 50 R 50 : Cool1 √...
... HDMI or any Component mode. • The Tint cannot be adjusted while watching Digital TV. • In PC mode, only the Contrast and Brightness can use the on the remote control. 2 Press the ENTER button to decrease or increase the value of a particular ...75 55 R 50 : Cool1 √ Move Enter Return TV Mode Mode Contrast Brightness Sharpness Color Tint G 50 Color Tone Reset : DDyynnaammiicc Standa1rd00 Movie 45 Custom75 55 R 50 : Cool1 Move Enter Return TV Mode Mode Contrast Brightness Sharpness Color Tint G 50 Color Tone Reset : Custom √ 80 50 50 50 R 50 : Cool1 √...
User Manual (ENGLISH)
Page 56
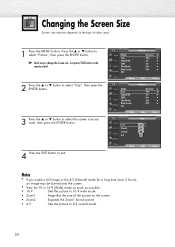
... ▼ button to select "Picture", then press the ENTER button. ➤ Quick way to change the Screen size: Just press P.SIZE button on the remote control. 2 Press the ▲ or ▼ button to select "Size", then press the ENTER button. 3 Press the ▲ or ▼ button...DNIe Film Mode Blue Screen PIP Picture : Dynamic √ : 16:9 √ : On √ : On √ : Off √ : Off √ Move Enter Return TV Mode Size Digital NR DNIe Film Mode Blue Screen PIP Picture : Dynamic √ : 16:9 √ : On √ : On √ : Off √ : Off &#...
... ▼ button to select "Picture", then press the ENTER button. ➤ Quick way to change the Screen size: Just press P.SIZE button on the remote control. 2 Press the ▲ or ▼ button to select "Size", then press the ENTER button. 3 Press the ▲ or ▼ button...DNIe Film Mode Blue Screen PIP Picture : Dynamic √ : 16:9 √ : On √ : On √ : Off √ : Off √ Move Enter Return TV Mode Size Digital NR DNIe Film Mode Blue Screen PIP Picture : Dynamic √ : 16:9 √ : On √ : On √ : Off √ : Off &#...


