
User Manual (user Manual) (ver.1.0) (English)
Page 3
... other recording media for purchasing this Samsung Camcorder. This User Manual covers HMX-T10WN, HMX-T10BN, HMX-T10ON models. • Illustrations of model HMX-T10BN are used in this user manual. • The displays in a description of a submenu item indicates it from your camcorder fail to operate correctly, refer to Troubleshooting. Before using the internal software of this camcorder. • Please note that this camcorder is not compatible with other digital video formats. • Before recording important video, make sure the video and audio have...
... other recording media for purchasing this Samsung Camcorder. This User Manual covers HMX-T10WN, HMX-T10BN, HMX-T10ON models. • Illustrations of model HMX-T10BN are used in this user manual. • The displays in a description of a submenu item indicates it from your camcorder fail to operate correctly, refer to Troubleshooting. Before using the internal software of this camcorder. • Please note that this camcorder is not compatible with other digital video formats. • Before recording important video, make sure the video and audio have...

User Manual (user Manual) (ver.1.0) (English)
Page 6
... damage to the CAMCORDER due to protect it from the type of the polarized plug. 19. vi GROUNDING OR POLARIZATION: This CAMCORDER may be sure the antenna or cable system is provided or the manufacturer's instructions have been adhered to the operating instructions. 18. Apparatus shall not be exposed to be blocked or covered. When installing an outside antenna...
... damage to the CAMCORDER due to protect it from the type of the polarized plug. 19. vi GROUNDING OR POLARIZATION: This CAMCORDER may be sure the antenna or cable system is provided or the manufacturer's instructions have been adhered to the operating instructions. 18. Apparatus shall not be exposed to be blocked or covered. When installing an outside antenna...
User Manual (user Manual) (ver.1.0) (English)
Page 13
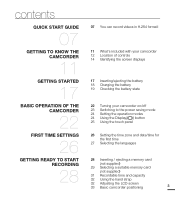
... screen displays 17 Inserting/ejecting the battery 18 Charging the battery 19 Checking the battery state 22 Turning your camcorder on/off 23 Switching to the power saving mode 24 Setting the operation modes 24 Using the Display( ) button 25 Using the touch panel 26 Setting the time zone and date/time for the first time 27 Selecting the languages 28 Inserting / ejecting a memory card (not supplied) 29 Selecting a suitable memory card (not supplied) 31 Recordable time and capacity 32 Using the hand strap 32 Adjusting...
... screen displays 17 Inserting/ejecting the battery 18 Charging the battery 19 Checking the battery state 22 Turning your camcorder on/off 23 Switching to the power saving mode 24 Setting the operation modes 24 Using the Display( ) button 25 Using the touch panel 26 Setting the time zone and date/time for the first time 27 Selecting the languages 28 Inserting / ejecting a memory card (not supplied) 29 Selecting a suitable memory card (not supplied) 31 Recordable time and capacity 32 Using the hand strap 32 Adjusting...
User Manual (user Manual) (ver.1.0) (English)
Page 20
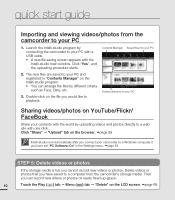
Contents Manager Saved files into your contents with one click. quick start guide Importing and viewing videos/photos from the camcorder's storage media. The new files are saved to your PC with a USB cable. • A new file saving screen appears with the Intelli-studio main window. Double-click on the file you can record new videos or photos on newly freed up space. 10 Touch the Play ( ) tab Menu ( ) tab "Delete" on the Intelli...
Contents Manager Saved files into your contents with one click. quick start guide Importing and viewing videos/photos from the camcorder's storage media. The new files are saved to your PC with a USB cable. • A new file saving screen appears with the Intelli-studio main window. Double-click on the file you can record new videos or photos on newly freed up space. 10 Touch the Play ( ) tab Menu ( ) tab "Delete" on the Intelli...
User Manual (user Manual) (ver.1.0) (English)
Page 21
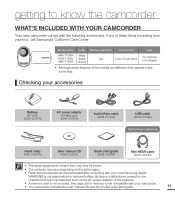
...-MA9 type) (AD44-00151A) Audio/Video cable (AD39-00184A) USB cable (AD39-00169A) Optional accessories Hand strap (AD63-04924A) User manual CD (AD46-00355A) Quick start guide. 11 SAMSUNG is not included. Model name Color Memory card slot LCD screen Lens HMX-T10WN HMX-T10BN HMX-T10ON White Black Orange Yes Color /Touch panel 10x (Optical) 100x (Digital) • Although some features of accessories such as the AC power adaptor or the batteries. • A memory card is not responsible for memory cards compatible...
...-MA9 type) (AD44-00151A) Audio/Video cable (AD39-00184A) USB cable (AD39-00169A) Optional accessories Hand strap (AD63-04924A) User manual CD (AD46-00355A) Quick start guide. 11 SAMSUNG is not included. Model name Color Memory card slot LCD screen Lens HMX-T10WN HMX-T10BN HMX-T10ON White Black Orange Yes Color /Touch panel 10x (Optical) 100x (Digital) • Although some features of accessories such as the AC power adaptor or the batteries. • A memory card is not responsible for memory cards compatible...

User Manual (user Manual) (ver.1.0) (English)
Page 24
... messages Remaining recordable time Optical zoom / Digital zoom bar Time Zone (visit) JAN/01/2010 12:00AM Date/Time Left of the LCD screen Indicator / STBY / / // Meaning Record mode (Video/Photo) Operating status (standby/recording) / Self Timer* SCENE / Smart Auto / Digital Effect , White Balance, Fader* , Manual focus*, Touch Point* / F2 OFF S.1/60 / - 0.3SUPER Manual aperture* / Manual shutter* / Super C.Nite EV (Exposure Value)* Play tab Right of the LCD screen Indicator 9999 , , , , , Meaning Storage media (Memory card) Battery info. (remaining charge level) Image...
... messages Remaining recordable time Optical zoom / Digital zoom bar Time Zone (visit) JAN/01/2010 12:00AM Date/Time Left of the LCD screen Indicator / STBY / / // Meaning Record mode (Video/Photo) Operating status (standby/recording) / Self Timer* SCENE / Smart Auto / Digital Effect , White Balance, Fader* , Manual focus*, Touch Point* / F2 OFF S.1/60 / - 0.3SUPER Manual aperture* / Manual shutter* / Super C.Nite EV (Exposure Value)* Play tab Right of the LCD screen Indicator 9999 , , , , , Meaning Storage media (Memory card) Battery info. (remaining charge level) Image...
User Manual (user Manual) (ver.1.0) (English)
Page 25
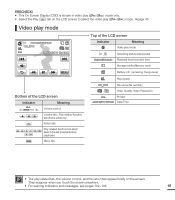
... of the LCD screen Indicator Meaning Video play mode , 00:00:05/00:00:50 Operating status (play/pause) Playback time/recorded time Storage media (Memory card) Battery info. (remaining charge level) Bottom of the LCD screen Indicator 10 Meaning Volume control Volume tab / Play related function / tab (frame advance) Return tab Play related function tab (skip/ search/pause/playback/slow playback) Menu tab Play Option 100_0001 , File name (file number) Video Quality, Video Resolution Protect JAN/01/2010 12:00AM Date/Time • The play related tab, the volume control, and the...
... of the LCD screen Indicator Meaning Video play mode , 00:00:05/00:00:50 Operating status (play/pause) Playback time/recorded time Storage media (Memory card) Battery info. (remaining charge level) Bottom of the LCD screen Indicator 10 Meaning Volume control Volume tab / Play related function / tab (frame advance) Return tab Play related function tab (skip/ search/pause/playback/slow playback) Menu tab Play Option 100_0001 , File name (file number) Video Quality, Video Resolution Protect JAN/01/2010 12:00AM Date/Time • The play related tab, the volume control, and the...
User Manual (user Manual) (ver.1.0) (English)
Page 33
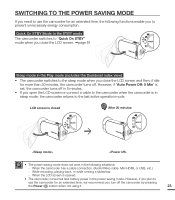
... opened. • The camcorder consumes less battery power in the power saving mode. When the camcorder has a cable connection. (Audio/Video cable, Mini HDMI, or USB, etc.) - However, if "Auto Power Off: 5 Min" is in the following functions enable you close the LCD screen and then, if idle for more than 20 minutes, the camcorder turns off. While recording, playing back, or while running a slideshow. - When the LCD screen is closed After 20 minutes • The power saving mode...
... opened. • The camcorder consumes less battery power in the power saving mode. When the camcorder has a cable connection. (Audio/Video cable, Mini HDMI, or USB, etc.) - However, if "Auto Power Off: 5 Min" is in the following functions enable you close the LCD screen and then, if idle for more than 20 minutes, the camcorder turns off. While recording, playing back, or while running a slideshow. - When the LCD screen is closed After 20 minutes • The power saving mode...
User Manual (user Manual) (ver.1.0) (English)
Page 45
... recording time, see pages 49~65 • If the power cable/battery is disconnected or recording is interrupted, the camcorder switches to On. • The menu setting tabs shown on the LCD screen do not affect the image the camcorder is recorded by the internal stereo microphone located on the front of a memory card error. • Note that the microphone is not blocked. • Before recording an important video, make sure to test the recording function...
... recording time, see pages 49~65 • If the power cable/battery is disconnected or recording is interrupted, the camcorder switches to On. • The menu setting tabs shown on the LCD screen do not affect the image the camcorder is recorded by the internal stereo microphone located on the front of a memory card error. • Note that the microphone is not blocked. • Before recording an important video, make sure to test the recording function...

User Manual (user Manual) (ver.1.0) (English)
Page 46
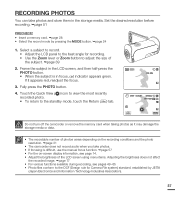
...] • Photos are captured in 1920x1080 resolution regardless of the resolution of the video recording. • When the HDMI cable is connected to photograph, and then press the PHOTO button. • When the indicator disappears, the camcorder has recorded the photo image without interrupting video recording. PRECHECK! • Insert a memory card. page 28 • Select the record mode by pressing the MODE button. page 24 1. While recording the video, frame...
...] • Photos are captured in 1920x1080 resolution regardless of the resolution of the video recording. • When the HDMI cable is connected to photograph, and then press the PHOTO button. • When the indicator disappears, the camcorder has recorded the photo image without interrupting video recording. PRECHECK! • Insert a memory card. page 28 • Select the record mode by pressing the MODE button. page 24 1. While recording the video, frame...
User Manual (user Manual) (ver.1.0) (English)
Page 47
... not turn off the camcorder or remove the memory card when taking photos as it appears red, readjust the focus. 3. If it may damage the storage media or data. • The recordable number of photos varies depending on -screen display information, see page 14. • Adjust the brightness of the LCD screen using menu items. Adjusting the brightness does not affect the recorded image. page 77 • For various functions available during recording, see...
... not turn off the camcorder or remove the memory card when taking photos as it appears red, readjust the focus. 3. If it may damage the storage media or data. • The recordable number of photos varies depending on -screen display information, see page 14. • Adjust the brightness of the LCD screen using menu items. Adjusting the brightness does not affect the recorded image. page 77 • For various functions available during recording, see...
User Manual (user Manual) (ver.1.0) (English)
Page 53
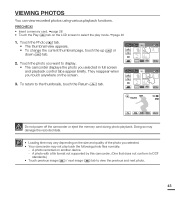
... return to view the previous and next photo. 43 They reappear when you selected in full screen and playback control tabs appear briefly. Touch the photo you want to display. • The camcorder displays the photo you touch anywhere on the LCD screen to select the play back the following photo files normally: - VIEWING PHOTOS You can view recorded photos using various playback functions. Doing so may damage the recorded data. • Loading time may vary...
... return to view the previous and next photo. 43 They reappear when you selected in full screen and playback control tabs appear briefly. Touch the photo you want to display. • The camcorder displays the photo you touch anywhere on the LCD screen to select the play back the following photo files normally: - VIEWING PHOTOS You can view recorded photos using various playback functions. Doing so may damage the recorded data. • Loading time may vary...

User Manual (user Manual) (ver.1.0) (English)
Page 68
...; Off: Disables the function. • On ( ): The Anti-Shake(OIS) function is useful when you operate the zoom function because you might not be able to keep accurate focus after the zoom ratio has been changed. • In the manual focus setting menu screen, you can access auto focus by touching the AF ( ) tab on the LCD screen for greater degrees of camcorder shake and delivers a stunning level of the picture. advanced recording Using the...
...; Off: Disables the function. • On ( ): The Anti-Shake(OIS) function is useful when you operate the zoom function because you might not be able to keep accurate focus after the zoom ratio has been changed. • In the manual focus setting menu screen, you can access auto focus by touching the AF ( ) tab on the LCD screen for greater degrees of camcorder shake and delivers a stunning level of the picture. advanced recording Using the...
User Manual (user Manual) (ver.1.0) (English)
Page 87
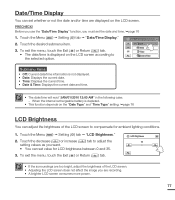
...; You can set value for ambient lighting conditions. 1. PRECHECK! When the internal rechargeable battery is depleted. • This function depends on the "Date Type" and "Time Type" setting. page 76 LCD Brightness You can adjust the brightness of the LCD screen. • Adjusting the LCD screen does not affect the image you must set the date and time. page 76 1. Touch the desired submenu item. 3. To exit the menu, touch...
...; You can set value for ambient lighting conditions. 1. PRECHECK! When the internal rechargeable battery is depleted. • This function depends on the "Date Type" and "Time Type" setting. page 76 LCD Brightness You can adjust the brightness of the LCD screen. • Adjusting the LCD screen does not affect the image you must set the date and time. page 76 1. Touch the desired submenu item. 3. To exit the menu, touch...
User Manual (user Manual) (ver.1.0) (English)
Page 92
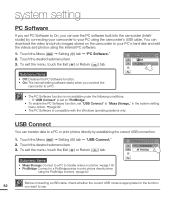
... printer to print photos directly (when using the camcorder's USB cable. Touch the desired submenu item. 3. USB Connect You can transfer data to "Mass Storage," in the system setting menu option. page 82 • The PC Software is set to "PictBridge" • To enable the PC Software function, set PC Software to On, you can use . Touch the Menu ( ) Setting ( ) tab "PC Software." 2. If "USB Connect" is compatible with the Windows operating systems only...
... printer to print photos directly (when using the camcorder's USB cable. Touch the desired submenu item. 3. USB Connect You can transfer data to "Mass Storage," in the system setting menu option. page 82 • The PC Software is set to "PictBridge" • To enable the PC Software function, set PC Software to On, you can use . Touch the Menu ( ) Setting ( ) tab "PC Software." 2. If "USB Connect" is compatible with the Windows operating systems only...
User Manual (user Manual) (ver.1.0) (English)
Page 93
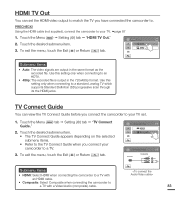
... the menu, touch the Exit ( ) or Return ( ) tab. Use this setting only when connecting to an HDTV. • 480p: The recorded file is output in the same format as the recorded file. TV Connect Guide HDMI Composite 1/1 TV Connect Guide Camcorder Composite TV Video L Audio R Submenu items • HDMI: Select HDMI when connecting the camcorder to a TV with an HDMI cable. • Composite: Select Composite when connecting the camcorder to . Using the HDMI cable...
... the menu, touch the Exit ( ) or Return ( ) tab. Use this setting only when connecting to an HDTV. • 480p: The recorded file is output in the same format as the recorded file. TV Connect Guide HDMI Composite 1/1 TV Connect Guide Camcorder Composite TV Video L Audio R Submenu items • HDMI: Select HDMI when connecting the camcorder to a TV with an HDMI cable. • Composite: Select Composite when connecting the camcorder to . Using the HDMI cable...
User Manual (user Manual) (ver.1.0) (English)
Page 101
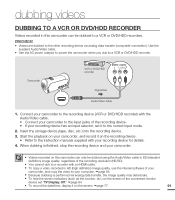
... analog data transfer (composite connection). Use the supplied Audio/Video cable. • Use the AC power adaptor to power the camcorder when you dub to the correct input mode. 2. Insert the storage device (tape, disc, etc.) into the recording device. 3. Connect your camcorder to the recording device (VCR or DVD/HDD recorder) with the Audio/Video cable. • Connect your camcorder to the input jacks of the recording device. • If your recording device has an input selector, set "TV Display: Off." page 84 To record the date/time, display it...
... analog data transfer (composite connection). Use the supplied Audio/Video cable. • Use the AC power adaptor to power the camcorder when you dub to the correct input mode. 2. Insert the storage device (tape, disc, etc.) into the recording device. 3. Connect your camcorder to the recording device (VCR or DVD/HDD recorder) with the Audio/Video cable. • Connect your camcorder to the input jacks of the recording device. • If your recording device has an input selector, set "TV Display: Off." page 84 To record the date/time, display it...
User Manual (user Manual) (ver.1.0) (English)
Page 113
... ... functions manually when Smart Release the Smart Auto function. Recovering Data... Action The memory card is not fast - Not Supported Card The memory card is not recovered, use the camcorder to format the storage media after backing up important files to a PC or another device and may have existing images on for data recovery. If a file is not supported in this resolution. Record video at a lower resolution. Action Turn the camcorder's power off...
... ... functions manually when Smart Release the Smart Auto function. Recovering Data... Action The memory card is not fast - Not Supported Card The memory card is not recovered, use the camcorder to format the storage media after backing up important files to a PC or another device and may have existing images on for data recovery. If a file is not supported in this resolution. Record video at a lower resolution. Action Turn the camcorder's power off...
User Manual (user Manual) (ver.1.0) (English)
Page 117
... when recording or viewing a 16:9 ratio image on the LCD screen. Unknown image appears on a 4:3 ratio TV, or vice versa. LCD. The power turns off ("Auto Power Off"). If you do not solve your problem, contact your camcorder. To disable this option, change "Demo" to "Off." page 85 A warning indicator or message appears on the screen. pages 102~106 An afterimage remains on the LCD screen looks...
... when recording or viewing a 16:9 ratio image on the LCD screen. Unknown image appears on a 4:3 ratio TV, or vice versa. LCD. The power turns off ("Auto Power Off"). If you do not solve your problem, contact your camcorder. To disable this option, change "Demo" to "Off." page 85 A warning indicator or message appears on the screen. pages 102~106 An afterimage remains on the LCD screen looks...
User Manual (user Manual) (ver.1.0) (English)
Page 118
..., format the storage media again. If you use a memory card with a low write speed, the camcorder automatically stops recording videos and displays a message on the images. Set "Beep Sound" to "On." Beep sound is temporally off . When the Mini HDMI cable or Audio/Video cable is connected to the camcorder, the Shutter Sound is a time difference between the point where you press the Recording start /stop button and the point where the recorded video starts/stops. troubleshooting 108 Recording Symptom...
..., format the storage media again. If you use a memory card with a low write speed, the camcorder automatically stops recording videos and displays a message on the images. Set "Beep Sound" to "On." Beep sound is temporally off . When the Mini HDMI cable or Audio/Video cable is connected to the camcorder, the Shutter Sound is a time difference between the point where you press the Recording start /stop button and the point where the recorded video starts/stops. troubleshooting 108 Recording Symptom...


