
User Manual (user Manual) (ver.1.0) (English)
Page 3
... surges. 22. POWER-CORD PROTECTION: Power-supply cords should be operated from the unit. 20. OUTDOOR ANTENNA GROUNDING: CAMCORDER, be sure the antenna or cable system is intended to be routed so that they exit from battery power, or other electric light or power circuits where it is provided or the manufacturer's instructions have been adhered to the operating instructions. 18. This CAMCORDER should be...
... surges. 22. POWER-CORD PROTECTION: Power-supply cords should be operated from the unit. 20. OUTDOOR ANTENNA GROUNDING: CAMCORDER, be sure the antenna or cable system is intended to be routed so that they exit from battery power, or other electric light or power circuits where it is provided or the manufacturer's instructions have been adhered to the operating instructions. 18. This CAMCORDER should be...

User Manual (user Manual) (ver.1.0) (English)
Page 7
... recording important video, make sure the video and audio have been recorded properly. • Recorded contents may be used without permission of the owner of important recorded data. Even if you record an event such as a show, performance, or exhibition for personal enjoyment. in this manual. • The SD logo is a trademark. Refer to the software installation and USB connection guide. • Copyrights: Please note that this camcorder or memory card, etc. Samsung...
... recording important video, make sure the video and audio have been recorded properly. • Recorded contents may be used without permission of the owner of important recorded data. Even if you record an event such as a show, performance, or exhibition for personal enjoyment. in this manual. • The SD logo is a trademark. Refer to the software installation and USB connection guide. • Copyrights: Please note that this camcorder or memory card, etc. Samsung...

User Manual (user Manual) (ver.1.0) (English)
Page 12
... reading this user manual 2 Safety warnings 2 Precautions 2 Important information on use 2 Safety information 4 Warning 4 Caution 6 Contents 8 Basic operation of the camcorder 27 Turning your camcorder on/off 27 Adjusting the LCD screen 28 Setting the operation modes 29 Using the display( ) button 29 Using the touch panel 30 First time settings 31 Setting the time zone and date/time for the first time 31 Selecting the languages 32 Quick start guide 11 You can record videos in H.264 format 11 Getting...
... reading this user manual 2 Safety warnings 2 Precautions 2 Important information on use 2 Safety information 4 Warning 4 Caution 6 Contents 8 Basic operation of the camcorder 27 Turning your camcorder on/off 27 Adjusting the LCD screen 28 Setting the operation modes 29 Using the display( ) button 29 Using the touch panel 30 First time settings 31 Setting the time zone and date/time for the first time 31 Selecting the languages 32 Quick start guide 11 You can record videos in H.264 format 11 Getting...

User Manual (user Manual) (ver.1.0) (English)
Page 14
... Auto Power Off 82 Quick On STBY 82 PC Software 83 USB Connect 84 HDMI TV Out 84 TV Connect Guide 85 TV Display 85 Format 86 Default Set 86 Language 86 Demo 87 Anynet+ (HDMI-CEC 87 10 Connecting to a TV 88 Connecting to a high definition TV with HDMI 88 Connecting to a regular TV 89 Viewing on a TV screen 90 Dubbing videos 91 Dubbing to a VCR or DVD/HDD recorder 91 Printing photos...
... Auto Power Off 82 Quick On STBY 82 PC Software 83 USB Connect 84 HDMI TV Out 84 TV Connect Guide 85 TV Display 85 Format 86 Default Set 86 Language 86 Demo 87 Anynet+ (HDMI-CEC 87 10 Connecting to a TV 88 Connecting to a high definition TV with HDMI 88 Connecting to a regular TV 89 Viewing on a TV screen 90 Dubbing videos 91 Dubbing to a VCR or DVD/HDD recorder 91 Printing photos...

User Manual (user Manual) (ver.1.0) (English)
Page 19
... 16GB Black/Silver/Red/Blue 30x (Optical) 300x (Digital) HMX-H305BN/HMX-H305SN/ HMX-H305RN/HMX-H305UN 32GB • Although some features of these items is missing from Samsung authorized service center. • A memory card is not responsible for memory cards compatible with your camcorder. • Your camcorder includes the user manual CD and the printed quick 15 start guide (AD68-05486A) Mini HDMI cable (AD39-00159A) Memory card Carrying case (IA-CC1U27B) External battery charger (IA...
... 16GB Black/Silver/Red/Blue 30x (Optical) 300x (Digital) HMX-H305BN/HMX-H305SN/ HMX-H305RN/HMX-H305UN 32GB • Although some features of these items is missing from Samsung authorized service center. • A memory card is not responsible for memory cards compatible with your camcorder. • Your camcorder includes the user manual CD and the printed quick 15 start guide (AD68-05486A) Mini HDMI cable (AD39-00159A) Memory card Carrying case (IA-CC1U27B) External battery charger (IA...

User Manual (user Manual) (ver.1.0) (English)
Page 22
... Meaning Time counter (video recording time) Card Full [307Min] Warning indicators and messages Remaining recordable time Indicator Meaning Optical zoom / Digital zoom bar Time Zone (visit) 12:00 AM JAN/01/2011 Date/Time 1Sec/72Hr Time Lapse REC* Right of the LCD screen Indicator / 9999 , , , / OFF , , SUPER Meaning Storage media (Memory card or internal memory) (HMX-H303/H304/H305 only) Battery info. (remaining charge level) Image counter (total number of recordable photos is based on available space on the operation mode you...
... Meaning Time counter (video recording time) Card Full [307Min] Warning indicators and messages Remaining recordable time Indicator Meaning Optical zoom / Digital zoom bar Time Zone (visit) 12:00 AM JAN/01/2011 Date/Time 1Sec/72Hr Time Lapse REC* Right of the LCD screen Indicator / 9999 , , , / OFF , , SUPER Meaning Storage media (Memory card or internal memory) (HMX-H303/H304/H305 only) Battery info. (remaining charge level) Image counter (total number of recordable photos is based on available space on the operation mode you...

User Manual (user Manual) (ver.1.0) (English)
Page 23
...:00:50 100_0001 JAN/01/2011 12:00 AM • The play /pause) Playback time/ recorded time Storage media (Memory card or internal memory) (HMX-H303/ H304/H305 only) Battery info. (remaining charge level) Play Option 100_0001 , File name (file number) Video Quality, Video Resolution Protect JAN/01/2011 12:00 AM Date/Time Bottom of the LCD screen Indicator Meaning 10 Volume control Volume tab / / Play related function tab (frame advance) Return tab Play related function tab (skip/ search/pause/ playback/slow playback) Menu tab 19
...:00:50 100_0001 JAN/01/2011 12:00 AM • The play /pause) Playback time/ recorded time Storage media (Memory card or internal memory) (HMX-H303/ H304/H305 only) Battery info. (remaining charge level) Play Option 100_0001 , File name (file number) Video Quality, Video Resolution Protect JAN/01/2011 12:00 AM Date/Time Bottom of the LCD screen Indicator Meaning 10 Volume control Volume tab / / Play related function tab (frame advance) Return tab Play related function tab (skip/ search/pause/ playback/slow playback) Menu tab 19

User Manual (user Manual) (ver.1.0) (English)
Page 43
... menu setting tabs shown on -screen information display, see pages 101~105 • For approximate recording time, see page 37. • Sound is recorded by motor when the zoom is moving can set HDIS off the camcorder or remove the memory card while the camcorder is accessing the memory card. • If power is interrupted or an error occurs during recording, see pages 53~69 • If the power cable/battery is disconnected or recording...
... menu setting tabs shown on -screen information display, see pages 101~105 • For approximate recording time, see page 37. • Sound is recorded by motor when the zoom is moving can set HDIS off the camcorder or remove the memory card while the camcorder is accessing the memory card. • If power is interrupted or an error occurs during recording, see pages 53~69 • If the power cable/battery is disconnected or recording...
User Manual (user Manual) (ver.1.0) (English)
Page 44
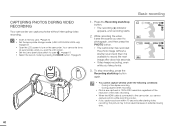
... extended saving time. 40 To stop recording, press the Recording start /stop button again. 00:00:00 [307Min] OFF SUPER 00:00:32 [307Min] • You cannot capture photos under the following conditions: - Your camcorder turns on automatically when you open the LCD screen. • Set the Lens open ( ). page 16 • Select the record mode by pressing the MODE button. page 29 Basic recording 1. CAPTURING PHOTOS DURING VIDEO RECORDING Your camcorder can capture photos without a shutter sound...
... extended saving time. 40 To stop recording, press the Recording start /stop button again. 00:00:00 [307Min] OFF SUPER 00:00:32 [307Min] • You cannot capture photos under the following conditions: - Your camcorder turns on automatically when you open the LCD screen. • Set the Lens open ( ). page 16 • Select the record mode by pressing the MODE button. page 29 Basic recording 1. CAPTURING PHOTOS DURING VIDEO RECORDING Your camcorder can capture photos without a shutter sound...

User Manual (user Manual) (ver.1.0) (English)
Page 52
... view recorded photos using various playback functions. • Insert a memory card. page 34 • Set the appropriate storage media. (HMX-H303/H304/H305 only) page 33 • Touch the Play ( ) tab on another device. - A photo with a file format not supported by this camcorder. (One that does not conform to DCF standards.) • Touch previous image ( ) / next image ( ) tab to the thumbnails, touch the Return ( ) tab. A photo recorded on the LCD screen to display...
... view recorded photos using various playback functions. • Insert a memory card. page 34 • Set the appropriate storage media. (HMX-H303/H304/H305 only) page 33 • Touch the Play ( ) tab on another device. - A photo with a file format not supported by this camcorder. (One that does not conform to DCF standards.) • Touch previous image ( ) / next image ( ) tab to the thumbnails, touch the Return ( ) tab. A photo recorded on the LCD screen to display...

User Manual (user Manual) (ver.1.0) (English)
Page 64
... been changed. • In the manual focus setting menu screen, you can activate touch point by lightly pressing a particular point on the LCD screen for facial imperfections. Art ( ) This mode helps adjust for about 2 seconds. • The Auto Focus (AF) setting is useful when you operate the zoom function because you might not be able to focus on a particular point by touching the AF ( ) tab on a small section of 9 Digital Effect...
... been changed. • In the manual focus setting menu screen, you can activate touch point by lightly pressing a particular point on the LCD screen for facial imperfections. Art ( ) This mode helps adjust for about 2 seconds. • The Auto Focus (AF) setting is useful when you operate the zoom function because you might not be able to focus on a particular point by touching the AF ( ) tab on a small section of 9 Digital Effect...

User Manual (user Manual) (ver.1.0) (English)
Page 69
... set interval. do not remove the power source or memory card from the camcorder. • We recommend using the AC power adaptor for a time lapse recording. • Pause function is useful for its total recording time, it switches to the standby mode. • Press the Recording start another Time Lapse Recording, repeat steps 1 through 5. • 60 captured images compose a video of a video your camcorder can save is a normal operation; Time Lapse Recording is not available during a Time Lapse REC, the camcorder switches to...
... set interval. do not remove the power source or memory card from the camcorder. • We recommend using the AC power adaptor for a time lapse recording. • Pause function is useful for its total recording time, it switches to the standby mode. • Press the Recording start another Time Lapse Recording, repeat steps 1 through 5. • 60 captured images compose a video of a video your camcorder can save is a normal operation; Time Lapse Recording is not available during a Time Lapse REC, the camcorder switches to...

User Manual (user Manual) (ver.1.0) (English)
Page 84
While the Demo function is idle for more than 5 minutes when recording a video, the power saving mode starts by dimming the LCD screen. Auto LCD Off Off On 1/1 Submenu items • Off: Disables the function. • On: When the camcorder is in operation. 80 Touch the desired submenu item. 3. If the AC power adaptor is disabled in the following cases: - System setting STBY 00:00:00 [307Min] 9999 OFF...
While the Demo function is idle for more than 5 minutes when recording a video, the power saving mode starts by dimming the LCD screen. Auto LCD Off Off On 1/1 Submenu items • Off: Disables the function. • On: When the camcorder is in operation. 80 Touch the desired submenu item. 3. If the AC power adaptor is disabled in the following cases: - System setting STBY 00:00:00 [307Min] 9999 OFF...

User Manual (user Manual) (ver.1.0) (English)
Page 88
... establishing the correct USB connection. 1. Use this setting only when connecting to . Touch the Menu ( ) Setting ( ) tab "USB Connect." 2. Submenu items • Auto: The video signals are output in the 720x480p format. System setting USB Connect You can set the HDMI video output to match the TV you want to print photos directly (when using the PictBridge function). page 92 Before connecting a USB cable, check whether the current USB mode is output in the same format as the recorded file.
... establishing the correct USB connection. 1. Use this setting only when connecting to . Touch the Menu ( ) Setting ( ) tab "USB Connect." 2. Submenu items • Auto: The video signals are output in the 720x480p format. System setting USB Connect You can set the HDMI video output to match the TV you want to print photos directly (when using the PictBridge function). page 92 Before connecting a USB cable, check whether the current USB mode is output in the same format as the recorded file.

User Manual (user Manual) (ver.1.0) (English)
Page 92
... can use only a C to A type Mini HDMI cable with this to occur, set to view connection instructions on the camcorder's screen. page 85 • You can use the Anynet + function on an HDTV using an HDMI connection. Turn on the camcorder. • If you can use the "TV Connect Guide" menu function to "Auto," you can view High Definition (HD) quality videos recorded in HD format. • This camcorder comes with a Mini HDMI cable. 3. If you control all devices that supports...
... can use only a C to A type Mini HDMI cable with this to occur, set to view connection instructions on the camcorder's screen. page 85 • You can use the Anynet + function on an HDTV using an HDMI connection. Turn on the camcorder. • If you can use the "TV Connect Guide" menu function to "Auto," you can view High Definition (HD) quality videos recorded in HD format. • This camcorder comes with a Mini HDMI cable. 3. If you control all devices that supports...

User Manual (user Manual) (ver.1.0) (English)
Page 95
... data transfer, the image quality may deteriorate. • To hide the screen indicators (such as the counter, etc.) on the screen of the recording device. • If your recording device has an input selector, set "TV Display: Off." page 85 • To record the date/time, display it on the screen. page 79 91 Insert the storage device (tape, disc, etc.) into the recording device. 3. Camcorder VCR or DVD/HDD recorder Signal flow Audio/Video cable 1. Use the supplied Audio/Video cable...
... data transfer, the image quality may deteriorate. • To hide the screen indicators (such as the counter, etc.) on the screen of the recording device. • If your recording device has an input selector, set "TV Display: Off." page 85 • To record the date/time, display it on the screen. page 79 91 Insert the storage device (tape, disc, etc.) into the recording device. 3. Camcorder VCR or DVD/HDD recorder Signal flow Audio/Video cable 1. Use the supplied Audio/Video cable...

User Manual (user Manual) (ver.1.0) (English)
Page 99
... direction. • Use the AC power adaptor to power the camcorder when transferring files to play back and edit files. Step 1. Connecting the USB cable 1 Set "USB Connect: Mass Storage" and "PC Software: On". • These are the default settings. If this occurs, access My Computer or Windows Explorer, open the drive that allows you must follow these steps: 1. USING THE Intelli-studio PROGRAM Intelli-studio is connected, turning the camcorder on your camcorder...
... direction. • Use the AC power adaptor to power the camcorder when transferring files to play back and edit files. Step 1. Connecting the USB cable 1 Set "USB Connect: Mass Storage" and "PC Software: On". • These are the default settings. If this occurs, access My Computer or Windows Explorer, open the drive that allows you must follow these steps: 1. USING THE Intelli-studio PROGRAM Intelli-studio is connected, turning the camcorder on your camcorder...

User Manual (user Manual) (ver.1.0) (English)
Page 100
... up, video and photo thumbnails are displayed in the main window. 1 23 4 5 6 7 % $ # 8 9 @ 0 ! • If you can update the firmware of this product by selecting "Web Support" "Upgrade firmware for the connected device" from the program toolbar. • The camcorder's built-in the list. 7 Select a file type. 8 View videos and photos of the selected folder on a map, store files in the selected folder. 3 Switch to Photo edit mode. 4 Switch to Video edit mode. 5 Switch to...
... up, video and photo thumbnails are displayed in the main window. 1 23 4 5 6 7 % $ # 8 9 @ 0 ! • If you can update the firmware of this product by selecting "Web Support" "Upgrade firmware for the connected device" from the program toolbar. • The camcorder's built-in the list. 7 Select a file type. 8 View videos and photos of the selected folder on a map, store files in the selected folder. 3 Switch to Photo edit mode. 4 Switch to Video edit mode. 5 Switch to...

User Manual (user Manual) (ver.1.0) (English)
Page 110
... installed in Demo mode. Insert the battery into the camcorder. • The inserted battery may not be discharged. To disable this option, change "Demo" to "Off." For more details, see Demo images, change the setting of its lifespan and cannot be turned off. • Remove the battery or unplug the AC power adaptor, and connect the power supply to the camcorder again before turning the screen. is in your nearest Samsung authorized service center. screen...
... installed in Demo mode. Insert the battery into the camcorder. • The inserted battery may not be discharged. To disable this option, change "Demo" to "Off." For more details, see Demo images, change the setting of its lifespan and cannot be turned off. • Remove the battery or unplug the AC power adaptor, and connect the power supply to the camcorder again before turning the screen. is in your nearest Samsung authorized service center. screen...

User Manual (user Manual) (ver.1.0) (English)
Page 119
...HMX-H320BN/HMX-H320SN/HMX-H320RN/HMX-H320UN Video signal NTSC Picture compression format H.264 (MPEG-4.AVC) Audio compression format AAC (Advanced Audio Coding) System Image device Effective pixels 1/4" CMOS 1.7M Total pixels 5M Lens F1.8 ~ F3.8, 30x optical zoom, 300x digital zoom Focal length 2.47mm ~ 74.1mm LCD screen Size/dot number LCD screen method 3" Wide Touch LCD / 230k TFT LCD Composite output 1Vp-p (75 Ω terminated) Connectors HDMI output Audio output C type connector -7.5 dBs (600 Ω terminated) USB output mini USB-B type (USB2.0 High Speed) Power...
...HMX-H320BN/HMX-H320SN/HMX-H320RN/HMX-H320UN Video signal NTSC Picture compression format H.264 (MPEG-4.AVC) Audio compression format AAC (Advanced Audio Coding) System Image device Effective pixels 1/4" CMOS 1.7M Total pixels 5M Lens F1.8 ~ F3.8, 30x optical zoom, 300x digital zoom Focal length 2.47mm ~ 74.1mm LCD screen Size/dot number LCD screen method 3" Wide Touch LCD / 230k TFT LCD Composite output 1Vp-p (75 Ω terminated) Connectors HDMI output Audio output C type connector -7.5 dBs (600 Ω terminated) USB output mini USB-B type (USB2.0 High Speed) Power...


