

User Manual Ver.1.0 (English)
Page 1
Recommended Memory Card: 6MB/s (Class 6) or above. USER MANUAL HMX-F90/HMX-F91 HMX-F900/HMX-F910 HMX-F920 Digital Camcorder www.samsung.com/register For video recording, use a memory card that supports faster write speeds. -
Recommended Memory Card: 6MB/s (Class 6) or above. USER MANUAL HMX-F90/HMX-F91 HMX-F900/HMX-F910 HMX-F920 Digital Camcorder www.samsung.com/register For video recording, use a memory card that supports faster write speeds. -
User Manual Ver.1.0 (English)
Page 3
...electrician to qualified service personnel. See figure below. These openings must not be operated only from the unit. 20 OUTDOOR ANTENNA GROUNDING: CAMCORDER, be sure the antenna or cable system is provided or the manufacturer's instructions have fallen into the apparatus, the apparatus has been ...register. Important safety instructions 14 Refer all servicing to replace your outlet. If you are provided for the grounding electrode. This CAMCORDER should be routed so that they exit from the type of power supply at your home, consult your appliance dealer or local power...
...electrician to qualified service personnel. See figure below. These openings must not be operated only from the unit. 20 OUTDOOR ANTENNA GROUNDING: CAMCORDER, be sure the antenna or cable system is provided or the manufacturer's instructions have fallen into the apparatus, the apparatus has been ...register. Important safety instructions 14 Refer all servicing to replace your outlet. If you are provided for the grounding electrode. This CAMCORDER should be routed so that they exit from the type of power supply at your home, consult your appliance dealer or local power...

User Manual Ver.1.0 (English)
Page 4
...unit and have fallen into such power lines or circuits. Opening or removing covers may result in damage and will prevent damage to the CAMCORDER due to lightning and powerline surges. 22 POWER LINES: An outside antenna system, extreme care should be taken to its normal operation....a technician before use. 25 SERVICING: Do not attempt to determine that could result in the vicinity of any kind onto the CAMCORDER. If the CAMCORDER does not operate normally by following conditions: a. Improper adjustment of any service or repairs to qualified service personnel under the following ...
...unit and have fallen into such power lines or circuits. Opening or removing covers may result in damage and will prevent damage to the CAMCORDER due to lightning and powerline surges. 22 POWER LINES: An outside antenna system, extreme care should be taken to its normal operation....a technician before use. 25 SERVICING: Do not attempt to determine that could result in the vicinity of any kind onto the CAMCORDER. If the CAMCORDER does not operate normally by following conditions: a. Improper adjustment of any service or repairs to qualified service personnel under the following ...
User Manual Ver.1.0 (English)
Page 6
...corresponding function. On-screen display If you for any source of model HMX-F90 are subject to Troubleshooting. pages 93~102 This User Manual covers models HMX-F90, HMX-F91, HMX-F900, HMX-F910, and HMX-F920. • Illustrations of excessive heat. Please follow these basic... • Designs and specifications of the camcorder and other accessories are used in this user manual. • The displays in this Samsung Camcorder. Please read the Safety information carefully and then use the product properly. • Samsung is not responsible for purchasing this user ...
...corresponding function. On-screen display If you for any source of model HMX-F90 are subject to Troubleshooting. pages 93~102 This User Manual covers models HMX-F90, HMX-F91, HMX-F900, HMX-F910, and HMX-F920. • Illustrations of excessive heat. Please follow these basic... • Designs and specifications of the camcorder and other accessories are used in this user manual. • The displays in this Samsung Camcorder. Please read the Safety information carefully and then use the product properly. • Samsung is not responsible for purchasing this user ...
User Manual Ver.1.0 (English)
Page 7
... [Recording Notes regarding trademarks start/stop recording. • The terms 'photo' and 'still image' are used interchangeably with your Samsung product are trademarks or registered trademarks of their authorization or consent. • Do not record videos or photos in forbidden recording places...a PC. Refer to other documentation provided with the same meaning. • All the trade names and registered trademarks mentioned in this camcorder or memory card, etc. Furthermore, 'TM' and '®' are either registered trademarks or Play back your trial recording to stop ...
... [Recording Notes regarding trademarks start/stop recording. • The terms 'photo' and 'still image' are used interchangeably with your Samsung product are trademarks or registered trademarks of their authorization or consent. • Do not record videos or photos in forbidden recording places...a PC. Refer to other documentation provided with the same meaning. • All the trade names and registered trademarks mentioned in this camcorder or memory card, etc. Furthermore, 'TM' and '®' are either registered trademarks or Play back your trial recording to stop ...

User Manual Ver.1.0 (English)
Page 8
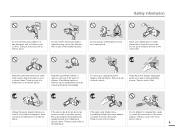
... a high temperature may result in abnormal heat or fire. Fine sand or dust entering the camcorder or power adaptor could cause electric shock, malfunctions or defects. 4 Do not aim the camcorder directly into the sun. Prohibited action. This precaution must be followed. There is a potential risk...overload outlets or extension cords as lead to malfunctioning of internal parts of personal injury or damage to the product. Oil entering the camcorder or power adaptor could cause malfunctions or defects. Unplug from the power supply. No sand or dust! Do not bend the USB...
... a high temperature may result in abnormal heat or fire. Fine sand or dust entering the camcorder or power adaptor could cause electric shock, malfunctions or defects. 4 Do not aim the camcorder directly into the sun. Prohibited action. This precaution must be followed. There is a potential risk...overload outlets or extension cords as lead to malfunctioning of internal parts of personal injury or damage to the product. Oil entering the camcorder or power adaptor could cause malfunctions or defects. Unplug from the power supply. No sand or dust! Do not bend the USB...
User Manual Ver.1.0 (English)
Page 9
... explode. Keep the power adaptor unplugged when not in use or during lightning storms. There is a risk of a malfunction or an electric shock. Keep the camcorder away from water when using it near the beach or pool or when it . There is a risk of the blades exposed. If the lithium battery... hands. Do not plug or unplug the power adaptor with no part of a malfunction or an electric the power adaptor immediately and or battery from a Samsung There is a risk of the battery in , there sound or smell, or smokes, unplug immediately detach the power adaptor or modify the...
... explode. Keep the power adaptor unplugged when not in use or during lightning storms. There is a risk of a malfunction or an electric shock. Keep the camcorder away from water when using it near the beach or pool or when it . There is a risk of the blades exposed. If the lithium battery... hands. Do not plug or unplug the power adaptor with no part of a malfunction or an electric the power adaptor immediately and or battery from a Samsung There is a risk of the battery in , there sound or smell, or smokes, unplug immediately detach the power adaptor or modify the...

User Manual Ver.1.0 (English)
Page 10
... Safety information Do not press the surface of defect or electric shock when using outdoors during lightning storms. Do not wipe the camcorder body with vinyl sheet, etc. If you push the LCD surface, display unevenness may cause a malfunction or injury. Do not use the... long time where the temperature is very high. This may corrode the external or internal terminals, disabling normal operation. INSECTICIDE Do not leave the camcorder in temperature or high humidity. Thick soot or steam could cause the product to fail to severe vibrations or impact. Doing so may cause a...
... Safety information Do not press the surface of defect or electric shock when using outdoors during lightning storms. Do not wipe the camcorder body with vinyl sheet, etc. If you push the LCD surface, display unevenness may cause a malfunction or injury. Do not use the... long time where the temperature is very high. This may corrode the external or internal terminals, disabling normal operation. INSECTICIDE Do not leave the camcorder in temperature or high humidity. Thick soot or steam could cause the product to fail to severe vibrations or impact. Doing so may cause a...

User Manual Ver.1.0 (English)
Page 11
...Noise from other manufacturers may fall. Keep important data separately. Samsung is well ventilated. Only plug the power adaptor plug into a socket that is not responsible for any problem occurs with this camcorder are recording. Use the optional accessories according to disconnect the ... with the product, you are responsible for their own products. Turning off the camcorder completely. Place the camcorder on a stable surface that is not responsible for data loss. Samsung is easily accessible. The LCD screen could distort the video or audio you must...
...Noise from other manufacturers may fall. Keep important data separately. Samsung is well ventilated. Only plug the power adaptor plug into a socket that is not responsible for any problem occurs with this camcorder are recording. Use the optional accessories according to disconnect the ... with the product, you are responsible for their own products. Turning off the camcorder completely. Place the camcorder on a stable surface that is not responsible for data loss. Samsung is easily accessible. The LCD screen could distort the video or audio you must...
User Manual Ver.1.0 (English)
Page 12
... user manual 2 SAFETY WARNINGS 2 PRECAUTIONS 2 IMPORTANT INFORMATION ON USE 2 Safety information 4 Quick start guide 10 Getting to know the camcorder 13 unpacking 13 LOCATION OF CONTROLS 14 IDENTIFIYING THE SCREEN DISPLAYS 16 Getting started 19 INSERTING/EJECTING THE BATTERY 19 CHARGING THE BATTERY 20 ...CHECKING THE BATTERY STATE 21 Basic operation of the camcorder 24 TURNING YOUR CAMCORDER ON/OFF 24 SWITCHING TO THE POWER SAVING MODE 24 SETTING THE DATE/TIME FOR THE FIRST TIME 25 SETTING THE ...
... user manual 2 SAFETY WARNINGS 2 PRECAUTIONS 2 IMPORTANT INFORMATION ON USE 2 Safety information 4 Quick start guide 10 Getting to know the camcorder 13 unpacking 13 LOCATION OF CONTROLS 14 IDENTIFIYING THE SCREEN DISPLAYS 16 Getting started 19 INSERTING/EJECTING THE BATTERY 19 CHARGING THE BATTERY 20 ...CHECKING THE BATTERY STATE 21 Basic operation of the camcorder 24 TURNING YOUR CAMCORDER ON/OFF 24 SWITCHING TO THE POWER SAVING MODE 24 SETTING THE DATE/TIME FOR THE FIRST TIME 25 SETTING THE ...
User Manual Ver.1.0 (English)
Page 13
... USING AS A REMOVABLE STORAGE DEVICE 91 Troubleshooting 93 WARNING INDICATORS AND MESSAGES 93 Symptoms and solutions 96 Maintenance & additional information 103 MAINTENANCE 103 USING YOUR CAMCORDER ABROAD 104 GLOSSARY 105 Specifications 106 9 Contents White Balance 54 Face Detection 56 EV (Exposure Value 57 C.Nite 58 Focus 58 Anti-Shake(HDIS 60...
... USING AS A REMOVABLE STORAGE DEVICE 91 Troubleshooting 93 WARNING INDICATORS AND MESSAGES 93 Symptoms and solutions 96 Maintenance & additional information 103 MAINTENANCE 103 USING YOUR CAMCORDER ABROAD 104 GLOSSARY 105 Specifications 106 9 Contents White Balance 54 Face Detection 56 EV (Exposure Value 57 C.Nite 58 Focus 58 Anti-Shake(HDIS 60...
User Manual Ver.1.0 (English)
Page 14
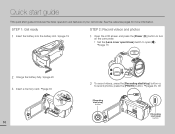
... into the battery slot. page 19 STEP 2: Record videos and photos 1 Open the LCD screen and press the [Power ( )] button to turn on the camcorder. • Set the [Lens cover open/close] switch to open ( ). page 15 2 Charge the battery fully. page 20 3 Insert a memory card. page... the reference pages for more information. Quick start guide This quick start /stop ] button [Recording start guide introduces the basic operation and features of your camcorder.
... into the battery slot. page 19 STEP 2: Record videos and photos 1 Open the LCD screen and press the [Power ( )] button to turn on the camcorder. • Set the [Lens cover open/close] switch to open ( ). page 15 2 Charge the battery fully. page 20 3 Insert a memory card. page... the reference pages for more information. Quick start guide This quick start /stop ] button [Recording start guide introduces the basic operation and features of your camcorder.

User Manual Ver.1.0 (English)
Page 15
... the playback ( ) mode. 2 Select the video or photo thumbnail view by using the [Zoom] lever. 3 Use the [Control (Up/Down/Left/Right)] button to your camcorder, you can find recordings quickly by using the thumbnail view.
... the playback ( ) mode. 2 Select the video or photo thumbnail view by using the [Zoom] lever. 3 Use the [Control (Up/Down/Left/Right)] button to your camcorder, you can find recordings quickly by using the thumbnail view.

User Manual Ver.1.0 (English)
Page 16
Quick start guide Importing and viewing videos/photos to your PC from the camcorder's storage media. Then you can arrange the files by uploading photos and videos directly to play back. Delete videos or photos you would like to a ... the Intelli-studio browser. page 89 Intelli-studio runs automatically when you connect the camcorder to a Windows computer (if you have saved to your computer from the camcorder 1 Start the Intelli-studio program by connecting the camcorder to Contents Manager in your PC Sharing videos/photos on your contents with the world...
Quick start guide Importing and viewing videos/photos to your PC from the camcorder's storage media. Then you can arrange the files by uploading photos and videos directly to play back. Delete videos or photos you would like to a ... the Intelli-studio browser. page 89 Intelli-studio runs automatically when you connect the camcorder to a Windows computer (if you have saved to your computer from the camcorder 1 Start the Intelli-studio program by connecting the camcorder to Contents Manager in your PC Sharing videos/photos on your contents with the world...
User Manual Ver.1.0 (English)
Page 17
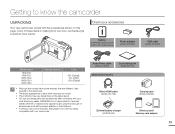
... A memory card is not responsible for memory cards compatible with your local Samsung dealer. SAMSUNG is not included. If any unauthorized use of these items is missing from your box, call Samsung's Customer Care Center. See page 31 for reduced battery life time or ...can purchase parts and accessories after consulting with your camcorder. Check your accessories Battery (IA-BP105R: AD43-00201A) (IA-BP210R: AD43-00200A) Power adaptor (AD44-00196A) USB cable (AD39-00169A) Model name HMX-F90 HMX-F91 HMX-F900 HMX-F910 HMX-F920 Internal memory - Audio/Video cable (AD39-...
... A memory card is not responsible for memory cards compatible with your local Samsung dealer. SAMSUNG is not included. If any unauthorized use of these items is missing from your box, call Samsung's Customer Care Center. See page 31 for reduced battery life time or ...can purchase parts and accessories after consulting with your camcorder. Check your accessories Battery (IA-BP105R: AD43-00201A) (IA-BP210R: AD43-00200A) Power adaptor (AD44-00196A) USB cable (AD39-00169A) Model name HMX-F90 HMX-F91 HMX-F900 HMX-F910 HMX-F920 Internal memory - Audio/Video cable (AD39-...
User Manual Ver.1.0 (English)
Page 18
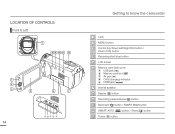
LOCATION OF CONTROLS Front & Left 1 8 9 10 11 12 2 3 4 14 5 6 7 CARD Getting to know the camcorder 1 Lens 2 MENU button 3 Control (Up/Down/Left/Right/OK) button / Zoom (T/W) button 4 Recording start/stop button 5 LCD screen 6 Memory card/Jack cover ⓐ USB jack ( ) ⓑ Memory card slot ( ) ⓒ AV jack ( ) ⓓ CHG (charging) indicator ⓔ HDMI jack ( ) 7 Internal speaker 8 Display ( ) button 9 Recording pause/resume ( ) button 10 Back light ( ) button / SMART BGM button 11 SMART AUTO ( ) button / Share ( ) button 12 Power ( ) button
LOCATION OF CONTROLS Front & Left 1 8 9 10 11 12 2 3 4 14 5 6 7 CARD Getting to know the camcorder 1 Lens 2 MENU button 3 Control (Up/Down/Left/Right/OK) button / Zoom (T/W) button 4 Recording start/stop button 5 LCD screen 6 Memory card/Jack cover ⓐ USB jack ( ) ⓑ Memory card slot ( ) ⓒ AV jack ( ) ⓓ CHG (charging) indicator ⓔ HDMI jack ( ) 7 Internal speaker 8 Display ( ) button 9 Recording pause/resume ( ) button 10 Back light ( ) button / SMART BGM button 11 SMART AUTO ( ) button / Share ( ) button 12 Power ( ) button

User Manual Ver.1.0 (English)
Page 19
Right/Top & Bottom 1 2 3 7 6 4 5 8 1 MODE button 2 Zoom lever (T/W) 3 PHOTO / My Clip button 4 Strap 5 Strap hook 6 Lens cover open ( ) /close ( ) switch 7 Internal microphone 8 Battery release switch (BATT.) 9 Tripod receptacle Getting to know the camcorder Rear 9 1 2 3 1 Mode indicator : Recording mode (Video/Photo) : Playback mode 2 Recording start/stop button 3 Battery slot Be careful not to cover the internal microphone and lens during recording. 15
Right/Top & Bottom 1 2 3 7 6 4 5 8 1 MODE button 2 Zoom lever (T/W) 3 PHOTO / My Clip button 4 Strap 5 Strap hook 6 Lens cover open ( ) /close ( ) switch 7 Internal microphone 8 Battery release switch (BATT.) 9 Tripod receptacle Getting to know the camcorder Rear 9 1 2 3 1 Mode indicator : Recording mode (Video/Photo) : Playback mode 2 Recording start/stop button 3 Battery slot Be careful not to cover the internal microphone and lens during recording. 15
User Manual Ver.1.0 (English)
Page 20
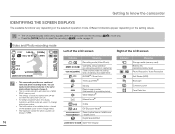
... on the selected operation mode. Different indicators appear depending on the setting values. • The On Screen Display (OSD) below appears when the camcorder is in the same mode without having to change it. • The on-screen indicators are based on a 16GB SDHC memory card. •...; The settings of functions marked with a are lost when the camcorder turns off. • For enhanced performance, the display indications and their order are subject to change without prior notice. • The total number of...
... on the selected operation mode. Different indicators appear depending on the setting values. • The On Screen Display (OSD) below appears when the camcorder is in the same mode without having to change it. • The on-screen indicators are based on a 16GB SDHC memory card. •...; The settings of functions marked with a are lost when the camcorder turns off. • For enhanced performance, the display indications and their order are subject to change without prior notice. • The total number of...
User Manual Ver.1.0 (English)
Page 21
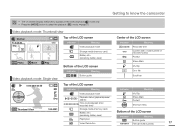
Getting to know the camcorder • The On Screen Display (OSD) below appears in the video playback ( ) mode only. • Press the [MODE] button to select the playback ( ) mode. ...
Getting to know the camcorder • The On Screen Display (OSD) below appears in the video playback ( ) mode only. • Press the [MODE] button to select the playback ( ) mode. ...
User Manual Ver.1.0 (English)
Page 22
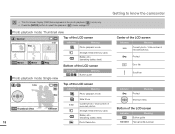
Getting to know the camcorder • This On Screen Display (OSD) below appears in the photo playback ( ) mode only. • Press the [MODE] button to select the playback ( ) mode. ...
Getting to know the camcorder • This On Screen Display (OSD) below appears in the photo playback ( ) mode only. • Press the [MODE] button to select the playback ( ) mode. ...


