User Manual Ver.1.0 (English)
Page 3
... near a radiator or heat register. See figure below. Important safety instructions 14 Refer all servicing to protect it from overheating. These openings must not be operated only from the type of the CAMCORDER and to qualified service personnel. Do not defeat the safety purpose of the polarized plug. 19 POWER-CORD PROTECTION: Power-supply cords should be blocked or covered. GROUND CLAMP ANTENNA...
... near a radiator or heat register. See figure below. Important safety instructions 14 Refer all servicing to protect it from overheating. These openings must not be operated only from the type of the CAMCORDER and to qualified service personnel. Do not defeat the safety purpose of the polarized plug. 19 POWER-CORD PROTECTION: Power-supply cords should be blocked or covered. GROUND CLAMP ANTENNA...

User Manual Ver.1.0 (English)
Page 7
... of important recorded data. Notes regarding trademarks • All the trade names and registered trademarks mentioned in this manual or other digital video formats. • Before recording important video, make sure the video and audio have been recorded properly. • Recorded contents may be used interchangeably with your trial recording to make a trial recording. Before using this camcorder • This camcorder records video in H.264 (MPEG4/AVC) format. • You can play back and...
... of important recorded data. Notes regarding trademarks • All the trade names and registered trademarks mentioned in this manual or other digital video formats. • Before recording important video, make sure the video and audio have been recorded properly. • Recorded contents may be used interchangeably with your trial recording to make a trial recording. Before using this camcorder • This camcorder records video in H.264 (MPEG4/AVC) format. • You can play back and...

User Manual Ver.1.0 (English)
Page 12
... CONTROLS 14 IDENTIFIYING THE SCREEN DISPLAYS 16 Getting started 19 INSERTING/EJECTING THE BATTERY 19 CHARGING THE BATTERY 20 CHECKING THE BATTERY STATE 21 Basic operation of the camcorder 24 TURNING YOUR CAMCORDER ON/OFF 24 SWITCHING TO THE POWER SAVING MODE 24 SETTING THE DATE/TIME FOR THE FIRST TIME 25 SETTING THE OPERATION MODES 26 SWITCHING THE INFORMATION DISPLAY MODE 26 USING THE SHORTCUT MENU (OK GUIDE 27 SELECTING THE LANGUAGES 29 8 Getting ready to start recording 30 INSERTING AND EJECTING A MEMORY CARD...
... CONTROLS 14 IDENTIFIYING THE SCREEN DISPLAYS 16 Getting started 19 INSERTING/EJECTING THE BATTERY 19 CHARGING THE BATTERY 20 CHECKING THE BATTERY STATE 21 Basic operation of the camcorder 24 TURNING YOUR CAMCORDER ON/OFF 24 SWITCHING TO THE POWER SAVING MODE 24 SETTING THE DATE/TIME FOR THE FIRST TIME 25 SETTING THE OPERATION MODES 26 SWITCHING THE INFORMATION DISPLAY MODE 26 USING THE SHORTCUT MENU (OK GUIDE 27 SELECTING THE LANGUAGES 29 8 Getting ready to start recording 30 INSERTING AND EJECTING A MEMORY CARD...

User Manual Ver.1.0 (English)
Page 13
... File Info 73 Other settings 74 Storage Info 74 File No 74 Date/Time Set 75 Date/Time Display 75 LCD Brightness 76 Auto LCD Off 76 Beep Sound 77 Shutter Sound 77 Auto Power Off 78 PC Software 78 Format 79 Default Set 79 Language 79 Connecting to a TV 80 CONNECTING TO A HIGH DEFINITION TV WITH HDMI 80 CONNECTING TO A REGULAR TV 81 VIEWING ON A TV SCREEN 82 Dubbing videos 83 DUBBING TO VCR OR DVD/HDD RECORDERS 83 Using with a windows...
... File Info 73 Other settings 74 Storage Info 74 File No 74 Date/Time Set 75 Date/Time Display 75 LCD Brightness 76 Auto LCD Off 76 Beep Sound 77 Shutter Sound 77 Auto Power Off 78 PC Software 78 Format 79 Default Set 79 Language 79 Connecting to a TV 80 CONNECTING TO A HIGH DEFINITION TV WITH HDMI 80 CONNECTING TO A REGULAR TV 81 VIEWING ON A TV SCREEN 82 Dubbing videos 83 DUBBING TO VCR OR DVD/HDD RECORDERS 83 Using with a windows...
User Manual Ver.1.0 (English)
Page 14
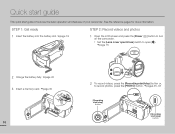
... 19 STEP 2: Record videos and photos 1 Open the LCD screen and press the [Power ( )] button to turn on the camcorder. • Set the [Lens cover open/close] switch to open ( ). ¬page 15 2 Charge the battery fully. ¬page 20 3 Insert a memory card. ¬page 30 CARD CARD 10 2 To record videos, press the [Recording start/stop] button or, to record photos, press the [PHOTO] button. ¬pages 35, 38 [Recording start/stop ] button Quick start guide This quick start /stop ] button [Recording start guide introduces the basic operation and features...
... 19 STEP 2: Record videos and photos 1 Open the LCD screen and press the [Power ( )] button to turn on the camcorder. • Set the [Lens cover open/close] switch to open ( ). ¬page 15 2 Charge the battery fully. ¬page 20 3 Insert a memory card. ¬page 30 CARD CARD 10 2 To record videos, press the [Recording start/stop] button or, to record photos, press the [PHOTO] button. ¬pages 35, 38 [Recording start/stop ] button Quick start guide This quick start /stop ] button [Recording start guide introduces the basic operation and features...
User Manual Ver.1.0 (English)
Page 17
... your local Samsung dealer. Lens 52x (Optical), 65x (Intelli), 130x (Digital) Although the models have some features that are different, they operate in the same way. Checking your camcorder. • Your camcorder includes the user manual CD and the printed quick start guide (AD68-06902A) Model name HMX-F80BN HMX-F800BN HMX-F80SN HMX-F800SN Color Internal memory Black - See page 31 for reduced battery life time or malfunctions caused by any unauthorized use of...
... your local Samsung dealer. Lens 52x (Optical), 65x (Intelli), 130x (Digital) Although the models have some features that are different, they operate in the same way. Checking your camcorder. • Your camcorder includes the user manual CD and the printed quick start guide (AD68-06902A) Model name HMX-F80BN HMX-F800BN HMX-F80SN HMX-F800SN Color Internal memory Black - See page 31 for reduced battery life time or malfunctions caused by any unauthorized use of...
User Manual Ver.1.0 (English)
Page 20
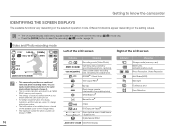
... camcorder IDENTIFIYING THE SCREEN DISPLAYS The available functions vary depending on the storage media. • The maximum number the photo counter can easily record videos or photos in the recording ( • Press the [MODE] button to change without prior notice. • The total number of recordable photos) White Balance Manual focus 1/60 +0.3 C.Nite EV (Exposure Value) Zoom (optical zoom / intelli zoom / digital zoom) Digital Special Effect JAN/01/2012 12:00AM Date/Time Display Indicator Meaning Storage media (memory card) Battery info. (remaining battery level) , Photo...
... camcorder IDENTIFIYING THE SCREEN DISPLAYS The available functions vary depending on the storage media. • The maximum number the photo counter can easily record videos or photos in the recording ( • Press the [MODE] button to change without prior notice. • The total number of recordable photos) White Balance Manual focus 1/60 +0.3 C.Nite EV (Exposure Value) Zoom (optical zoom / intelli zoom / digital zoom) Digital Special Effect JAN/01/2012 12:00AM Date/Time Display Indicator Meaning Storage media (memory card) Battery info. (remaining battery level) , Photo...
User Manual Ver.1.0 (English)
Page 21
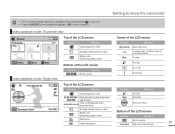
... media (memory card) Battery info (remaining battery level) Bottom of the LCD screen Indicator Meaning Button guide Center of the LCD screen Indicator 0:00:55 1/10 Meaning Recorded time Current video / total number of recorded videos Protect My Clip Error file Scroll bar 0:00:00/0:00:55 Top of the LCD screen Indicator Meaning Indicator Meaning Video playback mode My Clip / / / / Playback status (playback/pause/ / search/skip) 0:00:00/0:00:55 Time code (elapsed recorded time) time / Protect Shortcut menu Thumbnail View 100-0001 Storage media (memory card) Battery...
... media (memory card) Battery info (remaining battery level) Bottom of the LCD screen Indicator Meaning Button guide Center of the LCD screen Indicator 0:00:55 1/10 Meaning Recorded time Current video / total number of recorded videos Protect My Clip Error file Scroll bar 0:00:00/0:00:55 Top of the LCD screen Indicator Meaning Indicator Meaning Video playback mode My Clip / / / / Playback status (playback/pause/ / search/skip) 0:00:00/0:00:55 Time code (elapsed recorded time) time / Protect Shortcut menu Thumbnail View 100-0001 Storage media (memory card) Battery...
User Manual Ver.1.0 (English)
Page 28
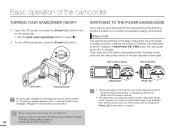
... recording, playing back, or displaying a slide show. - However, if you plan to the last operation mode used. When using it , the Date/ Time Set screen appears at start-up. 24 Set the date and time. ¬page 25 • The power saving mode does not work in the power saving mode. However, if Auto Power Off: 5 Min is closed After 20 minutes LCD screen Power( ) button The camcorder operates the self-diagnosis function when powered on the camcorder. • Set the [Lens cover open/close] switch...
... recording, playing back, or displaying a slide show. - However, if you plan to the last operation mode used. When using it , the Date/ Time Set screen appears at start-up. 24 Set the date and time. ¬page 25 • The power saving mode does not work in the power saving mode. However, if Auto Power Off: 5 Min is closed After 20 minutes LCD screen Power( ) button The camcorder operates the self-diagnosis function when powered on the camcorder. • Set the [Lens cover open/close] switch...
User Manual Ver.1.0 (English)
Page 31
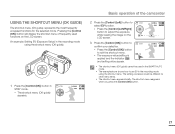
... the [Control (OK)] button will display the shortcut menu of frequently used in the recording mode using the shortcut menu (OK guide). 1 Press the [Control (OK)] button in STBY STBY mode. • The shortcut menu (OK guide) appears. [220Min] 9999 Basic operation of the camcorder 2 Press the [Control (Left)] button to STBY select EV function. • Press the [Control (Left/Right)] button to adjust the exposure while viewing the image on the LCD screen. An example: Setting EV...
... the [Control (OK)] button will display the shortcut menu of frequently used in the recording mode using the shortcut menu (OK guide). 1 Press the [Control (OK)] button in STBY STBY mode. • The shortcut menu (OK guide) appears. [220Min] 9999 Basic operation of the camcorder 2 Press the [Control (Left)] button to STBY select EV function. • Press the [Control (Left/Right)] button to adjust the exposure while viewing the image on the LCD screen. An example: Setting EV...

User Manual Ver.1.0 (English)
Page 32
...: x2→x4→x8→x16 - Basic operation of the camcorder SHORTCUT FUNCTION USING THE CONTROL BUTTONS Button Recording ( ) mode Video playback ( Playback ( ) mode ) mode Photo playback ( ) mode Menu selection Confirms selection - Confirm selection - Playback zoom - Zoom (tele) UP Increases the volume - Search playback RPS (Reverse Playback Search) rate: x2→x4→x8→x16 - Previous skip playback Previous image - Focus - Access the shortcut menu - iSCENE - Next skip playback Next image Moves the cursor down Moves to the previous...
...: x2→x4→x8→x16 - Basic operation of the camcorder SHORTCUT FUNCTION USING THE CONTROL BUTTONS Button Recording ( ) mode Video playback ( Playback ( ) mode ) mode Photo playback ( ) mode Menu selection Confirms selection - Confirm selection - Playback zoom - Zoom (tele) UP Increases the volume - Search playback RPS (Reverse Playback Search) rate: x2→x4→x8→x16 - Previous skip playback Previous image - Focus - Access the shortcut menu - iSCENE - Next skip playback Next image Moves the cursor down Moves to the previous...
User Manual Ver.1.0 (English)
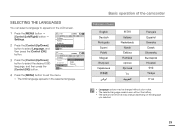
Page 33
... Român ไทย Français Español Svenska Dansk Slovensky Hrvatski ѣᮽ Türkçe • Language options may be changed without prior notice. • The selected language remains even without the battery. • The date and time format may change depending on the LCD screen. 1 Press the [MENU] button p [Control (Left/Right)] button p Settings. 2 Press the [Control (Up/Down)] button to select Language...
... Român ไทย Français Español Svenska Dansk Slovensky Hrvatski ѣᮽ Türkçe • Language options may be changed without prior notice. • The selected language remains even without the battery. • The date and time format may change depending on the LCD screen. 1 Press the [MENU] button p [Control (Left/Right)] button p Settings. 2 Press the [Control (Up/Down)] button to select Language...
User Manual Ver.1.0 (English)
Page 40
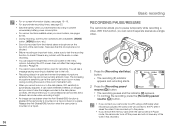
... this microphone is not blocked. • Before recording an important video, make interference effects on a tripod. Basic recording • For on-screen information display, see pages 16~18. • For approximate recording times, see page 33. • Eject the battery when you have finished recording to the pause. • If you remove the memory card when the camcorder is in Pause mode, the camcorder turns off the power and will not save any problem...
... this microphone is not blocked. • Before recording an important video, make interference effects on a tripod. Basic recording • For on-screen information display, see pages 16~18. • For approximate recording times, see page 33. • Eject the battery when you have finished recording to the pause. • If you remove the memory card when the camcorder is in Pause mode, the camcorder turns off the power and will not save any problem...
User Manual Ver.1.0 (English)
Page 41
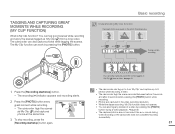
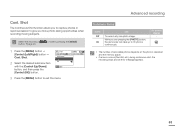
... a long video. Basic recording Understanding My Clip function Captured photos are not recorded if an error occurs during a video playback. ¬page 46 • The captured photos are saved on the photo thumbnail view. TAGGING AND CAPTURING GREAT MOMENTS WHILE RECORDING (MY CLIP FUNCTION) What is My Clip function? The camcorder can work by pressing the [PHOTO] button during video recording or the camcorder does not complete recording successfully. 37 The My Clip function can also capture photos while...
... a long video. Basic recording Understanding My Clip function Captured photos are not recorded if an error occurs during a video playback. ¬page 46 • The captured photos are saved on the photo thumbnail view. TAGGING AND CAPTURING GREAT MOMENTS WHILE RECORDING (MY CLIP FUNCTION) What is My Clip function? The camcorder can work by pressing the [PHOTO] button during video recording or the camcorder does not complete recording successfully. 37 The My Clip function can also capture photos while...
User Manual Ver.1.0 (English)
Page 47
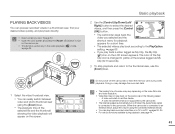
... PlayOption setting. ¬page 68 • If you play back a video tagged as My Clip (for 8 seconds). 3 To stop playback and return to the thumbnail view, use the [Zoom] lever. 1 Select the video thumbnail view. • You can easily switch between video and photo thumbnail view using the connected external device.) • You can play back directly. • Insert a memory card. ¬page 30 • Open the LCD screen and press the [Power ( )] button to turn on the camcorder...
... PlayOption setting. ¬page 68 • If you play back a video tagged as My Clip (for 8 seconds). 3 To stop playback and return to the thumbnail view, use the [Zoom] lever. 1 Select the video thumbnail view. • You can easily switch between video and photo thumbnail view using the connected external device.) • You can play back directly. • Insert a memory card. ¬page 30 • Open the LCD screen and press the [Power ( )] button to turn on the camcorder...
User Manual Ver.1.0 (English)
Page 67
On-screen display - • The number of recordable photos depends on the photo's resolution and the memory space. • If an error occurs (Card full, etc.) during continuous shot, the recording stops and an error message appears. 63 Shot The Continuous Shot function allows you to capture photos in rapid succession to give you are pressing the [PHOTO] button, the camcorder can take up to exit the menu. [220Min] Advanced recording Submenu...
On-screen display - • The number of recordable photos depends on the photo's resolution and the memory space. • If an error occurs (Card full, etc.) during continuous shot, the recording stops and an error message appears. 63 Shot The Continuous Shot function allows you to capture photos in rapid succession to give you are pressing the [PHOTO] button, the camcorder can take up to exit the menu. [220Min] Advanced recording Submenu...

User Manual Ver.1.0 (English)
Page 68
... [Control (OK)] button to finish the setting, and then press the [MENU] button to exit the menu. 6 After setting the Time Lapse REC mode, press the [Recording start/stop] button. • The Time Lapse REC starts. • Depending on the selected total recording time and recording interval, image frames are captured by recording a series of frames over a set the total time of time with [Control (Up/Down)] button. Submenu items Items Off On Use On-screen display To disable the function...
... [Control (OK)] button to finish the setting, and then press the [MENU] button to exit the menu. 6 After setting the Time Lapse REC mode, press the [Recording start/stop] button. • The Time Lapse REC starts. • Depending on the selected total recording time and recording interval, image frames are captured by recording a series of frames over a set the total time of time with [Control (Up/Down)] button. Submenu items Items Off On Use On-screen display To disable the function...
User Manual Ver.1.0 (English)
Page 80
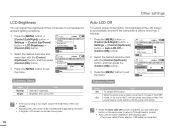
... [Control (OK)] button. 3 Press the [MENU] button to exit the menu. If the power cable (Power adaptor, USB cable) is idle for more than 2 minutes in the following case: - STBY Settings Auto LCD Off Beep Sound Shutter Sound Exit [220Min] : LCD : : STBY [220Min] Settings Auto LCD Off Off LCD Beep Sound On LCD Shutter Sound Exit Submenu Items Items Off On Use To disable the function. When the camcorder is connected. STBY Settings Date/Time Set Date/Time Display LCD Brightness Exit [220Min] : 1O2FF : STBY [220Min] Settings Date/Time Set Date/Time Display LCD Brightness...
... [Control (OK)] button. 3 Press the [MENU] button to exit the menu. If the power cable (Power adaptor, USB cable) is idle for more than 2 minutes in the following case: - STBY Settings Auto LCD Off Beep Sound Shutter Sound Exit [220Min] : LCD : : STBY [220Min] Settings Auto LCD Off Off LCD Beep Sound On LCD Shutter Sound Exit Submenu Items Items Off On Use To disable the function. When the camcorder is connected. STBY Settings Date/Time Set Date/Time Display LCD Brightness Exit [220Min] : 1O2FF : STBY [220Min] Settings Date/Time Set Date/Time Display LCD Brightness...
User Manual Ver.1.0 (English)
Page 99
... format is compatible with the international standard. An afterimage remains on a Windows XP computer, card. Storage media Symptom Memory card functions are stored on your camcorder properly. ¬page 30 • If you disconnect the power adaptor or remove the battery before connecting the product to the device. 95 Ensure that are not operable. To use the exFAT file system. Your TV or computer cannot display photos and videos...
... format is compatible with the international standard. An afterimage remains on a Windows XP computer, card. Storage media Symptom Memory card functions are stored on your camcorder properly. ¬page 30 • If you disconnect the power adaptor or remove the battery before connecting the product to the device. 95 Ensure that are not operable. To use the exFAT file system. Your TV or computer cannot display photos and videos...
User Manual Ver.1.0 (English)
Page 108
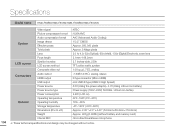
Specifications Model name HMX-F80BN/HMX-F80SN/HMX-F800BN/HMX-F800SN Video signal NTSC Picture compression format H.264/AVC Audio compression format AAC (Advanced Audio Coding) System Image device Effective pixels 1/3.2" CMOS Approx. 920,000 pixels Total pixels Approx. 5 Mega pixels Lens 2.0 to 4.9, 52x (Optical), 65x (Intelli), 130x (Digital) Electronic zoom lens Focal length 2.1mm~109.2mm LCD screen Size/dot number LCD screen method 2.7 inches wide, 230k TFT active matrix system Composite video out 1.0V (p_p), 75Ω...
Specifications Model name HMX-F80BN/HMX-F80SN/HMX-F800BN/HMX-F800SN Video signal NTSC Picture compression format H.264/AVC Audio compression format AAC (Advanced Audio Coding) System Image device Effective pixels 1/3.2" CMOS Approx. 920,000 pixels Total pixels Approx. 5 Mega pixels Lens 2.0 to 4.9, 52x (Optical), 65x (Intelli), 130x (Digital) Electronic zoom lens Focal length 2.1mm~109.2mm LCD screen Size/dot number LCD screen method 2.7 inches wide, 230k TFT active matrix system Composite video out 1.0V (p_p), 75Ω...


