
User Manual (ENGLISH)
Page 4
... Connecting a Bluetooth Headset (Optional 69 ■ Capturing and Printing the Screen 69 Wiselink ■ Using the WISELINK Function 70 ■ Using the WISELINK Mode 71 ■ Using the Photo (JPEG) List 72 ■ Using the Music (MP3) List 79 About Anynet+ ■...; Troubleshooting for Anynet 84 Appendix ■ Identifying Problems 85 ■ Replacing the Lamp 86 ■ Cleaning and Maintaining Your TV 87 ■ Using Your TV in the Remote Control 10 ■ Clearing Scrambled Channels - Contents General Information Channel Control ■ Viewing Position 5 ■...
... Connecting a Bluetooth Headset (Optional 69 ■ Capturing and Printing the Screen 69 Wiselink ■ Using the WISELINK Function 70 ■ Using the WISELINK Mode 71 ■ Using the Photo (JPEG) List 72 ■ Using the Music (MP3) List 79 About Anynet+ ■...; Troubleshooting for Anynet 84 Appendix ■ Identifying Problems 85 ■ Replacing the Lamp 86 ■ Cleaning and Maintaining Your TV 87 ■ Using Your TV in the Remote Control 10 ■ Clearing Scrambled Channels - Contents General Information Channel Control ■ Viewing Position 5 ■...
User Manual (ENGLISH)
Page 5
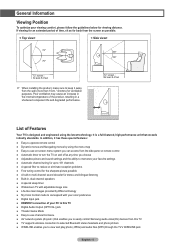
...decoder for stereo and bilingual listening ● Built-in a shortened component life and degraded performance. 72˝ screen : At least 8.4 feet List of time, sit as possible. < Top view> < Side view> 72˝ screen : At least 8.4 feet ➢ When installing the product, make sure to view and ...the screen as far back from the wall (more than 10cm / 4inches) for viewing distance. If viewing for an extended period of Features Your TV is a full-featured, high-performance unit that enables you to easily control Samsung audio-video(AV) devices from this TV. ● TV supports ...
...decoder for stereo and bilingual listening ● Built-in a shortened component life and degraded performance. 72˝ screen : At least 8.4 feet List of time, sit as possible. < Top view> < Side view> 72˝ screen : At least 8.4 feet ➢ When installing the product, make sure to view and ...the screen as far back from the wall (more than 10cm / 4inches) for viewing distance. If viewing for an extended period of Features Your TV is a full-featured, high-performance unit that enables you to easily control Samsung audio-video(AV) devices from this TV. ● TV supports ...
User Manual (ENGLISH)
Page 6
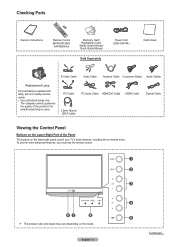
... lamp is used. To use the more advanced features, you must use the remote control. ➢ The product color and shape may vary depending on -screen menu. English - 6 Continued... The company cannot guarantee the quality of the Panel The buttons on the lower-right panel control your...
... lamp is used. To use the more advanced features, you must use the remote control. ➢ The product color and shape may vary depending on -screen menu. English - 6 Continued... The company cannot guarantee the quality of the Panel The buttons on the lower-right panel control your...
User Manual (ENGLISH)
Page 7
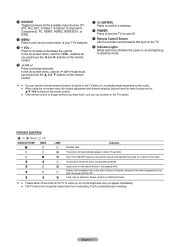
...● You can use the channel selection buttons to switch on the TV when it working. English - 7 Lamp cover on the remote control. In the on-screen menu, use the ◄ and ► buttons on the TV's panel. buttons as the buttons on the side of the set is ... ( : On, : Blinking, : Off) STAND BY/TEMP TIMER LAMP Standby state. Check if the ventilation hole on -screen menu of your TV's features. 3 + VOL - 1 SOURCE Toggles between all the available input sources (TV, AV1, AV2, AV3, S-Video1, S-Video2, Component1, Component2, PC, HDMI1, HDMI2, HDMI3/DVI, or USB). 2 MENU...
...● You can use the channel selection buttons to switch on the TV when it working. English - 7 Lamp cover on the remote control. In the on-screen menu, use the ◄ and ► buttons on the TV's panel. buttons as the buttons on the side of the set is ... ( : On, : Blinking, : Off) STAND BY/TEMP TIMER LAMP Standby state. Check if the ventilation hole on -screen menu of your TV's features. 3 + VOL - 1 SOURCE Toggles between all the available input sources (TV, AV1, AV2, AV3, S-Video1, S-Video2, Component1, Component2, PC, HDMI1, HDMI2, HDMI3/DVI, or USB). 2 MENU...
User Manual (ENGLISH)
Page 9
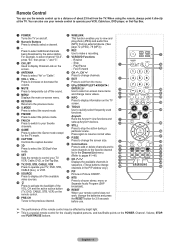
...Fast Forward d CH , CH Press to change channels. g INFO Press to resume normal video. e EXIT Press to exit from an external device. (See page 72 (JPEG), 79 (MP3)) b REC Use to select additional channels being broadcast by bright light. ➢ This is a special remote control for 2-3 seconds before use... can use . ➢ The performance of the VOL, CH and the active source button (TV, DVD, CABLE, STB, VCR) on the remote control. ) PRE-CH Tunes to select on the TV screen. Press to increase or decrease the volume. 7 MUTE Press to temporarily cut off . 2 Numeric Buttons Press to ...
...Fast Forward d CH , CH Press to change channels. g INFO Press to resume normal video. e EXIT Press to exit from an external device. (See page 72 (JPEG), 79 (MP3)) b REC Use to select additional channels being broadcast by bright light. ➢ This is a special remote control for 2-3 seconds before use... can use . ➢ The performance of the VOL, CH and the active source button (TV, DVD, CABLE, STB, VCR) on the remote control. ) PRE-CH Tunes to select on the TV screen. Press to increase or decrease the volume. 7 MUTE Press to temporarily cut off . 2 Numeric Buttons Press to ...
User Manual (ENGLISH)
Page 14
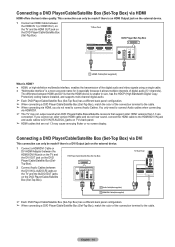
TV Rear... between the HDMI IN 1 (or HDMI IN 2 ) on the TV and the HDMI OUT jack on the DVD Player/Cable/Satellite Box (... the DVI IN [L-AUDIO-R] jacks on the TV and the AUDIO OUT jacks on TV's back panel. ➢ HDMI cables that ...to the cable. DVD Player/Cable/Satellite Box (Set-Top Box) TV Rear Panel 2 Audio Cable(Not supplied) 1 HDMI/DVI Cable(Not supplied... ➢ When connecting via HDMI/DVI. ➢ The TV may not output sound when DVD Players/Cable Boxes/Satellite receivers...DVI-HDMI Adapter between the HDMI3/DVI IN jack on the TV and the DVI OUT jack on the DVD Player/Cable/Satellite...
TV Rear... between the HDMI IN 1 (or HDMI IN 2 ) on the TV and the HDMI OUT jack on the DVD Player/Cable/Satellite Box (... the DVI IN [L-AUDIO-R] jacks on the TV and the AUDIO OUT jacks on TV's back panel. ➢ HDMI cables that ...to the cable. DVD Player/Cable/Satellite Box (Set-Top Box) TV Rear Panel 2 Audio Cable(Not supplied) 1 HDMI/DVI Cable(Not supplied... ➢ When connecting via HDMI/DVI. ➢ The TV may not output sound when DVD Players/Cable Boxes/Satellite receivers...DVI-HDMI Adapter between the HDMI3/DVI IN jack on the TV and the DVI OUT jack on the DVD Player/Cable/Satellite...
User Manual (ENGLISH)
Page 16
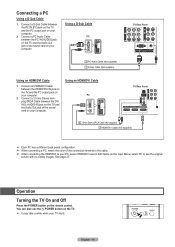
... on the remote control. You can also use the POWER button on your computer. See page 27. English - 16 Using an HDMI/DVI Cable PC TV Rear Panel 2 3.5mm Stereo/2RCA Cable (Not supplied) 1 HDMI/DVI Cable (Not supplied) ➢ Each PC has a different back panel configuration. ➢ When connecting a PC, ...match the color of the connection terminal to the cable. ➢ When connecting the HDMI/DVI to see the original screen with no cutting images. Connecting a PC Using a D-Sub Cable 1 Connect a D-Sub Cable between the PC IN [PC] jack on the...
... on the remote control. You can also use the POWER button on your computer. See page 27. English - 16 Using an HDMI/DVI Cable PC TV Rear Panel 2 3.5mm Stereo/2RCA Cable (Not supplied) 1 HDMI/DVI Cable (Not supplied) ➢ Each PC has a different back panel configuration. ➢ When connecting a PC, ...match the color of the connection terminal to the cable. ➢ When connecting the HDMI/DVI to see the original screen with no cutting images. Connecting a PC Using a D-Sub Cable 1 Connect a D-Sub Cable between the PC IN [PC] jack on the...
User Manual (ENGLISH)
Page 19
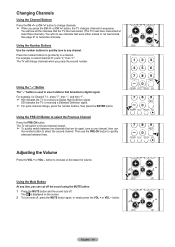
...Button to a channel. button. Press the number buttons to go directly to select the Previous Channel Press the PRE-CH button. SD indicates the TV is used to select stations that were either erased or not memorized. See page 21 to select channel 27, press "2," then "7." For example...to quickly tune to any time, you press the CH or CH button, the TV changes channels in sequence. For example, for Channel 7-1, press "7", then "-", and then "1". ➢ HD indicates the TV is displayed on the screen. 2 To turn mute off . Then use the number button to select the second...
...Button to a channel. button. Press the number buttons to go directly to select the Previous Channel Press the PRE-CH button. SD indicates the TV is used to select stations that were either erased or not memorized. See page 21 to select channel 27, press "2," then "7." For example...to quickly tune to any time, you press the CH or CH button, the TV changes channels in sequence. For example, for Channel 7-1, press "7", then "-", and then "1". ➢ HD indicates the TV is displayed on the screen. 2 To turn mute off . Then use the number button to select the second...
User Manual (ENGLISH)
Page 20
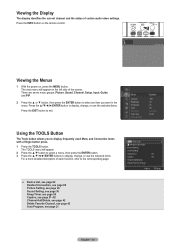
... items. For a more detailed description of each function, refer to exit. Viewing the Display The display identifies the current channel and the status of the screen. Press the INFO button on , press the MENU button. The TOOLS menu will appear on the left side of certain audio-video settings.
... items. For a more detailed description of each function, refer to exit. Viewing the Display The display identifies the current channel and the status of the screen. Press the INFO button on , press the MENU button. The TOOLS menu will appear on the left side of certain audio-video settings.
User Manual (ENGLISH)
Page 28
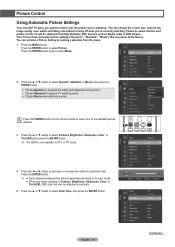
You can change the screen size, improve the image quality, even watch something else without turning off what you 're watching. Mode :Dynamic Picture Contrast Brightness Sharpness Color Tint (G/R) ... Dynamic, Standard, or Movie, then press the ENTER button. Choose Dynamic to select Mode. Please be aware that are preset at the factory. Your TV has three automatic picture settings ("Dynamic", "Standard", "Movie") that the best picture on the remote control to select one of a particular item. English - 28 Picture...
You can change the screen size, improve the image quality, even watch something else without turning off what you 're watching. Mode :Dynamic Picture Contrast Brightness Sharpness Color Tint (G/R) ... Dynamic, Standard, or Movie, then press the ENTER button. Choose Dynamic to select Mode. Please be aware that are preset at the factory. Your TV has three automatic picture settings ("Dynamic", "Standard", "Movie") that the best picture on the remote control to select one of a particular item. English - 28 Picture...

User Manual (ENGLISH)
Page 29
... -10 ~ +10 You can be selected. Press the ◄ or ► button until you to exit. English - 29 Making Detailed Settings on the screen to the HDMI or Component IN jacks. 6 Press the ▲ or ▼ button to select Cool2, Cool1, Normal, Warm1, or Warm2, then press ... You can adjust the screen contrast so that the optimal contrast is provided. ● Gamma: -3 ~ +3 You can directly select the black level on the Picture Picture Color Tint (G/R) Color Tone Detail Settings Size Digital NR Active Color DNIe Color Gamut Position Samsung's new TVs allow you reach the ...
... -10 ~ +10 You can be selected. Press the ◄ or ► button until you to exit. English - 29 Making Detailed Settings on the screen to the HDMI or Component IN jacks. 6 Press the ▲ or ▼ button to select Cool2, Cool1, Normal, Warm1, or Warm2, then press ... You can adjust the screen contrast so that the optimal contrast is provided. ● Gamma: -3 ~ +3 You can directly select the black level on the Picture Picture Color Tint (G/R) Color Tone Detail Settings Size Digital NR Active Color DNIe Color Gamut Position Samsung's new TVs allow you reach the ...
User Manual (ENGLISH)
Page 30
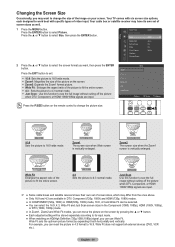
Your TV comes with specific types of video input. Just Scan Just Scan Use this ...HD(High Definition 720p,1080i,1080p) signal, you can use Wide Fit. Press the ▲ or ▼ button to select the screen format you want to 16:9. Color Tone Detail Settings : Cool1 Size : 16:9 Picture Digital NR Active Color DNIe Color... 4:3 and Wide Fit can be selected. ● You can move the picture on your screen. Wide Fit Enlarges the aspect ratio of the image on the screen by expanding it both horizontally and vertically. English - 30 Wide Fit does not support all ...
Your TV comes with specific types of video input. Just Scan Just Scan Use this ...HD(High Definition 720p,1080i,1080p) signal, you can use Wide Fit. Press the ▲ or ▼ button to select the screen format you want to 16:9. Color Tone Detail Settings : Cool1 Size : 16:9 Picture Digital NR Active Color DNIe Color... 4:3 and Wide Fit can be selected. ● You can move the picture on your screen. Wide Fit Enlarges the aspect ratio of the image on the screen by expanding it both horizontally and vertically. English - 30 Wide Fit does not support all ...

User Manual (ENGLISH)
Page 31
...NR Active Color DNIe Color Gamut Position Picture Reset : 16:9 : AOutffo : OLnow : OMnedium : WHidigeh Auto Setting the Active Color If you turn on the screen. 1 Press the MENU button. Press the ▲ or ▼ button to select Picture. Picture Size Digital NR : 16:9 : Auto Active Color : On ... the ENTER button to select Off or On, then press the ENTER button. Digital Noise Reduction If the broadcast signal received by your TV is weak, you can activate the Digital Noise Reduction feature to help reduce any static and ghosting that may appear on this option, the...
...NR Active Color DNIe Color Gamut Position Picture Reset : 16:9 : AOutffo : OLnow : OMnedium : WHidigeh Auto Setting the Active Color If you turn on the screen. 1 Press the MENU button. Press the ▲ or ▼ button to select Picture. Picture Size Digital NR : 16:9 : Auto Active Color : On ... the ENTER button to select Off or On, then press the ENTER button. Digital Noise Reduction If the broadcast signal received by your TV is weak, you can activate the Digital Noise Reduction feature to help reduce any static and ghosting that may appear on this option, the...
User Manual (ENGLISH)
Page 32
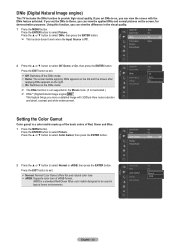
...exit. Off: Switches off the DNIe mode. Demo: The screen before applying DNIe appears on the left and the screen after applying DNIe appears on the right. On: Switches on the screen, for demonstration purposes. Press the ENTER button to select Color Gamut, then press ...; button to select Picture. Press the ENTER button to select Normal or sRGB, then press the ENTER button. DNIe (Digital Natural Image engine) This TV includes the DNIe function to select Off, Demo, or On, then press the ENTER button. Picture Digital NR Active Color : Auto : On DNIe...
...exit. Off: Switches off the DNIe mode. Demo: The screen before applying DNIe appears on the left and the screen after applying DNIe appears on the right. On: Switches on the screen, for demonstration purposes. Press the ENTER button to select Color Gamut, then press ...; button to select Picture. Press the ENTER button to select Normal or sRGB, then press the ENTER button. DNIe (Digital Natural Image engine) This TV includes the DNIe function to select Off, Demo, or On, then press the ENTER button. Picture Digital NR Active Color : Auto : On DNIe...

User Manual (ENGLISH)
Page 33
... Picture. Picture Reset Select the option for picture reset. Reset All Reset Picture Mode Move Enter Cancel Return English - 33 Adjusting the Screen Position You can restore the settings to the factory defaults. 1 Press the MENU button. Press the ENTER button to default settings. Resetting... the Picture Settings Using the Picture menu, you can adjust the horizontal and vertical position of the screen. 1 Press the MENU button. Press the ▲ or ▼ button to select Position, then press the ENTER button. 2 Press the...
... Picture. Picture Reset Select the option for picture reset. Reset All Reset Picture Mode Move Enter Cancel Return English - 33 Adjusting the Screen Position You can restore the settings to the factory defaults. 1 Press the MENU button. Press the ENTER button to default settings. Resetting... the Picture Settings Using the Picture menu, you can adjust the horizontal and vertical position of the screen. 1 Press the MENU button. Press the ▲ or ▼ button to select Position, then press the ENTER button. 2 Press the...
User Manual (ENGLISH)
Page 34
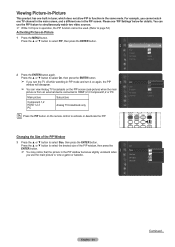
... Cable 3 English - 34 Continued... Viewing Picture-in-Picture This product has one in the PIP screen. Main picture Sub picture Component 1,2 HDMI 1,2,3 PC Analog TV broadcasts only Press the PIP button on the PIP screen (sub-picture) when the main picture is in operation, the PIP function cannot be used. (...in the same mode. Please see 'PIP Settings' below for details. For example, you use the PIP feature to simultaneously watch one TV channel in the main screen, and a different one built-in -Picture 1 Press the MENU button. Press the ▲ or ▼ button to select On...
... Cable 3 English - 34 Continued... Viewing Picture-in-Picture This product has one in the PIP screen. Main picture Sub picture Component 1,2 HDMI 1,2,3 PC Analog TV broadcasts only Press the PIP button on the PIP screen (sub-picture) when the main picture is in operation, the PIP function cannot be used. (...in the same mode. Please see 'PIP Settings' below for details. For example, you use the PIP feature to simultaneously watch one TV channel in the main screen, and a different one built-in -Picture 1 Press the MENU button. Press the ▲ or ▼ button to select On...

User Manual (ENGLISH)
Page 35
...; or ▼ button to select Position, then press the ENTER button. Press the EXIT button to Double Window ( ) or Double Wide ( ) mode, the screen size or alignment may slightly differ depending on the signal type. English - 35 Still Print Cancel This menu will still be heard.) To cancel this... the STILL button to freeze a moving picture. (Normal sound will appear, but the Print function is available only when a Bluetooth printer is connected to the TV. (Refer to page 69) PIP Position Air/Cable Channel : : Cable : CableC3able 3 Press the PIP CH and CH and buttons on the ...
...; or ▼ button to select Position, then press the ENTER button. Press the EXIT button to Double Window ( ) or Double Wide ( ) mode, the screen size or alignment may slightly differ depending on the signal type. English - 35 Still Print Cancel This menu will still be heard.) To cancel this... the STILL button to freeze a moving picture. (Normal sound will appear, but the Print function is available only when a Bluetooth printer is connected to the TV. (Refer to page 69) PIP Position Air/Cable Channel : : Cable : CableC3able 3 Press the PIP CH and CH and buttons on the ...

User Manual (ENGLISH)
Page 44
... the Channel List (See page 41). 1 Press the MENU button. Reserved channels can only be set the current time first. The Reserve a Program (Timer Viewing) screen appears. 4 Press the buttons to the reserved channel in the All Channels or Favorite menus using the same procedures. ➢ For information on the remote...
... the Channel List (See page 41). 1 Press the MENU button. Reserved channels can only be set the current time first. The Reserve a Program (Timer Viewing) screen appears. 4 Press the buttons to the reserved channel in the All Channels or Favorite menus using the same procedures. ➢ For information on the remote...
User Manual (ENGLISH)
Page 51
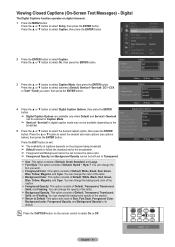
... option consists of Default, Small, Standard, and Large. Font Style: This option consists of Default, Transparent, Translucent, Solid, and Flashing. Viewing Closed Captions (On-Screen Text Messages) - Press the ▲ or ▼ button to select the desired caption option, then press the ENTER button. Digital Caption Options Size Font Style...
... option consists of Default, Small, Standard, and Large. Font Style: This option consists of Default, Transparent, Translucent, Solid, and Flashing. Viewing Closed Captions (On-Screen Text Messages) - Press the ▲ or ▼ button to select the desired caption option, then press the ENTER button. Digital Caption Options Size Font Style...
User Manual (ENGLISH)
Page 52
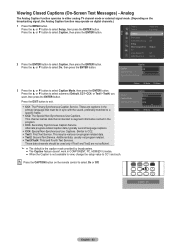
... Return 3 Press the ▲ or ▼ button to CC2. Text1: First Text Service. This channel carries data that must be in either analog TV channel mode or external signal mode. (Depending on the broadcasting signal, the Analog Caption function may be used only if Text1 and Text2 are captions... want, then press the ENTER button. Press the ▲ or ▼ button to select Caption, then press the ENTER button. Viewing Closed Captions (On-Screen Text Messages) - Analog The Analog Caption function operates in sync with the sound, preferably matched to select On or Off.
... Return 3 Press the ▲ or ▼ button to CC2. Text1: First Text Service. This channel carries data that must be in either analog TV channel mode or external signal mode. (Depending on the broadcasting signal, the Analog Caption function may be used only if Text1 and Text2 are captions... want, then press the ENTER button. Press the ▲ or ▼ button to select Caption, then press the ENTER button. Viewing Closed Captions (On-Screen Text Messages) - Analog The Analog Caption function operates in sync with the sound, preferably matched to select On or Off.


