
Owner Instructions
Page 2
.... • Dolby Surround Sound With DTV, you can listen to progressive-scan DVD movies in two different formats. Many HDTV programs are comparable to a variety of these services can transmit high definition TV (HDTV) images, Dolby digital surround audio, and new services such as multicasting (transmitting more than one program on the same TV channel) and datacasting. Digital television (DTV) is Digital Television? Several of Dolby digital audio formats from Dolby Surround...
.... • Dolby Surround Sound With DTV, you can listen to progressive-scan DVD movies in two different formats. Many HDTV programs are comparable to a variety of these services can transmit high definition TV (HDTV) images, Dolby digital surround audio, and new services such as multicasting (transmitting more than one program on the same TV channel) and datacasting. Digital television (DTV) is Digital Television? Several of Dolby digital audio formats from Dolby Surround...
Owner Instructions
Page 3
... high-quality audio. Can I connect my DTV set -top receiver to my cable TV service? All you already get good UHF reception, your location is decoded at the receiver, the digital video and audio data is to each apartment. 4. You can provide broadcast DTV signals via a master TV antenna system to the transmission tower. How difficult is no more than analog channels. Over-the-air (OTA) digital TV broadcasting uses...
... high-quality audio. Can I connect my DTV set -top receiver to my cable TV service? All you already get good UHF reception, your location is decoded at the receiver, the digital video and audio data is to each apartment. 4. You can provide broadcast DTV signals via a master TV antenna system to the transmission tower. How difficult is no more than analog channels. Over-the-air (OTA) digital TV broadcasting uses...
Owner Instructions
Page 4
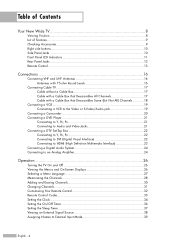
... 23 Connecting a Digital Audio System 24 Connecting to an Analog Amplifier 24 Operation 26 Turning the TV On and Off 26 Viewing the Menus and On-Screen Displays 26 Selecting a Menu Language 27 Memorizing the Channels 28 Adding and Erasing Channels 30 Changing Channels 31 Customizing Your Remote Control 32 Remote Control Codes 33 Setting the Clock...34 Setting the On/Off Timer 36 Setting the Sleep Timer 37 Viewing an External Signal Source 38 Assigning Names to External Input Mode...
... 23 Connecting a Digital Audio System 24 Connecting to an Analog Amplifier 24 Operation 26 Turning the TV On and Off 26 Viewing the Menus and On-Screen Displays 26 Selecting a Menu Language 27 Memorizing the Channels 28 Adding and Erasing Channels 30 Changing Channels 31 Customizing Your Remote Control 32 Remote Control Codes 33 Setting the Clock...34 Setting the On/Off Timer 36 Setting the Sleep Timer 37 Viewing an External Signal Source 38 Assigning Names to External Input Mode...
Owner Instructions
Page 5
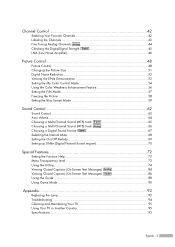
... 44 Checking the Digital-Signal Strength Digital 45 LNA (Low Noise Amplifier 46 Picture Control 48 Picture Control...48 Changing the Picture Size 51 Digital Noise Reduction 52 Viewing the DNIe Demonstration 53 Setting the My Color Control Mode 54 Using the Color Weakness Enhancement Feature 56 Setting the Film Mode 57 Freezing the Picture 58 Setting the Blue Screen Mode 59 Sound Control 62 Sound Control ...62 Auto Volume...64 Choosing a Multi-Channel Sound (MTS) track Digital 65 Choosing a Multi-Channel Sound (MTS) track Analog 66 Choosing a Digital Sound Format Digital 67...
... 44 Checking the Digital-Signal Strength Digital 45 LNA (Low Noise Amplifier 46 Picture Control 48 Picture Control...48 Changing the Picture Size 51 Digital Noise Reduction 52 Viewing the DNIe Demonstration 53 Setting the My Color Control Mode 54 Using the Color Weakness Enhancement Feature 56 Setting the Film Mode 57 Freezing the Picture 58 Setting the Blue Screen Mode 59 Sound Control 62 Sound Control ...62 Auto Volume...64 Choosing a Multi-Channel Sound (MTS) track Digital 65 Choosing a Multi-Channel Sound (MTS) track Analog 66 Choosing a Digital Sound Format Digital 67...
Owner Instructions
Page 9
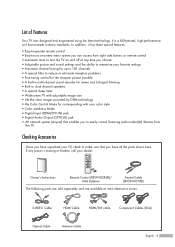
... Once you have unpacked your color style • Color weakness Mode • Digital Input (HDMI/DVI IN) jack • Digital Audio Output (OPTICAL) jack • AV network system (Anynet) that enables you to easily control Samsung audio-video(AV) devices from this TV. S-VIDEO Cable HDMI Cable HDMI/DVI cable Component Cables (RCA) Optical Cable Antenna Cable English - 9 If any time you choose • Adjustable picture and sound settings and the ability to memorize your favorite settings • Automatic channel tuning for up to 181...
... Once you have unpacked your color style • Color weakness Mode • Digital Input (HDMI/DVI IN) jack • Digital Audio Output (OPTICAL) jack • AV network system (Anynet) that enables you to easily control Samsung audio-video(AV) devices from this TV. S-VIDEO Cable HDMI Cable HDMI/DVI cable Component Cables (RCA) Optical Cable Antenna Cable English - 9 If any time you choose • Adjustable picture and sound settings and the ability to memorize your favorite settings • Automatic channel tuning for up to 181...

Owner Instructions
Page 11
... the remote control towards this spot on the TV. Indicator Light Key : Light is On : Light is Blinking : Light is too high, the power will automatically be defective. Auto Timer ON/OFF has been set and the set is not properly shut. POWER Press to keep the inside the set will shut off . Lamp cover on and off . Lamp may not appear immediately. • The TV has a fan to turn the TV on the rear of your TV. A cooling fan inside lamp from...
... the remote control towards this spot on the TV. Indicator Light Key : Light is On : Light is Blinking : Light is too high, the power will automatically be defective. Auto Timer ON/OFF has been set and the set is not properly shut. POWER Press to keep the inside the set will shut off . Lamp cover on and off . Lamp may not appear immediately. • The TV has a fan to turn the TV on the rear of your TV. A cooling fan inside lamp from...
Owner Instructions
Page 12
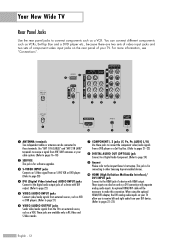
... rear panel of a device with DVI output. (Refer to page 22) ˆ VIDEO/AUDIO INPUT jacks Connect video/audio signals from external sources, such as VCR or DVD players. (Refer to page 21) Ø VIDEO/AUDIO OUTPUT jacks Sends video/audio signals from your TV. These inputs can connect different components such as a VCR. When using the optional HDMI/DVI adapter, the DVI analog audio inputs on your cable system. (Refer to pages 16~18) ´ SERVICE This jack is for software upgrades...
... rear panel of a device with DVI output. (Refer to page 22) ˆ VIDEO/AUDIO INPUT jacks Connect video/audio signals from external sources, such as VCR or DVD players. (Refer to page 21) Ø VIDEO/AUDIO OUTPUT jacks Sends video/audio signals from your TV. These inputs can connect different components such as a VCR. When using the optional HDMI/DVI adapter, the DVI analog audio inputs on your cable system. (Refer to pages 16~18) ´ SERVICE This jack is for software upgrades...
Owner Instructions
Page 13
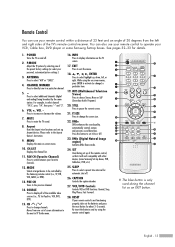
... and try using the on -screen menu. 10. POWER Turns the TV on the TV screen. 17. ANTENNA Press to pause the current screen. 21. CH.LIST Displays the channel list. 11. MTS (Multichannel Television Stereo) Press to a particular channel. 5. DNIe (Digital Natural Image engine) Activates DNIe Demo mode. 24. Remote Control You can also use your VCR, Cable box, DVD player or some Samsung Set-top boxes, VCR, Cable box, DVD, etc.) 25. Press to display information on and off . 26. CHANNEL NUMBER Press to...
... and try using the on -screen menu. 10. POWER Turns the TV on the TV screen. 17. ANTENNA Press to pause the current screen. 21. CH.LIST Displays the channel list. 11. MTS (Multichannel Television Stereo) Press to a particular channel. 5. DNIe (Digital Natural Image engine) Activates DNIe Demo mode. 24. Remote Control You can also use your VCR, Cable box, DVD player or some Samsung Set-top boxes, VCR, Cable box, DVD, etc.) 25. Press to display information on and off . 26. CHANNEL NUMBER Press to...
Owner Instructions
Page 21
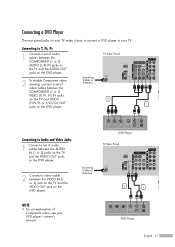
Connecting a DVD Player The rear panel jacks on the DVD player. Connecting to Y, PB, PR 1 Connect a set of video cables between the COMPONENT (1 or 2) AUDIO (L, R) IN jacks on the TV and the AUDIO OUT jacks on the DVD player. TV Rear Panel 2 To enable Component video viewing, connect a set of Component video, see your TV. DVD Player TV Rear Panel Incoming Cable or Antenna 2 1 NOTE • For an explanation of audio cables between the AUDIO IN (1 or 2) jacks on the TV and the AUDIO OUT jacks on the DVD player. 2 Connect a video cable between...
Connecting a DVD Player The rear panel jacks on the DVD player. Connecting to Y, PB, PR 1 Connect a set of video cables between the COMPONENT (1 or 2) AUDIO (L, R) IN jacks on the TV and the AUDIO OUT jacks on the DVD player. TV Rear Panel 2 To enable Component video viewing, connect a set of Component video, see your TV. DVD Player TV Rear Panel Incoming Cable or Antenna 2 1 NOTE • For an explanation of audio cables between the AUDIO IN (1 or 2) jacks on the TV and the AUDIO OUT jacks on the DVD player. 2 Connect a video cable between...

Owner Instructions
Page 22
... to DVI (Digital Visual Interface) 1 Connect a set of audio cables between the DVI AUDIO (L, R) IN jacks on the TV and the AUDIO OUT jacks on the Set-Top Box. NOTES • For an explanation of Component video, see your Set-Top Box owner's manual. • Requires a Cable Converter. • Make sure the DVI source's power is on the Set-Top Box. DTV Set-Top Box TV Rear Panel 2 Connect an HDMI/DVI video cable between the HDMI/DVI IN jack on the TV and the DVI OUT...
... to DVI (Digital Visual Interface) 1 Connect a set of audio cables between the DVI AUDIO (L, R) IN jacks on the TV and the AUDIO OUT jacks on the Set-Top Box. NOTES • For an explanation of Component video, see your Set-Top Box owner's manual. • Requires a Cable Converter. • Make sure the DVI source's power is on the Set-Top Box. DTV Set-Top Box TV Rear Panel 2 Connect an HDMI/DVI video cable between the HDMI/DVI IN jack on the TV and the DVI OUT...
Owner Instructions
Page 24
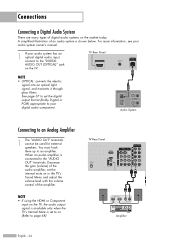
... be used for external speakers. TV Rear Panel NOTE • OPTICAL: converts the electric signal into an optical light signal, and transmits it through glass fibers. Audio System Connecting to an amplifier. NOTE • If using the HDMI or Component input on in the TV's Sound Menu and adjust the volume level with the volume control of an audio system is set the digital output format (Dolby Digital or PCM) appropriate to your audio system has an optical digital audio input, connect to page 68) TV Rear Panel...
... be used for external speakers. TV Rear Panel NOTE • OPTICAL: converts the electric signal into an optical light signal, and transmits it through glass fibers. Audio System Connecting to an amplifier. NOTE • If using the HDMI or Component input on in the TV's Sound Menu and adjust the volume level with the volume control of an audio system is set the digital output format (Dolby Digital or PCM) appropriate to your audio system has an optical digital audio input, connect to page 68) TV Rear Panel...
Owner Instructions
Page 26
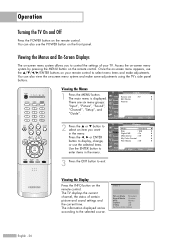
...remote control to control the settings of certain picture and sound settings and the current time. Cable 3 Picture Mode Standard Sound Mode Custom MTS Stereo Caption Off V-Chip Off No Time Information English - 26 Viewing the Menus and On-Screen Displays The on -screen menu system and make adjustments. Access the on-screen menu system by pressing the MENU button on the remote control. Setup Guide Move Enter Exit 2 Press the ... Viewing the Display Press the INFO button on the remote control. Picture Input Mode : Standard √ Picture Size Digital...
...remote control to control the settings of certain picture and sound settings and the current time. Cable 3 Picture Mode Standard Sound Mode Custom MTS Stereo Caption Off V-Chip Off No Time Information English - 26 Viewing the Menus and On-Screen Displays The on -screen menu system and make adjustments. Access the on-screen menu system by pressing the MENU button on the remote control. Setup Guide Move Enter Exit 2 Press the ... Viewing the Display Press the INFO button on the remote control. Picture Input Mode : Standard √ Picture Size Digital...
Owner Instructions
Page 28
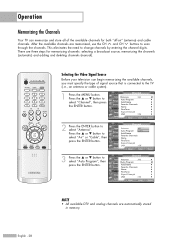
... connected to the TV (i.e., an antenna or cable system). 1 Press the MENU button. Press the ... Channel Input Picture Sound Channel Setup Guide Antenna : Air Auto Program Add/Delete Favorite Channels Name Fine Tune Signal Strength LNA : On Move Enter Return NOTE • All available DTV and analog channels are three steps for both "off-air" (antenna) and cable channels. English - 28 Press the ... or † button to change channels by entering the channel digits. After the available channels...
... connected to the TV (i.e., an antenna or cable system). 1 Press the MENU button. Press the ... Channel Input Picture Sound Channel Setup Guide Antenna : Air Auto Program Add/Delete Favorite Channels Name Fine Tune Signal Strength LNA : On Move Enter Return NOTE • All available DTV and analog channels are three steps for both "off-air" (antenna) and cable channels. English - 28 Press the ... or † button to change channels by entering the channel digits. After the available channels...
Owner Instructions
Page 34
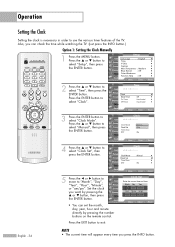
... you want by pressing the number buttons on the remote control. Input Picture Sound Channel Setup Guide • You can check the time while watching the TV. (Just press the INFO button.) Option 1: Setting the Clock Manually 1 Press the MENU button. Operation Setting the Clock Setting the clock is necessary in order to select "Clock". Setup Input Picture Sound Channel Setup Guide Language : English √ Time √ V-Chip √ Caption √ Menu Transparency : Medium √ Blue Screen : Off √ Color Weakness √ Function Help : Off...
... you want by pressing the number buttons on the remote control. Input Picture Sound Channel Setup Guide • You can check the time while watching the TV. (Just press the INFO button.) Option 1: Setting the Clock Manually 1 Press the MENU button. Operation Setting the Clock Setting the clock is necessary in order to select "Clock". Setup Input Picture Sound Channel Setup Guide Language : English √ Time √ V-Chip √ Caption √ Menu Transparency : Medium √ Blue Screen : Off √ Color Weakness √ Function Help : Off...
Owner Instructions
Page 36
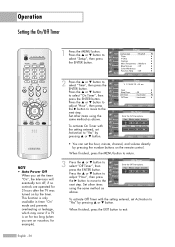
... the next step. Setup Input Picture Sound Channel Setup Guide Language : English √ Time √ V-Chip √ Caption √ Menu Transparency : Medium √ Blue Screen : Off √ Color Weakness √ Function Help : Off √ Move Enter Return Time Input 1/ 1/ 2005/ 12 : 00 am Air ▼ Channel Volume Activation 3 10 No Move Adjust Return • You can set the hour, minute, channel, and volume directly by pressing the number buttons on by pressing ... Hour Minute am/pm...
... the next step. Setup Input Picture Sound Channel Setup Guide Language : English √ Time √ V-Chip √ Caption √ Menu Transparency : Medium √ Blue Screen : Off √ Color Weakness √ Function Help : Off √ Move Enter Return Time Input 1/ 1/ 2005/ 12 : 00 am Air ▼ Channel Volume Activation 3 10 No Move Adjust Return • You can set the hour, minute, channel, and volume directly by pressing the number buttons on by pressing ... Hour Minute am/pm...

Owner Instructions
Page 37
...to select "Time", then press the ENTER button. Minute ▲ --- ▼ Activation No Move Adjust Return Input Picture Sound Channel Setup Guide Sleep Timer Set sleep timer. Setup Input Picture Sound Channel Setup Guide Language : English √ Time √ V-Chip √ Caption √ Menu Transparency : Medium √ Blue Screen : Off √ Color Weakness √ Function Help : Off √ Move Enter Return Time Input 1/ 1/ 2005/ 12 : 00 am Picture Clock √ Sound Sleep Timer : Off √ Channel On Timer Off Timer : Inactivated √...
...to select "Time", then press the ENTER button. Minute ▲ --- ▼ Activation No Move Adjust Return Input Picture Sound Channel Setup Guide Sleep Timer Set sleep timer. Setup Input Picture Sound Channel Setup Guide Language : English √ Time √ V-Chip √ Caption √ Menu Transparency : Medium √ Blue Screen : Off √ Color Weakness √ Function Help : Off √ Move Enter Return Time Input 1/ 1/ 2005/ 12 : 00 am Picture Clock √ Sound Sleep Timer : Off √ Channel On Timer Off Timer : Inactivated √...
Owner Instructions
Page 54
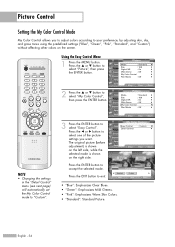
... • Changing the settings in the "Detail Control" menu (see next page) will automatically set the My Color Control mode to your preference, by adjusting skin, sky, and grass tones using the predefined settings ("Blue", "Green", "Pink", "Standard", and "Custom") without affecting other colors on the right side. Press the œ or √ button to accept the selected mode. My Color Control Input Easy Control : Custom √ Picture Detail Control √ Sound Channel Setup Guide Move...
... • Changing the settings in the "Detail Control" menu (see next page) will automatically set the My Color Control mode to your preference, by adjusting skin, sky, and grass tones using the predefined settings ("Blue", "Green", "Pink", "Standard", and "Custom") without affecting other colors on the right side. Press the œ or √ button to accept the selected mode. My Color Control Input Easy Control : Custom √ Picture Detail Control √ Sound Channel Setup Guide Move...
Owner Instructions
Page 74
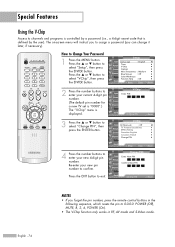
... select "Setup", then press the ENTER button. Press the ... Picture * (The default pin number for Sound a new TV set is "0000".) Channel The "V-Chip" menu is defined by the user). Guide 0~9 Enter PIN Return 3 Press the ... or † button to select "Change PIN", then press the ENTER button. 4 Press the number buttons to enter your new 4-digit pin number. Special Features Using the V-Chip Access to channels and programs is controlled by a password (i.e., a 4-digit secret code that is Setup displayed.
... select "Setup", then press the ENTER button. Press the ... Picture * (The default pin number for Sound a new TV set is "0000".) Channel The "V-Chip" menu is defined by the user). Guide 0~9 Enter PIN Return 3 Press the ... or † button to select "Change PIN", then press the ENTER button. 4 Press the number buttons to enter your new 4-digit pin number. Special Features Using the V-Chip Access to channels and programs is controlled by a password (i.e., a 4-digit secret code that is Setup displayed.
Owner Instructions
Page 94
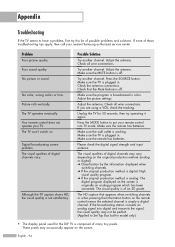
.... No color, wrong colors or tints. The TV operates erratically. Adjust the antenna. Check the antenna connections. Make sure the TV is working. Poor sound quality. The TV won't switch on the screen. Check all wire connections. Make sure the wall outlet is plugged in. Please check the digital signal strength and input antenna. These pixels may occasionally appear on . Appendix Troubleshooting If the TV seems to Set Top Box built-in model only.) • The display panel used for...
.... No color, wrong colors or tints. The TV operates erratically. Adjust the antenna. Check the antenna connections. Make sure the TV is working. Poor sound quality. The TV won't switch on the screen. Check all wire connections. Make sure the wall outlet is plugged in. Please check the digital signal strength and input antenna. These pixels may occasionally appear on . Appendix Troubleshooting If the TV seems to Set Top Box built-in model only.) • The display panel used for...

Owner Instructions
Page 95
... - 95 Specifications Model HL-R4656W HL-R5056W HL-R5656W HL-R6156W Voltage AC110-120V~ AC110-120V~ AC110-120V~ AC110-120V~ Frequency of the cabinet. • This DLP TV projects the image onto a large screen by applying an optical system. do not place the TV on the TV. Never use around the world. Cleaning and Maintaining Your TV With proper care, your TV will give...
... - 95 Specifications Model HL-R4656W HL-R5056W HL-R5656W HL-R6156W Voltage AC110-120V~ AC110-120V~ AC110-120V~ AC110-120V~ Frequency of the cabinet. • This DLP TV projects the image onto a large screen by applying an optical system. do not place the TV on the TV. Never use around the world. Cleaning and Maintaining Your TV With proper care, your TV will give...


