User Manual (ENGLISH)
Page 4
...03 10:09 AM Page 6 Table of Contents Your New Wide TV 10 Replacing the Lamp 10 List of Features ...12 Checking Parts...12 Side Panel Buttons 13 Side Panel Jacks 13 Front Panel LED Indicators 14 Rear Panel Jacks 15 Remote Control ...16 Installing Batteries in the Remote ...53 Setting the Film Mode 53 DNIeTM (Digital Natural Image engine) 54 Digital Noise Reduction 55 Setting the Blue Screen Mode 56 Changing the Screen Size 57 Special Audio Options 59 MTS Settings: Choosing a Soundtrack 59 Dolby Virtual 60 BBE ...61 Auto Volume 62 Viewing Closed Caption Information 63...
...03 10:09 AM Page 6 Table of Contents Your New Wide TV 10 Replacing the Lamp 10 List of Features ...12 Checking Parts...12 Side Panel Buttons 13 Side Panel Jacks 13 Front Panel LED Indicators 14 Rear Panel Jacks 15 Remote Control ...16 Installing Batteries in the Remote ...53 Setting the Film Mode 53 DNIeTM (Digital Natural Image engine) 54 Digital Noise Reduction 55 Setting the Blue Screen Mode 56 Changing the Screen Size 57 Special Audio Options 59 MTS Settings: Choosing a Soundtrack 59 Dolby Virtual 60 BBE ...61 Auto Volume 62 Viewing Closed Caption Information 63...
User Manual (ENGLISH)
Page 7
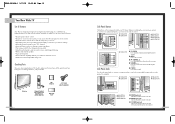
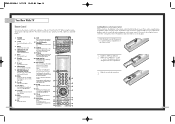
If any time you must use the remote control. œ HLN467W œ HLN567W œ HLN437W œ HLN507W œ HLN4365W œ HLN5065W Side Panel Jacks œ HLN617W Œ TV/VIDEO Press to switch between items on the on-screen menu. ¨ VOLUME +, - Use the side panel jacks to connect ... the video signal from a camcorder or video game. ´ AUDIO Input jacks Connect the audio signal from a camcorder or video game. ˇ S-VIDEO Input jack Connect an S-video signal from a camcorder or video game. (S-Video 3 jack and Audio L/R input 3 are used in -Picture capability that lets you...
If any time you must use the remote control. œ HLN467W œ HLN567W œ HLN437W œ HLN507W œ HLN4365W œ HLN5065W Side Panel Jacks œ HLN617W Œ TV/VIDEO Press to switch between items on the on-screen menu. ¨ VOLUME +, - Use the side panel jacks to connect ... the video signal from a camcorder or video game. ´ AUDIO Input jacks Connect the audio signal from a camcorder or video game. ˇ S-VIDEO Input jack Connect an S-video signal from a camcorder or video game. (S-Video 3 jack and Audio L/R input 3 are used in -Picture capability that lets you...
User Manual (ENGLISH)
Page 8
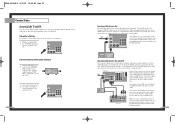
... connected to these to an external source, such as a VCR or DVD players. ¨ VIDEO/AUDIO MONITOR OUTPUT jacks Sends a video signal from VHF/UHF antennas or your TV. Check if the ventilation hole on the rear of the set top box or PC etc. ' RS-232C jack ˝ PC VIDEO INPUT jack... Connect to connect the component video/audio signals from a set of component video input jacks on the...
... connected to these to an external source, such as a VCR or DVD players. ¨ VIDEO/AUDIO MONITOR OUTPUT jacks Sends a video signal from VHF/UHF antennas or your TV. Check if the ventilation hole on the rear of the set top box or PC etc. ' RS-232C jack ˝ PC VIDEO INPUT jack... Connect to connect the component video/audio signals from a set of component video input jacks on the...
User Manual (ENGLISH)
Page 9
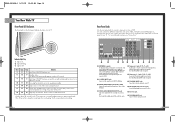
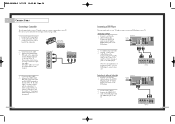
... over 100 on -screen menu. 4. Menu Displays the main on TV. 3. CH(Channel) and VOL(Volume) Controls volume, channel selection. 5. Surround Press to choose stereo, mono or Separate Audio Program (SAP broadcast). 10. MTS(Multichannel Television Stereo) Press to ...hear the Dolby surround effect. 9. S.Mode Adjust the TV sound by selecting one of the preset factory settings (or select your personal, customized sound settings.) 19. P.Mode Adjust the TV picture by the Samsung remote control (i.e., TV...
... over 100 on -screen menu. 4. Menu Displays the main on TV. 3. CH(Channel) and VOL(Volume) Controls volume, channel selection. 5. Surround Press to choose stereo, mono or Separate Audio Program (SAP broadcast). 10. MTS(Multichannel Television Stereo) Press to ...hear the Dolby surround effect. 9. S.Mode Adjust the TV sound by selecting one of the preset factory settings (or select your personal, customized sound settings.) 19. P.Mode Adjust the TV picture by the Samsung remote control (i.e., TV...
User Manual (ENGLISH)
Page 12
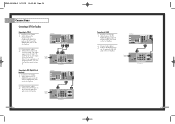
... with the VCR, select ANT-B (whichever channel is connected to IN on the cable converter box. If you have a mono VCR, connect L/Mono to VCR Audio OUT using only one channel while watching another channel, a splitter (not included) must be labeled "ANT OUT," "VHF OUT," or simply, "OUT." 2 .... BP68-00142A-2 5/27/03 10:09 AM Page 22 Connections Connecting Cable TV and VCR You can connect different cable systems to your TV, including cable without a Cable Box If you want to record one audio cable. You should keep your TV selected to ANT-A so that descrambles some or all channels.
... with the VCR, select ANT-B (whichever channel is connected to IN on the cable converter box. If you have a mono VCR, connect L/Mono to VCR Audio OUT using only one channel while watching another channel, a splitter (not included) must be labeled "ANT OUT," "VHF OUT," or simply, "OUT." 2 .... BP68-00142A-2 5/27/03 10:09 AM Page 22 Connections Connecting Cable TV and VCR You can connect different cable systems to your TV, including cable without a Cable Box If you want to record one audio cable. You should keep your TV selected to ANT-A so that descrambles some or all channels.
User Manual (ENGLISH)
Page 13
... tapes without using a VCR. 1 Locate the A/V output jacks on the camcorder. Connecting to Y,Pb,Pr 1 Connect a set of audio cables between the AUDIO IN jacks on the TV and the AUDIO OUT jacks on the DVD player. 2 Connect video cables between the VIDEO OUTPUT jack on the camcorder and the VIDEO terminal... and the section on "Viewing an External Signal Source" in this manual. 24 Connecting a DVD Player The rear panel jacks on your TV make it easy to connect a DVD player to your TV. BP68-00142A-2 5/27/03 10:09 AM Page 24 Connections Connecting a Camcorder The side panel jacks on your...
... tapes without using a VCR. 1 Locate the A/V output jacks on the camcorder. Connecting to Y,Pb,Pr 1 Connect a set of audio cables between the AUDIO IN jacks on the TV and the AUDIO OUT jacks on the DVD player. 2 Connect video cables between the VIDEO OUTPUT jack on the camcorder and the VIDEO terminal... and the section on "Viewing an External Signal Source" in this manual. 24 Connecting a DVD Player The rear panel jacks on your TV make it easy to connect a DVD player to your TV. BP68-00142A-2 5/27/03 10:09 AM Page 24 Connections Connecting a Camcorder The side panel jacks on your...
User Manual (ENGLISH)
Page 14
... on the Set Top Box. 2 Connect video cables between the DVI IN jack on the TV and the DVI OUT jack on the Set Top Box. 26 TV Rear Panel Component1 Component1/2 (480i/480p) (480p/720p/10801i) PC AUDIO Y ANT-A Pb ANT A-OUT MONITOR OUT Pr VIDEO 2 L L ANT-B S-VIDEO 1... S-VIDEO 2 VIDEO 1 R R V L R DVI PC RS-232C DTV Set Top Box TV Rear Panel Component1 Component1/2 (480i/480p) (480p/720p/10801i) PC AUDIO Y ANT-A Pb ANT A-OUT MONITOR OUT Pr VIDEO 2 L L ANT-B S-VIDEO 1 S-VIDEO 2 VIDEO 1 R R V L R DVI PC...
... on the Set Top Box. 2 Connect video cables between the DVI IN jack on the TV and the DVI OUT jack on the Set Top Box. 26 TV Rear Panel Component1 Component1/2 (480i/480p) (480p/720p/10801i) PC AUDIO Y ANT-A Pb ANT A-OUT MONITOR OUT Pr VIDEO 2 L L ANT-B S-VIDEO 1... S-VIDEO 2 VIDEO 1 R R V L R DVI PC RS-232C DTV Set Top Box TV Rear Panel Component1 Component1/2 (480i/480p) (480p/720p/10801i) PC AUDIO Y ANT-A Pb ANT A-OUT MONITOR OUT Pr VIDEO 2 L L ANT-B S-VIDEO 1 S-VIDEO 2 VIDEO 1 R R V L R DVI PC...
User Manual (ENGLISH)
Page 16
... button to enter items in the menu. Use the joystick (right) or VOL(+) buttons to display, change, or use the joystick button on your TV. Displaying Status Information 1 Press the Display button on the remote control to exit the menu. 31 Move the joystick down to select "Language." 3..."A" or "B". The main menu appears on this product can press the Menu button on your TV on and off. The channel setup menu will display the channel, current time, and the audio signal you can being working before screen video. On-screen menus disappear from the screen automatically after...
... button to enter items in the menu. Use the joystick (right) or VOL(+) buttons to display, change, or use the joystick button on your TV. Displaying Status Information 1 Press the Display button on the remote control to exit the menu. 31 Move the joystick down to select "Language." 3..."A" or "B". The main menu appears on this product can press the Menu button on your TV on and off. The channel setup menu will display the channel, current time, and the audio signal you can being working before screen video. On-screen menus disappear from the screen automatically after...

User Manual (ENGLISH)
Page 30
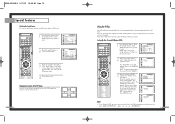
... size can't be changed in the DVI and PC (1080i) mode. • You can select Wide(TV), Wide(PC) screen size in the DVI and PC (720p) Mode. • You can select Wide(TV), Wide(PC), Normal(4:3) screen size in the DVI and PC (480p) Mode. • If you ... repeatedly to select "Mono", "SAP" or"Stereo". 4 Press the Menu button to stereo, mono, or a Separate Audio Program. (SAP audio is usually a foreign-language trans- lation. 59 Guide to the Separate Audio Program, which is usually a foreign-language translation. Sometimes SAP has unrelated information like news or weather.) 1 Press the...
... size can't be changed in the DVI and PC (1080i) mode. • You can select Wide(TV), Wide(PC) screen size in the DVI and PC (720p) Mode. • You can select Wide(TV), Wide(PC), Normal(4:3) screen size in the DVI and PC (480p) Mode. • If you ... repeatedly to select "Mono", "SAP" or"Stereo". 4 Press the Menu button to stereo, mono, or a Separate Audio Program. (SAP audio is usually a foreign-language trans- lation. 59 Guide to the Separate Audio Program, which is usually a foreign-language translation. Sometimes SAP has unrelated information like news or weather.) 1 Press the...
User Manual (ENGLISH)
Page 36
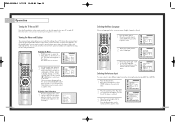
...8594; 8 → 2 → 4 → POWER ON. 71 Note: The default PIN number for a new TV set up or changed. The "Enter PIN" screen will appear. Choose any of the PIP image Press the Locate button repeatedly... you forget the PIN, press the remote-control keys in -Picture is for the main TV picture audio, and Sub is active. Enter your PIN and enter them. As soon as the 4...Move the joystick down to select SETUP, then press the joystick to enter. Main is for the PIP picture audio. 4 Press Menu to corner on the remote control. 2 Move the joystick down to select "Change PIN",...
...8594; 8 → 2 → 4 → POWER ON. 71 Note: The default PIN number for a new TV set up or changed. The "Enter PIN" screen will appear. Choose any of the PIP image Press the Locate button repeatedly... you forget the PIN, press the remote-control keys in -Picture is for the main TV picture audio, and Sub is active. Enter your PIN and enter them. As soon as the 4...Move the joystick down to select SETUP, then press the joystick to enter. Main is for the PIP picture audio. 4 Press Menu to corner on the remote control. 2 Move the joystick down to select "Change PIN",...
User Manual (ENGLISH)
Page 40
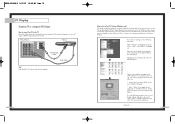
...Settings" is highlighted, move the cursor so that apply to the TV-PC interface are : * Screen area (sometimes called "resolution"): 1024 x 768 pixels * Color: "24-bit" color (might also be different, depending on the model. 15Pin(D-Sub) Cable Audio Cable NOTE Jack RS232C is "60" or "60 Hz." ... upgrade. 78 How to the "Settings" tab on the Windows start menu. If a vertical-frequency option exists on your computer manufacturer or Samsung Dealer.) First, click on "Settings" on the display dialog-box. Shown at left is highlighted. The actual screens on your PC will appear...
...Settings" is highlighted, move the cursor so that apply to the TV-PC interface are : * Screen area (sometimes called "resolution"): 1024 x 768 pixels * Color: "24-bit" color (might also be different, depending on the model. 15Pin(D-Sub) Cable Audio Cable NOTE Jack RS232C is "60" or "60 Hz." ... upgrade. 78 How to the "Settings" tab on the Windows start menu. If a vertical-frequency option exists on your computer manufacturer or Samsung Dealer.) First, click on "Settings" on the display dialog-box. Shown at left is highlighted. The actual screens on your PC will appear...


