User Manual (ENGLISH)
Page 4
... Contents Your New Wide TV 10 Replacing the Lamp 10 List of Features ...12 Checking Parts...12 Side Panel Buttons 13 Side Panel Jacks 13 Front Panel LED Indicators 14 Rear Panel Jacks 15 Remote ...53 DNIeTM (Digital Natural Image engine) 54 Digital Noise Reduction 55 Setting the Blue Screen Mode 56 Changing the Screen Size 57 Special Audio Options 59 MTS Settings: Choosing a Soundtrack 59 Dolby Virtual... PC Software (Windows only 79 Display Modes 80 How to Set up Your TV as a PC display 81 Picture Quality Adjustment 82 Changing the Position of the Image (Moving left, right,...
... Contents Your New Wide TV 10 Replacing the Lamp 10 List of Features ...12 Checking Parts...12 Side Panel Buttons 13 Side Panel Jacks 13 Front Panel LED Indicators 14 Rear Panel Jacks 15 Remote ...53 DNIeTM (Digital Natural Image engine) 54 Digital Noise Reduction 55 Setting the Blue Screen Mode 56 Changing the Screen Size 57 Special Audio Options 59 MTS Settings: Choosing a Soundtrack 59 Dolby Virtual... PC Software (Windows only 79 Display Modes 80 How to Set up Your TV as a PC display 81 Picture Quality Adjustment 82 Changing the Position of the Image (Moving left, right,...
User Manual (ENGLISH)
Page 6
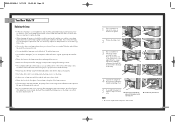
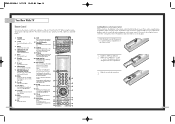
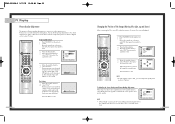
... follow these steps in the picture. 2 Remove the Lamp cover. 3 Use a screwdriver to remove the screws securing the Lamp. If you remove the lamp, you wish to buy a new lamp, please phone your Service Center or a nearby TV dealer, and tell them the model of your projection TV to handle the lamp. &#... help cool the lamp so you use only the correct lamp replacement. HLN467W/HLN567W 11 BP68-00142A-1 5/27/03 10:09 AM Page 10 Your New Wide TV Replacing the Lamp • A Projection TV lamp is improperly handled, the quality of the screen image can be affected and the expected life span ...
... follow these steps in the picture. 2 Remove the Lamp cover. 3 Use a screwdriver to remove the screws securing the Lamp. If you remove the lamp, you wish to buy a new lamp, please phone your Service Center or a nearby TV dealer, and tell them the model of your projection TV to handle the lamp. &#... help cool the lamp so you use only the correct lamp replacement. HLN467W/HLN567W 11 BP68-00142A-1 5/27/03 10:09 AM Page 10 Your New Wide TV Replacing the Lamp • A Projection TV lamp is improperly handled, the quality of the screen image can be affected and the expected life span ...
User Manual (ENGLISH)
Page 7
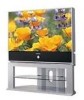
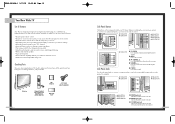
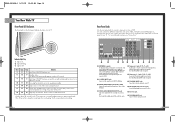
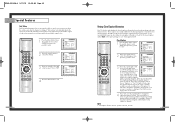
...• A special filter to reduce or eliminate reception problems • Fine tuning control for the sharpest picture possible • A built-in multi-channel sound decoder for example). œ HLN467W œ HLN567W œ HLN437W œ HLN4365W œ HLN507W œ HLN617W œ HLN5065W Œ VIDEO Input...40001B) Remote Control (BP59-00016A)/ AAA Batteries (4301-000121) Warranty Card 12 Side Panel Buttons The buttons on the side panel control your TV's basic features, including the on -screen menu. ¨ VOLUME +, - To use the more advanced features, you must use on-screen ...
...• A special filter to reduce or eliminate reception problems • Fine tuning control for the sharpest picture possible • A built-in multi-channel sound decoder for example). œ HLN467W œ HLN567W œ HLN437W œ HLN4365W œ HLN507W œ HLN617W œ HLN5065W Œ VIDEO Input...40001B) Remote Control (BP59-00016A)/ AAA Batteries (4301-000121) Warranty Card 12 Side Panel Buttons The buttons on the side panel control your TV's basic features, including the on -screen menu. ¨ VOLUME +, - To use the more advanced features, you must use on-screen ...
User Manual (ENGLISH)
Page 8
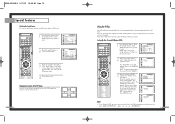
... Use these terminals. Indicator Light Key : Light is On : Light is Blinking : Light is not operating normally. The picture will shut off. Lamp may not appear immediately. • The TV has a fan to an external source, such as a VCR. You'll occasionally hear it working. 14 Œ ANTENNA ... of your PC. 15 Please contact a certified technician. • It takes about 25 seconds. Rear Panel Jacks Use the rear panel jacks to the audio-output jacks on the rear of component video input jacks on in about 25 seconds. Note: Only 480p, 720p and 1080i ...
... Use these terminals. Indicator Light Key : Light is On : Light is Blinking : Light is not operating normally. The picture will shut off. Lamp may not appear immediately. • The TV has a fan to an external source, such as a VCR. You'll occasionally hear it working. 14 Œ ANTENNA ... of your PC. 15 Please contact a certified technician. • It takes about 25 seconds. Rear Panel Jacks Use the rear panel jacks to the audio-output jacks on the rear of component video input jacks on in about 25 seconds. Note: Only 480p, 720p and 1080i ...
User Manual (ENGLISH)
Page 9
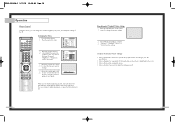
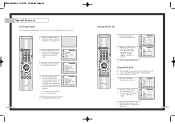
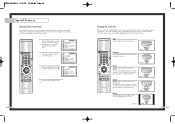
... buttons change the screen size. 8. Mode Selects a target device to be replaced. P.Mode Adjust the TV picture by selecting one of the preset factory settings (or select your personal, customized picture settings.) 20. VCR controls Controls VCR tape functions: Rewind, Play, Fast Forward, Stop, Pause. 21...to stop the action during set up and activate the parental locks. 23. PIP Activates picture in the PIP window only.) 22. S.Mode Adjust the TV sound by the Samsung remote control (i.e., TV, VCR, Cable, or DVD). 11. Add/Erase Press to select one of the preset...
... buttons change the screen size. 8. Mode Selects a target device to be replaced. P.Mode Adjust the TV picture by selecting one of the preset factory settings (or select your personal, customized picture settings.) 20. VCR controls Controls VCR tape functions: Rewind, Play, Fast Forward, Stop, Pause. 21...to stop the action during set up and activate the parental locks. 23. PIP Activates picture in the PIP window only.) 22. S.Mode Adjust the TV sound by the Samsung remote control (i.e., TV, VCR, Cable, or DVD). 11. Add/Erase Press to select one of the preset...
User Manual (ENGLISH)
Page 20
...the joystick up or down to select Adjust, then press the joystick to adjust the settings yourself. 39 Guide to Automatic Picture Settings • Choose Standard to set the TV to operate at top performance according to your guide. You will return. BP68-00142A-3 5/27/03 10:08 AM Page ... to make adjustments, or press the Menu button to exit. 38 Using Automatic ("Standard") Picture Settings 1 Press the P.Mode button on -screen gauge as your TV's specifications. • Choose Dynamic for viewing the TV during the day or when there is bright light in the room. • Choose Movie...
...the joystick up or down to select Adjust, then press the joystick to adjust the settings yourself. 39 Guide to Automatic Picture Settings • Choose Standard to set the TV to operate at top performance according to your guide. You will return. BP68-00142A-3 5/27/03 10:08 AM Page ... to make adjustments, or press the Menu button to exit. 38 Using Automatic ("Standard") Picture Settings 1 Press the P.Mode button on -screen gauge as your TV's specifications. • Choose Dynamic for viewing the TV during the day or when there is bright light in the room. • Choose Movie...
User Manual (ENGLISH)
Page 27
... off the Film mode. 1 Press the Menu button. Setting the Film Mode On: Automatically senses and processes film signals from all sources and adjusts the picture for optimum quality. Press the joystick to enter. 2 Move the joystick down to select SETUP, then press the joystick to enter. 3 Press the joystick... to enter in the TV's memory, move the joystick up. (A heart icon will appear.) To reset the fine tuning to "0," move the joystick to the right or left to exit...
... off the Film mode. 1 Press the Menu button. Setting the Film Mode On: Automatically senses and processes film signals from all sources and adjusts the picture for optimum quality. Press the joystick to enter. 2 Move the joystick down to select SETUP, then press the joystick to enter. 3 Press the joystick... to enter in the TV's memory, move the joystick up. (A heart icon will appear.) To reset the fine tuning to "0," move the joystick to the right or left to exit...
User Manual (ENGLISH)
Page 29
... AM Page 56 Special Features Setting the Blue Screen Mode If no signal is being received or the signal is a standard TV screen size. Normal Sets the picture to scroll the picture. The name of the screen mode will be displayed at the bottom of the picture more than Zoom1.... Press the CH ( , ) buttons to 4:3 normal mode. Zoom2 Magnifies the size of the TV screen. You can also move the picture on screen using the "Scroll" function. continued... 57 Wide Sets the picture to scroll the picture. Panorama Use this order: Wide, Panorama, Zoom1, Zoom2, Normal. Press the CH ( , )...
... AM Page 56 Special Features Setting the Blue Screen Mode If no signal is being received or the signal is a standard TV screen size. Normal Sets the picture to scroll the picture. The name of the screen mode will be displayed at the bottom of the picture more than Zoom1.... Press the CH ( , ) buttons to 4:3 normal mode. Zoom2 Magnifies the size of the TV screen. You can also move the picture on screen using the "Scroll" function. continued... 57 Wide Sets the picture to scroll the picture. Panorama Use this order: Wide, Panorama, Zoom1, Zoom2, Normal. Press the CH ( , )...
User Manual (ENGLISH)
Page 32
... SOUND, then press the joystick to enter. 2 Move the joystick down to turn closed captioning on the tape's package or your TV program-schedule. Different channels and fields display different information. In text mode, information unrelated to exit. 62 Viewing Closed Caption Information Your...3 Move the joystick to the right or left to change the captioning channel or field. "Auto volume" automatically adjusts the volume of the picture. These captions are usually subtitles for the closed -caption information. Then, press Menu to return to adjust the volume every time the channel is...
... SOUND, then press the joystick to enter. 2 Move the joystick down to turn closed captioning on the tape's package or your TV program-schedule. Different channels and fields display different information. In text mode, information unrelated to exit. 62 Viewing Closed Caption Information Your...3 Move the joystick to the right or left to change the captioning channel or field. "Auto volume" automatically adjusts the volume of the picture. These captions are usually subtitles for the closed -caption information. Then, press Menu to return to adjust the volume every time the channel is...

User Manual (ENGLISH)
Page 33
... while watching and turn it on again, then the mode will appear in the corner of your TV. The advanced PIP system allows you to watch two different pictures at once, even if you have a VCR connected to exit. Selecting a PIP Screen 1 Press the Menu button. Move the joystick down to...chip is the same as a VCR. 1 Press the Menu button. BP68-00142A-4 5/27/03 10:08 AM Page 64 Special Features Viewing Picture-in-Picture One of the most best features of the screen. 3 Press Menu to your TV is the Picture-in-Picture (PIP) feature. the PIP image is active. • If you select...
... while watching and turn it on again, then the mode will appear in the corner of your TV. The advanced PIP system allows you to watch two different pictures at once, even if you have a VCR connected to exit. Selecting a PIP Screen 1 Press the Menu button. Move the joystick down to...chip is the same as a VCR. 1 Press the Menu button. BP68-00142A-4 5/27/03 10:08 AM Page 64 Special Features Viewing Picture-in-Picture One of the most best features of the screen. 3 Press Menu to your TV is the Picture-in-Picture (PIP) feature. the PIP image is active. • If you select...

User Manual (ENGLISH)
Page 34
If a Cable TV system is providing the signal, move the joystick to exit. 66 Swapping the Contents of the PIP and Main image 1 Press the Menu button. NOTE &#... 10:08 AM Page 66 Special Features Selecting a Signal Source (Antenna or Cable) for PIP If the PIP source is TV during PIP ON, you can select the broadcasting source of PIP picture separately from the main picture. (If the main picture is ANT-B and the broadcasting sources are different, making adjustments is "AIR."
If a Cable TV system is providing the signal, move the joystick to exit. 66 Swapping the Contents of the PIP and Main image 1 Press the Menu button. NOTE &#... 10:08 AM Page 66 Special Features Selecting a Signal Source (Antenna or Cable) for PIP If the PIP source is TV during PIP ON, you can select the broadcasting source of PIP picture separately from the main picture. (If the main picture is ANT-B and the broadcasting sources are different, making adjustments is "AIR."

User Manual (ENGLISH)
Page 35
... change channels. 1 Press the Menu button. Note: Double function doesn't operate In the Component, PC, DVI mode. 4 Press Menu to exit. 68 Changing the Picture-in-Picture Channel After you set to ANT-B. (The PIP channels link to ANT-A). 69 BP68-00142A-4 5/27/03 10:08 AM Page 68 Special Features Changing...
... change channels. 1 Press the Menu button. Note: Double function doesn't operate In the Component, PC, DVI mode. 4 Press Menu to exit. 68 Changing the Picture-in-Picture Channel After you set to ANT-B. (The PIP channels link to ANT-A). 69 BP68-00142A-4 5/27/03 10:08 AM Page 68 Special Features Changing...
User Manual (ENGLISH)
Page 36
...down to select SETUP, then press the joystick to switch Main or Sub audio source. Note: The V-chip doesn't function when the Picture-in the following sequence, which resets the pin to 0-0-0-0: POWER OFF → Mute → 8 → 2 → ... POWER ON. 71 The "Enter PIN" screen will appear. The Change pin screen will appear. Main is for the main TV picture audio, and Sub is active. Press MENU to enter. Changing the Location of the V-Chip restrictions can use this feature to... you forget the PIN, press the remote-control keys in -Picture is for a new TV set up or changed.
...down to select SETUP, then press the joystick to switch Main or Sub audio source. Note: The V-chip doesn't function when the Picture-in the following sequence, which resets the pin to 0-0-0-0: POWER OFF → Mute → 8 → 2 → ... POWER ON. 71 The "Enter PIN" screen will appear. The Change pin screen will appear. Main is for the main TV picture audio, and Sub is active. Press MENU to enter. Changing the Location of the V-Chip restrictions can use this feature to... you forget the PIN, press the remote-control keys in -Picture is for a new TV set up or changed.

User Manual (ENGLISH)
Page 38
...the next section, and set the FV, D, L, S and V sub-ratings: First, select one of these TV-Ratings: TV-Y7, TV-PG, TV-14 or TV-MA (See Step 4, on previous page.) Next, while the TV-Rating is selected, repeatedly move the joystick right to select "U" or "B". Move the joystick down to enter. 74... : 5 How to Set up Restrictions Using the MPAA Ratings: G, PG, PG-13, R, NC-17, X The MPAA rating system uses the Motion Picture Association of America (MPAA) system, and its main application is for movies. (Eventually, movie videocassettes will be encoded with objectionable ratings (either MPAA or...
...the next section, and set the FV, D, L, S and V sub-ratings: First, select one of these TV-Ratings: TV-Y7, TV-PG, TV-14 or TV-MA (See Step 4, on previous page.) Next, while the TV-Rating is selected, repeatedly move the joystick right to select "U" or "B". Move the joystick down to enter. 74... : 5 How to Set up Restrictions Using the MPAA Ratings: G, PG, PG-13, R, NC-17, X The MPAA rating system uses the Motion Picture Association of America (MPAA) system, and its main application is for movies. (Eventually, movie videocassettes will be encoded with objectionable ratings (either MPAA or...
User Manual (ENGLISH)
Page 42
After the noise has been reduced, re-adjust the picture so that it is not well-aligned. 1 Press TV/VIDEO on the screen). Move the joystick down to select "PC", then press the joystick to enter. 3 Move the joystick down to select "Position", then .... BP68-00142A-5 5/27/03 10:08 AM Page 82 PC Display Picture Quality Adjustment The purpose of picture quality adjustment is to DVI, you can't adjust the quality and position of picture. Move the joystick up or down ) After connecting the TV to enter. 2 Press the Menu button. Fine tuning 4 Move the joystick down...
After the noise has been reduced, re-adjust the picture so that it is not well-aligned. 1 Press TV/VIDEO on the screen). Move the joystick down to select "PC", then press the joystick to enter. 3 Move the joystick down to select "Position", then .... BP68-00142A-5 5/27/03 10:08 AM Page 82 PC Display Picture Quality Adjustment The purpose of picture quality adjustment is to DVI, you can't adjust the quality and position of picture. Move the joystick up or down ) After connecting the TV to enter. 2 Press the Menu button. Fine tuning 4 Move the joystick down...

User Manual (ENGLISH)
Page 43
...name of the screen mode will be displayed at the bottom of input source. Normal Displays the picture as it is without changing the aspect ratio of the TV screen. Wide (PC) Scales the picture to 92% of the screen regardless of the aspect ratio of the input source. The screen displays... ASPECT button on the remote control, the TV's screen mode choices appear in this order: Wide(TV), Wide(PC),Expand, Normal. Expand Scales the picture to the size of the TV screen regardless of the aspect ratio of the input source. Wide (TV) Scales the picture to the aspect ratio of the input source...
...name of the screen mode will be displayed at the bottom of input source. Normal Displays the picture as it is without changing the aspect ratio of the TV screen. Wide (PC) Scales the picture to 92% of the screen regardless of the aspect ratio of the input source. The screen displays... ASPECT button on the remote control, the TV's screen mode choices appear in this order: Wide(TV), Wide(PC),Expand, Normal. Expand Scales the picture to the size of the TV screen regardless of the aspect ratio of the input source. Wide (TV) Scales the picture to the aspect ratio of the input source...
User Manual (ENGLISH)
Page 45
...picture or sound. Make sure the remote has batteries. Erratic operation, or intermittent failure. Try another channel. Press the TV/Video button. These, pixels may occasionally appear on top of the cabinet. • This DLP Projection TV projects... 40.5 x 15.7 x 29.7 inches 46.6 x 17.5 x 33.8 inches 56.5 x 19.3 x 40.2 inches 41.2 x 15.7 x 30.6inches 49.9 ...TV is suddenly moved from your remote control into "TV" mode. Make sure the program is working. Check all wire connections. Specifications Model HLN4365W/HLN437W HLN5065W/HLN507W HLN617W HLN467W HLN567W...
...picture or sound. Make sure the remote has batteries. Erratic operation, or intermittent failure. Try another channel. Press the TV/Video button. These, pixels may occasionally appear on top of the cabinet. • This DLP Projection TV projects... 40.5 x 15.7 x 29.7 inches 46.6 x 17.5 x 33.8 inches 56.5 x 19.3 x 40.2 inches 41.2 x 15.7 x 30.6inches 49.9 ...TV is suddenly moved from your remote control into "TV" mode. Make sure the program is working. Check all wire connections. Specifications Model HLN4365W/HLN437W HLN5065W/HLN507W HLN617W HLN467W HLN567W...


