User Manual (ENGLISH)
Page 2
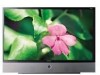
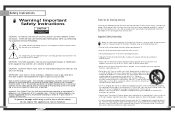
... Code (Section 54 of Canadian Electrical Code, Part I), that the cable ground shall be in television technology. If you do not use a mounting accessory recommended by the manufacturer or sold with care. Important Safety Instructions CAUTION RISK OF ELECTRIC SHOCK DO NOT OPEN CAUTION: TO REDUCE THE RISK OF ELECTRIC SHOCK, DO NOT REMOVE COVER (OR BACK). Your new Samsung projection TV...
... Code (Section 54 of Canadian Electrical Code, Part I), that the cable ground shall be in television technology. If you do not use a mounting accessory recommended by the manufacturer or sold with care. Important Safety Instructions CAUTION RISK OF ELECTRIC SHOCK DO NOT OPEN CAUTION: TO REDUCE THE RISK OF ELECTRIC SHOCK, DO NOT REMOVE COVER (OR BACK). Your new Samsung projection TV...

User Manual (ENGLISH)
Page 3
... uses replacement parts specified by the operating instructions. When the LAMP(BULB ONLY) replacement is a detachable power supply cord with such lines can radiate radio frequency energy and, if not installed and used in a residential installation. EXAMPLE OF ANTENNA GROUNDING GROUND CLAMP ELECTRIC SERVICE EQUIPMENT NEC - It is damaged - This television receiver provides display of television closed captioning in accordance with §15.119 of the computer convenience outlet is equal to this monitor is needed User Instructions...
... uses replacement parts specified by the operating instructions. When the LAMP(BULB ONLY) replacement is a detachable power supply cord with such lines can radiate radio frequency energy and, if not installed and used in a residential installation. EXAMPLE OF ANTENNA GROUNDING GROUND CLAMP ELECTRIC SERVICE EQUIPMENT NEC - It is damaged - This television receiver provides display of television closed captioning in accordance with §15.119 of the computer convenience outlet is equal to this monitor is needed User Instructions...

User Manual (ENGLISH)
Page 4
... Picture Control ...38 Sound Control ...40 Setting the Clock 42 Setting the Timers 43 Viewing an External Signal Source 45 6 Special Features 48 Setting Up Your Remote Control 48 Remote Control Codes 51 Fine Tuning Channels 52 Selecting the Color Tone 53 Setting the Film Mode 53 DNIeTM (Digital Natural Image engine) 54 Digital Noise Reduction 55 Setting the Blue Screen Mode 56 Changing the Screen Size 57 Special Audio Options 59 MTS Settings: Choosing a Soundtrack 59 Dolby Virtual 60 BBE ...61 Auto Volume 62 Viewing Closed Caption Information 63 Viewing...
... Picture Control ...38 Sound Control ...40 Setting the Clock 42 Setting the Timers 43 Viewing an External Signal Source 45 6 Special Features 48 Setting Up Your Remote Control 48 Remote Control Codes 51 Fine Tuning Channels 52 Selecting the Color Tone 53 Setting the Film Mode 53 DNIeTM (Digital Natural Image engine) 54 Digital Noise Reduction 55 Setting the Blue Screen Mode 56 Changing the Screen Size 57 Special Audio Options 59 MTS Settings: Choosing a Soundtrack 59 Dolby Virtual 60 BBE ...61 Auto Volume 62 Viewing Closed Caption Information 63 Viewing...

User Manual (ENGLISH)
Page 6
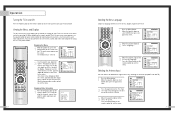
... the volume and to select items when using the latest technology. Your New Wide TV List of Features Your TV was designed and engineered using the on-screen menu. ˆ POWER Press to turn the TV on and off . To use the remote control. Œ TV/VIDEO Press to switch between items on the on -screen menu system. If any time you must use the more advanced features, you choose • Adjustable picture and sound settings...
... the volume and to select items when using the latest technology. Your New Wide TV List of Features Your TV was designed and engineered using the on-screen menu. ˆ POWER Press to turn the TV on and off . To use the remote control. Œ TV/VIDEO Press to switch between items on the on -screen menu system. If any time you must use the more advanced features, you choose • Adjustable picture and sound settings...

User Manual (ENGLISH)
Page 7
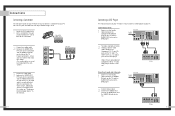
... the rear of the set is not properly shut. Press to lower or raise the volume and to select items when using the on-screen menu. ˆ POWER Press to keep the inside the set will automatically appear in about 25 seconds. Side Panel Jacks HLM4365W/HLM5065W Use the side panel jacks to change channels and move between viewing TV programs and signals from a camcorder or video game. (S-Video 3 jack and Audio L/R input 3 are used...
... the rear of the set is not properly shut. Press to lower or raise the volume and to select items when using the on-screen menu. ˆ POWER Press to keep the inside the set will automatically appear in about 25 seconds. Side Panel Jacks HLM4365W/HLM5065W Use the side panel jacks to change channels and move between viewing TV programs and signals from a camcorder or video game. (S-Video 3 jack and Audio L/R input 3 are used...

User Manual (ENGLISH)
Page 8
... "Connections". The PIP channel can be connected to these to an external source, such as a VCR or DVD players. ¨ VIDEO/AUDIO MONITOR OUTPUT jacks Sends a video signal from a DVD player when using the component video input jacks. A cooling fan inside lamp from a set will automatically appear in RF, Video and S-Video modes. ˆ Component1 jacks (Y, Pb, Pr, L, R) Use these jacks to connect the component video/audio signals from the TV to the audio-output jacks on your TV. Lamp cover on rear of the set is connected to keep the inside...
... "Connections". The PIP channel can be connected to these to an external source, such as a VCR or DVD players. ¨ VIDEO/AUDIO MONITOR OUTPUT jacks Sends a video signal from a DVD player when using the component video input jacks. A cooling fan inside lamp from a set will automatically appear in RF, Video and S-Video modes. ˆ Component1 jacks (Y, Pb, Pr, L, R) Use these jacks to connect the component video/audio signals from the TV to the audio-output jacks on your TV. Lamp cover on rear of the set is connected to keep the inside...

User Manual (ENGLISH)
Page 9
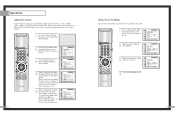
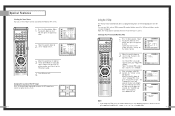
... preset factory settings (or select your personal, customized sound settings.) 19. S.Mode Adjust the TV sound by selecting one of the batteries with the diagram inside the compartment. 3 Slide the cover back into place. 17 P.Mode Adjust the TV picture by the Samsung remote control (i.e., TV, VCR, Cable, or DVD). 11. Press to move the PIP window to switch between your VCR, cable box, and DVD player. 1. V.chip Press to display information on the main screen with other devices (VCR, cable box, DVD...
... preset factory settings (or select your personal, customized sound settings.) 19. S.Mode Adjust the TV sound by selecting one of the batteries with the diagram inside the compartment. 3 Slide the cover back into place. 17 P.Mode Adjust the TV picture by the Samsung remote control (i.e., TV, VCR, Cable, or DVD). 11. Press to move the PIP window to switch between your VCR, cable box, and DVD player. 1. V.chip Press to display information on the main screen with other devices (VCR, cable box, DVD...
User Manual (ENGLISH)
Page 13
..., follow your camera's instructions and the section on "Viewing an External Signal Source" in this manual. 24 Connecting a DVD Player The rear panel jacks on your TV make it easy to connect a DVD player to your TV. If your camcorder is stereo, you must connect two separate cables. (The audio cables are usually found on the side or back of the camcorder. 2 Connect an audio cable between the VIDEO OUTPUT jack on the camcorder...
..., follow your camera's instructions and the section on "Viewing an External Signal Source" in this manual. 24 Connecting a DVD Player The rear panel jacks on your TV make it easy to connect a DVD player to your TV. If your camcorder is stereo, you must connect two separate cables. (The audio cables are usually found on the side or back of the camcorder. 2 Connect an audio cable between the VIDEO OUTPUT jack on the camcorder...
User Manual (ENGLISH)
Page 14
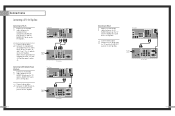
... MONITOR OUT Pr VIDEO 2 L L ANT-B S-VIDEO 1 S-VIDEO 2 VIDEO 1 R R V L R DVI PC RS-232C DVI DTV Set Top Box 27 Note: For an explanation of Component video, see your Set Top Box owner's manual. Connecting to DVI (Digital Visual Interface) 1 Connect a set of audio cables between the PC AUDIO IN jacks on the TV and the AUDIO OUT jacks on the Set Top Box. 2 Connect video cables between the DVI IN jack on the TV and the DVI OUT jack on the Set Top Box. 26 TV Rear Panel...
... MONITOR OUT Pr VIDEO 2 L L ANT-B S-VIDEO 1 S-VIDEO 2 VIDEO 1 R R V L R DVI PC RS-232C DVI DTV Set Top Box 27 Note: For an explanation of Component video, see your Set Top Box owner's manual. Connecting to DVI (Digital Visual Interface) 1 Connect a set of audio cables between the PC AUDIO IN jacks on the TV and the AUDIO OUT jacks on the Set Top Box. 2 Connect video cables between the DVI IN jack on the TV and the DVI OUT jack on the Set Top Box. 26 TV Rear Panel...
User Manual (ENGLISH)
Page 16
... Display button on the remote control. Access the on-screen menu system by choosing the antenna input(ANT A or ANT B). 1 Press the Menu button. The channel setup menu will display the channel, current time, and the audio signal you can press the Menu button on -screen menus: English, Spanish or French. 1 Press the Menu button. Move the joystick down ) or CH( , )buttons to move between menu items, select menu items, and make some adjustments using the TV's side panel buttons. The first line...
... Display button on the remote control. Access the on-screen menu system by choosing the antenna input(ANT A or ANT B). 1 Press the Menu button. The channel setup menu will display the channel, current time, and the audio signal you can press the Menu button on -screen menus: English, Spanish or French. 1 Press the Menu button. Move the joystick down ) or CH( , )buttons to move between menu items, select menu items, and make some adjustments using the TV's side panel buttons. The first line...
User Manual (ENGLISH)
Page 19
...SETUP, then press the joystick to begin labeling. (Each label has four fields. Operation Labeling the Channels Use this sequence: A,B,...Z, blank,0,1,...9). 5 Move the joystick to the right to switch to enter. When the DISPLAY button is pressed, the channel label will be labeled. Setting The On/Off Melody You can hear clear melody sound when the TV is a letter, a number...to the channel number. 1 Press the CH or CH button to tune to any channel (i.e., "CBS", "ESPN", "PBS2", CNN1", etc.) A label consists of four fields, where each field is powered On or Off. 1 Press the Menu button. Move ...
...SETUP, then press the joystick to begin labeling. (Each label has four fields. Operation Labeling the Channels Use this sequence: A,B,...Z, blank,0,1,...9). 5 Move the joystick to the right to switch to enter. When the DISPLAY button is pressed, the channel label will be labeled. Setting The On/Off Melody You can hear clear melody sound when the TV is a letter, a number...to the channel number. 1 Press the CH or CH button to tune to any channel (i.e., "CBS", "ESPN", "PBS2", CNN1", etc.) A label consists of four fields, where each field is powered On or Off. 1 Press the Menu button. Move ...

User Manual (ENGLISH)
Page 22
... Time, then press the joystick to enter. 3 Move the joystick right to select the minute. Move the joystick up or down to turn on or off . 1 Press the Menu button. Operation Setting the Clock This TV has a built-in clock that you choose. Setting this clock also allows you press the Display button on the remote control. Before using the timers, you must set to adjust...
... Time, then press the joystick to enter. 3 Move the joystick right to select the minute. Move the joystick up or down to turn on or off . 1 Press the Menu button. Operation Setting the Clock This TV has a built-in clock that you choose. Setting this clock also allows you press the Display button on the remote control. Before using the timers, you must set to adjust...

User Manual (ENGLISH)
Page 23
... the cover of TV.). 6 When you can set the volume level or channel when the TV turns on . Press the Sleep button to select the time interval for access to the tape function controls. The interval ranges from 10 to 360 minutes. 44 Viewing an External Signal Source Selecting the Signal Source Use the remote control to switch between the following on-screen menu will illuminate (front or side panel of your remote control...
... the cover of TV.). 6 When you can set the volume level or channel when the TV turns on . Press the Sleep button to select the time interval for access to the tape function controls. The interval ranges from 10 to 360 minutes. 44 Viewing an External Signal Source Selecting the Signal Source Use the remote control to switch between the following on-screen menu will illuminate (front or side panel of your remote control...

User Manual (ENGLISH)
Page 25
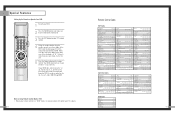
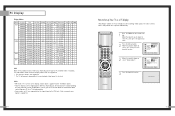
... Using Remote Control Modes: Cable Box • When your remote control is a "0." Special Features Setting Up Your Remote Control This TV's remote control can operate in "VCR" mode, the volume buttons still control your TV's volume. 48 Setting Up the Remote to Operate Your Cable Box 1 Turn off your VCR. 2 Press the MODE button and make sure that the VCR LED is illuminated. 3 Press the Set button on your TV's remote control. 4 Using the number buttons on your remote control, enter three digits of the VCR code listed on page 51 of this manual...
... Using Remote Control Modes: Cable Box • When your remote control is a "0." Special Features Setting Up Your Remote Control This TV's remote control can operate in "VCR" mode, the volume buttons still control your TV's volume. 48 Setting Up the Remote to Operate Your Cable Box 1 Turn off your VCR. 2 Press the MODE button and make sure that the VCR LED is illuminated. 3 Press the Set button on your TV's remote control. 4 Using the number buttons on your remote control, enter three digits of the VCR code listed on page 51 of this manual...
User Manual (ENGLISH)
Page 26
... the Power button on the remote control. Special Features Setting Up the Remote to Operate Your DVD 1 Turn off your DVD. 2 Press the MODE button and make sure that the DVD LED is illuminated. 3 Press the SET button on your TV's remote control. 4 Using the number buttons on your remote control, enter three digits of the DVD code listed on page 51 of this manual for your brand of DVD. If no other codes listed for your TV's volume. DVD Codes 50 51 Remote Control Codes VCR Codes Cable Box Codes Note on Using Remote Control Modes: DVD...
... the Power button on the remote control. Special Features Setting Up the Remote to Operate Your DVD 1 Turn off your DVD. 2 Press the MODE button and make sure that the DVD LED is illuminated. 3 Press the SET button on your TV's remote control. 4 Using the number buttons on your remote control, enter three digits of the DVD code listed on page 51 of this manual for your brand of DVD. If no other codes listed for your TV's volume. DVD Codes 50 51 Remote Control Codes VCR Codes Cable Box Codes Note on Using Remote Control Modes: DVD...
User Manual (ENGLISH)
Page 32
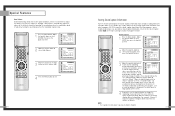
... the desired channel by lowering the sound output when the modulation signal is high or by raising the sound output when the modulation signal is low. 1 Press the Menu button. Move the joystick right or left to exit. 62 Viewing Closed Caption Information Your TV decodes and displays the closed caption transmissions, especially those of the picture. ln caption mode, captions appear at the bottom of the screen, and they usually cover only...
... the desired channel by lowering the sound output when the modulation signal is high or by raising the sound output when the modulation signal is low. 1 Press the Menu button. Move the joystick right or left to exit. 62 Viewing Closed Caption Information Your TV decodes and displays the closed caption transmissions, especially those of the picture. ln caption mode, captions appear at the bottom of the screen, and they usually cover only...
User Manual (ENGLISH)
Page 36
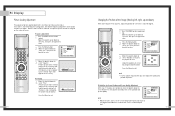
... and enter them. Choose any of the PIP image Press the Locate button repeatedly to move the PIP image from corner to hear sound from the Main or PIP screen. 1 Press the Menu button. The user must first enter a PIN (personal ID number) before any 4-digits for the main TV picture audio, and Sub is "0-0-0-0." 3 After entering a valid PIN number, the "V-chip" screen will appear. Move the joystick down to...
... and enter them. Choose any of the PIP image Press the Locate button repeatedly to move the PIP image from corner to hear sound from the Main or PIP screen. 1 Press the Menu button. The user must first enter a PIN (personal ID number) before any 4-digits for the main TV picture audio, and Sub is "0-0-0-0." 3 After entering a valid PIN number, the "V-chip" screen will appear. Move the joystick down to...
User Manual (ENGLISH)
Page 41
... are supported for information about connecting your particular version of the display modes that are adjusted automatically. 1 Press TV/VIDEO on your PC to a TV display-monitor. • Same modes as a PC display "Auto Adjust" allows the TV to self-adjust to enter. 2 Press the Menu button. The table above shows all of Windows). Freq Polarity Ver. Only a separate sync signal is selected. Check your PC instruction book for the signal input to...
... are supported for information about connecting your particular version of the display modes that are adjusted automatically. 1 Press TV/VIDEO on your PC to a TV display-monitor. • Same modes as a PC display "Auto Adjust" allows the TV to self-adjust to enter. 2 Press the Menu button. The table above shows all of Windows). Freq Polarity Ver. Only a separate sync signal is selected. Check your PC instruction book for the signal input to...
User Manual (ENGLISH)
Page 42
... DVI, you can't adjust the quality and position of picture. Remove picture noise (vertical stripes) on the screen by fine tuning alone, then do the frequency adjustments to enter. 2 Press the Menu button. Adjust the position of screen by moving the joystick right or left , right, up or down ) After connecting the TV to your PC, adjust the position of screen if it is aligned on the remote control...
... DVI, you can't adjust the quality and position of picture. Remove picture noise (vertical stripes) on the screen by fine tuning alone, then do the frequency adjustments to enter. 2 Press the Menu button. Adjust the position of screen by moving the joystick right or left , right, up or down ) After connecting the TV to your PC, adjust the position of screen if it is aligned on the remote control...
User Manual (ENGLISH)
Page 45
... an optical system. Check the antenna connections. Appendix Troubleshooting Before you many tiny pixels. Erratic operation, or intermittent failure. Make sure the remote has batteries. Make sure the wall outlet is off or the screen center might cause a problem because dirt, or some other contaminant may not work properly with a clean, dry cloth. No color or wrong colors. Check all wire connections. Adjust the picture settings. Using the TV in...
... an optical system. Check the antenna connections. Appendix Troubleshooting Before you many tiny pixels. Erratic operation, or intermittent failure. Make sure the remote has batteries. Make sure the wall outlet is off or the screen center might cause a problem because dirt, or some other contaminant may not work properly with a clean, dry cloth. No color or wrong colors. Check all wire connections. Adjust the picture settings. Using the TV in...


