User Manual (ENGLISH)
Page 32
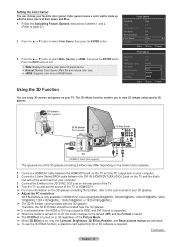
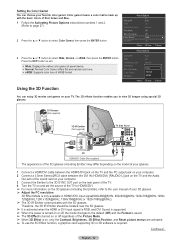
... Normal, or sRGB, then press the ENTER button. Color gamut means a color matrix made up with the 3D glasses. The 3D effects function enables you to view 3D images using special 3D glasses. 3D Glasses (Not supplied) 3D IR Emitter (Not supplied) TV Side Panel PC HDMI/DVI Cable (Not supplied) ※ The appearance of...panel of the TV. 4 Turn the TV on and set the source of the TV to HDMI3/DVI. ➢ For more information on the 3D glasses (including the Emitter), refer to the user manual of Red, Green and Blue. 1 Follow the Activating Picture Options instructions numbers 1 and 2. (Refer...
... Normal, or sRGB, then press the ENTER button. Color gamut means a color matrix made up with the 3D glasses. The 3D effects function enables you to view 3D images using special 3D glasses. 3D Glasses (Not supplied) 3D IR Emitter (Not supplied) TV Side Panel PC HDMI/DVI Cable (Not supplied) ※ The appearance of...panel of the TV. 4 Turn the TV on and set the source of the TV to HDMI3/DVI. ➢ For more information on the 3D glasses (including the Emitter), refer to the user manual of Red, Green and Blue. 1 Follow the Activating Picture Options instructions numbers 1 and 2. (Refer...

User Manual (ENGLISH)
Page 33
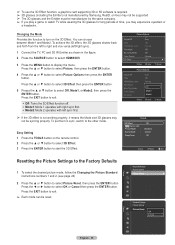
... the same company. ➢ If you play a game or watch TV while wearing the 3D glasses for long periods of time, you may not be supported. ➢ The 3D glasses and the Emitter must be reset. Picture Picture Detailed Settings Picture Options Picture Reset ► ...1 operates with right sync first. Mode2: Mode 2 operates with left sync first. ➢ If the 3D effect is required. ➢ 3D glasses (including the Emitter) not manufactured by Samsung, RealD, or ilixco may experience eyestrain or a headache. Press the EXIT button to the other mode. Press the &#...
... the same company. ➢ If you play a game or watch TV while wearing the 3D glasses for long periods of time, you may not be supported. ➢ The 3D glasses and the Emitter must be reset. Picture Picture Detailed Settings Picture Options Picture Reset ► ...1 operates with right sync first. Mode2: Mode 2 operates with left sync first. ➢ If the 3D effect is required. ➢ 3D glasses (including the Emitter) not manufactured by Samsung, RealD, or ilixco may experience eyestrain or a headache. Press the EXIT button to the other mode. Press the &#...
User Manual (ENGLISH)
Page 32
...and set the source of the TV to HDMI3/DVI. ➢ For more information on the 3D glasses (including the Emitter), refer to the user manual of your 3D glasses. ➢ Adjust the PC resolution: 3D Effect Mode is only available in HDMI3/DVI input signal(640x480@60Hz, 800x600@60Hz,1024x768@60Hz,... English - 32 Press the EXIT button to the default (Off) and the Format is saved. ➢ The 3D Effect is required. Continued... Therefore, the 3D IR Emitter should be located near the 3D glasses. ➢ It is activated when the HDMI or DVI input signal is RGB, and DVI Sound is supported....
...and set the source of the TV to HDMI3/DVI. ➢ For more information on the 3D glasses (including the Emitter), refer to the user manual of your 3D glasses. ➢ Adjust the PC resolution: 3D Effect Mode is only available in HDMI3/DVI input signal(640x480@60Hz, 800x600@60Hz,1024x768@60Hz,... English - 32 Press the EXIT button to the default (Off) and the Format is saved. ➢ The 3D Effect is required. Continued... Therefore, the 3D IR Emitter should be located near the 3D glasses. ➢ It is activated when the HDMI or DVI input signal is RGB, and DVI Sound is supported....
User Manual (ENGLISH)
Page 33
.... Press the EXIT button to right and vice versa (left sync first. ➢ If the 3D effect is required. ➢ 3D glasses (including the Emitter) not manufactured by Samsung, RealD, or ilixco may not be supported. ➢ The 3D glasses and the Emitter must be reset. Press the ◄ or ► button to select Picture Options...
.... Press the EXIT button to right and vice versa (left sync first. ➢ If the 3D effect is required. ➢ 3D glasses (including the Emitter) not manufactured by Samsung, RealD, or ilixco may not be supported. ➢ The 3D glasses and the Emitter must be reset. Press the ◄ or ► button to select Picture Options...


