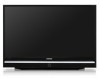

Owner Instructions
Page 2
...conforming to ISO/IEC 11172-3 or ISO/IEC 13818-3 used or sold in widescreen, and offer much higher picture quality than this product unit. Both HDTV formats are always broadcast in combination with DD 5.1 soundtracks. U.S.A Only... reserved. No rights are granted for commercial use of certain third parties. Digital Television Services ● Digital Picture Quality DTV programs are comparable to your home audio system. The first is Standard Definition Television (SDTV) and...2.0 to the ISO/IEC 11172-3 or ISO/IEC 13818-3. © 2007 Samsung Electronics Co., Ltd.
...conforming to ISO/IEC 11172-3 or ISO/IEC 13818-3 used or sold in widescreen, and offer much higher picture quality than this product unit. Both HDTV formats are always broadcast in combination with DD 5.1 soundtracks. U.S.A Only... reserved. No rights are granted for commercial use of certain third parties. Digital Television Services ● Digital Picture Quality DTV programs are comparable to your home audio system. The first is Standard Definition Television (SDTV) and...2.0 to the ISO/IEC 11172-3 or ISO/IEC 13818-3. © 2007 Samsung Electronics Co., Ltd.
Owner Instructions
Page 4
...engine 32 ■ Setting the Active Color 33 ■ Setting the Color Gamut 33 ■ Adjusting the Screen Position 34 ■ Freezing the Picture 34 Sound Control ■ Using Automatic Sound Settings 34 ■ Customizing the Sound 35 ■ Setting up the TV with your PC 62 ■...; Changing the Picture Size (PC Mode 64 ■ Setting the Home Theater PC 64 Appendix ■ Identifying Problems 65 ■ Replacing the Lamp 66 ■ Cleaning...
...engine 32 ■ Setting the Active Color 33 ■ Setting the Color Gamut 33 ■ Adjusting the Screen Position 34 ■ Freezing the Picture 34 Sound Control ■ Using Automatic Sound Settings 34 ■ Customizing the Sound 35 ■ Setting up the TV with your PC 62 ■...; Changing the Picture Size (PC Mode 64 ■ Setting the Home Theater PC 64 Appendix ■ Identifying Problems 65 ■ Replacing the Lamp 66 ■ Cleaning...
Owner Instructions
Page 6
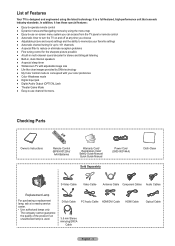
It is designed and engineered using the menu map ● Easy-to-use on-screen menu system you choose ● Adjustable picture and sound settings and the ability to memorize your favorite settings ● Automatic channel tuning for up to 181 channels ● A... special filter to reduce or eliminate reception problems ● Fine tuning control for the sharpest picture possible ● A built-in multi-channel sound decoder for stereo and bilingual listening ● Built-in, dual channel speakers ● A special sleep timer...
It is designed and engineered using the menu map ● Easy-to-use on-screen menu system you choose ● Adjustable picture and sound settings and the ability to memorize your favorite settings ● Automatic channel tuning for up to 181 channels ● A... special filter to reduce or eliminate reception problems ● Fine tuning control for the sharpest picture possible ● A built-in multi-channel sound decoder for stereo and bilingual listening ● Built-in, dual channel speakers ● A special sleep timer...

Owner Instructions
Page 8
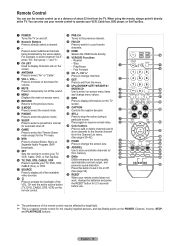
Indication The picture will automatically be defective. Lamp may be turned on in stand-by mode. 4 SOURCE Toggles between all the available input sources (TV, AV1, AV2, AV3, S-...
Indication The picture will automatically be defective. Lamp may be turned on in stand-by mode. 4 SOURCE Toggles between all the available input sources (TV, AV1, AV2, AV3, S-...
Owner Instructions
Page 10
..., always point it On or Off. (See page 36) m RESET When your remote control does not work, change menu values. P.MODE Press to select the picture mode. @ SLEEP Press to select a preset time interval for automatic shut off. # GAME Press to select the Theater Game mode except for 2-3 seconds before use...
..., always point it On or Off. (See page 36) m RESET When your remote control does not work, change menu values. P.MODE Press to select the picture mode. @ SLEEP Press to select a preset time interval for automatic shut off. # GAME Press to select the Theater Game mode except for 2-3 seconds before use...

Owner Instructions
Page 13
... or antenna from the rear of the TV 2 Connect the cable or antenna to a game player. S-Video Connection Your Samsung TV can be displayed with a cut off picture when the TV is connected to the ANT IN terminal on the rear of the VCR. 3 Connect an Antenna Cable between...connector (not supplied) to hook up to the right and left 2 3 Antenna cable(Not supplied) audio input jacks of a VCR. (This connection delivers a better picture when compared to the regular video connection above.) 1 To begin, follow steps 1-3 in the previous section to connect the antenna or cable to the cable...
... or antenna from the rear of the TV 2 Connect the cable or antenna to a game player. S-Video Connection Your Samsung TV can be displayed with a cut off picture when the TV is connected to the ANT IN terminal on the rear of the VCR. 3 Connect an Antenna Cable between...connector (not supplied) to hook up to the right and left 2 3 Antenna cable(Not supplied) audio input jacks of a VCR. (This connection delivers a better picture when compared to the regular video connection above.) 1 To begin, follow steps 1-3 in the previous section to connect the antenna or cable to the cable...

Owner Instructions
Page 18
... to Shop mode and you can set to Dynamic (Home) mode, press the Volume button and then hold down the MENU button for the best picture in your watching. Enter Skip Plug & Play Select the antennas to select a language, then press the ENTER button. is automatically displayed. Plug & Play Menu language...
... to Shop mode and you can set to Dynamic (Home) mode, press the Volume button and then hold down the MENU button for the best picture in your watching. Enter Skip Plug & Play Select the antennas to select a language, then press the ENTER button. is automatically displayed. Plug & Play Menu language...
Owner Instructions
Page 20
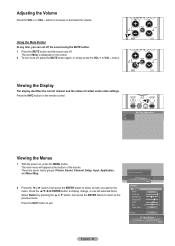
... the MUTE button and the sound cuts off , press the MUTE button again, or simply press the VOL + or VOL - There are seven menu groups: Picture, Sound, Channel, Setup, Input, Application, and Menu Map. 2 Press the ◄ or ► button, then press the ENTER button to the previous ... the screen. Press the INFO button on the remote control. Press the EXIT button to increase or decrease the volume. Sets the picture options. Picture Enter Picture Return Mode Dynamic Contrast 100 Brightness 45 Sharpness 75 Color 55 Tint G50 R50 Color Tone Cool1 Detailed Settings Size 16...
... the MUTE button and the sound cuts off , press the MUTE button again, or simply press the VOL + or VOL - There are seven menu groups: Picture, Sound, Channel, Setup, Input, Application, and Menu Map. 2 Press the ◄ or ► button, then press the ENTER button to the previous ... the screen. Press the INFO button on the remote control. Press the EXIT button to increase or decrease the volume. Sets the picture options. Picture Enter Picture Return Mode Dynamic Contrast 100 Brightness 45 Sharpness 75 Color 55 Tint G50 R50 Color Tone Cool1 Detailed Settings Size 16...

Owner Instructions
Page 21
... Cable, then press the ENTER button. Press the ◄ or ► button to the selected menu. There are memorized, use the selected items. Menu Map Picture Sound Channel Setup 1/2 Mode І Contrast І Brightness І Shapness І Color І Tint Color Tone І Detailed Settings І Size І Digital NR І...
... Cable, then press the ENTER button. Press the ◄ or ► button to the selected menu. There are memorized, use the selected items. Menu Map Picture Sound Channel Setup 1/2 Mode І Contrast І Brightness І Shapness І Color І Tint Color Tone І Detailed Settings І Size І Digital NR І...

Owner Instructions
Page 28
...select Mode, then press the ENTER button. Press the ENTER button to increase the clarity and sharpness of a particular item. Picture Return Mode Dynamic Contrast 100 Brightness 45 Sharpness 75 Color 55 Tint G50 R50 Color Tone Cool1 Detailed Settings Size 16:9 ...75 Color 55 Tint G50 R50 Color Tone Cool1 Detailed Settings Size 16:9 Picture Enter Picture ▲ Contrast ▼ Adjust Enter 100 Return English - 28 Continued... Picture Enter Picture Return Mode Contrast Brightness Sharpness DyDnaynmaicmic Standard 100 Movie 45 75 Color 55 Tint...
...select Mode, then press the ENTER button. Press the ENTER button to increase the clarity and sharpness of a particular item. Picture Return Mode Dynamic Contrast 100 Brightness 45 Sharpness 75 Color 55 Tint G50 R50 Color Tone Cool1 Detailed Settings Size 16:9 ...75 Color 55 Tint G50 R50 Color Tone Cool1 Detailed Settings Size 16:9 Picture Enter Picture ▲ Contrast ▼ Adjust Enter 100 Return English - 28 Continued... Picture Enter Picture Return Mode Contrast Brightness Sharpness DyDnaynmaicmic Standard 100 Movie 45 75 Color 55 Tint...

Owner Instructions
Page 29
... G50 R50 Color Tone Cool1 Detailed Settings Size 16:9 Digital NR Auto DNIe On Active Color On Color Gamut Normal Position OK Reset CancelOK Picture Enter English - 29 5 Press the ▲ or ▼ button to select Color Tone, then press the ENTER button. 6 Press the ▲ or ▼ ...button to select Cool2, Cool1, Normal, Warm1, or Warm2, then press the ENTER button. ➢ When the picture mode is set to select OK or Cancel then press the ENTER button. Press the ▲ or ▼ button to Dynamic or Standard, Warm1 and...
... G50 R50 Color Tone Cool1 Detailed Settings Size 16:9 Digital NR Auto DNIe On Active Color On Color Gamut Normal Position OK Reset CancelOK Picture Enter English - 29 5 Press the ▲ or ▼ button to select Color Tone, then press the ENTER button. 6 Press the ▲ or ▼ ...button to select Cool2, Cool1, Normal, Warm1, or Warm2, then press the ENTER button. ➢ When the picture mode is set to select OK or Cancel then press the ENTER button. Press the ▲ or ▼ button to Dynamic or Standard, Warm1 and...

Owner Instructions
Page 30
... ► button until you are satisfied with your personal preferences. English - 30 Making Detailed Picture Settings You can emphasize object boundaries. Press the EXIT button to exit. ➢ When the picture mode is set to Standard or Movie, Detailed Settings can be adjusted to suit your setting,...Medium/High You can directly select the black level on the screen to Off and the picture mode is provided. ● Gamma: -3 ~ +3 You can be selected. ➢ If DNIe is set detailed picture settings. 1 Press the MENU button. Red/Blue/Green/Yellow/Pink: Changing the adjustment ...
... ► button until you are satisfied with your personal preferences. English - 30 Making Detailed Picture Settings You can emphasize object boundaries. Press the EXIT button to exit. ➢ When the picture mode is set to Standard or Movie, Detailed Settings can be adjusted to suit your setting,...Medium/High You can directly select the black level on the screen to Off and the picture mode is provided. ● Gamma: -3 ~ +3 You can be selected. ➢ If DNIe is set detailed picture settings. 1 Press the MENU button. Red/Blue/Green/Yellow/Pink: Changing the adjustment ...

Owner Instructions
Page 31
...setting will be stored separately according to its input mode. ● When watching an HD(High Definition 720p, 1080i, 1080p) signal, you can select the picture size which best corresponds to your viewing requirements. 1 Press the MENU button. For example, you can be selected. ● In Analog TV, AV, ... select Size, then press the ENTER button. 2 Press the ▲ or ▼ button to 16:9 wide mode. Changing the Screen Size You can reset the picture in the Component (1080i, 1080p), HDMI (1080i, 1080p), or DTV (1080i) mode. ● In DTV (720p), Component (720p) or HDMI (720p) mode...
...setting will be stored separately according to its input mode. ● When watching an HD(High Definition 720p, 1080i, 1080p) signal, you can select the picture size which best corresponds to your viewing requirements. 1 Press the MENU button. For example, you can be selected. ● In Analog TV, AV, ... select Size, then press the ENTER button. 2 Press the ▲ or ▼ button to 16:9 wide mode. Changing the Screen Size You can reset the picture in the Component (1080i, 1080p), HDMI (1080i, 1080p), or DTV (1080i) mode. ● In DTV (720p), Component (720p) or HDMI (720p) mode...
Owner Instructions
Page 32
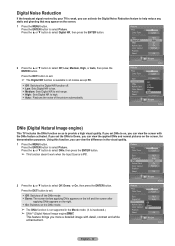
... NR to mid range. High : Sets Digital NR to high. Auto : Reduces the noise of the picture automatically. Picture Enter Picture Tint G50 R50 Color Tone Cool1 Detailed Settings Size 16:9 Digital NR Auto DNIe Active Color Color Gamut Position Off On Demo Off... is not supported in the visual quality. 1 Press the MENU button. Press the ▲ or ▼ button to select Picture. Picture Enter Picture Tint G50 R50 Color Tone Cool1 Detailed Settings Size 16:9 Digital NR DNIe Active Color Color Gamut Position Reset Off Low LowCooOl1n MediOumKOff...
... NR to mid range. High : Sets Digital NR to high. Auto : Reduces the noise of the picture automatically. Picture Enter Picture Tint G50 R50 Color Tone Cool1 Detailed Settings Size 16:9 Digital NR Auto DNIe Active Color Color Gamut Position Off On Demo Off... is not supported in the visual quality. 1 Press the MENU button. Press the ▲ or ▼ button to select Picture. Picture Enter Picture Tint G50 R50 Color Tone Cool1 Detailed Settings Size 16:9 Digital NR DNIe Active Color Color Gamut Position Reset Off Low LowCooOl1n MediOumKOff...

Owner Instructions
Page 33
... the ENTER button. Press the ▲ or ▼ button to select Off or On, then press the ENTER button. Picture Enter Picture Tint G50 R50 Color Tone Cool1 Detailed Settings Size 16:9 Digital NR Auto DNIe On Active Color On Color Gamut Position Reset NormNalormal... sRGB OK Picture Enter English - 33 Picture Enter Picture Tint G50 R50 Color Tone Cool1 Detailed Settings Size 16:9 Digital NR Auto DNIe On Active Color Color Gamut ...
... the ENTER button. Press the ▲ or ▼ button to select Off or On, then press the ENTER button. Picture Enter Picture Tint G50 R50 Color Tone Cool1 Detailed Settings Size 16:9 Digital NR Auto DNIe On Active Color On Color Gamut Position Reset NormNalormal... sRGB OK Picture Enter English - 33 Picture Enter Picture Tint G50 R50 Color Tone Cool1 Detailed Settings Size 16:9 Digital NR Auto DNIe On Active Color Color Gamut ...

Owner Instructions
Page 34
...Off Preferred Language English Multi-Track Sound Stereo Auto Volume Off Internal Mute Off 2 Press the ▲ or ▼ button to select Picture. Picture Tint G50 Color Tone Detailed Settings Size Digital NR DNIe Active Color Color Gamut Position Reset R50 Cool1 16:9 Auto On On Normal ►.... Press the ▲ or ▼ button to select Position, then press the ENTER button. 2 Press the button to freeze a moving picture. (Normal sound will still be heard.) To cancel this function, press the STILL button again or press any button on the remote control to...
...Off Preferred Language English Multi-Track Sound Stereo Auto Volume Off Internal Mute Off 2 Press the ▲ or ▼ button to select Picture. Picture Tint G50 Color Tone Detailed Settings Size Digital NR DNIe Active Color Color Gamut Position Reset R50 Cool1 16:9 Auto On On Normal ►.... Press the ▲ or ▼ button to select Position, then press the ENTER button. 2 Press the button to freeze a moving picture. (Normal sound will still be heard.) To cancel this function, press the STILL button again or press any button on the remote control to...

Owner Instructions
Page 43
.... Digital Unlike analog channels, which can vary in a weak-signal area, sometimes the LNA function can , however, adjust your antenna to exit. ➢ If the picture is noisy with the strongest signal. You can improve the reception (a low-noise preamplifier boosts the incoming signal). 1 Press the MENU button. Checking the Digital...
.... Digital Unlike analog channels, which can vary in a weak-signal area, sometimes the LNA function can , however, adjust your antenna to exit. ➢ If the picture is noisy with the strongest signal. You can improve the reception (a low-noise preamplifier boosts the incoming signal). 1 Press the MENU button. Checking the Digital...
Owner Instructions
Page 46
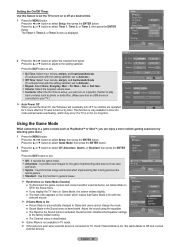
... : 00 am 12 : 00 am /pm, and Inactivate/Activate. (To activate timer with the selected source. ➢ If Game Mode is On ● Picture Mode is automatically changed to Game and users cannot change the mode. Setup Return Plug & Play Language Clock Sleep Timer Timer 1 Timer 2 Timer 3 Game Mode...provides clear images for the game implementing dark area such as cave and room. Sports : It synchronizes image and sound when implementing fast moving pictures like sports games. Standard : Use this feature to set the TV to turn on a specific channel or play back contents such as ...
... : 00 am 12 : 00 am /pm, and Inactivate/Activate. (To activate timer with the selected source. ➢ If Game Mode is On ● Picture Mode is automatically changed to Game and users cannot change the mode. Setup Return Plug & Play Language Clock Sleep Timer Timer 1 Timer 2 Timer 3 Game Mode...provides clear images for the game implementing dark area such as cave and room. Sports : It synchronizes image and sound when implementing fast moving pictures like sports games. Standard : Use this feature to set the TV to turn on a specific channel or play back contents such as ...

Owner Instructions
Page 50
... Enter 6 How to unlock all TV ratings. ➢ Allow All: Press to set up Restrictions Using "MPAA Ratings" The MPAA rating system uses the Motion Picture Association of America (MPAA) system, and its main application is selected, press the ► button to go to block or unblock the category. For example...
... Enter 6 How to unlock all TV ratings. ➢ Allow All: Press to set up Restrictions Using "MPAA Ratings" The MPAA rating system uses the Motion Picture Association of America (MPAA) system, and its main application is selected, press the ► button to go to block or unblock the category. For example...
Owner Instructions
Page 55
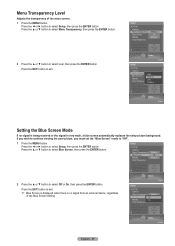
... displayed when there is no signal is being received or the signal is very weak, a blue screen automatically replaces the noisy picture background. If you wish to continue viewing the poor picture, you must set the "Blue Screen" mode to select Off or On, then press the ENTER button. Setup V-Chip Caption...
... displayed when there is no signal is being received or the signal is very weak, a blue screen automatically replaces the noisy picture background. If you wish to continue viewing the poor picture, you must set the "Blue Screen" mode to select Off or On, then press the ENTER button. Setup V-Chip Caption...

