

Owner Instructions
Page 6
... and shape may vary depending on -screen menu. Checking Parts Owner's Instructions Remote Control (BP59-00126A)/ AAA Batteries Warranty Card/ Registration Card/ Safety Guide Manual/ Quick Guide Manual Sold Separately Power Cord (3903-000144) Cloth-Clean S-Video Cable Video Cable Antenna Cable Component Cables Audio Cables PC Cable PC Audio Cable HDMI...
... and shape may vary depending on -screen menu. Checking Parts Owner's Instructions Remote Control (BP59-00126A)/ AAA Batteries Warranty Card/ Registration Card/ Safety Guide Manual/ Quick Guide Manual Sold Separately Power Cord (3903-000144) Cloth-Clean S-Video Cable Video Cable Antenna Cable Component Cables Audio Cables PC Cable PC Audio Cable HDMI...

Owner Instructions
Page 18
...then go to step 9. 7 Press the ◄ or ► button to move the highlight to highlight the time zone for setting the current time manually, then press the ENTER button. Press the ENTER button. Newfoundland Atlantic Eastern Central Mountain Pacific Move Enter Skip Plug & Play Enjoy your watching.... & Play Set the Clock Mode. Move Minute - - If clock is not pressed, the message will automatically disappear after several seconds. Clock Mode : AAuuttoo Manual Move Enter Skip Plug & Play Set current date and time Month Day - - - - is displayed.
...then go to step 9. 7 Press the ◄ or ► button to move the highlight to highlight the time zone for setting the current time manually, then press the ENTER button. Press the ENTER button. Newfoundland Atlantic Eastern Central Mountain Pacific Move Enter Skip Plug & Play Enjoy your watching.... & Play Set the Clock Mode. Move Minute - - If clock is not pressed, the message will automatically disappear after several seconds. Clock Mode : AAuuttoo Manual Move Enter Skip Plug & Play Set current date and time Month Day - - - - is displayed.

Owner Instructions
Page 21
... available channels, you have Digital cable, select the signal source for memorizing channels: selecting a broadcast source, memorizing the channels(automatic) and adding or deleting channels(manual). Cable: "Cable" antenna signal. If you must be connected to stop the auto channel selection? Select Yes by entering the channel digits. Yes No Move...
... available channels, you have Digital cable, select the signal source for memorizing channels: selecting a broadcast source, memorizing the channels(automatic) and adding or deleting channels(manual). Cable: "Cable" antenna signal. If you must be connected to stop the auto channel selection? Select Yes by entering the channel digits. Yes No Move...

Owner Instructions
Page 22
... for your remote is in five different modes: TV, VCR, Cable, DVD, or Set-Top Box. Your VCR should turn on page 25 of this manual for your VCR does not turn on Using Remote Control Modes: VCR When your remote control is set up correctly. If no other codes are... turn on the remote control. Note on if your TV's volume. If your brand of VCR. Pressing the corresponding button on page 24 of this manual for your TV's volume. English - 22 Continued... Make sure you choose. ➢ The remote control might not be compatible with all DVD Players, VCRs, Cable...
... for your remote is in five different modes: TV, VCR, Cable, DVD, or Set-Top Box. Your VCR should turn on page 25 of this manual for your VCR does not turn on Using Remote Control Modes: VCR When your remote control is set up correctly. If no other codes are... turn on the remote control. Note on if your TV's volume. If your brand of VCR. Pressing the corresponding button on page 24 of this manual for your TV's volume. English - 22 Continued... Make sure you choose. ➢ The remote control might not be compatible with all DVD Players, VCRs, Cable...

Owner Instructions
Page 23
... your TV's remote control. 4 Using the number buttons on your remote control, enter three digits of the DVD code listed on page 26 of this manual for your brand of DVD. Your STB should turn on if your remote is set up correctly. English - 23 Continued... Your DVD should turn on... page 25 of this manual for your remote is set up correctly. Setting Up the Remote to Operate Your DVD 1 Turn off your STB. 2 Press the STB button on your...
... your TV's remote control. 4 Using the number buttons on your remote control, enter three digits of the DVD code listed on page 26 of this manual for your brand of DVD. Your STB should turn on if your remote is set up correctly. English - 23 Continued... Your DVD should turn on... page 25 of this manual for your remote is set up correctly. Setting Up the Remote to Operate Your DVD 1 Turn off your STB. 2 Press the STB button on your...

Owner Instructions
Page 46
Press the ▲ or ▼ button to manually adjust a particular channel for optimal reception. 1 Press the MENU button. Analog Use fine tuning to select Channel, then press the ENTER button. English - 46 Air 6 ...
Press the ▲ or ▼ button to manually adjust a particular channel for optimal reception. 1 Press the MENU button. Analog Use fine tuning to select Channel, then press the ENTER button. English - 46 Air 6 ...
Owner Instructions
Page 48
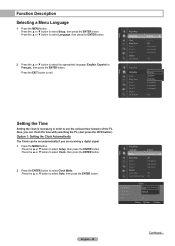
... Timer 1 : Inactivated Timer 2 : Inactivated Timer 3 : Inactivated Caption Game Mode : Off DLP® 3D/Dual-View : Off Clock Mode Clock Set Time zone DST Clock : AAuutoto Manual : Off Move Enter Return English - 48 Continued... Function Description Selecting a Menu Language 1 Press the MENU button. Press the EXIT button to exit.
... Timer 1 : Inactivated Timer 2 : Inactivated Timer 3 : Inactivated Caption Game Mode : Off DLP® 3D/Dual-View : Off Clock Mode Clock Set Time zone DST Clock : AAuutoto Manual : Off Move Enter Return English - 48 Continued... Function Description Selecting a Menu Language 1 Press the MENU button. Press the EXIT button to exit.

Owner Instructions
Page 49
...ENTER button. Press the ▲ or ▼ button to highlight the time zone for your local area (and to move to set the time manually. Time zone Off ➢ Depending on the map of the United States), then press the ENTER button. Press the EXIT button to the appropriate ...connected in order to Month, Day, Year, Hour, Minute, or am Adjust Enter Return English - 49 Continued... Press the ▲ or ▼ button to select Manual, then press the ENTER button. 3 Press the ▲ or ▼ button to select Clock Set, then press the ENTER button. 4 Press the ◄ or ...
...ENTER button. Press the ▲ or ▼ button to highlight the time zone for your local area (and to move to set the time manually. Time zone Off ➢ Depending on the map of the United States), then press the ENTER button. Press the EXIT button to the appropriate ...connected in order to Month, Day, Year, Hour, Minute, or am Adjust Enter Return English - 49 Continued... Press the ▲ or ▼ button to select Manual, then press the ENTER button. 3 Press the ▲ or ▼ button to select Clock Set, then press the ENTER button. 4 Press the ◄ or ...

Owner Instructions
Page 68
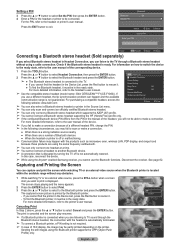
... more information on . ➢ To not use only. 1 Press the MENU button. Using Bluetooth, you have to set up for the TV to the user manual of the Bluetooth devices operating nearby. Press the ▲ or ▼ button to select Bluetooth, then press the ENTER button.
... more information on . ➢ To not use only. 1 Press the MENU button. Using Bluetooth, you have to set up for the TV to the user manual of the Bluetooth devices operating nearby. Press the ▲ or ▼ button to select Bluetooth, then press the ENTER button.
Owner Instructions
Page 69
...nearby ● When there are a number of the corresponding device. 1 Press the TOOLS button. If you cannot find the printer in the manual of a different headset PIN, change the PIN. ➢ In the following website: www.iskin.com Picture Setting Sound Setting Sleep Timer Off ...PIN for the headset or printer to be in the ready state. Sending the still images using the Anynet+ enabled Samsung receiver, you wish to the printer's user manual. For more detailed information, refer to print is connected when you are listening to TV sound through a Bluetooth stereo ...
...nearby ● When there are a number of the corresponding device. 1 Press the TOOLS button. If you cannot find the printer in the manual of a different headset PIN, change the PIN. ➢ In the following website: www.iskin.com Picture Setting Sound Setting Sleep Timer Off ...PIN for the headset or printer to be in the ready state. Sending the still images using the Anynet+ enabled Samsung receiver, you wish to the printer's user manual. For more detailed information, refer to print is connected when you are listening to TV sound through a Bluetooth stereo ...
Owner Instructions
Page 81
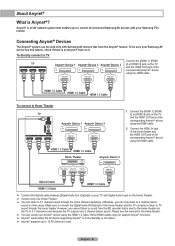
... To directly connect to TV Connect the [HDMI 1], [HDMI TV Anynet+ Device 1 Anynet+ Device 2 Anynet+ Device 3 2] or [HDMI 3] jack on your Samsung TV's remote. HDMI 1.3 Cable HDMI 1.3 Cable Home Theater Anynet+ Device 3 Optical Cable HDMI 1.3 Cable HDMI 1.3 Cable ➢ Connect the Optical cable between [... using the HDMI cable. Connecting Anynet+ Devices The Anynet+ system can listen to 5.1 channel sound through the home theater. Please see the manual for the home theater. ➢ You can only listen to 12 AV devices in 5.1 channel sound because the TV outputs only 2 channel...
... To directly connect to TV Connect the [HDMI 1], [HDMI TV Anynet+ Device 1 Anynet+ Device 2 Anynet+ Device 3 2] or [HDMI 3] jack on your Samsung TV's remote. HDMI 1.3 Cable HDMI 1.3 Cable Home Theater Anynet+ Device 3 Optical Cable HDMI 1.3 Cable HDMI 1.3 Cable ➢ Connect the Optical cable between [... using the HDMI cable. Connecting Anynet+ Devices The Anynet+ system can listen to 5.1 channel sound through the home theater. Please see the manual for the home theater. ➢ You can only listen to 12 AV devices in 5.1 channel sound because the TV outputs only 2 channel...

Owner Instructions
Page 83
.... When a DVD Recorder is properly connected to Record Immediately and press the ENTER button. Press the ▲ or ▼ button to select to its user manual. Anynet+ Menu The Anynet+ menu changes depending on the type and status of the Anynet+ devices connected to TV broadcast mode. Recording begins. But there...
.... When a DVD Recorder is properly connected to Record Immediately and press the ENTER button. Press the ▲ or ▼ button to select to its user manual. Anynet+ Menu The Anynet+ menu changes depending on the type and status of the Anynet+ devices connected to TV broadcast mode. Recording begins. But there...


