
Owner Instructions
Page 2
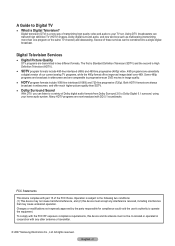
... picture quality than one program on the same TV channel) and datacasting. A Guide to your home audio system. Digital television (DTV) is a new way of Dolby digital audio formats from Dolby Surround 2.0 to operate the equipment. Using DTV, broadcasters can transmit high definition TV (HDTV) images, Dolby digital surround audio, and new services such as multicasting (transmitting more than SDTV. ● Dolby Surround Sound With DTV, you can be co-located...
... picture quality than one program on the same TV channel) and datacasting. A Guide to your home audio system. Digital television (DTV) is a new way of Dolby digital audio formats from Dolby Surround 2.0 to operate the equipment. Using DTV, broadcasters can transmit high definition TV (HDTV) images, Dolby digital surround audio, and new services such as multicasting (transmitting more than SDTV. ● Dolby Surround Sound With DTV, you can be co-located...

Owner Instructions
Page 3
... high-quality images and sound. This depends on whether your local DTV stations are running full power or not and how close your location is currently incompatible with many existing TV antennas. This is decoded at the receiver, the digital video and audio data is a big advantage for DTV broadcasts. How can I connect an antenna in some markets, both VHF and UHF channels are on VHF (channels...
... high-quality images and sound. This depends on whether your local DTV stations are running full power or not and how close your location is currently incompatible with many existing TV antennas. This is decoded at the receiver, the digital video and audio data is a big advantage for DTV broadcasts. How can I connect an antenna in some markets, both VHF and UHF channels are on VHF (channels...

Owner Instructions
Page 4
...; Connecting a DVD Player/Set-Top Box 13 ■ Connecting a DVD Player/Set-Top Box via HDMI .. 14 ■ Connecting a DVD Player/Set-Top Box via DVI ..... 14 ■ Connecting a Digital Audio System 15 ■ Connecting an Amplifier/DVD Home Theater......... 15 ■ Connecting a PC 16 Operation ■ Turning the TV On and Off 16 ■ Plug & Play Feature 17 ■ Changing Channels 19 ■ Adjusting the Volume 19 ■ Viewing the Display 20 ■ Viewing the Menus 20 ■ Using the TOOLS Button...
...; Connecting a DVD Player/Set-Top Box 13 ■ Connecting a DVD Player/Set-Top Box via HDMI .. 14 ■ Connecting a DVD Player/Set-Top Box via DVI ..... 14 ■ Connecting a Digital Audio System 15 ■ Connecting an Amplifier/DVD Home Theater......... 15 ■ Connecting a PC 16 Operation ■ Turning the TV On and Off 16 ■ Plug & Play Feature 17 ■ Changing Channels 19 ■ Adjusting the Volume 19 ■ Viewing the Display 20 ■ Viewing the Menus 20 ■ Using the TOOLS Button...
Owner Instructions
Page 5
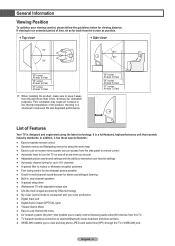
...; My Color Control mode to correspond with your viewing comfort, please follow the guidelines below for an extended period of Features Your TV is a full-featured, high-performance unit that enables you to easily control Samsung audio-video(AV) devices from this TV. ● TV supports wireless connection to selected Bluetooth stereo headsets and photo printers. ● WISELINK enables you choose ● Adjustable picture and sound settings and...
...; My Color Control mode to correspond with your viewing comfort, please follow the guidelines below for an extended period of Features Your TV is a full-featured, high-performance unit that enables you to easily control Samsung audio-video(AV) devices from this TV. ● TV supports wireless connection to selected Bluetooth stereo headsets and photo printers. ● WISELINK enables you choose ● Adjustable picture and sound settings and...

Owner Instructions
Page 7
... for the TV to warm up in stand-by mode. ➢ ● You can use controls on the remote control. ● If the remote control no longer works or you have the same function as you can use the channel selection buttons to keep the inside the set is too high, the power will automatically be defective. A cooling fan inside optic chassis from overheating. Auto Timer ON/OFF has been set and the set is blocked...
... for the TV to warm up in stand-by mode. ➢ ● You can use controls on the remote control. ● If the remote control no longer works or you have the same function as you can use the channel selection buttons to keep the inside the set is too high, the power will automatically be defective. A cooling fan inside optic chassis from overheating. Auto Timer ON/OFF has been set and the set is blocked...

Owner Instructions
Page 9
... select the picture mode. @ FAV.CH Press to switch to your favorite channels. # GAME Press to select the Game mode except for the TV mode. $ CAPTION Controls the caption decoder. % 3D Press to select the 3D/Dual-View mode. ^ SET Sets the remote to control your TV, VCR, Cable, DVD, or Set-Top Box. & TV, DVD, STB, CABLE, VCR Press to operate your VCR, Cable box, DVD player, or Set-Top Box. 1 POWER Turns the TV on and off the sound. 8 MENU Displays the main on-screen menu. 9 RETURN...
... select the picture mode. @ FAV.CH Press to switch to your favorite channels. # GAME Press to select the Game mode except for the TV mode. $ CAPTION Controls the caption decoder. % 3D Press to select the 3D/Dual-View mode. ^ SET Sets the remote to control your TV, VCR, Cable, DVD, or Set-Top Box. & TV, DVD, STB, CABLE, VCR Press to operate your VCR, Cable box, DVD player, or Set-Top Box. 1 POWER Turns the TV on and off the sound. 8 MENU Displays the main on-screen menu. 9 RETURN...

Owner Instructions
Page 15
... color of the TV, and adjust the volume level with the audio system's volume control. Connecting an Amplifier/DVD Home Theater 1 Connect Audio Cables between the DIGITAL AUDIO OUT (OPTICAL) jack on the TV and the Digital Audio Input jack on the Amplifier/DVD Home Theater. Connecting a Digital Audio System The side panel jacks on your TV make it through glass fibers. When a Digital Audio System is OPTICAL? ● Converts the electric signal into an optical light signal, and transmits it easy to connect a Digital Audio...
... color of the TV, and adjust the volume level with the audio system's volume control. Connecting an Amplifier/DVD Home Theater 1 Connect Audio Cables between the DIGITAL AUDIO OUT (OPTICAL) jack on the TV and the Digital Audio Input jack on the Amplifier/DVD Home Theater. Connecting a Digital Audio System The side panel jacks on your TV make it through glass fibers. When a Digital Audio System is OPTICAL? ● Converts the electric signal into an optical light signal, and transmits it easy to connect a Digital Audio...

Owner Instructions
Page 16
Operation Turning the TV On and Off Press the POWER button on your TV starts. Using the HDMI/DVI Cable PC TV Side Panel 2 1Streo/2RCA Cable (Not supplied) 1 HDMI/DVI Cable (Not supplied) ➢ Each PC has a different side panel configuration. ➢ When connecting a PC, match the color of the connection terminal to the cable. ➢ When connecting the HDMI/DVI to see the original screen with no cutting images. English - 16 Connecting a PC Using the D-Sub Cable 1 Connect a D-Sub Cable between the...
Operation Turning the TV On and Off Press the POWER button on your TV starts. Using the HDMI/DVI Cable PC TV Side Panel 2 1Streo/2RCA Cable (Not supplied) 1 HDMI/DVI Cable (Not supplied) ➢ Each PC has a different side panel configuration. ➢ When connecting a PC, match the color of the connection terminal to the cable. ➢ When connecting the HDMI/DVI to see the original screen with no cutting images. English - 16 Connecting a PC Using the D-Sub Cable 1 Connect a D-Sub Cable between the...

Owner Instructions
Page 17
.... Cable 10 3% Digital Channels are memorized. The message Select Home Mode when installing this TV at home. Plug & Play Executes the Plug & Play function when you want to return to Shop mode, and you set the TV at first or reset it. Stop Enter Skip Plug & Play Auto Program is connected to enter the language. Press the ENTER button when channel memorization is automatically displayed. 2 Press...
.... Cable 10 3% Digital Channels are memorized. The message Select Home Mode when installing this TV at home. Plug & Play Executes the Plug & Play function when you want to return to Shop mode, and you set the TV at first or reset it. Stop Enter Skip Plug & Play Auto Program is connected to enter the language. Press the ENTER button when channel memorization is automatically displayed. 2 Press...

Owner Instructions
Page 20
... seven menu groups: Picture, Sound, Channel, Setup, Input, Guide, and PIP. 2 Press the ▲ or ▼ button, then press the ENTER button to display frequently used Menu and Connection items with a Single button press. 1 Press the TOOLS button. The main menu will appear. 2 Press the ▲/▼ button to select a menu, then press the ENTER button. 3 Press the ENTER buttons to display, change , or use the selected items. For a more detailed description of certain audio-video settings...
... seven menu groups: Picture, Sound, Channel, Setup, Input, Guide, and PIP. 2 Press the ▲ or ▼ button, then press the ENTER button to display frequently used Menu and Connection items with a Single button press. 1 Press the TOOLS button. The main menu will appear. 2 Press the ▲/▼ button to select a menu, then press the ENTER button. 3 Press the ENTER buttons to display, change , or use the selected items. For a more detailed description of certain audio-video settings...
Owner Instructions
Page 29
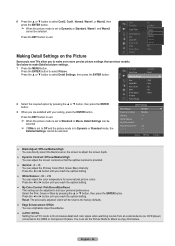
... Standard mode, the Detailed Settings cannot be selected. Detail Settings Black Adjust Dynamic Contrast Gamma White Balance My Color Control Edge Enhancement xvYCC : Medium : Medium : +1 : 0 : On : Off Move Enter Return ● Black Adjust: Off/Low/Medium/High You can directly select the black level on the Picture Picture Color Tint (G/R) Color Tone Detail Settings Size Digital NR Active Color DNIe Color Gamut Position Samsung's new TVs allow you reach the optimal setting. ● White...
... Standard mode, the Detailed Settings cannot be selected. Detail Settings Black Adjust Dynamic Contrast Gamma White Balance My Color Control Edge Enhancement xvYCC : Medium : Medium : +1 : 0 : On : Off Move Enter Return ● Black Adjust: Off/Low/Medium/High You can directly select the black level on the Picture Picture Color Tint (G/R) Color Tone Detail Settings Size Digital NR Active Color DNIe Color Gamut Position Samsung's new TVs allow you reach the optimal setting. ● White...

Owner Instructions
Page 44
... select Timer Viewing, then press the ENTER button. Antenna : Air Channel List Channel Auto Program Clear Scrambled Channel Fine Tune Signal Strength LNA : On 2 Press the ▲ or ▼ button to select a channel, then press the Blue (Options) button. 3 Press the ▲ or ▼ button to select Channel, then press the ENTER button. Reserving a program has been completed. You can also reserve a program in the All Channels or Favorite menus using...
... select Timer Viewing, then press the ENTER button. Antenna : Air Channel List Channel Auto Program Clear Scrambled Channel Fine Tune Signal Strength LNA : On 2 Press the ▲ or ▼ button to select a channel, then press the Blue (Options) button. 3 Press the ▲ or ▼ button to select Channel, then press the ENTER button. Reserving a program has been completed. You can also reserve a program in the All Channels or Favorite menus using...

Owner Instructions
Page 53
...; Picture Mode is automatically changed to Game and users cannot change the mode. ● Sound Mode in the Sound menu is activated. Adjust the sound using the equalizer. ● The Reset in the Sound menu is deactivated. Reset function initializes the Equalizer settings to the factory default setting. ● The Channel menu is deactivated. ➢ Game Mode is not available in TV mode. ➢ If the picture is poor when external device is connected to Off and connect external devices. Set...
...; Picture Mode is automatically changed to Game and users cannot change the mode. ● Sound Mode in the Sound menu is activated. Adjust the sound using the equalizer. ● The Reset in the Sound menu is deactivated. Reset function initializes the Equalizer settings to the factory default setting. ● The Channel menu is deactivated. ➢ Game Mode is not available in TV mode. ➢ If the picture is poor when external device is connected to Off and connect external devices. Set...
Owner Instructions
Page 61
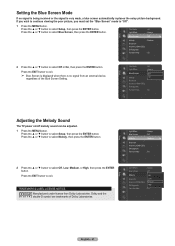
... : Always Setup Blue Screen : Off ▶ Melody : Medium Bluetooth Anynet+ (HDMI-CEC) SW Upgrade Function Help : On 2 Press the ▲ or ▼ button to select Melody, then press the ENTER button. Setup Film Mode Light Effect : Off : Always Blue Screen : OOffff ▶ Melody : MOendium Bluetooth Anynet+ (HDMI-CEC) SW Upgrade Function Help : On Adjusting the Melody Sound The TV power on/off melody sound can be adjusted. 1 Press the MENU button. Setup Light Effect Blue Screen...
... : Always Setup Blue Screen : Off ▶ Melody : Medium Bluetooth Anynet+ (HDMI-CEC) SW Upgrade Function Help : On 2 Press the ▲ or ▼ button to select Melody, then press the ENTER button. Setup Film Mode Light Effect : Off : Always Blue Screen : OOffff ▶ Melody : MOendium Bluetooth Anynet+ (HDMI-CEC) SW Upgrade Function Help : On Adjusting the Melody Sound The TV power on/off melody sound can be adjusted. 1 Press the MENU button. Setup Light Effect Blue Screen...

Owner Instructions
Page 62
... TV's firmware in the future. Please contact the Samsung call center at 1-800-SAMSUNG to select Function Help, then press the ENTER button. The message Scanning for USB..... It may take up to exit. ➢ The Function Help default setting is displayed. Press the ▲ or ▼ button to receive information about downloading upgrades and using the USB device. Please check the firmware version after upgrade. Setup...
... TV's firmware in the future. Please contact the Samsung call center at 1-800-SAMSUNG to select Function Help, then press the ENTER button. The message Scanning for USB..... It may take up to exit. ➢ The Function Help default setting is displayed. Press the ▲ or ▼ button to receive information about downloading upgrades and using the USB device. Please check the firmware version after upgrade. Setup...

Owner Instructions
Page 65
... ▼ button to have the TV set automatically adjust the video signals it is not removed by fine tuning alone, then do the frequency adjustments to the PC mode first. 1 Press the MENU button. Setting up the TV with your PC How to Auto Adjust Use the Auto Adjust function to select Setup, then press the ENTER button. V-Chip Menu Transparency : Medium Setup PC Home theater PC HDMI Black Level Film Mode Light Effect Blue Screen Melody Bluetooth Image Lock ▶...
... ▼ button to have the TV set automatically adjust the video signals it is not removed by fine tuning alone, then do the frequency adjustments to the PC mode first. 1 Press the MENU button. Setting up the TV with your PC How to Auto Adjust Use the Auto Adjust function to select Setup, then press the ENTER button. V-Chip Menu Transparency : Medium Setup PC Home theater PC HDMI Black Level Film Mode Light Effect Blue Screen Melody Bluetooth Image Lock ▶...

Owner Instructions
Page 79
... the files repeatedly, change the setting by referring to select Play the selected file. Files with its playing time. ➢ To adjust the music volume, press the VOL+ or VOL- Music function information icon (Displayed at the top of the selected music. ➢ Repeat the above operation to select multiple music files. 2 Press the blue button, then press the...
... the files repeatedly, change the setting by referring to select Play the selected file. Files with its playing time. ➢ To adjust the music volume, press the VOL+ or VOL- Music function information icon (Displayed at the top of the selected music. ➢ Repeat the above operation to select multiple music files. 2 Press the blue button, then press the...

Owner Instructions
Page 83
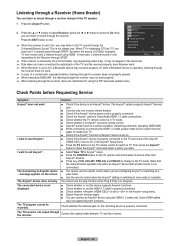
... Watching TV status. Press the EXIT button to the TV. But there's SPDIF output in TV. If you are watching a TV program CH / button Audio Device When Receiver is activated VOL +/- Recording begins. So TV sound can control Anynet+ devices only using the TV remote control. ➢ The TV remote control may differ depending on Device Shows the menu of the connected device. For the antenna connection to the recording device, refer to its user manual.
... Watching TV status. Press the EXIT button to the TV. But there's SPDIF output in TV. If you are watching a TV program CH / button Audio Device When Receiver is activated VOL +/- Recording begins. So TV sound can control Anynet+ devices only using the TV remote control. ➢ The TV remote control may differ depending on Device Shows the menu of the connected device. For the antenna connection to the recording device, refer to its user manual.
Owner Instructions
Page 84
... receiver is set to On in the Anynet+ Setup menu. ■ Press the TV button on the TV remote control and select a device other than Anynet+ devices. ■ Press any of CH, CH LIST, PRE-CH, and FAV.CH to change to the TV mode. (Note that case, 2 channel sound is set to view mode is in Anynet+ menu. ■ Press the SOURCE button on the TV remote control to switch to the TV and check...
... receiver is set to On in the Anynet+ Setup menu. ■ Press the TV button on the TV remote control and select a device other than Anynet+ devices. ■ Press any of CH, CH LIST, PRE-CH, and FAV.CH to change to the TV mode. (Note that case, 2 channel sound is set to view mode is in Anynet+ menu. ■ Press the SOURCE button on the TV remote control to switch to the TV and check...
Owner Instructions
Page 85
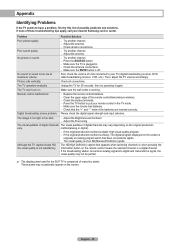
... TV for the DLP TV is digital: High visual quality program. - Press the TV button to your TV (digital broadcasting receiver, DVD, cable broadcasting receiver, VCR, etc.). First, check the volume of digital channels may occasionally appear on . Adjust the Brightness and Contrast. - If the original production method is analog: The digital program displayed on the original production vary. English - 85 Appendix Identifying Problems If the TV seems to digital. Please check the digital signal strength and input antenna. Check the antenna connections. - Adjust the antenna...
... TV for the DLP TV is digital: High visual quality program. - Press the TV button to your TV (digital broadcasting receiver, DVD, cable broadcasting receiver, VCR, etc.). First, check the volume of digital channels may occasionally appear on . Adjust the Brightness and Contrast. - If the original production method is analog: The digital program displayed on the original production vary. English - 85 Appendix Identifying Problems If the TV seems to digital. Please check the digital signal strength and input antenna. Check the antenna connections. - Adjust the antenna...


