

Open Source Guide (ENGLISH)
Page 1
... and change the software or use to the public, the best way to these conditions: a) You must cause the modified files to carry prominent notices stating that you redistribute the Program (or any warranty; Each time you changed the files and the date of any work written entirely by running the Program is not restricted, and the output from the Program...
... and change the software or use to the public, the best way to these conditions: a) You must cause the modified files to carry prominent notices stating that you redistribute the Program (or any warranty; Each time you changed the files and the date of any work written entirely by running the Program is not restricted, and the output from the Program...

Open Source Guide (ENGLISH)
Page 2
...line and a pointer to where the full notice is safest to attach them to the start of each source file to most effectively convey the exclusion of warranty; 16. To apply these terms (or, alternatively, under the terms of the greatest possible use...USE OR INABILITY TO USE THE LIBRARY (INCLUDING BUT NOT LIMITED TO LOSS OF DATA OR DATA BEING RENDERED INACCURATE OR LOSSES SUSTAINED BY YOU OR THIRD PARTIES OR A FAILURE OF THE LIBRARY TO OPERATE WITH ANY OTHER SOFTWARE... and change. How to Apply These Terms to Your New Libraries If you develop a new library, and you want it free software that ...
...line and a pointer to where the full notice is safest to attach them to the start of each source file to most effectively convey the exclusion of warranty; 16. To apply these terms (or, alternatively, under the terms of the greatest possible use...USE OR INABILITY TO USE THE LIBRARY (INCLUDING BUT NOT LIMITED TO LOSS OF DATA OR DATA BEING RENDERED INACCURATE OR LOSSES SUSTAINED BY YOU OR THIRD PARTIES OR A FAILURE OF THE LIBRARY TO OPERATE WITH ANY OTHER SOFTWARE... and change. How to Apply These Terms to Your New Libraries If you develop a new library, and you want it free software that ...

User Manual (user Manual) (ver.1.0) (English)
Page 4
... the vicinity of overhead power lines or other controls may result in additional damage to normal. • When replacement parts are covered by following the operating instructions - Unauthorized substitutions may cause undesired operation. Pay particular attention to an antenna discharge unit, size of grounding conductors, location of time. This will often require extensive work by a qualified technician to restore the TV to the unit. •...
... the vicinity of overhead power lines or other controls may result in additional damage to normal. • When replacement parts are covered by following the operating instructions - Unauthorized substitutions may cause undesired operation. Pay particular attention to an antenna discharge unit, size of grounding conductors, location of time. This will often require extensive work by a qualified technician to restore the TV to the unit. •...

User Manual (user Manual) (ver.1.0) (English)
Page 6
... Connecting a DTV Set-Top Box 2.9 Connecting to Y, PB, PR (480p, 1080i 2.9 Connecting to DVI (Digital Visual Interface)(480p, 720p, 1080i) . .2.10 Installing Batteries in the Remote Control 2.11 Chapter 3: Operation 3.1 Turning the TV On and Off 3.1 Plug & Play Feature 3.1 Using the Perfect Focus Feature 3.3 Adjusting Manual convergence 3.4 Adjust Red Convergence 3.5 Viewing the Menus and On-Screen Displays 3.6 Viewing the Menus 3.6 Viewing the Display 3.6 Selecting a Menu Language 3.7 Selecting the Antenna Input 3.7 Memorizing the Channels 3.8 Selecting the Video Signal-source...
... Connecting a DTV Set-Top Box 2.9 Connecting to Y, PB, PR (480p, 1080i 2.9 Connecting to DVI (Digital Visual Interface)(480p, 720p, 1080i) . .2.10 Installing Batteries in the Remote Control 2.11 Chapter 3: Operation 3.1 Turning the TV On and Off 3.1 Plug & Play Feature 3.1 Using the Perfect Focus Feature 3.3 Adjusting Manual convergence 3.4 Adjust Red Convergence 3.5 Viewing the Menus and On-Screen Displays 3.6 Viewing the Menus 3.6 Viewing the Display 3.6 Selecting a Menu Language 3.7 Selecting the Antenna Input 3.7 Memorizing the Channels 3.8 Selecting the Video Signal-source...
User Manual (user Manual) (ver.1.0) (English)
Page 7
...the Sleep Timer 4.6 Extra sound settings 4.7 Choosing a Multi-Channel Sound (MTS) track 4.8 Viewing Closed Captions 4.9 Viewing Picture-in-Picture 4.10 Activating Picture-in-Picture 4.10 Selecting a Signal Source (Antenna or Cable) for PIP . . . . .4.11 Selecting a Signal Source (External A/V) for PIP 4.11 Swapping the Contents of the PIP image and Main image .4.12 Changing the Size of the PIP Window 4.12 Changing the PIP Channel 4.13 Changing the Location (Rotating) the PIP mode 4.13 Scanning the Available Channels 4.13 Using the V-Chip 4.14 Setting Up Your Personal ID Number (PIN...
...the Sleep Timer 4.6 Extra sound settings 4.7 Choosing a Multi-Channel Sound (MTS) track 4.8 Viewing Closed Captions 4.9 Viewing Picture-in-Picture 4.10 Activating Picture-in-Picture 4.10 Selecting a Signal Source (Antenna or Cable) for PIP . . . . .4.11 Selecting a Signal Source (External A/V) for PIP 4.11 Swapping the Contents of the PIP image and Main image .4.12 Changing the Size of the PIP Window 4.12 Changing the PIP Channel 4.13 Changing the Location (Rotating) the PIP mode 4.13 Scanning the Available Channels 4.13 Using the V-Chip 4.14 Setting Up Your Personal ID Number (PIN...
User Manual (user Manual) (ver.1.0) (English)
Page 9
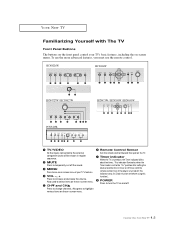
... / HCN653W PCN5425R Œ TV/VIDEO All the inputs connected to the external component jacks will be set to turn the TV on and off. 1.2 CHAPTER ONE: YOUR NEW TV YOUR NEW TV Familiarizing Yourself with the remote control. Also used to change channels. Also press to highlight various items on the on-screen menu. Ø Remote Control Sensor Aim the remote control towards this spot on the TV. ∏ Timer indicator When the TV is turned...
... / HCN653W PCN5425R Œ TV/VIDEO All the inputs connected to the external component jacks will be set to turn the TV on and off. 1.2 CHAPTER ONE: YOUR NEW TV YOUR NEW TV Familiarizing Yourself with the remote control. Also used to change channels. Also press to highlight various items on the on-screen menu. Ø Remote Control Sensor Aim the remote control towards this spot on the TV. ∏ Timer indicator When the TV is turned...

User Manual (user Manual) (ver.1.0) (English)
Page 10
... center of door and pull it is used only occasionally, such as shown in the Factory. ´ VIDEO INPUT jack Use to connect a video signal from a camcorder or a video game. ˇ AUDIO INPUT jacks Use to connect the audio signals from a camcorder or video game. ¨ S-VIDEO INPUT jack Use to connect an S-Video signal from the front and sides for the optimum picture set in figure below. 4 Shut the door by pressing the " " symbol...
... center of door and pull it is used only occasionally, such as shown in the Factory. ´ VIDEO INPUT jack Use to connect a video signal from a camcorder or a video game. ˇ AUDIO INPUT jacks Use to connect the audio signals from a camcorder or video game. ¨ S-VIDEO INPUT jack Use to connect an S-Video signal from the front and sides for the optimum picture set in figure below. 4 Shut the door by pressing the " " symbol...
User Manual (user Manual) (ver.1.0) (English)
Page 11
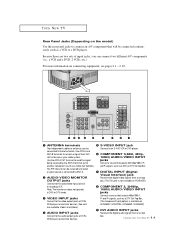
... a Cable Set Top Box). " COMPONENT 2, 3(480p, Note: The monitor out does not operate 1080i) AUDIO/VIDEO INPUT in DVD or DTV mode. YOUR NEW TV Rear Panel Jacks (Depending on PCN5425R.) Connect to the audio/video input jacks of a recording VCR. Use ANT-A and ANT-B terminals to receive a signal from a set top OUTPUT jacks box. (The DVI jack is connected to ANT-A. ∏ DIGITAL INPUT (Digital ´ AUDIO-VIDEO MONITOR Visual Interface) jack Receives the digital video signals from a set top Connect to these terminals. jacks ˇ VIDEO INPUT...
... a Cable Set Top Box). " COMPONENT 2, 3(480p, Note: The monitor out does not operate 1080i) AUDIO/VIDEO INPUT in DVD or DTV mode. YOUR NEW TV Rear Panel Jacks (Depending on PCN5425R.) Connect to the audio/video input jacks of a recording VCR. Use ANT-A and ANT-B terminals to receive a signal from a set top OUTPUT jacks box. (The DVI jack is connected to ANT-A. ∏ DIGITAL INPUT (Digital ´ AUDIO-VIDEO MONITOR Visual Interface) jack Receives the digital video signals from a set top Connect to these terminals. jacks ˇ VIDEO INPUT...

User Manual (user Manual) (ver.1.0) (English)
Page 12
... switch between your VCR and cable box. Press again to resume normal video. ¨ CH and CH (Channel Up/Down) Press CH or CH to change the screen size. See page 4.20 for details. Œ Power Turns the TV on -screen menu. Ú Caption Controls the caption decoder. Æ PIP Activates picture in picture. ı Perfect Focus Press to adjust for automatic shutoff. Ø Display Press to display the current channel and the audio-video settings. ∏ Aspect...
... switch between your VCR and cable box. Press again to resume normal video. ¨ CH and CH (Channel Up/Down) Press CH or CH to change the screen size. See page 4.20 for details. Œ Power Turns the TV on -screen menu. Ú Caption Controls the caption decoder. Æ PIP Activates picture in picture. ı Perfect Focus Press to adjust for automatic shutoff. Ø Display Press to display the current channel and the audio-video settings. ∏ Aspect...

User Manual (user Manual) (ver.1.0) (English)
Page 18
... the AUDIO jacks on the model. 2.5 CHAPTER TWO: INSTALLATION The actual configuration on your TV may be different, depending on the TV. Follow the instructions in "Viewing a VCR or Camcorder Tape" to VCR audio out using only one audio cable. 3 Connect a video cable between the ANTENNA OUT terminal on the VCR and the antenna terminal on pages 2.1-2.3). If you have a S-VHS VCR, use the S-Video connections and remove the video cable. Note...
... the AUDIO jacks on the model. 2.5 CHAPTER TWO: INSTALLATION The actual configuration on your TV may be different, depending on the TV. Follow the instructions in "Viewing a VCR or Camcorder Tape" to VCR audio out using only one audio cable. 3 Connect a video cable between the ANTENNA OUT terminal on the VCR and the antenna terminal on pages 2.1-2.3). If you have a S-VHS VCR, use the S-Video connections and remove the video cable. Note...
User Manual (user Manual) (ver.1.0) (English)
Page 19
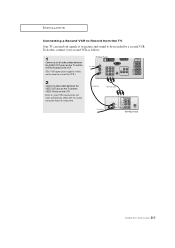
INSTALLATION Connecting a Second VCR to Record from the TV Your TV can send out signals of its picture and sound to record using this , connect your VCR's instructions for more information about how to be either on the front or rear of the VCR.) 2 Connect a video cable between the VIDEO OUT jack on the TV and the VIDEO IN jack on the VCR. (The VCR input jacks might be...
INSTALLATION Connecting a Second VCR to Record from the TV Your TV can send out signals of its picture and sound to record using this , connect your VCR's instructions for more information about how to be either on the front or rear of the VCR.) 2 Connect a video cable between the VIDEO OUT jack on the TV and the VIDEO IN jack on the VCR. (The VCR input jacks might be...

User Manual (user Manual) (ver.1.0) (English)
Page 21
... DVD player's (or DTV Set-Top Box) owner's instruction. Connecting to regular audio and video jacks 1 Connect a set of Component video, see your TV may be different, depending on the model. 2.8 CHAPTER TWO: INSTALLATION Note: This figure shows the Standard Connector-jack panel. Note: For an explanation of audio cables between the DVD audio in jacks on the TV and the AUDIO OUT jacks on the DVD player (or DTV Set-Top Box). 2 To enable Component video viewing, connect video cables...
... DVD player's (or DTV Set-Top Box) owner's instruction. Connecting to regular audio and video jacks 1 Connect a set of Component video, see your TV may be different, depending on the model. 2.8 CHAPTER TWO: INSTALLATION Note: This figure shows the Standard Connector-jack panel. Note: For an explanation of audio cables between the DVD audio in jacks on the TV and the AUDIO OUT jacks on the DVD player (or DTV Set-Top Box). 2 To enable Component video viewing, connect video cables...

User Manual (user Manual) (ver.1.0) (English)
Page 23
... Protection high-definition picture source to the DVI INPUT jack on the TV, high-definition pictures can only be displayed on the screen in their digital form. (This DVI INPUT jack is not compatible with the picture signal of a personal computer. • Use a DVI 25-pin cable (commercially available) in jacks on the TV and the AUDIO OUT jacks on the DTV Set-Top box. 2 Connect a set of Component video, see your DTV Set-top box's owner's instruction...
... Protection high-definition picture source to the DVI INPUT jack on the TV, high-definition pictures can only be displayed on the screen in their digital form. (This DVI INPUT jack is not compatible with the picture signal of a personal computer. • Use a DVI 25-pin cable (commercially available) in jacks on the TV and the AUDIO OUT jacks on the DTV Set-Top box. 2 Connect a set of Component video, see your DTV Set-top box's owner's instruction...

User Manual (user Manual) (ver.1.0) (English)
Page 27
Language Plug & Play Convergence Caption Time Auto Clock Set V-Chip Function : English 3 Press the CH button to exit. OPERATION Using the Perfect Focus Feature When the picture size is distorted after Perfect Focus, then make adjustments, contact your Service Center. • The Perfect Focus function doesn't operate when component input is in 480P. 3.3 CHAPTER THREE: TV OPERATION Convergence Manual Convergence Red Blue Perfect Focus Perfect Focus Mode On Process : 8% Notes • If any error happens during Perfect Focus, then perform Perfect...
Language Plug & Play Convergence Caption Time Auto Clock Set V-Chip Function : English 3 Press the CH button to exit. OPERATION Using the Perfect Focus Feature When the picture size is distorted after Perfect Focus, then make adjustments, contact your Service Center. • The Perfect Focus function doesn't operate when component input is in 480P. 3.3 CHAPTER THREE: TV OPERATION Convergence Manual Convergence Red Blue Perfect Focus Perfect Focus Mode On Process : 8% Notes • If any error happens during Perfect Focus, then perform Perfect...

User Manual (user Manual) (ver.1.0) (English)
Page 28
... Plug & Play Convergence Caption Time Auto Clock Set V-Chip Function : English 2 Press the CH button to select "Function", then press the VOL + button. OPERATION Adjusting Manual Convergence If the color appears spread out or "smeared" on the screen, the convergence probably needs alignment. Press the CH button to select "Convergence", then press the VOL + button. Be sure to use the remote control for the convergence adjustments. Convergence Manual Convergence Red Blue Perfect Focus continued... 3.4 CHAPTER THREE: TV OPERATION First steps: 1 Press the Menu button.
... Plug & Play Convergence Caption Time Auto Clock Set V-Chip Function : English 2 Press the CH button to select "Function", then press the VOL + button. OPERATION Adjusting Manual Convergence If the color appears spread out or "smeared" on the screen, the convergence probably needs alignment. Press the CH button to select "Convergence", then press the VOL + button. Be sure to use the remote control for the convergence adjustments. Convergence Manual Convergence Red Blue Perfect Focus continued... 3.4 CHAPTER THREE: TV OPERATION First steps: 1 Press the Menu button.
User Manual (user Manual) (ver.1.0) (English)
Page 30
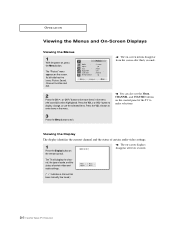
... menu. OPERATION Viewing the Menus and On-Screen Displays Viewing the Menus 1 With the power on the control panel of the TV to make selections. 3 Press the Menu button to exit. Mode Adjust Size Digital NR Color tone Demonstration Picture : Custom : Wide : Off : Normal w The on -screen displays disappear after thirty seconds. 2 Press the CH or CH button to enter items in the menu (the icons blink when highlighted). button to display, change, or use the Menu, CHANNEL, and VOLUME buttons...
... menu. OPERATION Viewing the Menus and On-Screen Displays Viewing the Menus 1 With the power on the control panel of the TV to make selections. 3 Press the Menu button to exit. Mode Adjust Size Digital NR Color tone Demonstration Picture : Custom : Wide : Off : Normal w The on -screen displays disappear after thirty seconds. 2 Press the CH or CH button to enter items in the menu (the icons blink when highlighted). button to display, change, or use the Menu, CHANNEL, and VOLUME buttons...
User Manual (user Manual) (ver.1.0) (English)
Page 39
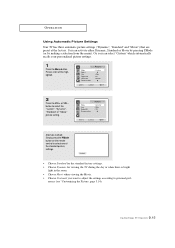
... automatically recalls your personalized picture settings. 1 Press the Menu button. Mode Adjust Size Digital NR Color tone Demonstration Picture : Custom : Wide : Off : Normal 2 Press the VOL + or VOL button to personal pref- OPERATION Using Automatic Picture Settings Your TV has three automatic picture settings ("Dynamic", "Standard" and "Movie") that are preset at the factory. erence (see "Customizing the Picture, page 3.14). 3.15 CHAPTER THREE: TV OPERATION Or, you want to adjust the settings according to...
... automatically recalls your personalized picture settings. 1 Press the Menu button. Mode Adjust Size Digital NR Color tone Demonstration Picture : Custom : Wide : Off : Normal 2 Press the VOL + or VOL button to personal pref- OPERATION Using Automatic Picture Settings Your TV has three automatic picture settings ("Dynamic", "Standard" and "Movie") that are preset at the factory. erence (see "Customizing the Picture, page 3.14). 3.15 CHAPTER THREE: TV OPERATION Or, you want to adjust the settings according to...
User Manual (user Manual) (ver.1.0) (English)
Page 54
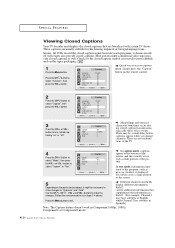
... displayed. Press the CH button to select "Caption" or "Text." Language Plug & Play Convergence Caption Time Auto Clock Set V-Chip Function : English 3 Press the VOL + or VOL button to turn closed captioning "on the tape's packaging: . 1 Press the Menu button. In text mode, information unrelated to the program, such as well. buttons to make changes to "Channels" and "Field": Use the CH , CH , VOL + and VOL - All VCRs record the closed caption signal from television programs...
... displayed. Press the CH button to select "Caption" or "Text." Language Plug & Play Convergence Caption Time Auto Clock Set V-Chip Function : English 3 Press the VOL + or VOL button to turn closed captioning "on the tape's packaging: . 1 Press the Menu button. In text mode, information unrelated to the program, such as well. buttons to make changes to "Channels" and "Field": Use the CH , CH , VOL + and VOL - All VCRs record the closed caption signal from television programs...
User Manual (user Manual) (ver.1.0) (English)
Page 55
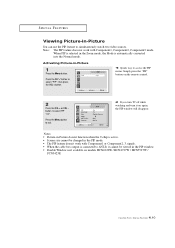
... PIP SOURCE Size Swap ANT/CATV Channel PIP : On : TV : Double Screen : ANT : ANT 4 w If you turn TV off while watching and turn it cannot be changed in the PIP mode. • The PIP feature doesn't work with Component1 or Component2, 3 signals. • When the cable box output is automatically converted into the Normal mode. SPECIAL FEATURES Viewing Picture-in-Picture You can use the PIP feature to select "PIP", then press the VOL + button. Note: The PIP...
... PIP SOURCE Size Swap ANT/CATV Channel PIP : On : TV : Double Screen : ANT : ANT 4 w If you turn TV off while watching and turn it cannot be changed in the PIP mode. • The PIP feature doesn't work with Component1 or Component2, 3 signals. • When the cable box output is automatically converted into the Normal mode. SPECIAL FEATURES Viewing Picture-in-Picture You can use the PIP feature to select "PIP", then press the VOL + button. Note: The PIP...

User Manual (user Manual) (ver.1.0) (English)
Page 68
... channel. Press the TV/Video button. Press the "MODE" button to have a problem, first try operating it again. Adjust the picture settings. Adjust the antenna. Check all wire connections. Make sure the program is working. Make sure the wall outlet is broadcast in the "TV" mode. Chapter Five TROUBLESHOOTING If the TV seems to put your remote control in color. No color, wrong colors or tints. Picture rolls vertically. Poor sound quality. Try another channel. Adjust the antenna. Unplug the TV for a long time, images...
... channel. Press the TV/Video button. Press the "MODE" button to have a problem, first try operating it again. Adjust the picture settings. Adjust the antenna. Check all wire connections. Make sure the program is working. Make sure the wall outlet is broadcast in the "TV" mode. Chapter Five TROUBLESHOOTING If the TV seems to put your remote control in color. No color, wrong colors or tints. Picture rolls vertically. Poor sound quality. Try another channel. Adjust the antenna. Unplug the TV for a long time, images...


