
User Manual (user Manual) (ver.1.0) (English)
Page 3
... new Samsung Projection TV represents the latest in mind when installing, using your outlet. 1 SAFETY Important Safety Information Always be careful when using , and maintaining your machine. • Read all operating and use on-screen menus and closed captioning capabilities, making it from overheating. do not place the TV receiver on a rack or bookcase, ensure that you've followed the manufacturer's instructions for choosing Samsung...
... new Samsung Projection TV represents the latest in mind when installing, using your outlet. 1 SAFETY Important Safety Information Always be careful when using , and maintaining your machine. • Read all operating and use on-screen menus and closed captioning capabilities, making it from overheating. do not place the TV receiver on a rack or bookcase, ensure that you've followed the manufacturer's instructions for choosing Samsung...
User Manual (user Manual) (ver.1.0) (English)
Page 4
... with part 15 of television closed captioning in damage and will prevent damage to the unit due to provide some protection against them. This television receiver provides display of the FCC Rules. If an outside antenna or cable system is in wire to an antenna discharge unit, size of grounding conductors, location of antenna discharge unit, connection to qualified service personnel under the following the operating instructions...
... with part 15 of television closed captioning in damage and will prevent damage to the unit due to provide some protection against them. This television receiver provides display of the FCC Rules. If an outside antenna or cable system is in wire to an antenna discharge unit, size of grounding conductors, location of antenna discharge unit, connection to qualified service personnel under the following the operating instructions...

User Manual (user Manual) (ver.1.0) (English)
Page 5
... connection to any interference received, including interference that interference will not occur in a residential installation. ferent from the U.S. User Information Changes or modifications not expressly approved by turning the equipment off and on a circuit dif- The party responsible for product compliance: SAMSUNG ELECTRONICS CO., LTD America QA Lab of the FCC Rules. Product Safety. 3 SAFETY Operation is a detachable power supply cord...
... connection to any interference received, including interference that interference will not occur in a residential installation. ferent from the U.S. User Information Changes or modifications not expressly approved by turning the equipment off and on a circuit dif- The party responsible for product compliance: SAMSUNG ELECTRONICS CO., LTD America QA Lab of the FCC Rules. Product Safety. 3 SAFETY Operation is a detachable power supply cord...
User Manual (user Manual) (ver.1.0) (English)
Page 6
...a DVD (480i, 480p) Player 2.7 Connecting a DTV Set-Top Box (480p, 1080i 2.8 Connecting Surround Speakers (HCL552W/HCL652W/HCL473W/HCM553W/HCM653W only 2.8 Installing Batteries in the Remote Control 2.9 Chapter 3: Operation 3.1 Turning the TV On and Off 3.1 Plug & Play Feature 3.1 Using the Perfect Focus Feature 3.3 Adjusting Manual convergence 3.4 Adjust Red Convergence 3.5 Viewing the Menus and On-Screen Displays 3.6 Viewing the Menus 3.6 Viewing the Display 3.6 Selecting a Menu Language 3.7 Selecting the Antenna Input 3.7 Memorizing the Channels 3.8 Selecting the Video Signal...
...a DVD (480i, 480p) Player 2.7 Connecting a DTV Set-Top Box (480p, 1080i 2.8 Connecting Surround Speakers (HCL552W/HCL652W/HCL473W/HCM553W/HCM653W only 2.8 Installing Batteries in the Remote Control 2.9 Chapter 3: Operation 3.1 Turning the TV On and Off 3.1 Plug & Play Feature 3.1 Using the Perfect Focus Feature 3.3 Adjusting Manual convergence 3.4 Adjust Red Convergence 3.5 Viewing the Menus and On-Screen Displays 3.6 Viewing the Menus 3.6 Viewing the Display 3.6 Selecting a Menu Language 3.7 Selecting the Antenna Input 3.7 Memorizing the Channels 3.8 Selecting the Video Signal...
User Manual (user Manual) (ver.1.0) (English)
Page 7
... Tuning Channels 4.1 Digital Noise Reduction 4.2 Changing the Screen Size 4.3 Using the R.surf Feature 4.4 Setting the On/Off Timer 4.5 Setting the Sleep Timer 4.6 Dolby Surround (HCL552W/HCL652W/HCL473W/HCM553W/HCM653W only 4.7 Choosing a Multi-Channel Sound (MTS) track 4.8 Auto Volume 4.9 Viewing Closed Captions 4.10 Viewing Picture-in-Picture 4.11 Activating Picture-in-Picture 4.11 Selecting a Signal Source (Antenna or Cable) for PIP . . . . .4.12 Selecting a Signal Source (External A/V) for PIP 4.12 Swapping the Contents of the PIP image and Main image .4.13 Changing the Size...
... Tuning Channels 4.1 Digital Noise Reduction 4.2 Changing the Screen Size 4.3 Using the R.surf Feature 4.4 Setting the On/Off Timer 4.5 Setting the Sleep Timer 4.6 Dolby Surround (HCL552W/HCL652W/HCL473W/HCM553W/HCM653W only 4.7 Choosing a Multi-Channel Sound (MTS) track 4.8 Auto Volume 4.9 Viewing Closed Captions 4.10 Viewing Picture-in-Picture 4.11 Activating Picture-in-Picture 4.11 Selecting a Signal Source (Antenna or Cable) for PIP . . . . .4.12 Selecting a Signal Source (External A/V) for PIP 4.12 Swapping the Contents of the PIP image and Main image .4.13 Changing the Size...
User Manual (user Manual) (ver.1.0) (English)
Page 8
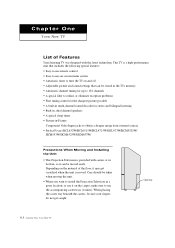
... control for the sharpest picture possible • A built-in multi-channel sound decoder for stereo and bilingual listening • Built-in, dual channel speakers • A special sleep timer • Picture-in-Picture Component Video Input jacks to install the Projection Television in a given location, or use on-screen menu system • Automatic timer to turn the TV on and off • Adjustable picture and sound settings that can be moved easily. Chapter One YOUR NEW TV List...
... control for the sharpest picture possible • A built-in multi-channel sound decoder for stereo and bilingual listening • Built-in, dual channel speakers • A special sleep timer • Picture-in-Picture Component Video Input jacks to install the Projection Television in a given location, or use on-screen menu system • Automatic timer to turn the TV on and off • Adjustable picture and sound settings that can be moved easily. Chapter One YOUR NEW TV List...

User Manual (user Manual) (ver.1.0) (English)
Page 10
.../HCM6525W/ HCM653W Œ S-VIDEO INPUT jack Use to connect an S-Video signal from a camcorder or a video game. ´ VIDEO INPUT jack Use to connect a video signal from a camcorder or a video game. ˇ AUDIO INPUT jacks Use to connect the audio signals from either end. When displaying a component in the Factory. Using a display deck (HCL473W/HCM5525W/HCM553W/ HCM6525W/HCM653W) You can use the front or side panel jacks to adjust for the optimum picture set in the display deck, please space...
.../HCM6525W/ HCM653W Œ S-VIDEO INPUT jack Use to connect an S-Video signal from a camcorder or a video game. ´ VIDEO INPUT jack Use to connect a video signal from a camcorder or a video game. ˇ AUDIO INPUT jacks Use to connect the audio signals from either end. When displaying a component in the Factory. Using a display deck (HCL473W/HCM5525W/HCM553W/ HCM6525W/HCM653W) You can use the front or side panel jacks to adjust for the optimum picture set in the display deck, please space...

User Manual (user Manual) (ver.1.0) (English)
Page 11
...-A terminal out to a (optional) rear-surround amp: Surround Left, Surround Right and Center. 1.4 CHAPTER ONE: YOUR NEW TV " SURROUND OUT (HCL552W/HCL652W/HCL473W/ HCM553W/HCM653W only) Connects to another component (such as a Cable Set Top Box). Use ANT-A and ANT-B terminals to the audio/video input jacks of VCRs, DVD players and similar devices. ˆ AUDIO-VIDEO MONITOR OUTPUT jacks Connect to receive a signal from VHF/UHF antennas or your cable system.
...-A terminal out to a (optional) rear-surround amp: Surround Left, Surround Right and Center. 1.4 CHAPTER ONE: YOUR NEW TV " SURROUND OUT (HCL552W/HCL652W/HCL473W/ HCM553W/HCM653W only) Connects to another component (such as a Cable Set Top Box). Use ANT-A and ANT-B terminals to the audio/video input jacks of VCRs, DVD players and similar devices. ˆ AUDIO-VIDEO MONITOR OUTPUT jacks Connect to receive a signal from VHF/UHF antennas or your cable system.
User Manual (user Manual) (ver.1.0) (English)
Page 12
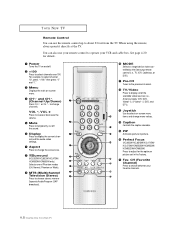
.../ HCL473W/HCM5525W/HCM553W/ HCM6525W/HCM653W) Press to switch between your VCR and cable box. When using the remote, always point it directly at the TV. See page 4.20 for details. Œ Power Turns the TV on and off the sound. Ø Display Press to display the current channel and the audio-video settings. ∏ Aspect Press to change menu values. Ú Caption Controls the caption decoder. Æ PIP Activates picture in the Factory. ˜ Fav.
.../ HCL473W/HCM5525W/HCM553W/ HCM6525W/HCM653W) Press to switch between your VCR and cable box. When using the remote, always point it directly at the TV. See page 4.20 for details. Œ Power Turns the TV on and off the sound. Ø Display Press to display the current channel and the audio-video settings. ∏ Aspect Press to change menu values. Ú Caption Controls the caption decoder. Æ PIP Activates picture in the Factory. ˜ Fav.

User Manual (user Manual) (ver.1.0) (English)
Page 13
... window doesn't function on the main screen with other devices (VCR, cable box, DVD.) - CH Displays the available channels in sequence. (These buttons change channels in the TV's memory. 1.6 CHAPTER ONE: YOUR NEW TV Locate Press to move the PIP window to set up and activate the parental locks. ≠ Set Used during set up of this Samsung remote control, so that is currently displayed on the models HCL5515W/ HCL6515W/HCL4715W/HCM552 5W...
... window doesn't function on the main screen with other devices (VCR, cable box, DVD.) - CH Displays the available channels in sequence. (These buttons change channels in the TV's memory. 1.6 CHAPTER ONE: YOUR NEW TV Locate Press to move the PIP window to set up and activate the parental locks. ≠ Set Used during set up of this Samsung remote control, so that is currently displayed on the models HCL5515W/ HCL6515W/HCL4715W/HCM552 5W...
User Manual (user Manual) (ver.1.0) (English)
Page 18
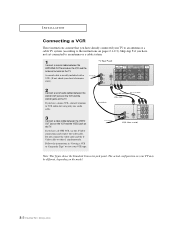
... connected your local electronics store). 2 Connect a set of audio cables between the ANTENNA OUT terminal on the VCR and the antenna terminal on the TV. INSTALLATION Connecting a VCR These instructions assume that you have a S-VHS VCR, use the S-Video connections and remove the video cable. Note: This figure shows the Standard Connector-jack panel. Skip step 1 if you have not yet connected to VCR audio out using only one audio cable. 3 Connect a video cable between the VIDEO...
... connected your local electronics store). 2 Connect a set of audio cables between the ANTENNA OUT terminal on the VCR and the antenna terminal on the TV. INSTALLATION Connecting a VCR These instructions assume that you have a S-VHS VCR, use the S-Video connections and remove the video cable. Note: This figure shows the Standard Connector-jack panel. Skip step 1 if you have not yet connected to VCR audio out using only one audio cable. 3 Connect a video cable between the VIDEO...

User Manual (user Manual) (ver.1.0) (English)
Page 19
... on the model. 2.6 CHAPTER TWO: INSTALLATION The audio-video cables shown here are usually found on the side or rear of the camcorder. 2 Connect an audio cable between the VIDEO OUTPUT jack on the camcorder and the VIDEO terminal on the front of the TV. Refer to your VCR's instructions for more information about how to camcorder audio out using only one audio cable. 3 Connect a video cable between the AUDIO OUTPUT jack on...
... on the model. 2.6 CHAPTER TWO: INSTALLATION The audio-video cables shown here are usually found on the side or rear of the camcorder. 2 Connect an audio cable between the VIDEO OUTPUT jack on the camcorder and the VIDEO terminal on the front of the TV. Refer to your VCR's instructions for more information about how to camcorder audio out using only one audio cable. 3 Connect a video cable between the AUDIO OUTPUT jack on...

User Manual (user Manual) (ver.1.0) (English)
Page 20
... DVD player and the VIDEO IN jack on your DVD player's owner's instruction. The actual configuration on the TV. INSTALLATION Connecting a DVD (480i, 480p) Player The rear panel jacks on the model. 2.7 CHAPTER TWO: INSTALLATION Connecting Y, PB , PR 1 Connect a set of audio cables between the AUDIO IN jacks on the TV and the AUDIO OUT jacks on the DVD player. 2 Connect video cables between the Y, PB, and PR inputs on the TV and Y, PB, and PR (or Y, CB, CR) outputs on the DVD player...
... DVD player and the VIDEO IN jack on your DVD player's owner's instruction. The actual configuration on the TV. INSTALLATION Connecting a DVD (480i, 480p) Player The rear panel jacks on the model. 2.7 CHAPTER TWO: INSTALLATION Connecting Y, PB , PR 1 Connect a set of audio cables between the AUDIO IN jacks on the TV and the AUDIO OUT jacks on the DVD player. 2 Connect video cables between the Y, PB, and PR inputs on the TV and Y, PB, and PR (or Y, CB, CR) outputs on the DVD player...

User Manual (user Manual) (ver.1.0) (English)
Page 21
... on the DTV Set-Top box. I N S TA L L AT I O N Connecting a DTV Set-Top Box (480p, 1080i) When switching to the DTV mode, either 480p or 1080i format is automatically selected according to your DTV Settop box's owner's instruction. Then connect the surround speakers to the input signal. Note: For an explanation of Component video, see your amp. Note: Only 480p and 1080i formats are supported. 1 Connect a set of the...
... on the DTV Set-Top box. I N S TA L L AT I O N Connecting a DTV Set-Top Box (480p, 1080i) When switching to the DTV mode, either 480p or 1080i format is automatically selected according to your DTV Settop box's owner's instruction. Then connect the surround speakers to the input signal. Note: For an explanation of Component video, see your amp. Note: Only 480p and 1080i formats are supported. 1 Connect a set of the...
User Manual (user Manual) (ver.1.0) (English)
Page 25
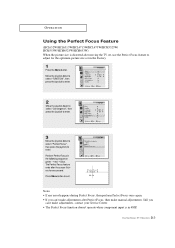
... adjustments after Perfect Focus, then make adjustments, contact your Service Center. • The Perfect Focus function doesn't operate when component input is distorted after the cursor flickers for the optimum picture size set , use the Perfect Focus feature to exit. Perform Perfect Focus in 480P. 3.3 CHAPTER THREE: TV OPERATION The Perfect Focus feature ends after moving the TV set in the Factory. 1 Press the Menu button . Still you can 't make manual adjustments. Move...
... adjustments after Perfect Focus, then make adjustments, contact your Service Center. • The Perfect Focus function doesn't operate when component input is distorted after the cursor flickers for the optimum picture size set , use the Perfect Focus feature to exit. Perform Perfect Focus in 480P. 3.3 CHAPTER THREE: TV OPERATION The Perfect Focus feature ends after moving the TV set in the Factory. 1 Press the Menu button . Still you can 't make manual adjustments. Move...

User Manual (user Manual) (ver.1.0) (English)
Page 28
... the menu (the icons blink when highlighted). w The on the control panel of certain video and audio settings. ("MFT" indicates a channel has been manually fine tuned.) 3.6 CHAPTER THREE: TV OPERATION You can also use the selected items. Use the joystick ( ) to exit. The TV will display the channel, the type of audio, and the status of the TV to display, change, or use the MENU, CHANNEL, and VOLUME buttons on -screen displays disappear after thirty seconds. The PICTURE menu...
... the menu (the icons blink when highlighted). w The on the control panel of certain video and audio settings. ("MFT" indicates a channel has been manually fine tuned.) 3.6 CHAPTER THREE: TV OPERATION You can also use the selected items. Use the joystick ( ) to exit. The TV will display the channel, the type of audio, and the status of the TV to display, change, or use the MENU, CHANNEL, and VOLUME buttons on -screen displays disappear after thirty seconds. The PICTURE menu...

User Manual (user Manual) (ver.1.0) (English)
Page 37
... standard picture settings. PICTURE icon will be highlighted (blinking). Alternate method: Simply press the P.Mode button on the remote control to select the "Standard," "Dynamic," "Mild," or "Custom" picture setting. You can select "Custom" which automatically recalls your personalized picture settings. 1 Press the Menu button. Or, you want to adjust the settings according to personal preference (see "Customizing the Picture, page 3.14). 3.15 CHAPTER THREE: TV OPERATION OPERATION Using Automatic Picture Settings Your TV has...
... standard picture settings. PICTURE icon will be highlighted (blinking). Alternate method: Simply press the P.Mode button on the remote control to select the "Standard," "Dynamic," "Mild," or "Custom" picture setting. You can select "Custom" which automatically recalls your personalized picture settings. 1 Press the Menu button. Or, you want to adjust the settings according to personal preference (see "Customizing the Picture, page 3.14). 3.15 CHAPTER THREE: TV OPERATION OPERATION Using Automatic Picture Settings Your TV has...

User Manual (user Manual) (ver.1.0) (English)
Page 53
... information that are usually subtitles for the closed captions. SPECIAL FEATURES Viewing Closed Captions Your TV decodes and displays the closed captions that supplements the information in Field 1. (For example, Channel 1 may be necessary to make changes to "Channel" and "Field": Use the joystick buttons to exit. w In caption mode, captions appear at the bottom of the screen, and they usually cover only a small portion of live events. In...
... information that are usually subtitles for the closed captions. SPECIAL FEATURES Viewing Closed Captions Your TV decodes and displays the closed captions that supplements the information in Field 1. (For example, Channel 1 may be necessary to make changes to "Channel" and "Field": Use the joystick buttons to exit. w In caption mode, captions appear at the bottom of the screen, and they usually cover only a small portion of live events. In...

User Manual (user Manual) (ver.1.0) (English)
Page 54
... you turn TV off while watching and turn it cannot be changed in the PIP mode. • The PIP feature doesn't work with Component1(480p) or Component2 signals. • When the cable box output is connected to simultaneously watch two video sources. Press the Menu button to select PIP "On". Menu 2 Move the joystick to the left or right to exit. SPECIAL FEATURES Viewing Picture-in-Picture You can use the PIP feature...
... you turn TV off while watching and turn it cannot be changed in the PIP mode. • The PIP feature doesn't work with Component1(480p) or Component2 signals. • When the cable box output is connected to simultaneously watch two video sources. Press the Menu button to select PIP "On". Menu 2 Move the joystick to the left or right to exit. SPECIAL FEATURES Viewing Picture-in-Picture You can use the PIP feature...
User Manual (user Manual) (ver.1.0) (English)
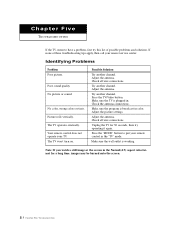
Page 66
... another channel. Adjust the picture settings. Note: If you watch a still image or the screen in . Picture rolls vertically. Try another channel. Poor sound quality. Adjust the antenna. Press the "MODE" button to have a problem, first try operating it again. Chapter Five TROUBLESHOOTING If the TV seems to put your remote control in color. No picture or sound. The TV won't turn on. Possible Solution Try another channel. Check all wire connections. Press the TV/Video button. Make sure the program is working. Check...
... another channel. Adjust the picture settings. Note: If you watch a still image or the screen in . Picture rolls vertically. Try another channel. Poor sound quality. Adjust the antenna. Press the "MODE" button to have a problem, first try operating it again. Chapter Five TROUBLESHOOTING If the TV seems to put your remote control in color. No picture or sound. The TV won't turn on. Possible Solution Try another channel. Check all wire connections. Press the TV/Video button. Make sure the program is working. Check...


