User Manual (ENGLISH)
Page 5
...00643A) Component Cables (RCA) (BN39-00279A) PC Cable (BN39-00115A) PC Audio Cable (BN39-00061B) Optical Cable ➢ Ferrite Core (Power Cord, Audio/Video Cable, S-Video Cable, Headphone) The ferrite cores are available at most DVD players, Set-top boxes, Cable Boxes and VCRs...of your TV. SRS TruSurround XT provides a virtual Dolby surround system. RETURN FAV.CH Remote Control (BN59-00599A) / AAA Batteries (4301-000103) Power Cord (3903-000144) Owner's Instructions / Quick Setup Guide Warranty Card / Registration Card / Safety Guide Manual Cloth-Clean Cover-Bottom / Screws (...
...00643A) Component Cables (RCA) (BN39-00279A) PC Cable (BN39-00115A) PC Audio Cable (BN39-00061B) Optical Cable ➢ Ferrite Core (Power Cord, Audio/Video Cable, S-Video Cable, Headphone) The ferrite cores are available at most DVD players, Set-top boxes, Cable Boxes and VCRs...of your TV. SRS TruSurround XT provides a virtual Dolby surround system. RETURN FAV.CH Remote Control (BN59-00599A) / AAA Batteries (4301-000103) Power Cord (3903-000144) Owner's Instructions / Quick Setup Guide Warranty Card / Registration Card / Safety Guide Manual Cloth-Clean Cover-Bottom / Screws (...
User Manual (ENGLISH)
Page 6
... the volume. In the on-screen menu, use the CH buttons as you would use the ▲ and ▼ buttons on the remote control. Power Indicator Blinks and turns off . English - 6 Press to change channels. Remote Control Sensor Aim the remote control towards this button as you would use ...up in stand-by mode. buttons as you must use the ◄ and ► buttons on the remote control. 5 (ENTER) Press to confirm a selection. 6 POWER Press to see an on-screen menu of the Panel The buttons on the lower-right panel control your TV's features. 3 + VOL - To use the...
... the volume. In the on-screen menu, use the CH buttons as you would use the ▲ and ▼ buttons on the remote control. Power Indicator Blinks and turns off . English - 6 Press to change channels. Remote Control Sensor Aim the remote control towards this button as you would use ...up in stand-by mode. buttons as you must use the ◄ and ► buttons on the remote control. 5 (ENTER) Press to confirm a selection. 6 POWER Press to see an on-screen menu of the Panel The buttons on the lower-right panel control your TV's features. 3 + VOL - To use the...
User Manual (ENGLISH)
Page 7
... or VCR. # COMPONENT IN 1, 2 Component video (Y/PB/PR) and audio (R-AUDIO-L) inputs. The product color and shape may vary depending on the model. 1 POWER IN Connect the supplied power cord. 2 DIGITAL AUDIO OUT (OPTICAL) Connect to a Digital Audio component. 3 AUDIO OUT (R/L) Audio outputs to external devices. 4 PC AUDIO IN Connect to the...
... or VCR. # COMPONENT IN 1, 2 Component video (Y/PB/PR) and audio (R-AUDIO-L) inputs. The product color and shape may vary depending on the model. 1 POWER IN Connect the supplied power cord. 2 DIGITAL AUDIO OUT (OPTICAL) Connect to a Digital Audio component. 3 AUDIO OUT (R/L) Audio outputs to external devices. 4 PC AUDIO IN Connect to the...
User Manual (ENGLISH)
Page 8
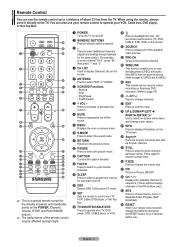
... of the available video sources. Fast/Forward 7 + VOL - g INFO Press to select additional channels (digital and analog) being broadcast by bright light. 1 POWER Turns the TV on and off. 2 NUMERIC BUTTONS Press to resume normal video. k PIP Picture-in sequence. (These buttons change the screen size. Press to...TV, DVD, CABLE, STB, VCR) on the remote. ) SOURCE Press to display all of the remote control may be used to control recording on Samsung DVD recorders. (Refer to page 74) d CH Press to change channels. f UP▲/DOWN▼/LEFT◄/ RIGHT►/ENTER Use to stop...
... of the available video sources. Fast/Forward 7 + VOL - g INFO Press to select additional channels (digital and analog) being broadcast by bright light. 1 POWER Turns the TV on and off. 2 NUMERIC BUTTONS Press to resume normal video. k PIP Picture-in sequence. (These buttons change the screen size. Press to...TV, DVD, CABLE, STB, VCR) on the remote. ) SOURCE Press to display all of the remote control may be used to control recording on Samsung DVD recorders. (Refer to page 74) d CH Press to change channels. f UP▲/DOWN▼/LEFT◄/ RIGHT►/ENTER Use to stop...
User Manual (ENGLISH)
Page 9
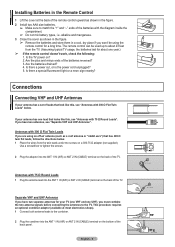
... the combiner. 2 Plug the combiner into the ANT 1 IN (AIR) or ANT 2 IN (CABLE) terminal on the bottom of the back panel. Is the TV power on a 300-75 Ω adapter (not supplied). Use a screwdriver to match the "+" and "-" ends of the batteries with 75 Ω Round Leads 1 Plug ...) terminal on the back of the TV. This procedure requires an optional combiner-adaptor (available at the back of the batteries reversed? 3. Is there a power cut, or is the power cord unplugged? 5. If your antenna has a set of leads that has 300 Ω twin flat leads, follow the directions below .
... the combiner. 2 Plug the combiner into the ANT 1 IN (AIR) or ANT 2 IN (CABLE) terminal on the bottom of the back panel. Is the TV power on a 300-75 Ω adapter (not supplied). Use a screwdriver to match the "+" and "-" ends of the batteries with 75 Ω Round Leads 1 Plug ...) terminal on the back of the TV. This procedure requires an optional combiner-adaptor (available at the back of the batteries reversed? 3. Is there a power cut, or is the power cord unplugged? 5. If your antenna has a set of leads that has 300 Ω twin flat leads, follow the directions below .
User Manual (ENGLISH)
Page 15
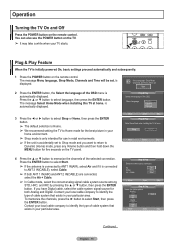
... & Play Feature When the TV is accidentally set to Shop mode and you have Digital cable, select the cable system signal source for use the POWER button on the TV panel. Contact your TV starts. Plug & Play Select the antennas to identify the type of the OSD. Operation Turning the TV... On and Off Press the POWER button on the remote control. You can also use in your local cable company to ANT 2 IN(CABLE), select Cable. ➢ If both Analog and...
... & Play Feature When the TV is accidentally set to Shop mode and you have Digital cable, select the cable system signal source for use the POWER button on the TV panel. Contact your TV starts. Plug & Play Select the antennas to identify the type of the OSD. Operation Turning the TV... On and Off Press the POWER button on the remote control. You can also use in your local cable company to ANT 2 IN(CABLE), select Cable. ➢ If both Analog and...
User Manual (ENGLISH)
Page 18
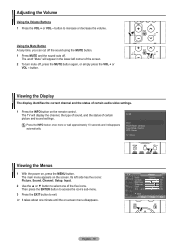
... Buttons 1 Press the VOL + or VOL - Air 28 Mono Picture Mode : Dynamic Sound Mode : Custom MTS : Stereo 12 : 00 am Viewing the Menus 1 With the power on -screen menu disappears.
... Buttons 1 Press the VOL + or VOL - Air 28 Mono Picture Mode : Dynamic Sound Mode : Custom MTS : Stereo 12 : 00 am Viewing the Menus 1 With the power on -screen menu disappears.
User Manual (ENGLISH)
Page 20
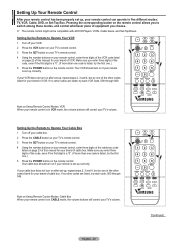
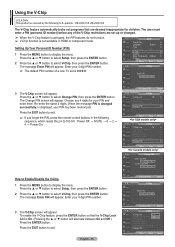
... 4, but try each VCR code, 000 through 046. If your cable box does not turn on if your remote is listed, try one .) 5 Press the POWER button on page 23 of this manual for your brand of the code, even if the first digit is a "0". (If more than one code is... might not be compatible with all DVD Players, VCRs, Cable boxes, and Set-Top Boxes. If no other codes are listed, try one .) 5 Press the POWER button on if your TV's volume. Your VCR should turn on Using Remote Control Modes: Cable Box When your remote control is in CABLE mode...
... 4, but try each VCR code, 000 through 046. If your cable box does not turn on if your remote is listed, try one .) 5 Press the POWER button on page 23 of this manual for your brand of the code, even if the first digit is a "0". (If more than one code is... might not be compatible with all DVD Players, VCRs, Cable boxes, and Set-Top Boxes. If no other codes are listed, try one .) 5 Press the POWER button on if your TV's volume. Your VCR should turn on Using Remote Control Modes: Cable Box When your remote control is in CABLE mode...
User Manual (ENGLISH)
Page 21
Your STB should turn on after set -up , repeat steps 2, 3 and 4, but try one .) 5 Press the POWER button on if your remote is listed, try the first one of the other codes listed for your brand of DVD. Setting Up the Remote ... your DVD does not turn on the remote control. Your DVD should turn on after set -up , repeat steps 2, 3 and 4, but try one .) 5 Press the POWER button on the remote control. Note on if your remote is listed, try the first one of the other codes listed for your TV's volume...
Your STB should turn on after set -up , repeat steps 2, 3 and 4, but try one .) 5 Press the POWER button on if your remote is listed, try the first one of the other codes listed for your brand of DVD. Setting Up the Remote ... your DVD does not turn on the remote control. Your DVD should turn on after set -up , repeat steps 2, 3 and 4, but try one .) 5 Press the POWER button on the remote control. Note on if your remote is listed, try the first one of the other codes listed for your TV's volume...
User Manual (ENGLISH)
Page 37
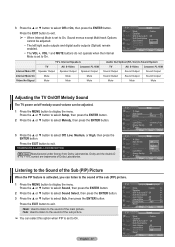
... Mute AV, S-Video Sound Output Sound Output Mute Component, PC, HDMI Sound Output Sound Output Mute Adjusting the TV On/Off Melody Sound The TV power on/off melody sound volume can be adjusted. • The left/right audio outputs and digital audio outputs (Optical) remain enabled. • The VOL +, VOL...
... Mute AV, S-Video Sound Output Sound Output Mute Component, PC, HDMI Sound Output Sound Output Mute Adjusting the TV On/Off Melody Sound The TV power on/off melody sound volume can be adjusted. • The left/right audio outputs and digital audio outputs (Optical) remain enabled. • The VOL +, VOL...
User Manual (ENGLISH)
Page 43
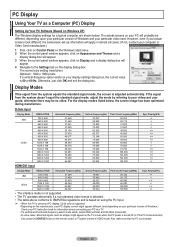
... a PC display, 32-bit color is supported. • Depending on the manufacturer, your PC display screen might appear on the TV screen when the PC power is turned off (or if the PC is disconnected).
... a PC display, 32-bit color is supported. • Depending on the manufacturer, your PC display screen might appear on the TV screen when the PC power is turned off (or if the PC is disconnected).
User Manual (ENGLISH)
Page 48
... TV to turn on or off the TV after the TV was turned on by pressing the number buttons on the remote control. ➢ Auto Power Off When you want the TV to turn on a specific channel or play back contents such as above. 3 Press the ◄ or ► button to...
... TV to turn on or off the TV after the TV was turned on by pressing the number buttons on the remote control. ➢ Auto Power Off When you want the TV to turn on a specific channel or play back contents such as above. 3 Press the ◄ or ► button to...
User Manual (ENGLISH)
Page 52
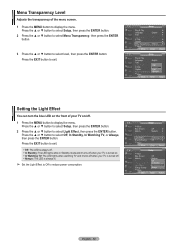
... LED lights while in Standby mode and it turns off when your TV is always lit. ➢ Set the Light Effect to Off to reduce power consumption. Menu Transparency Level Adjusts the transparency of your TV on . • In Watching TV: The LED lights when watching TV and it turns off...
... LED lights while in Standby mode and it turns off when your TV is always lit. ➢ Set the Light Effect to Off to reduce power consumption. Menu Transparency Level Adjusts the transparency of your TV on . • In Watching TV: The LED lights when watching TV and it turns off...
User Manual (ENGLISH)
Page 53
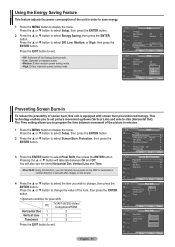
...On Horizontal Dot : 20 Vertical Line : 21 Time : 12 3 4 English - 53 Move Enter Return Using the Energy Saving Feature This feature adjusts the power consumption of the item, then press the ENTER button. • Optimum condition for pixel shift; T V Setup ▲ More Blue Screen Melody : Off.... This technology enables you wish to change the value of the unit in standard mode. • Medium: Enters medium power saving mode. • High: Enters maximum power saving mode. Press the ▲ or ▼ button to select Setup, then press the ENTER button. 2 Press ...
...On Horizontal Dot : 20 Vertical Line : 21 Time : 12 3 4 English - 53 Move Enter Return Using the Energy Saving Feature This feature adjusts the power consumption of the item, then press the ENTER button. • Optimum condition for pixel shift; T V Setup ▲ More Blue Screen Melody : Off.... This technology enables you wish to change the value of the unit in standard mode. • Medium: Enters medium power saving mode. • High: Enters maximum power saving mode. Press the ▲ or ▼ button to select Setup, then press the ENTER button. 2 Press ...
User Manual (ENGLISH)
Page 55
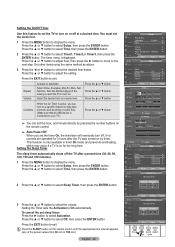
... is activated, the PIP features do not function. ➢ V-Chip function is not available in the following U.S. Press the EXIT button to 0-0-0-0 : Power Off. → MUTE → 8 → 2 → 4 → Power On. 0~9 Enter PIN Return T V V-Chip V-Chip Lock : Off ► TV Parental Guidelines ► MPAA Rating ► Downloadable U.S. Rating Change PIN Move...
... is activated, the PIP features do not function. ➢ V-Chip function is not available in the following U.S. Press the EXIT button to 0-0-0-0 : Power Off. → MUTE → 8 → 2 → 4 → Power On. 0~9 Enter PIN Return T V V-Chip V-Chip Lock : Off ► TV Parental Guidelines ► MPAA Rating ► Downloadable U.S. Rating Change PIN Move...

User Manual (ENGLISH)
Page 60
... MENU button to clear PIN. The " " symbol is not downloaded from the broadcasting station, the Downloadable U.S. To resume normal viewing, tune to 0-0-0-0 : Power Off. → MUTE → 8 → 2 → 4 → Power On. Press the ▲ or ▼ button to select Setup, then press the ENTER button. 3 Press the ▲ or ▼ button...
... MENU button to clear PIN. The " " symbol is not downloaded from the broadcasting station, the Downloadable U.S. To resume normal viewing, tune to 0-0-0-0 : Power Off. → MUTE → 8 → 2 → 4 → Power On. Press the ▲ or ▼ button to select Setup, then press the ENTER button. 3 Press the ▲ or ▼ button...
User Manual (ENGLISH)
Page 61
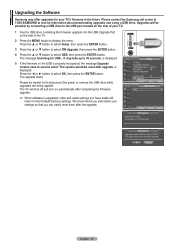
... Scanning for USB... Return SW Upgrade Upgrade version XXXX to version xxxx? It may take up to 30 seconds. The upgrade starts. Upgrading the Software Samsung may offer upgrades for your settings so that you have made will be reset after upgrade. It may take up to 30 seconds. is displayed... would be possible by connecting a USB drive to the USB port located on the side of the TV. 2 Press the MENU button to disconnect the power or remove the USB drive while upgrades are being applied. The system would be careful not to display the menu. The TV will shut off...
... Scanning for USB... Return SW Upgrade Upgrade version XXXX to version xxxx? It may take up to 30 seconds. The upgrade starts. Upgrading the Software Samsung may offer upgrades for your settings so that you have made will be reset after upgrade. It may take up to 30 seconds. is displayed... would be possible by connecting a USB drive to the USB port located on the side of the TV. 2 Press the MENU button to disconnect the power or remove the USB drive while upgrades are being applied. The system would be careful not to display the menu. The TV will shut off...
User Manual (ENGLISH)
Page 73
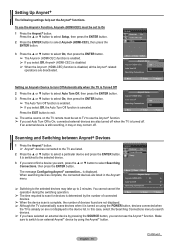
... in the device list. The message Configuring Anynet+ connection... Move Enter Return ➢ The time required to scan for devices is determined by using the POWER button, devices connected when the TV is turned on are not displayed in the Anynet+ Anynet+ Setup menu. Press the EXIT button to select Anynet...
... in the device list. The message Configuring Anynet+ connection... Move Enter Return ➢ The time required to scan for devices is determined by using the POWER button, devices connected when the TV is turned on are not displayed in the Anynet+ Anynet+ Setup menu. Press the EXIT button to select Anynet...

User Manual (ENGLISH)
Page 75
... using the HDMI 1.3 cable only. The Anynet+ system supports Anynet+ devices only. ■ Connect only one receiver (home theater). ■ Check if the Anynet+ device power cord is properly connected. ■ Check the Anynet+ device's Video/Audio/HDMI 1.3 cable connections. ■ Check whether Anynet+ (HDMI-CEC) is set to On in...
... using the HDMI 1.3 cable only. The Anynet+ system supports Anynet+ devices only. ■ Connect only one receiver (home theater). ■ Check if the Anynet+ device power cord is properly connected. ■ Check the Anynet+ device's Video/Audio/HDMI 1.3 cable connections. ■ Check whether Anynet+ (HDMI-CEC) is set to On in...
User Manual (ENGLISH)
Page 76
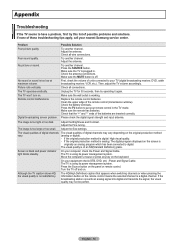
... batteries. Adjust the Brightness and Contrast. The visual qualities of digital channels The visual qualities of digital channels may not be perfect. check the Power and Signal Cable. The TV is a digital channel. The HD(High Definition) caption that the "+" and "-" ends of these troubleshooting tips .... Press the TV button to put your computer; Screen is plugged in the TV mode. On your remote control in . On your nearest Samsung service center. English - 76 Appendix Troubleshooting If the TV seems to have a problem, first try operating it again. If none of the ...
... batteries. Adjust the Brightness and Contrast. The visual qualities of digital channels The visual qualities of digital channels may not be perfect. check the Power and Signal Cable. The TV is a digital channel. The HD(High Definition) caption that the "+" and "-" ends of these troubleshooting tips .... Press the TV button to put your computer; Screen is plugged in the TV mode. On your remote control in . On your nearest Samsung service center. English - 76 Appendix Troubleshooting If the TV seems to have a problem, first try operating it again. If none of the ...


