User Manual (ENGLISH)
Page 4
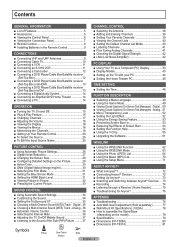
...; Using the Setup Menu 71 ■ Active Color 30 ■ DNIe (Digital Natural Image engine 30 ■ Selecting the Film Mode 31 ■ Setting the Blue Screen Mode 31 ■ Setting the HDMI Black Level 31 ■ Viewing Picture-in the Remote Control 9 CONNECTIONS ■ Connecting VHF and UHF Antennas 9 ■ Connecting Cable TV 10 ■ Connecting a VCR 11 ■ Connecting an S-VHS VCR 11 ■ Connecting a Camcorder 12 ■ Connecting a DVD Player/Cable Box/Satellite receiver (Set-Top Box 12 ■ Connecting a DVD Player/Cable Box/Satellite receiver (Set...
...; Using the Setup Menu 71 ■ Active Color 30 ■ DNIe (Digital Natural Image engine 30 ■ Selecting the Film Mode 31 ■ Setting the Blue Screen Mode 31 ■ Setting the HDMI Black Level 31 ■ Viewing Picture-in the Remote Control 9 CONNECTIONS ■ Connecting VHF and UHF Antennas 9 ■ Connecting Cable TV 10 ■ Connecting a VCR 11 ■ Connecting an S-VHS VCR 11 ■ Connecting a Camcorder 12 ■ Connecting a DVD Player/Cable Box/Satellite receiver (Set-Top Box 12 ■ Connecting a DVD Player/Cable Box/Satellite receiver (Set...
User Manual (ENGLISH)
Page 5
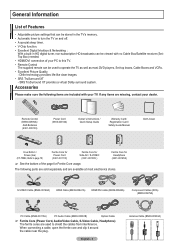
...; Adjustable picture settings that can be stored in the TV's memory. • Automatic timer to turn the TV on and off. • A special sleep timer. • V-Chip function. • Excellent Digital Interface & Networking : With a built-in HD digital tuner, non-subscription HD broadcasts can be viewed with your TV. RETURN FAV.CH Remote Control (BN59-00599A) / AAA Batteries (4301-000103) Power Cord (3903-000144) Owner's Instructions / Quick Setup Guide Warranty Card...
...; Adjustable picture settings that can be stored in the TV's memory. • Automatic timer to turn the TV on and off. • A special sleep timer. • V-Chip function. • Excellent Digital Interface & Networking : With a built-in HD digital tuner, non-subscription HD broadcasts can be viewed with your TV. RETURN FAV.CH Remote Control (BN59-00599A) / AAA Batteries (4301-000103) Power Cord (3903-000144) Owner's Instructions / Quick Setup Guide Warranty Card...
User Manual (ENGLISH)
Page 7
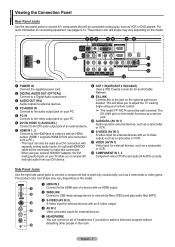
... you to adjust the TV viewing angle using an optional HDMI/DVI adapter, the DVI analog audio inputs on your remote control. ➢ The model FP-T6374 cannot be wall mounted. This will allow you to receive left and right audio from a PC.) - The EX-LINK jack on connecting equipment, see pages 9-14. For more information on this connection. - S-VIDEO (AV IN 1) S-Video input for external devices with an HDMI output. (HDMI 1 supports HDMI-DVI IN and connection from...
... you to adjust the TV viewing angle using an optional HDMI/DVI adapter, the DVI analog audio inputs on your remote control. ➢ The model FP-T6374 cannot be wall mounted. This will allow you to receive left and right audio from a PC.) - The EX-LINK jack on connecting equipment, see pages 9-14. For more information on this connection. - S-VIDEO (AV IN 1) S-Video input for external devices with an HDMI output. (HDMI 1 supports HDMI-DVI IN and connection from...
User Manual (ENGLISH)
Page 8
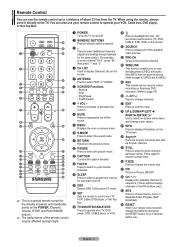
... Audio Program (SAP broadcast). h Anynet+ Runs the Anynet+ functions and sets up to a distance of the available video sources. l CH / Displays the available channels in sequence. (These buttons change channels in Picture ON/OFF. Play/Pause - Press again to select on and off . ^ SRS Selects SRS TruSurround XT mode. & SET Sets the remote to control your TV, VCR, Cable, DVD player, or Set-Top Box. * TV/DVD/STB/CABLE/VCR Press to operate your remote...
... Audio Program (SAP broadcast). h Anynet+ Runs the Anynet+ functions and sets up to a distance of the available video sources. l CH / Displays the available channels in sequence. (These buttons change channels in Picture ON/OFF. Play/Pause - Press again to select on and off . ^ SRS Selects SRS TruSurround XT mode. & SET Sets the remote to control your TV, VCR, Cable, DVD player, or Set-Top Box. * TV/DVD/STB/CABLE/VCR Press to operate your remote...
User Manual (ENGLISH)
Page 13
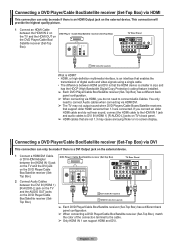
... is a DVI Output jack on the external device. 1 Connect a HDMI/DVI Cable or DVI-HDMI Adapter between the HDMI IN 2 on DVD Player / Cable Box/Satellite receiver (Set-Top Box) the TV and the HDMI OUT on the DVD Player/Cable Box/Satellite receiver (SetTop Box). 2 Audio Cable (Not supplied) 1 HDMI/DVI Cable (Not supplied) ➢ Each DVD Player/Cable Box/Satellite receiver (Set-Top Box) has a different back panel configuration. ➢ When connecting a DVD Player/Cable Box/Satellite receiver (Set-Top Box), match the color of digital audio and video signals using a single cable. •...
... is a DVI Output jack on the external device. 1 Connect a HDMI/DVI Cable or DVI-HDMI Adapter between the HDMI IN 2 on DVD Player / Cable Box/Satellite receiver (Set-Top Box) the TV and the HDMI OUT on the DVD Player/Cable Box/Satellite receiver (SetTop Box). 2 Audio Cable (Not supplied) 1 HDMI/DVI Cable (Not supplied) ➢ Each DVD Player/Cable Box/Satellite receiver (Set-Top Box) has a different back panel configuration. ➢ When connecting a DVD Player/Cable Box/Satellite receiver (Set-Top Box), match the color of digital audio and video signals using a single cable. •...

User Manual (ENGLISH)
Page 14
... HDMI IN jacks are connected, the Optical jack on the TV does not output audio. Amplifier/DVD Home Theater TV Rear Panel When an audio amplifier is connected to the "DIGITAL AUDIO OUT (OPTICAL)" jack: Decrease the gain (volume) Optical Cable (Not supplied) of the TV, and adjust the volume level with the Amplifier's volume control. S/PDIF is a transmission system of digital audio in the form of a light wave that uses a glass conductor. ➢ 5.1CH audio...
... HDMI IN jacks are connected, the Optical jack on the TV does not output audio. Amplifier/DVD Home Theater TV Rear Panel When an audio amplifier is connected to the "DIGITAL AUDIO OUT (OPTICAL)" jack: Decrease the gain (volume) Optical Cable (Not supplied) of the TV, and adjust the volume level with the Amplifier's volume control. S/PDIF is a transmission system of digital audio in the form of a light wave that uses a glass conductor. ➢ 5.1CH audio...

User Manual (ENGLISH)
Page 28
... change the picture size. Your cable box or satellite receiver may have their own set of the image on the screen by expanding it both horizontally and vertically. T V Picture ▲ More Color Tone : Cool1 Detailed Settings Size : 16:9 Digital NR : Auto Active Color : On DNIe : On Reset : OK Move Enter Return T V Size 16:9 Zoom1 Zoom2 Wide Fit 4:3 Just Scan ▲ Position Reset ▼ Press the P.SIZE button on the remote control to change the picture size when PIP is set...
... change the picture size. Your cable box or satellite receiver may have their own set of the image on the screen by expanding it both horizontally and vertically. T V Picture ▲ More Color Tone : Cool1 Detailed Settings Size : 16:9 Digital NR : Auto Active Color : On DNIe : On Reset : OK Move Enter Return T V Size 16:9 Zoom1 Zoom2 Wide Fit 4:3 Just Scan ▲ Position Reset ▼ Press the P.SIZE button on the remote control to change the picture size when PIP is set...
User Manual (ENGLISH)
Page 29
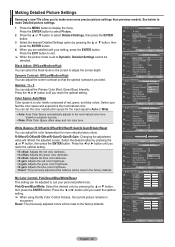
...: Changing the adjustment value will be reset to the factory defaults. Reset: The previously adjusted colors will be reset to adjust the screen depth. Select your favorite color space and experience the most natural color tone based on the screen to the factory defaults. My Color Control: Pink/Green/Blue/White/Reset This setting can set to Dynamic, Detailed Settings cannot be adjusted to display the menu. Press the ◄ or ► button until you to make Detailed picture settings. 1 Press the MENU button...
...: Changing the adjustment value will be reset to the factory defaults. Reset: The previously adjusted colors will be reset to adjust the screen depth. Select your favorite color space and experience the most natural color tone based on the screen to the factory defaults. My Color Control: Pink/Green/Blue/White/Reset This setting can set to Dynamic, Detailed Settings cannot be adjusted to display the menu. Press the ◄ or ► button until you to make Detailed picture settings. 1 Press the MENU button...
User Manual (ENGLISH)
Page 30
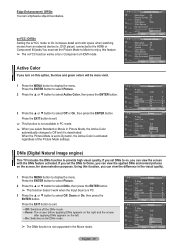
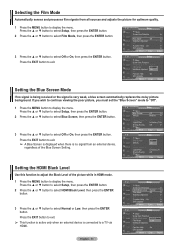
...; button to display the menu. When the Picture Mode is set the Picture Mode to Movie to enjoy this option, the blue and green colors will be more vivid. 1 Press the MENU button to select Off, Demo or On, then press the ENTER button. Press the EXIT button to exit. ➢ This function is deactivated. T V Detailed Settings Black Adjust : Off Dynamic Contrast : Off Gamma : 0 Color Space : Wide White Balance My Color Control Edge...
...; button to display the menu. When the Picture Mode is set the Picture Mode to Movie to enjoy this option, the blue and green colors will be more vivid. 1 Press the MENU button to select Off, Demo or On, then press the ENTER button. Press the EXIT button to exit. ➢ This function is deactivated. T V Detailed Settings Black Adjust : Off Dynamic Contrast : Off Gamma : 0 Color Space : Wide White Balance My Color Control Edge...
User Manual (ENGLISH)
Page 31
... Return Setting the HDMI Black Level Use this function to adjust the Black Level of the Blue Screen Setting. Press the ▲ or ▼ button to select Setup, then press the ENTER button. 2 Press the ▲ or ▼ button to select HDMI Black Level, then press the ENTER button. 3 Press the ▲ or ▼ button to display the menu. English - 31 T V Setup ▲ More Screen Burn Protection HDMI Black Level : Normal Film Mode : Off Wall-Mount Adjustment PIP Function...
... Return Setting the HDMI Black Level Use this function to adjust the Black Level of the Blue Screen Setting. Press the ▲ or ▼ button to select Setup, then press the ENTER button. 2 Press the ▲ or ▼ button to select HDMI Black Level, then press the ENTER button. 3 Press the ▲ or ▼ button to display the menu. English - 31 T V Setup ▲ More Screen Burn Protection HDMI Black Level : Normal Film Mode : Off Wall-Mount Adjustment PIP Function...
User Manual (ENGLISH)
Page 43
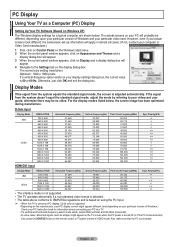
... video format is selected. • The table above conforms to IBM/VESA regulations and is based on using the PC Input. ➢ • When this TV is used as stripes) might appear on your PC will appear. 4 Navigate to the Settings tab on the remote control or TV panel to enter a VIDEO mode. If the signal from the system equals the standard signal mode, the screen is connected. PC Display Using...
... video format is selected. • The table above conforms to IBM/VESA regulations and is based on using the PC Input. ➢ • When this TV is used as stripes) might appear on your PC will appear. 4 Navigate to the Settings tab on the remote control or TV panel to enter a VIDEO mode. If the signal from the system equals the standard signal mode, the screen is connected. PC Display Using...
User Manual (ENGLISH)
Page 49
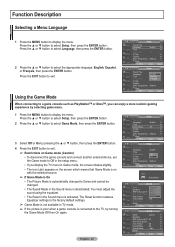
...; or ▼ button to display the menu. You must adjust the sound using the equalizer. • The Reset in the Sound menu is connected to Game and cannot be changed. • The Sound Mode in Game mode, the screen shakes slightly. • The icon ( ) appears on the screen which means that Game Mode is on Game mode (Caution) • To disconnect the game console and connect another external device, set the Game mode to Off in the setup menu. •...
...; or ▼ button to display the menu. You must adjust the sound using the equalizer. • The Reset in the Sound menu is connected to Game and cannot be changed. • The Sound Mode in Game mode, the screen shakes slightly. • The icon ( ) appears on the screen which means that Game Mode is on Game mode (Caution) • To disconnect the game console and connect another external device, set the Game mode to Off in the setup menu. •...
User Manual (ENGLISH)
Page 61
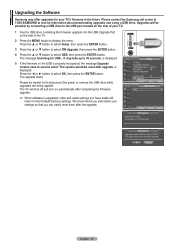
... message Scanning for USB... The system would be reset after upgrade. T V Setup ▲ More Screen Burn Protection ► HDMI Black Level : Normal ► Film Mode : Off ► Wall-Mount Adjustment ► PIP ► Function Help : On ► SW Upgrade ► Move Enter Return T V USB SW Upgrade ► Move Enter SW Upgrade Scanning for USB... Return SW Upgrade Upgrade version XXXX to select USB, then press the ENTER button. The system would be reset after upgrade. OK...
... message Scanning for USB... The system would be reset after upgrade. T V Setup ▲ More Screen Burn Protection ► HDMI Black Level : Normal ► Film Mode : Off ► Wall-Mount Adjustment ► PIP ► Function Help : On ► SW Upgrade ► Move Enter Return T V USB SW Upgrade ► Move Enter SW Upgrade Scanning for USB... Return SW Upgrade Upgrade version XXXX to select USB, then press the ENTER button. The system would be reset after upgrade. OK...
User Manual (ENGLISH)
Page 62
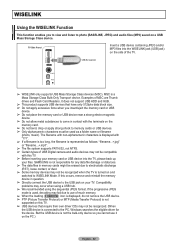
... remove the USB device. ➢ PTP (Picture Transfer Protocol) or MTP (Media Transfer Protocol) is used as follows: "filename...+.jpg" or "filename...+.mp3". ➢ The file system supports FAT16/32, not NTFS. ➢ Certain types of MSC are Thumb drives and Flash Card Readers. If the progressive JPEG mode is not supported on and switched to WISELINK Mode. USB (Not supplied) ➢ WISELINK only supports USB...
... remove the USB device. ➢ PTP (Picture Transfer Protocol) or MTP (Media Transfer Protocol) is used as follows: "filename...+.jpg" or "filename...+.mp3". ➢ The file system supports FAT16/32, not NTFS. ➢ Certain types of MSC are Thumb drives and Flash Card Readers. If the progressive JPEG mode is not supported on and switched to WISELINK Mode. USB (Not supplied) ➢ WISELINK only supports USB...
User Manual (ENGLISH)
Page 72
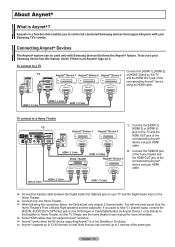
...'s user manual for more information. ➢ Some HDMI cables may not support Anynet+ functions. ➢ Anynet+ works when the AV device supporting Anynet+ is a function that enables you want to hear 5.1 channel audio, connect the DIGITAL AUDIO OUT (OPTICAL) jack on the DVD player or Cable/Satellite Box (ie Anynet Device 1 or 2) directly to a TV TV Anynet+ Device 1 Anynet+ Device 2 Anynet+ Device 3 Connect the [HDMI 1], [HDMI 2] or [HDMI 3] jack on your Samsung...
...'s user manual for more information. ➢ Some HDMI cables may not support Anynet+ functions. ➢ Anynet+ works when the AV device supporting Anynet+ is a function that enables you want to hear 5.1 channel audio, connect the DIGITAL AUDIO OUT (OPTICAL) jack on the DVD player or Cable/Satellite Box (ie Anynet Device 1 or 2) directly to a TV TV Anynet+ Device 1 Anynet+ Device 2 Anynet+ Device 3 Connect the [HDMI 1], [HDMI 2] or [HDMI 3] jack on your Samsung...
User Manual (ENGLISH)
Page 74
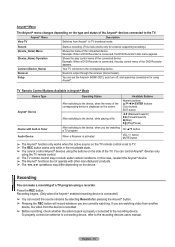
... program When a Receiver is set the Anynet+ (HDMI-CEC), auto turn off, and searching connections for a device supporting recording.) Shows the menu of the connected device. English - 74 Anynet+ Menu Description View TV Switches from the device is recorded. ➢ Before recording, check whether the antenna jack is connected, the play control menu of the TV. You can control Anynet+ devices only using Anynet+. You can set to TV broadcast mode. Record...
... program When a Receiver is set the Anynet+ (HDMI-CEC), auto turn off, and searching connections for a device supporting recording.) Shows the menu of the connected device. English - 74 Anynet+ Menu Description View TV Switches from the device is recorded. ➢ Before recording, check whether the antenna jack is connected, the play control menu of the TV. You can control Anynet+ devices only using Anynet+. You can set to TV broadcast mode. Record...

User Manual (ENGLISH)
Page 75
... out 5.1 channel sound to the Optical Out jack of the TV speaker. 1 Press the Anynet+ button. The Anynet+ system supports Anynet+ devices only. ■ Connect only one receiver (home theater). ■ Check if the Anynet+ device power cord is properly connected. ■ Check the Anynet+ device's Video/Audio/HDMI 1.3 cable connections. ■ Check whether Anynet+ (HDMI-CEC) is Anynet+ exclusive remote control. ■ Anynet+ doesn't work . You cannot use the remote control when...
... out 5.1 channel sound to the Optical Out jack of the TV speaker. 1 Press the Anynet+ button. The Anynet+ system supports Anynet+ devices only. ■ Connect only one receiver (home theater). ■ Check if the Anynet+ device power cord is properly connected. ■ Check the Anynet+ device's Video/Audio/HDMI 1.3 cable connections. ■ Check whether Anynet+ (HDMI-CEC) is Anynet+ exclusive remote control. ■ Anynet+ doesn't work . You cannot use the remote control when...
User Manual (ENGLISH)
Page 76
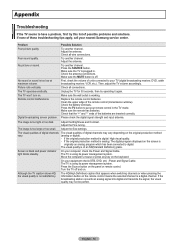
... on the screen is black and power indicator light blinks steadily. Possible Solution Try another channel. Adjust the antenna. Check the antenna connections. Then, adjust the TV volume accordingly. Clean the upper edge of these troubleshooting tips apply, call your nearest Samsung service center. Press the TV button to put your TV (digital broadcasting receiver, DVD, cable broadcasting receiver, VCR, etc.). Please check the digital signal strength and input antenna. check the Power and Signal Cable. Turn the TV...
... on the screen is black and power indicator light blinks steadily. Possible Solution Try another channel. Adjust the antenna. Check the antenna connections. Then, adjust the TV volume accordingly. Clean the upper edge of these troubleshooting tips apply, call your nearest Samsung service center. Press the TV button to put your TV (digital broadcasting receiver, DVD, cable broadcasting receiver, VCR, etc.). Please check the digital signal strength and input antenna. check the Power and Signal Cable. Turn the TV...
User Manual (ENGLISH)
Page 79
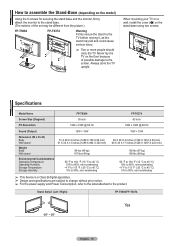
... - 79 Specifications Model Name Screen Size (Diagonal) PC Resolution FP-T5084 50 inch 1920 x 1080 @ 60 Hz FP-T6374 63 inch 1920 x 1080 @ 60 Hz Sound (Output) 15W + 15W Dimension (W x H x D) Body With stand Weight Body With stand 51 X 29 X 4 inches (1289 X 739 X 95 mm) 51 X 32 X 13 inches (1289 X... Always store the TV upright. How to assemble the Stand-Base (depending on the stand-base using two screws. When mounting your TV on a wall, install the cover (1) on the model) Using the 6 screws for securing the stand base and the monitor, firmly attach the monitor to the stand base. (The...
... - 79 Specifications Model Name Screen Size (Diagonal) PC Resolution FP-T5084 50 inch 1920 x 1080 @ 60 Hz FP-T6374 63 inch 1920 x 1080 @ 60 Hz Sound (Output) 15W + 15W Dimension (W x H x D) Body With stand Weight Body With stand 51 X 29 X 4 inches (1289 X 739 X 95 mm) 51 X 32 X 13 inches (1289 X... Always store the TV upright. How to assemble the Stand-Base (depending on the stand-base using two screws. When mounting your TV on a wall, install the cover (1) on the model) Using the 6 screws for securing the stand base and the monitor, firmly attach the monitor to the stand base. (The...
Brochure
Page 2
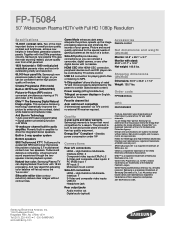
... video inputs USB 2.0 Headphone jack Rear output jacks Audio monitor out Digital audio (optical) Accessories Remote control Net dimensions and weight (WxHxD) Monitor: 50.8" x 29.1" x 3.7" Monitor with outstanding clarity and resolution. 60,000 hour panel life. SRS TruSurround XT is a registered trademark of a button. V-Chip system1 allows blocking of playing 5.1 multichannel content over two speakers. Power saving (off -air TV and cable channels. 2As an Energy Star® partner, Samsung has determined that solves the problem...
... video inputs USB 2.0 Headphone jack Rear output jacks Audio monitor out Digital audio (optical) Accessories Remote control Net dimensions and weight (WxHxD) Monitor: 50.8" x 29.1" x 3.7" Monitor with outstanding clarity and resolution. 60,000 hour panel life. SRS TruSurround XT is a registered trademark of a button. V-Chip system1 allows blocking of playing 5.1 multichannel content over two speakers. Power saving (off -air TV and cable channels. 2As an Energy Star® partner, Samsung has determined that solves the problem...


