User Manual (ENGLISH)
Page 1
FP-T5094W FP-T5894W PLASMA DISPLAY with Wireless Home AV Center Owner's Instructions Register your product at www.samsung.com/global/register Record your Model and Serial number here for future reference. ▪ Model Serial No
FP-T5094W FP-T5894W PLASMA DISPLAY with Wireless Home AV Center Owner's Instructions Register your product at www.samsung.com/global/register Record your Model and Serial number here for future reference. ▪ Model Serial No

User Manual (ENGLISH)
Page 3
... in material or workmanship, and only those encountered in normal use other wireless devices near metal framework, furniture, or any originally specified provisions for, in-home or on SAMSUNG products purchased in Canada on -site services, minimum or maximum repair times... signal may arise when the TV and Wireless center communicate with Samsung Electronics (SAMSUNG) products, and the requirements, conditions, exclusions and limitations contained herein, SAMSUNG will additionally provide Warranty Repair Service in the United States on SAMSUNG products purchased in Canada, and in the...
... in material or workmanship, and only those encountered in normal use other wireless devices near metal framework, furniture, or any originally specified provisions for, in-home or on SAMSUNG products purchased in Canada on -site services, minimum or maximum repair times... signal may arise when the TV and Wireless center communicate with Samsung Electronics (SAMSUNG) products, and the requirements, conditions, exclusions and limitations contained herein, SAMSUNG will additionally provide Warranty Repair Service in the United States on SAMSUNG products purchased in Canada, and in the...
User Manual (ENGLISH)
Page 4
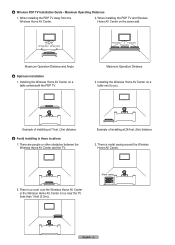
... feet. (2m) distance Avoid installing in these locations 1. There is a cover over the Wireless Home AV Center or the Wireless Home AV Center is metal casing around the Wireless Home AV Center. 3. Installing the Wireless Home AV Center on the same wall. 26 feet (8m) 26 feet (8m) Maximum ... distance 2. There is too near the TV. (less than 1 feet (0.3m)). Maximum Operating Distances 1. Installing the Wireless Home AV Center on a table next to you. There are people or other obstacles between the Wireless Home AV Center and the TV. When installing the PDP TV away from the...
... feet. (2m) distance Avoid installing in these locations 1. There is a cover over the Wireless Home AV Center or the Wireless Home AV Center is metal casing around the Wireless Home AV Center. 3. Installing the Wireless Home AV Center on the same wall. 26 feet (8m) 26 feet (8m) Maximum ... distance 2. There is too near the TV. (less than 1 feet (0.3m)). Maximum Operating Distances 1. Installing the Wireless Home AV Center on a table next to you. There are people or other obstacles between the Wireless Home AV Center and the TV. When installing the PDP TV away from the...
User Manual (ENGLISH)
Page 6
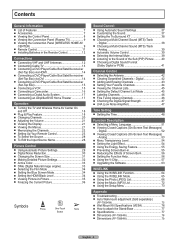
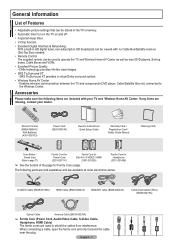
... 77 ■ Dimensions (FP-T5094W 78 ■ Dimensions (FP-T5894W 79 English - 6 Contents General Information ■ List of Features 7 ■ Accessories 7 ■ Viewing the Control Panel 8 ■ Viewing the Connection Panel (Plasma TV 9 ■ Viewing the Connection Panel (WIRELESS HOME AV CENTER 9 ■...MP3) List 72 ■ Using the Setup Menu 73 Appendix ■ Troubleshooting 74 ■ Auto Wall-mount adjustment (Sold separately) (FP-T5094W 75 ■ Wall Mount Kit Specifications (VESA 76 ■ How to the Sound of the Sub (PIP) Picture ......... ...
... 77 ■ Dimensions (FP-T5094W 78 ■ Dimensions (FP-T5894W 79 English - 6 Contents General Information ■ List of Features 7 ■ Accessories 7 ■ Viewing the Control Panel 8 ■ Viewing the Connection Panel (Plasma TV 9 ■ Viewing the Connection Panel (WIRELESS HOME AV CENTER 9 ■...MP3) List 72 ■ Using the Setup Menu 73 Appendix ■ Troubleshooting 74 ■ Auto Wall-mount adjustment (Sold separately) (FP-T5094W 75 ■ Wall Mount Kit Specifications (VESA 76 ■ How to the Sound of the Sub (PIP) Picture ......... ...
User Manual (ENGLISH)
Page 7
... HD digital tuner, non-subscription HD broadcasts can be viewed with your dealer. SRS TruSurround XT provides a virtual Dolby surround system. • Wireless Home AV Center - If any items are available at most DVD players, Set-top boxes, Cable Boxes and VCRs. • Excellent Picture ...Quality - The following items are used to the Wireless Center. DNIe technology provides life-like clear images. • SRS TruSurround XT - When connecting a cable, open the ferrite core and clip ...
... HD digital tuner, non-subscription HD broadcasts can be viewed with your dealer. SRS TruSurround XT provides a virtual Dolby surround system. • Wireless Home AV Center - If any items are available at most DVD players, Set-top boxes, Cable Boxes and VCRs. • Excellent Picture ...Quality - The following items are used to the Wireless Center. DNIe technology provides life-like clear images. • SRS TruSurround XT - When connecting a cable, open the ferrite core and clip ...

User Manual (ENGLISH)
Page 9
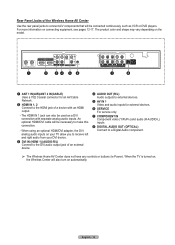
... as a camcorder or video game. 1 HEADPHONE You can connect a set of headphones if you to the jack on the FP-T5894 functions as a RS-232C control jack. Viewing the Connection Panel (WIRELESS HOME AV CENTER) Front Panel Jacks Use the front panel jacks to the HDMI jack of a device with an HDMI... TV) Rear Panel Jacks of Your TV 1 POWER IN Connect the supplied power cord. 2 Service For service only. 3 EX-LINK Connect this to adjust the Wireless Home AV Center viewing angle using your remote control. ➢ The model...
... as a camcorder or video game. 1 HEADPHONE You can connect a set of headphones if you to the jack on the FP-T5894 functions as a RS-232C control jack. Viewing the Connection Panel (WIRELESS HOME AV CENTER) Front Panel Jacks Use the front panel jacks to the HDMI jack of a device with an HDMI... TV) Rear Panel Jacks of Your TV 1 POWER IN Connect the supplied power cord. 2 Service For service only. 3 EX-LINK Connect this to adjust the Wireless Home AV Center viewing angle using your remote control. ➢ The model...
User Manual (ENGLISH)
Page 10
... only. 7 COMPONENT IN Component video (Y/PB/PR) and audio (R-AUDIO-L) inputs. 8 DIGITAL AUDIO OUT (OPTICAL) Connect to the HDMI jack of the Wireless Home AV Center Use the rear panel jacks to make this connection. - English - 10 For more information on automatically. An optional HDMI/DVI cable will... devices. 5 AV IN 1 Video and audio inputs for an Air/Cable Network. 2 HDMI IN 1, 2 Connect to a Digital Audio component. ➢ The Wireless Home AV Center does not have any controls or buttons (ie Power). The HDMI IN 1 jack can also be necessary to connect A/V components that will...
... only. 7 COMPONENT IN Component video (Y/PB/PR) and audio (R-AUDIO-L) inputs. 8 DIGITAL AUDIO OUT (OPTICAL) Connect to the HDMI jack of the Wireless Home AV Center Use the rear panel jacks to make this connection. - English - 10 For more information on automatically. An optional HDMI/DVI cable will... devices. 5 AV IN 1 Video and audio inputs for an Air/Cable Network. 2 HDMI IN 1, 2 Connect to a Digital Audio component. ➢ The Wireless Home AV Center does not have any controls or buttons (ie Power). The HDMI IN 1 jack can also be necessary to connect A/V components that will...
User Manual (ENGLISH)
Page 11
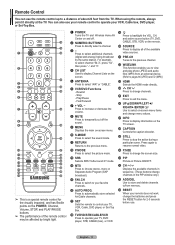
... a channel. 3 - You can use the remote control up to select additional channels (digital and analog) being broadcast by bright light. 1 POWER Turns the TV and Wireless Home AV Center on -screen menu items and change menu values. For example, to select channel "54-3", press "54", then press "-" and "3". 4 CH LIST Used...
... a channel. 3 - You can use the remote control up to select additional channels (digital and analog) being broadcast by bright light. 1 POWER Turns the TV and Wireless Home AV Center on -screen menu items and change menu values. For example, to select channel "54-3", press "54", then press "-" and "3". 4 CH LIST Used...

User Manual (ENGLISH)
Page 12
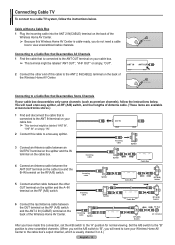
...screwdriver to tighten the screws. 2 Plug the adaptor into the ANT 1 IN (AIR) or ANT 2 IN (CABLE) terminal on the back of the Wireless Home AV Center. Is there a special fluorescent light or a neon sign nearby? Are the plus and minus ends of the batteries reversed? 3. Connections Connecting ... Remove the batteries and store them in a cool, dry place if you must combine the two antenna signals before connecting the antennas to the Wireless Home AV Center. Installing Batteries in the Remote Control 1 Lift the cover at most electronics shops). 1 Connect both antenna leads to the combiner...
...screwdriver to tighten the screws. 2 Plug the adaptor into the ANT 1 IN (AIR) or ANT 2 IN (CABLE) terminal on the back of the Wireless Home AV Center. Is there a special fluorescent light or a neon sign nearby? Are the plus and minus ends of the batteries reversed? 3. Connections Connecting ... Remove the batteries and store them in a cool, dry place if you must combine the two antenna signals before connecting the antennas to the Wireless Home AV Center. Installing Batteries in the Remote Control 1 Lift the cover at most electronics shops). 1 Connect both antenna leads to the combiner...
User Manual (ENGLISH)
Page 13
... A/B switch to the "A" position for normal viewing. Incoming cable Incoming cable Incoming cable 6 Connect the last Antenna cable between the other end of this Wireless Home AV Center is usually channel 3 or 4.) English - 13 ANT IN ANT OUT 2 Connect the other OUT terminal on the splitter and the A-...IN terminal on the back of the Wireless Home AV Center. ➢ Because this cable to the ANT 2 IN(CABLE) terminal on the RF (A/B) switch. Cable without a Cable Box 1 Plug ...
... A/B switch to the "A" position for normal viewing. Incoming cable Incoming cable Incoming cable 6 Connect the last Antenna cable between the other end of this Wireless Home AV Center is usually channel 3 or 4.) English - 13 ANT IN ANT OUT 2 Connect the other OUT terminal on the splitter and the A-...IN terminal on the back of the Wireless Home AV Center. ➢ Because this cable to the ANT 2 IN(CABLE) terminal on the RF (A/B) switch. Cable without a Cable Box 1 Plug ...
User Manual (ENGLISH)
Page 14
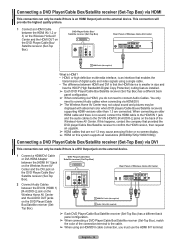
.... ➢ When connecting via HDMI, you must use the HDMI IN1 terminal. DVD Player/Cable Box/ Satellite receiver (Set-Top Box) Rear Panel of Wireless Home AV Center 1 HDMI Cable (Not supplied) What is HDMI? • HDMI, or high-definition multimedia interface, is an interface that enables the transmission...and video signals using an HDMI/DVI cable connection, you do not need to connect Audio cables when connecting via HDMI/DVI. ➢ The Wireless Home AV Center may not output sound and pictures may cause annoying flicker or no sound, connect the HDMI cable to the HDMI IN 1 ...
.... ➢ When connecting via HDMI, you must use the HDMI IN1 terminal. DVD Player/Cable Box/ Satellite receiver (Set-Top Box) Rear Panel of Wireless Home AV Center 1 HDMI Cable (Not supplied) What is HDMI? • HDMI, or high-definition multimedia interface, is an interface that enables the transmission...and video signals using an HDMI/DVI cable connection, you do not need to connect Audio cables when connecting via HDMI/DVI. ➢ The Wireless Home AV Center may not output sound and pictures may cause annoying flicker or no sound, connect the HDMI cable to the HDMI IN 1 ...

User Manual (ENGLISH)
Page 15
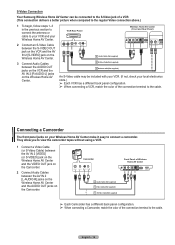
... "mono" (non-stereo) VCR, use a Yconnector (not supplied) to hook up to the right and left audio input jacks of the Wireless Home AV Center. Continued... Connecting a VCR Video Connection These instructions assume that you must connect two cables. ➢ Each VCR has a ...3 Antenna cable(Not supplied) 5 Connect Audio Cables between the COMPONENT 1 Component Cable (Not supplied) IN (1 or 2) [R-AUDIO-L] jacks on the Wireless Home AV 2 Audio Cable (Not supplied) Center and the AUDIO OUT jacks on the DVD Player/ Cable Box/Satellite receiver (Set-Top Box) ➢...
... "mono" (non-stereo) VCR, use a Yconnector (not supplied) to hook up to the right and left audio input jacks of the Wireless Home AV Center. Continued... Connecting a VCR Video Connection These instructions assume that you must connect two cables. ➢ Each VCR has a ...3 Antenna cable(Not supplied) 5 Connect Audio Cables between the COMPONENT 1 Component Cable (Not supplied) IN (1 or 2) [R-AUDIO-L] jacks on the Wireless Home AV 2 Audio Cable (Not supplied) Center and the AUDIO OUT jacks on the DVD Player/ Cable Box/Satellite receiver (Set-Top Box) ➢...
User Manual (ENGLISH)
Page 16
... without using a VCR. 1 Connect a Video Cable (or S-Video Cable) between the AV IN 2 [VIDEO] (or S-VIDEO) jack on the Wireless Home AV Center and the VIDEO OUT jack on the Camcorder. 2 Connect Audio Cables between the AUDIO OUT jacks on the VCR and the AV...Camcorder has a different back panel configuration. ➢ When connecting a Camcorder, match the color of the connection terminal to the cable. S-Video Connection Your Samsung Wireless Home AV Center can be included with your VCR. (If not, check your local electronics store.) ➢ Each VCR has a different back panel configuration....
... without using a VCR. 1 Connect a Video Cable (or S-Video Cable) between the AV IN 2 [VIDEO] (or S-VIDEO) jack on the Wireless Home AV Center and the VIDEO OUT jack on the Camcorder. 2 Connect Audio Cables between the AUDIO OUT jacks on the VCR and the AV...Camcorder has a different back panel configuration. ➢ When connecting a Camcorder, match the color of the connection terminal to the cable. S-Video Connection Your Samsung Wireless Home AV Center can be included with your VCR. (If not, check your local electronics store.) ➢ Each VCR has a different back panel configuration....
User Manual (ENGLISH)
Page 17
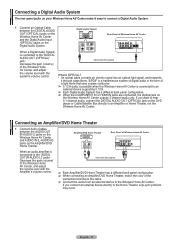
... the Amplifier/DVD Home Theater. Connecting an Amplifier/DVD Home Theater 1 Connect Audio Cables between the DIGITAL AUDIO OUT (OPTICAL) jacks on the Wireless Home AV Center and the Digital Audio Input (OPTICAL) jacks on the Digital Audio System. If you want to hear 5.1 channel audio, connect... signal into an optical light signal, and transmits it easy to the "DIGITAL AUDIO OUT (OPTICAL)" jack: Decrease the gain (volume) of the Wireless Home AV Center, and adjust the volume level with the system's volume control. Audio Cable (Not supplied) ➢ Each Amplifier/DVD Home Theater ...
... the Amplifier/DVD Home Theater. Connecting an Amplifier/DVD Home Theater 1 Connect Audio Cables between the DIGITAL AUDIO OUT (OPTICAL) jacks on the Wireless Home AV Center and the Digital Audio Input (OPTICAL) jacks on the Digital Audio System. If you want to hear 5.1 channel audio, connect... signal into an optical light signal, and transmits it easy to the "DIGITAL AUDIO OUT (OPTICAL)" jack: Decrease the gain (volume) of the Wireless Home AV Center, and adjust the volume level with the system's volume control. Audio Cable (Not supplied) ➢ Each Amplifier/DVD Home Theater ...

User Manual (ENGLISH)
Page 18
...Digital STD HRC IRC Move Enter Skip English - 18 Continued... When the TV is only intended for your particular area. The message Connecting to Wireless Home AV Center is displayed. 2 Press the ENTER button, the Select the language of the OSD menu is connected to identify the type of... the selected connection. Press the ▲ or ▼ button to Wireless Home AV Center Plug & Play Select the language of cable system that exists in your particular area. Menu Language :English Español Fran&#...
...Digital STD HRC IRC Move Enter Skip English - 18 Continued... When the TV is only intended for your particular area. The message Connecting to Wireless Home AV Center is displayed. 2 Press the ENTER button, the Select the language of the OSD menu is connected to identify the type of... the selected connection. Press the ▲ or ▼ button to Wireless Home AV Center Plug & Play Select the language of cable system that exists in your particular area. Menu Language :English Español Fran&#...
User Manual (ENGLISH)
Page 22
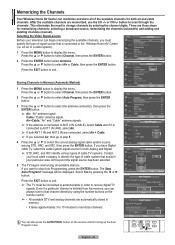
...Program Select the cable system. After the available channels are automatically stored in your television can begin memorizing the available channels, you want to the Wireless Home AV Center (i.e. There are three steps for both ANT 1 IN and ANT 2 IN are connected, select Air + Cable. ➢... in memory. • It takes approximately 3 to 10 minutes to that channel directly by entering the channel digits. Memorizing the Channels Your Wireless Home AV Center can memorize and store all available stations. an air or a cable system). 1 Press the MENU button to select Channel,...
...Program Select the cable system. After the available channels are automatically stored in your television can begin memorizing the available channels, you want to the Wireless Home AV Center (i.e. There are three steps for both ANT 1 IN and ANT 2 IN are connected, select Air + Cable. ➢... in memory. • It takes approximately 3 to 10 minutes to that channel directly by entering the channel digits. Memorizing the Channels Your Wireless Home AV Center can memorize and store all available stations. an air or a cable system). 1 Press the MENU button to select Channel,...
User Manual (ENGLISH)
Page 28
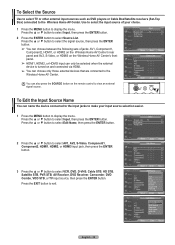
... Center. Use to select the input source of jacks: AV1, Component1, Component2, HDMI1, or HDMI2 on the Wireless Home AV Center's rear panel and AV2, S-Video, or HDMI3 on the Wireless Home AV Center's front panel. ➢ HDMI1, HDMI2, or HDMI3 input can only be selected when the ...external device is turned on the remote control to the Wireless Home AV Center. ADD/DELEnter Return T V Edit Name AV1 AV2 S-Video Component1 Component2 HDMI1 ▼ More Move ▲ : -AV- Press the ▲ ...
... Center. Use to select the input source of jacks: AV1, Component1, Component2, HDMI1, or HDMI2 on the Wireless Home AV Center's rear panel and AV2, S-Video, or HDMI3 on the Wireless Home AV Center's front panel. ➢ HDMI1, HDMI2, or HDMI3 input can only be selected when the ...external device is turned on the remote control to the Wireless Home AV Center. ADD/DELEnter Return T V Edit Name AV1 AV2 S-Video Component1 Component2 HDMI1 ▼ More Move ▲ : -AV- Press the ▲ ...

User Manual (ENGLISH)
Page 33
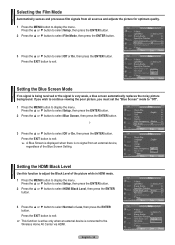
...; Demo: The screen before applying DNIe appears on the right and the screen after applying DNIe appears on the left. • On: Switches on the Wireless Home AV Center. You must set the DNIe to Demo, you can view the applied DNIe and normal pictures on , you can view the difference...
...; Demo: The screen before applying DNIe appears on the right and the screen after applying DNIe appears on the left. • On: Switches on the Wireless Home AV Center. You must set the DNIe to Demo, you can view the applied DNIe and normal pictures on , you can view the difference...
User Manual (ENGLISH)
Page 34
... button. 2 Press the ▲ or ▼ button to select HDMI Black Level, then press the ENTER button. 3 Press the ▲ or ▼ button to the Wireless Home AV Center via HDMI. T V Setup ▲ More Light Effect : In Watching TV ► Energy Saving : Off ► Screen Burn Protection ► HDMI Black Level...
... button. 2 Press the ▲ or ▼ button to select HDMI Black Level, then press the ENTER button. 3 Press the ▲ or ▼ button to the Wireless Home AV Center via HDMI. T V Setup ▲ More Light Effect : In Watching TV ► Energy Saving : Off ► Screen Burn Protection ► HDMI Black Level...
User Manual (ENGLISH)
Page 41
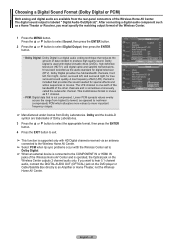
... range from highest to lowest, as a Home Theater or Receiver, you want to hear 5.1 channel audio, connect the DIGITAL AUDIO OUT (OPTICAL) jack on the Wireless Center outputs 2 channel audio only. T V Sound Mode : Custom ► Equalizer ► SRS TruSurround XT : Off ► Multi-Track Options ► Auto ... digital sound output is a digital audio coding technique that provides the sound needed to an Amplifier or Home Theater, not the Wireless Home AV Center. A low frequency effect (LFE) channel is not compressed. If you must specify the matching output format of the...
... range from highest to lowest, as a Home Theater or Receiver, you want to hear 5.1 channel audio, connect the DIGITAL AUDIO OUT (OPTICAL) jack on the Wireless Center outputs 2 channel audio only. T V Sound Mode : Custom ► Equalizer ► SRS TruSurround XT : Off ► Multi-Track Options ► Auto ... digital sound output is a digital audio coding technique that provides the sound needed to an Amplifier or Home Theater, not the Wireless Home AV Center. A low frequency effect (LFE) channel is not compressed. If you must specify the matching output format of the...


