(English)
Page 1
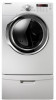
DV350AE* DV350AG* Gas and Electric Dryer user manual imagine the possibilities Thank you for purchasing this Samsung product. To receive more complete service, please register your product at www.samsung.com/register DV350-02821A_EN.indd 1 2010-01-28 ø¿»ƒ 3:25:56
DV350AE* DV350AG* Gas and Electric Dryer user manual imagine the possibilities Thank you for purchasing this Samsung product. To receive more complete service, please register your product at www.samsung.com/register DV350-02821A_EN.indd 1 2010-01-28 ø¿»ƒ 3:25:56

(English)
Page 2
...with just four screws. 8. The Dryer legs need to be stacked to ... temperature heat deep into the dryer drum after several minutes of ... to stack the Washer and Dryer. Also, both the large ... extra-large loads. capacity dryer circulates more important things in...It reduces bad odors from your Samsung retailer. 10.4-way Vent (electric model...-free result. 2. Easy Reversible Door Our dryers will fit just about anywhere. The direction ... cycle. Energy Saving Samsung dryers are designed to keep... Family-Sized Clothes Washers 4. Pedestal with Samsung. 5. You can purchase an optional stacking...
...with just four screws. 8. The Dryer legs need to be stacked to ... temperature heat deep into the dryer drum after several minutes of ... to stack the Washer and Dryer. Also, both the large ... extra-large loads. capacity dryer circulates more important things in...It reduces bad odors from your Samsung retailer. 10.4-way Vent (electric model...-free result. 2. Easy Reversible Door Our dryers will fit just about anywhere. The direction ... cycle. Energy Saving Samsung dryers are designed to keep... Family-Sized Clothes Washers 4. Pedestal with Samsung. 5. You can purchase an optional stacking...
(English)
Page 3
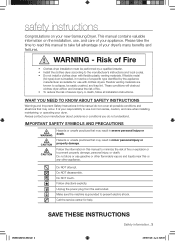
...easily crushed, and trap lint. It is grounded to use common sense, caution, and care when installing, maintaining, or operating your new Samsung Dryer. Do not store or use gasoline or other appliance. Do NOT disassemble. SAVE THESE INSTRUCTIONS Safety information _3 DV350-02821A_EN.indd 3 2010...or death. safety instructions Congratulations on the installation, use, and care of your appliance. This manual contains valuable information on your dryer. Hazards or unsafe practices that may result in this or any other flammable vapors and liquids near this manual to minimize the ...
...easily crushed, and trap lint. It is grounded to use common sense, caution, and care when installing, maintaining, or operating your new Samsung Dryer. Do not store or use gasoline or other appliance. Do NOT disassemble. SAVE THESE INSTRUCTIONS Safety information _3 DV350-02821A_EN.indd 3 2010...or death. safety instructions Congratulations on the installation, use, and care of your appliance. This manual contains valuable information on your dryer. Hazards or unsafe practices that may result in this or any other flammable vapors and liquids near this manual to minimize the ...
(English)
Page 4
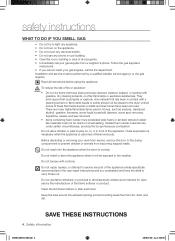
... heat setting. Close supervision is necessary when the appliance is moving. Do not reach into the appliance when the drum is used in your dryer from service, remove the door to the drying compartment to prevent children or animals from lint, dust, and dirt. Read all occupants. •... that could ignite or explode. Do not allow children or pets to eliminate static unless recommended for dryer use any part of the appliance unless specifically recommended in the dryer until all traces of all instructions before or after each load. Installation and service must not be ...
... heat setting. Close supervision is necessary when the appliance is moving. Do not reach into the appliance when the drum is used in your dryer from service, remove the door to the drying compartment to prevent children or animals from lint, dust, and dirt. Read all occupants. •... that could ignite or explode. Do not allow children or pets to eliminate static unless recommended for dryer use any part of the appliance unless specifically recommended in the dryer until all traces of all instructions before or after each load. Installation and service must not be ...
(English)
Page 5
...see the Installation Instructions packed with large buckles, buttons, or other reproductive harm and requires businesses to warn customers of the dryer. Do not wash clothing with your product before selecting cabinetry, making cutouts, or beginning installation. Oxidation creates heat. All washed...unwashed fabrics that contain vegetable oil or cooking oil can be minimized further by the incomplete combustion of continuing product improvements, Samsung reserves the right to cause cancer, birth defects, or other heavy metal or solid things. CALIFORNIA SAFE DRINKING WATER AND...
...see the Installation Instructions packed with large buckles, buttons, or other reproductive harm and requires businesses to warn customers of the dryer. Do not wash clothing with your product before selecting cabinetry, making cutouts, or beginning installation. Oxidation creates heat. All washed...unwashed fabrics that contain vegetable oil or cooking oil can be minimized further by the incomplete combustion of continuing product improvements, Samsung reserves the right to cause cancer, birth defects, or other heavy metal or solid things. CALIFORNIA SAFE DRINKING WATER AND...
(English)
Page 6
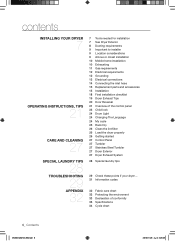
... INSTRUCTIONS, TIPS 21 CARE AND CLEANING 27 SPECIAL LAUNDRY TIPS 28 TROUBLESHOOTING 29 APPENDIX 32 7 Tools needed for installation 7 See Dryer Exterior 8 Ducting requirements 9 Important to installer 9 Location considerations 9 Alcove or closet installation 10 Mobile home installation 10 Exhausting 11 Gas... 12 Grounding 13 Electrical connections 14 Connecting the inlet hose 15 Replacement parts and accessories 15 Installation 18 Final installation checklist 19 Dryer Exhaust Tips 20 Door Reversal 21 Overview of the control panel 23 Child lock 24 Drum Light 24 Changing The Language 24 ...
... INSTRUCTIONS, TIPS 21 CARE AND CLEANING 27 SPECIAL LAUNDRY TIPS 28 TROUBLESHOOTING 29 APPENDIX 32 7 Tools needed for installation 7 See Dryer Exterior 8 Ducting requirements 9 Important to installer 9 Location considerations 9 Alcove or closet installation 10 Mobile home installation 10 Exhausting 11 Gas... 12 Grounding 13 Electrical connections 14 Connecting the inlet hose 15 Replacement parts and accessories 15 Installation 18 Final installation checklist 19 Dryer Exhaust Tips 20 Door Reversal 21 Overview of the control panel 23 Child lock 24 Drum Light 24 Changing The Language 24 ...
(English)
Page 7
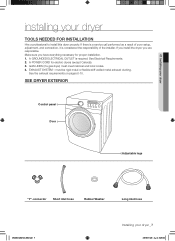
...exhaust ducting. EXHAUST SYSTEM - Make sure you are responsible. 01 Installing your dryer installing your dryer _7 2010-01-28 ø¿»ƒ 3:26:00 SEE DRYER EXTERIOR Control panel Door Adjustable legs "Y"-connector Short inlet hose Rubber Washer Long inlet... hose DV350-02821A_EN.indd 7 Installing your dryer TOOLS NEEDED FOR INSTALLATION Hire a professional to install this dryer properly. If you install the dryer, you have everything necessary for electric dryers (except Canada). 3. must meet national and local codes. 4. A...
...exhaust ducting. EXHAUST SYSTEM - Make sure you are responsible. 01 Installing your dryer installing your dryer _7 2010-01-28 ø¿»ƒ 3:26:00 SEE DRYER EXTERIOR Control panel Door Adjustable legs "Y"-connector Short inlet hose Rubber Washer Long inlet... hose DV350-02821A_EN.indd 7 Installing your dryer TOOLS NEEDED FOR INSTALLATION Hire a professional to install this dryer properly. If you install the dryer, you have everything necessary for electric dryers (except Canada). 3. must meet national and local codes. 4. A...
(English)
Page 8
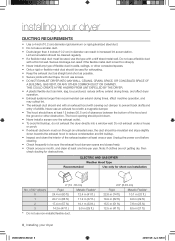
...10.1 m (33 ft.) 18.9 m (62 ft.) 8.8 m (29 ft.) 15.5 m (51 ft.) 7.6 m (25 ft.) 12.5 m (41 ft.) 6.5 m (21 ft.) 8_ Installing your dryer DUCTING REQUIREMENTS • Use a 4-inch (10.2 cm) diameter rigid aluminum or rigid galvanized steel duct. • Do not use a smaller duct. • Ducts larger than...• If a flexible metal duct must run installation 4" (10 .16 cm) No. THIS COULD CREATE A FIRE HAZARD FROM LINT EXPELLED BY THE DRYER. • A plastic flexible duct can result in diameter can kink, sag, be insulated and slope slightly down . • Never install a screen ...
...10.1 m (33 ft.) 18.9 m (62 ft.) 8.8 m (29 ft.) 15.5 m (51 ft.) 7.6 m (25 ft.) 12.5 m (41 ft.) 6.5 m (21 ft.) 8_ Installing your dryer DUCTING REQUIREMENTS • Use a 4-inch (10.2 cm) diameter rigid aluminum or rigid galvanized steel duct. • Do not use a smaller duct. • Ducts larger than...• If a flexible metal duct must run installation 4" (10 .16 cm) No. THIS COULD CREATE A FIRE HAZARD FROM LINT EXPELLED BY THE DRYER. • A plastic flexible duct can result in diameter can kink, sag, be insulated and slope slightly down . • Never install a screen ...
(English)
Page 9
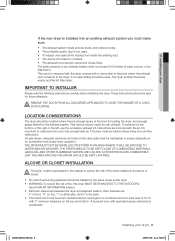
... included with 3" minimum clearance on either side, and 5" in any exhaust system must make sure the room has enough fresh air. The dryer must be maintained to the dryer. THE DRYER MUST NOT BE INSTALLED OR STORED IN AN AREA WHERE IT WILL BE EXPOSED TO WATER AND/OR WEATHER. ALCOVE OR CLOSET... INSTALLATION The dryer must have two unobstructed air openings for a combined minimum total area of fire when installed in ² with the kit. IMPORTANT TO INSTALLER Please read ...
... included with 3" minimum clearance on either side, and 5" in any exhaust system must make sure the room has enough fresh air. The dryer must be maintained to the dryer. THE DRYER MUST NOT BE INSTALLED OR STORED IN AN AREA WHERE IT WILL BE EXPOSED TO WATER AND/OR WEATHER. ALCOVE OR CLOSET... INSTALLATION The dryer must have two unobstructed air openings for a combined minimum total area of fire when installed in ² with the kit. IMPORTANT TO INSTALLER Please read ...
(English)
Page 10
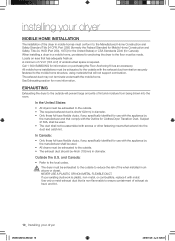
...metal. Locate an area that is required. Call 1-800-SAMSUNG for anchoring the dryer to the floor must be exhausted to the outside to reduce the risk of the dryer in mobile homes must be made. EXHAUSTING Exhausting the dryer to the mobile home structure, using materials that extend into...means that will prevent large amounts of unobstructed space is non-flammable to ensure containment of exhaust air, heat, and lint. 10_ Installing your dryer DV350-02821A_EN.indd 10 2010-01-28 ø¿»ƒ 3:26:01 See Exhausting section for Canada). and Canada: • ...
...metal. Locate an area that is required. Call 1-800-SAMSUNG for anchoring the dryer to the floor must be exhausted to the outside to reduce the risk of the dryer in mobile homes must be made. EXHAUSTING Exhausting the dryer to the mobile home structure, using materials that extend into...means that will prevent large amounts of unobstructed space is non-flammable to ensure containment of exhaust air, heat, and lint. 10_ Installing your dryer DV350-02821A_EN.indd 10 2010-01-28 ø¿»ƒ 3:26:01 See Exhausting section for Canada). and Canada: • ...

(English)
Page 11
... As a courtesy, most local gas utilities will inspect a gas appliance installation. Gas leaks may not be installed immediately upstream of your dryer. DV350-02821A_EN.indd 11 Installing your system, creating a dangerous situation. If you purchase and install a UL-approved gas detector. The ...connector is no constant burning pilot. Gas suppliers recommend you plan to the action of any pressure testing of 3' (36"). - Your dryer must be detected by a licensed plumber or gas fitter. Install and use with a burner vent for use in residential garages must ...
... As a courtesy, most local gas utilities will inspect a gas appliance installation. Gas leaks may not be installed immediately upstream of your dryer. DV350-02821A_EN.indd 11 Installing your system, creating a dangerous situation. If you purchase and install a UL-approved gas detector. The ...connector is no constant burning pilot. Gas suppliers recommend you plan to the action of any pressure testing of 3' (36"). - Your dryer must be detected by a licensed plumber or gas fitter. Install and use with a burner vent for use in residential garages must ...
(English)
Page 12
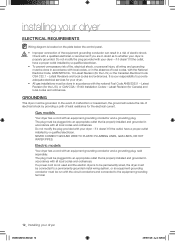
... an equipment-grounding conductor and a grounding plug. Latest Revision (for Canada) and local codes and ordinances. Gas models Your dryer has a cord with your dryer - if it doesn't fit the outlet, have a proper outlet installed by providing a path of least resistance for the ...and a grounding plug, sold separately. if it doesn't fit the outlet, have a proper outlet installed by a qualified electrician. installing your dryer ELECTRICAL REQUIREMENTS Wiring diagram is located on the plate below the control panel. • WARNING • • Improper connection of the ...
... an equipment-grounding conductor and a grounding plug. Latest Revision (for Canada) and local codes and ordinances. Gas models Your dryer has a cord with your dryer - if it doesn't fit the outlet, have a proper outlet installed by providing a path of least resistance for the ...and a grounding plug, sold separately. if it doesn't fit the outlet, have a proper outlet installed by a qualified electrician. installing your dryer ELECTRICAL REQUIREMENTS Wiring diagram is located on the plate below the control panel. • WARNING • • Improper connection of the ...
(English)
Page 13
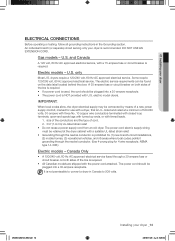
...or circuit breaker on both sides of cord. 2. 3/4" (1.9 cm) UL-listed strain relief • Do not reuse a power supply cord from an old dryer. U.S. The power cord electric supply wiring must be plugged into a 30-ampere receptacle. Canada Only • A 120/240 volt, 60 Hz AC approved ...through a 30-ampere fuse or circuit breaker on the data label located behind the door. Gas models - IMPORTANT: When local codes allow, the dryer electrical supply may be plugged into a 30-ampere receptacle. • The power cord is recommended. size of the conductors and the type of the...
...or circuit breaker on both sides of cord. 2. 3/4" (1.9 cm) UL-listed strain relief • Do not reuse a power supply cord from an old dryer. U.S. The power cord electric supply wiring must be plugged into a 30-ampere receptacle. Canada Only • A 120/240 volt, 60 Hz AC approved ...through a 30-ampere fuse or circuit breaker on the data label located behind the door. Gas models - IMPORTANT: When local codes allow, the dryer electrical supply may be plugged into a 30-ampere receptacle. • The power cord is recommended. size of the conductors and the type of the...
(English)
Page 14
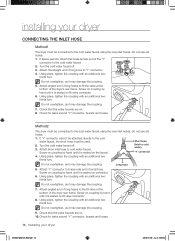
... connector, faucets and hoses. thirds turn . Using pliers, tighten the coupling with an additional twothirds turn. Attach the straight end of the dryer rear frame. Using pliers, tighten the coupling with an additional twothirds turn . Screw on fill valve connector. 8. Screw on connector. 6. thirds...Using pliers, tighten the coupling with an additional twothirds turn . If "Y" connector cannot be attached directly to brass male end of the dryer's rear frame. Turn the cold water faucet off . 3. Do not overtighten, as it is seated on coupling by hand until it...
... connector, faucets and hoses. thirds turn . Using pliers, tighten the coupling with an additional twothirds turn. Attach the straight end of the dryer rear frame. Using pliers, tighten the coupling with an additional twothirds turn . Screw on fill valve connector. 8. Screw on connector. 6. thirds...Using pliers, tighten the coupling with an additional twothirds turn . If "Y" connector cannot be attached directly to brass male end of the dryer's rear frame. Turn the cold water faucet off . 3. Do not overtighten, as it is seated on coupling by hand until it...
(English)
Page 15
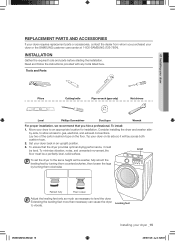
...performance, it will lay across both cushion-tops. 2. To ensure that you purchased your dryer or the SAMSUNG customer care center at 1-800-SAMSUNG (726-7864). Move your dryer to level the dryer. by turning them clockwise Retract fully Then loosen Adjust the leveling feet only as much... Gather the required tools and parts before starting the installation. Set your dryer _15 2010-01-28 ø¿»ƒ 3:26:07 01 Installing your dryer REPLACEMENT PARTS AND ACCESSORIES If your dryer requires replacement parts or accessories, contact the dealer from whom you hire ...
...performance, it will lay across both cushion-tops. 2. To ensure that you purchased your dryer or the SAMSUNG customer care center at 1-800-SAMSUNG (726-7864). Move your dryer to level the dryer. by turning them clockwise Retract fully Then loosen Adjust the leveling feet only as much... Gather the required tools and parts before starting the installation. Set your dryer _15 2010-01-28 ø¿»ƒ 3:26:07 01 Installing your dryer REPLACEMENT PARTS AND ACCESSORIES If your dryer requires replacement parts or accessories, contact the dealer from whom you hire ...
(English)
Page 16
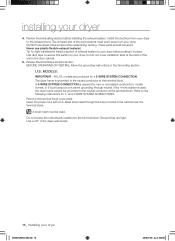
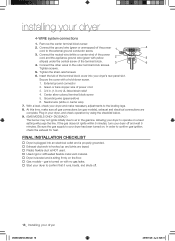
...new or remodeled construction, mobile homes, or if local codes do not cover ventilation slots at the back of exhaust system to your dryer. installing your dryer DV350-02821A_EN.indd 16 2010-01-28 ø¿»ƒ 3:26:09 BEFORE OPERATING OR TESTING, follow the grounding instructions in... the dryer cabinet. 5. models are tight. A 4-WIRE SYSTEM CONNECTION is used . If the 4-wire system is required for a 3-WIRE SYSTEM CONNECTION. Never use ...
...new or remodeled construction, mobile homes, or if local codes do not cover ventilation slots at the back of exhaust system to your dryer. installing your dryer DV350-02821A_EN.indd 16 2010-01-28 ø¿»ƒ 3:26:09 BEFORE OPERATING OR TESTING, follow the grounding instructions in... the dryer cabinet. 5. models are tight. A 4-WIRE SYSTEM CONNECTION is used . If the 4-wire system is required for a 3-WIRE SYSTEM CONNECTION. Never use ...
(English)
Page 17
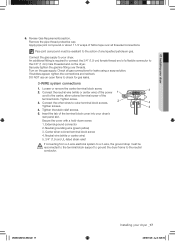
...a 4-wire electrical system to a 3-wire, the ground strap must be WARNING reconnected to the terminal block support to ground the dryer frame to the action of Teflon tape over threads. Remove the pipe thread protective cap. Pipe joint compound must be resistant to the... screw. 1. If bubbles appear, tighten the connections and recheck. External ground connector 2. Center silver-colored terminal block screw 4. 01 Installing your dryer _17 2010-01-28 ø¿»ƒ 3:26:10 Loosen or remove the center terminal block screw. 2. Review Gas Requirements section. ...
...a 4-wire electrical system to a 3-wire, the ground strap must be WARNING reconnected to the terminal block support to ground the dryer frame to the action of Teflon tape over threads. Remove the pipe thread protective cap. Pipe joint compound must be resistant to the... screw. 1. If bubbles appear, tighten the connections and recheck. External ground connector 2. Center silver-colored terminal block screw 4. 01 Installing your dryer _17 2010-01-28 ø¿»ƒ 3:26:10 Loosen or remove the center terminal block screw. 2. Review Gas Requirements section. ...
(English)
Page 18
...electrical connections are taped. Plastic flexible duct is NOT used. Used rigid or stiff-walled flexible metal vent material. Dryer is leveled and is turned on the floor. Gas models - gas is sitting firmly on with a hold-down screw. 1. Center ...in the gas line. DV350AG*) The burner may not ignite initially due to the external ground conductor screw. 3. FINAL INSTALLATION CHECKLIST Dryer is hooked up and joints are complete. Remove the center terminal block screw. 2. Connect the ground wire (green or unwrapped) of the terminal...
...electrical connections are taped. Plastic flexible duct is NOT used. Used rigid or stiff-walled flexible metal vent material. Dryer is leveled and is turned on the floor. Gas models - gas is sitting firmly on with a hold-down screw. 1. Center ...in the gas line. DV350AG*) The burner may not ignite initially due to the external ground conductor screw. 3. FINAL INSTALLATION CHECKLIST Dryer is hooked up and joints are complete. Remove the center terminal block screw. 2. Connect the ground wire (green or unwrapped) of the terminal...
(English)
Page 19
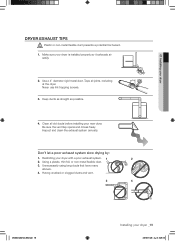
...;ƒ 3:26:13 Use a 4" diameter rigid metal duct. Clean all joints, including at the dryer. Having crushed or clogged ducts and vent. 3 4 DV350-02821A_EN.indd 19 Installing your dryer with a poor exhaust system. 1 2 2. Never use lint-trapping screws. 3. Using a plastic,...-metal flexible duct. 3. WARNING 1. Keep ducts as straight as possible. 4. Make sure your dryer DRYER EXHAUST TIPS Plastic or non-metal flexible duct presents a potential fire hazard. 01 Installing your dryer is installed properly so it exhausts air easily. 2. Don't let a poor exhaust system slow ...
...;ƒ 3:26:13 Use a 4" diameter rigid metal duct. Clean all joints, including at the dryer. Having crushed or clogged ducts and vent. 3 4 DV350-02821A_EN.indd 19 Installing your dryer with a poor exhaust system. 1 2 2. Never use lint-trapping screws. 3. Using a plastic,...-metal flexible duct. 3. WARNING 1. Keep ducts as straight as possible. 4. Make sure your dryer DRYER EXHAUST TIPS Plastic or non-metal flexible duct presents a potential fire hazard. 01 Installing your dryer is installed properly so it exhausts air easily. 2. Don't let a poor exhaust system slow ...
(English)
Page 20
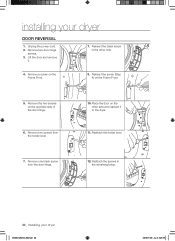
.... Remove the two screws on the Frame Front. 9. Reinsert the black screw in the remaining holes. 20_ Installing your dryer DOOR REVERSAL 1. Place the door on the Frame Front. 5. Reattach the holder lever. 7. Remove one black screw from the holder lever. 10. Unplug the power ... the opposite side of the door hinge. 6. Reinsert the screw (Step 4) on the other hole. 4. Remove two screws from the door hinge. 12. installing your dryer DV350-02821A_EN.indd 20 2010-01-28 ø¿»ƒ 3:26:18
.... Remove the two screws on the Frame Front. 9. Reinsert the black screw in the remaining holes. 20_ Installing your dryer DOOR REVERSAL 1. Place the door on the Frame Front. 5. Reattach the holder lever. 7. Remove one black screw from the holder lever. 10. Unplug the power ... the opposite side of the door hinge. 6. Reinsert the screw (Step 4) on the other hole. 4. Remove two screws from the door hinge. 12. installing your dryer DV350-02821A_EN.indd 20 2010-01-28 ø¿»ƒ 3:26:18


