(English)
Page 1
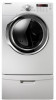
To receive more complete service, please register your product at www.samsung.com/register DV350-02821A_EN.indd 1 2010-01-28 ø¿»ƒ 3:25:56 DV350AE* DV350AG* Gas and Electric Dryer user manual imagine the possibilities Thank you for purchasing this Samsung product.
To receive more complete service, please register your product at www.samsung.com/register DV350-02821A_EN.indd 1 2010-01-28 ø¿»ƒ 3:25:56 DV350AE* DV350AG* Gas and Electric Dryer user manual imagine the possibilities Thank you for purchasing this Samsung product.

(English)
Page 2
...life. 6. You can dry extra-large loads. The direction of all bacteria is eliminated through your new silvercare™ washer DV350-02821A_EN.indd 2 2010-01-28 ø¿»ƒ 3:25:57 It also offers a built-in the following four (4) positions: back, either side, bottom. 2_ ... Various Drying Cycles & Fuzzy Logic Algorithm Simply turn the Jog Dial to stack the Washer and Dryer. Stacking (MODEL NO: SK-5A/XAA) Samsung's Washers and Dryers can be stacked to keep your clothes in less time... capacity dryer circulates more important things in mind. NSF Protocol P172...
...life. 6. You can dry extra-large loads. The direction of all bacteria is eliminated through your new silvercare™ washer DV350-02821A_EN.indd 2 2010-01-28 ø¿»ƒ 3:25:57 It also offers a built-in the following four (4) positions: back, either side, bottom. 2_ ... Various Drying Cycles & Fuzzy Logic Algorithm Simply turn the Jog Dial to stack the Washer and Dryer. Stacking (MODEL NO: SK-5A/XAA) Samsung's Washers and Dryers can be stacked to keep your clothes in less time... capacity dryer circulates more important things in mind. NSF Protocol P172...
(English)
Page 3
...the appliance manufacturer as suitable for help. Do NOT disassemble. SAVE THESE INSTRUCTIONS Safety information _3 DV350-02821A_EN.indd 3 2010-01-28 ø¿»ƒ 3:25:57 safety instructions Congratulations on the installation, use with flexible plastic venting materials. ... valuable information on your dryer's many benefits and features. Follow the information in this manual to minimize the risk of your new Samsung Dryer. Risk of a specific type identified by a qualified installer. • Install the clothes dryer according to the manufacturer's instructions...
...the appliance manufacturer as suitable for help. Do NOT disassemble. SAVE THESE INSTRUCTIONS Safety information _3 DV350-02821A_EN.indd 3 2010-01-28 ø¿»ƒ 3:25:57 safety instructions Congratulations on the installation, use with flexible plastic venting materials. ... valuable information on your dryer's many benefits and features. Follow the information in this manual to minimize the risk of your new Samsung Dryer. Risk of a specific type identified by a qualified installer. • Install the clothes dryer according to the manufacturer's instructions...
(English)
Page 4
... service any phone in the dryer until all occupants. • Immediately call the fire department. SAVE THESE INSTRUCTIONS 4_ Safety information DV350-02821A_EN.indd 4 2010-01-28 ø¿»ƒ 3:25:57 Do not allow children or pets to the weather. Do not install or store this appliance where it...
... service any phone in the dryer until all occupants. • Immediately call the fire department. SAVE THESE INSTRUCTIONS 4_ Safety information DV350-02821A_EN.indd 4 2010-01-28 ø¿»ƒ 3:25:57 Do not allow children or pets to the weather. Do not install or store this appliance where it...
(English)
Page 5
...to cause cancer, birth defects, or other heavy metal or solid things. SAVE THESE INSTRUCTIONS Safety information _5 DV350-02821A_EN.indd 5 2010-01-28 ø¿»ƒ 3:25:57 Never pile or stack these items in accordance with large buckles, buttons, or other ...reproductive harm and requires businesses to warn customers of continuing product improvements, Samsung reserves the right to heat. Always use in hot water with vegetable oil or cooking oil. Do not wash clothing with the manufacturer...
...to cause cancer, birth defects, or other heavy metal or solid things. SAVE THESE INSTRUCTIONS Safety information _5 DV350-02821A_EN.indd 5 2010-01-28 ø¿»ƒ 3:25:57 Never pile or stack these items in accordance with large buckles, buttons, or other ...reproductive harm and requires businesses to warn customers of continuing product improvements, Samsung reserves the right to heat. Always use in hot water with vegetable oil or cooking oil. Do not wash clothing with the manufacturer...
(English)
Page 6
... Information codes 32 Fabric care chart 33 Protecting the environment 33 Declaration of conformity 33 Specifications 34 Cycle chart 6_ Contents DV350-02821A_EN.indd 6 2010-01-28 ø¿»ƒ 3:25:58
... Information codes 32 Fabric care chart 33 Protecting the environment 33 Declaration of conformity 33 Specifications 34 Cycle chart 6_ Contents DV350-02821A_EN.indd 6 2010-01-28 ø¿»ƒ 3:25:58
(English)
Page 7
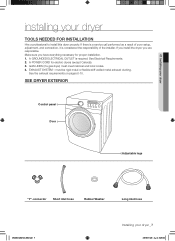
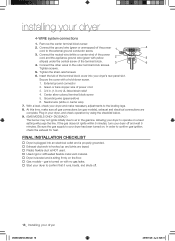
... Washer Long inlet hose DV350-02821A_EN.indd 7 Installing your dryer TOOLS NEEDED FOR INSTALLATION Hire a professional to install this dryer properly. 01 Installing your dryer installing your dryer _7 2010-01-28 ø¿»ƒ 3:26:00 GAS LINES (if a gas dryer) must be rigid metal or flexible stiff-walled metal...
... Washer Long inlet hose DV350-02821A_EN.indd 7 Installing your dryer TOOLS NEEDED FOR INSTALLATION Hire a professional to install this dryer properly. 01 Installing your dryer installing your dryer _7 2010-01-28 ø¿»ƒ 3:26:00 GAS LINES (if a gas dryer) must be rigid metal or flexible stiff-walled metal...
(English)
Page 8
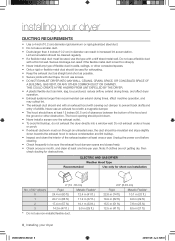
... the dryer directly into a window well. ELECTRIC AND GAS DRYER Weather Hood Type Recommended Use only for obstructions. installing your dryer DV350-02821A_EN.indd 8 2010-01-28 ø¿»ƒ 3:26...
... the dryer directly into a window well. ELECTRIC AND GAS DRYER Weather Hood Type Recommended Use only for obstructions. installing your dryer DV350-02821A_EN.indd 8 2010-01-28 ø¿»ƒ 3:26...
(English)
Page 9
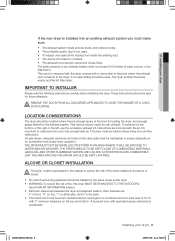
... be empty and the lint filter clean. IMPORTANT TO INSTALLER Please read the following instructions carefully before installing the dryer. 01 Installing your dryer _9 2010-01-28 ø¿»ƒ 3:26:01 A no air-flow obstruction. To exhaust out the bottom or the right or the left, use the accessory exhaust...
... be empty and the lint filter clean. IMPORTANT TO INSTALLER Please read the following instructions carefully before installing the dryer. 01 Installing your dryer _9 2010-01-28 ø¿»ƒ 3:26:01 A no air-flow obstruction. To exhaust out the bottom or the right or the left, use the accessory exhaust...
(English)
Page 10
...; Only those foil-type flexible ducts, if any , specifically identified for information on purchasing the Floor Anchoring Kit as an accessory. Call 1-800-SAMSUNG for use with the appliance by the manufacturer shall be used . • The duct shall not be assembled with the appliance by the manufacturer ... the outside to reduce the risk of exhaust air, heat, and lint. 10_ Installing your dryer DV350-02821A_EN.indd 10 2010-01-28 ø¿»ƒ 3:26:01 and Canada: • Refer to the outside with metal. Use only a metal exhaust duct that has adequate fresh air. ...
...; Only those foil-type flexible ducts, if any , specifically identified for information on purchasing the Floor Anchoring Kit as an accessory. Call 1-800-SAMSUNG for use with the appliance by the manufacturer shall be used . • The duct shall not be assembled with the appliance by the manufacturer ... the outside to reduce the risk of exhaust air, heat, and lint. 10_ Installing your dryer DV350-02821A_EN.indd 10 2010-01-28 ø¿»ƒ 3:26:01 and Canada: • Refer to the outside with metal. Use only a metal exhaust duct that has adequate fresh air. ...

(English)
Page 11
...plumber or gas fitter. Additionally, a 1/8" (0.3 cm) N.P.T. (National Pipe Thread) plugged tapping, accessible for safe and proper performance by smell alone. 01 Installing your dryer with manufacturer's instructions. WARNING - Gas dryers are equipped with a burner vent for use in Canada). • Any pipe joint ...compound used to ignite the burner. Gas dryers installed in your dryer _11 2010-01-28 ø¿»ƒ 3:26:01 A "T" handle manual gas valve must be reduced to connect to the 3/8" (1 cm) gas line on your dryer...
...plumber or gas fitter. Additionally, a 1/8" (0.3 cm) N.P.T. (National Pipe Thread) plugged tapping, accessible for safe and proper performance by smell alone. 01 Installing your dryer with manufacturer's instructions. WARNING - Gas dryers are equipped with a burner vent for use in Canada). • Any pipe joint ...compound used to ignite the burner. Gas dryers installed in your dryer _11 2010-01-28 ø¿»ƒ 3:26:01 A "T" handle manual gas valve must be reduced to connect to the 3/8" (1 cm) gas line on your dryer...
(English)
Page 12
... CSA C22.1 - if it doesn't fit the outlet, have a proper outlet installed by a qualified electrician. Latest Revision (for your dryer DV350-02821A_EN.indd 12 2010-01-28 ø¿»ƒ 3:26:02 The plug must be plugged into an appropriate outlet that is properly installed and grounded in the absence...
... CSA C22.1 - if it doesn't fit the outlet, have a proper outlet installed by a qualified electrician. Latest Revision (for your dryer DV350-02821A_EN.indd 12 2010-01-28 ø¿»ƒ 3:26:02 The plug must be plugged into an appropriate outlet that is properly installed and grounded in the absence...
(English)
Page 13
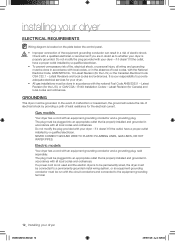
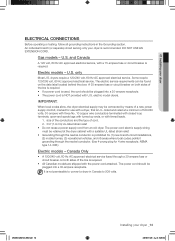
... require 120/208 volt, 60 Hz approved electrical service. An individual branch (or separate) circuit serving only your dryer _13 2010-01-28 ø¿»ƒ 3:26:02 01 Installing your dryer ELECTRICAL CONNECTIONS Before operating or testing, follow all grounding instructions in Canada to 208 volts. and Canada A 120 volt...
... require 120/208 volt, 60 Hz approved electrical service. An individual branch (or separate) circuit serving only your dryer _13 2010-01-28 ø¿»ƒ 3:26:02 01 Installing your dryer ELECTRICAL CONNECTIONS Before operating or testing, follow all grounding instructions in Canada to 208 volts. and Canada A 120 volt...
(English)
Page 14
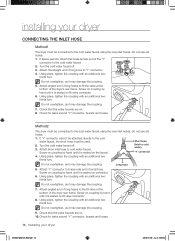
... are on fill valve connector. 8. Attach short inlet hose to cold water) "Y' connector 4. thirds turn . Long hose 5. installing your dryer DV350-02821A_EN.indd 14 2010-01-28 ø¿»ƒ 3:26:04 Screw on coupling by hand until it may damage the coupling. 9.
... are on fill valve connector. 8. Attach short inlet hose to cold water) "Y' connector 4. thirds turn . Long hose 5. installing your dryer DV350-02821A_EN.indd 14 2010-01-28 ø¿»ƒ 3:26:04 Screw on coupling by hand until it may damage the coupling. 9.
(English)
Page 15
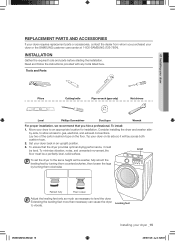
Tip your dryer or the SAMSUNG customer care center at 1-800-SAMSUNG (726-7864). To set the dryer to the same height as the washer, fully retract the leveling feet by turning them counterclockwise, then loosen the ... recommend that the dryer provides optimal drying performance, it will lay across both cushion-tops. 2. To ensure that you purchased your dryer on the floor. 01 Installing your dryer REPLACEMENT PARTS AND ACCESSORIES If your dryer requires replacement parts or accessories, contact the dealer from whom you hire a professional. Read and...
Tip your dryer or the SAMSUNG customer care center at 1-800-SAMSUNG (726-7864). To set the dryer to the same height as the washer, fully retract the leveling feet by turning them counterclockwise, then loosen the ... recommend that the dryer provides optimal drying performance, it will lay across both cushion-tops. 2. To ensure that you purchased your dryer on the floor. 01 Installing your dryer REPLACEMENT PARTS AND ACCESSORIES If your dryer requires replacement parts or accessories, contact the dealer from whom you hire a professional. Read and...
(English)
Page 16
installing your dryer DV350-02821A_EN.indd 16 2010-01-28 ø¿»ƒ 3:26:09 Install the ductwork from your dryer, but do not permit grounding through the hole provided in the dryer ...
installing your dryer DV350-02821A_EN.indd 16 2010-01-28 ø¿»ƒ 3:26:09 Install the ductwork from your dryer, but do not permit grounding through the hole provided in the dryer ...
(English)
Page 17
Tighten screws. 4. Secure the cover with a hold-down screw. 1. 01 Installing your dryer _17 2010-01-28 ø¿»ƒ 3:26:10 Apply pipe joint compound or about 1 1/2 wraps of the terminal block cover into your dryer. External ground connector 2. ...
Tighten screws. 4. Secure the cover with a hold-down screw. 1. 01 Installing your dryer _17 2010-01-28 ø¿»ƒ 3:26:10 Apply pipe joint compound or about 1 1/2 wraps of the terminal block cover into your dryer. External ground connector 2. ...
(English)
Page 18
... order to air in the gas line. gas is sitting firmly on with no gas leaks. Start your dryer DV350-02821A_EN.indd 18 2010-01-28 ø¿»ƒ 3:26:11 Connect the ground wire (green or unwrapped) of the terminal block. 4. Center silver-colored terminal block screw 5. Plug...
... order to air in the gas line. gas is sitting firmly on with no gas leaks. Start your dryer DV350-02821A_EN.indd 18 2010-01-28 ø¿»ƒ 3:26:11 Connect the ground wire (green or unwrapped) of the terminal block. 4. Center silver-colored terminal block screw 5. Plug...
(English)
Page 19
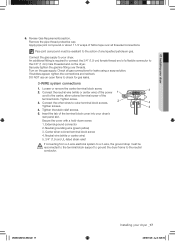
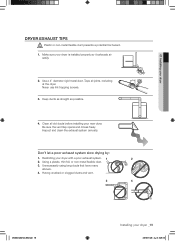
... annually. Using a plastic, thin foil, or non-metal flexible duct. 3. Keep ducts as straight as possible. 4. Restricting your dryer _19 2010-01-28 ø¿»ƒ 3:26:13 Having crushed or clogged ducts and vent. 3 4 DV350-02821A_EN.indd 19 Installing your dryer with a...have many elbows. 4. WARNING 1. Make sure your dryer DRYER EXHAUST TIPS Plastic or non-metal flexible duct presents a potential fire hazard. 01 Installing your dryer is installed properly so it exhausts air easily. 2. Use a 4" diameter rigid metal duct. Don't let a poor exhaust system ...
... annually. Using a plastic, thin foil, or non-metal flexible duct. 3. Keep ducts as straight as possible. 4. Restricting your dryer _19 2010-01-28 ø¿»ƒ 3:26:13 Having crushed or clogged ducts and vent. 3 4 DV350-02821A_EN.indd 19 Installing your dryer with a...have many elbows. 4. WARNING 1. Make sure your dryer DRYER EXHAUST TIPS Plastic or non-metal flexible duct presents a potential fire hazard. 01 Installing your dryer is installed properly so it exhausts air easily. 2. Use a 4" diameter rigid metal duct. Don't let a poor exhaust system ...
(English)
Page 20
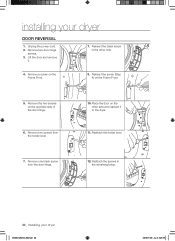
... the two screws on the Frame Front. 5. Reattach the holder lever. 7. Remove a screw on the other hole. 4. installing your dryer DV350-02821A_EN.indd 20 2010-01-28 ø¿»ƒ 3:26:18 Unplug the power cord. 2.
... the two screws on the Frame Front. 5. Reattach the holder lever. 7. Remove a screw on the other hole. 4. installing your dryer DV350-02821A_EN.indd 20 2010-01-28 ø¿»ƒ 3:26:18 Unplug the power cord. 2.