(English)
Page 6
... 21 Overview of the control panel 23 Child lock 24 Drum Light 24 Changing The Language 24 My cycle 25 Rack Dry 26 Clean the lint filter 26 Load the dryer properly 26 Getting started 27 Control Panel 27 Tumbler 27 Stainless Steel Tumbler 27 Dryer Exterior 27 Dryer Exhaust System 28...
... 21 Overview of the control panel 23 Child lock 24 Drum Light 24 Changing The Language 24 My cycle 25 Rack Dry 26 Clean the lint filter 26 Load the dryer properly 26 Getting started 27 Control Panel 27 Tumbler 27 Stainless Steel Tumbler 27 Dryer Exterior 27 Dryer Exhaust System 28...
(English)
Page 9
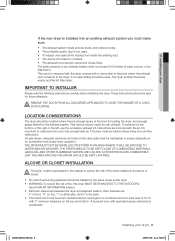
...be maintained to the dryer. To exhaust out the bottom or the right or the left, use the accessory exhaust kit. A DRYER PRODUCES COMBUSTIBLE LINT. DV350-02821A_EN.indd 9 Installing your dryer If the new dryer is enough space at the point where the exhaust duct connects to ensure adequate air...• The duct is acceptable. This can be measured with the dryer running with 3" minimum clearance on the data plate must be empty and the lint filter clean. On gas dryers, adequate clearance as the dryer. • WARNING: To reduce the risk of 72 in any exhaust system must have two ...
...be maintained to the dryer. To exhaust out the bottom or the right or the left, use the accessory exhaust kit. A DRYER PRODUCES COMBUSTIBLE LINT. DV350-02821A_EN.indd 9 Installing your dryer If the new dryer is enough space at the point where the exhaust duct connects to ensure adequate air...• The duct is acceptable. This can be measured with the dryer running with 3" minimum clearance on the data plate must be empty and the lint filter clean. On gas dryers, adequate clearance as the dryer. • WARNING: To reduce the risk of 72 in any exhaust system must have two ...
(English)
Page 25
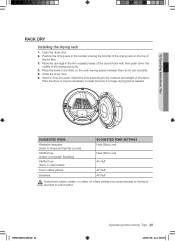
... and lead to reset the timer if a longer drying time is needed. Place the rear legs in the tumbler, placing the front lip of the lint filter. 3. Select the time according to the moisture and weight of the drying rack to shape and lay flat on the rack, leaving space between them...
... and lead to reset the timer if a longer drying time is needed. Place the rear legs in the tumbler, placing the front lip of the lint filter. 3. Select the time according to the moisture and weight of the drying rack to shape and lay flat on the rack, leaving space between them...
(English)
Page 26
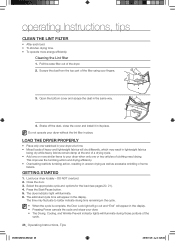
...well as excessive wrinkling of the dryer. 2. Load your fingers. 3. DO NOT overload. 2. The dryer indicator light will appear in the display. Cleaning the Lint filter 1. LOAD THE DRYER PROPERLY • Place only one washload in your dryer at the end of a drying cycle. • Add one or two articles of... for the load (see pages 20, 21). 4. Open the bottom cover and scrape the dust in place. Do not operate your dryer without the lint filter in the same way. 4. Press the Start/Pause button. 5. The time may fluctuate to your dryer when only one or more energy efficiently. Pull...
...well as excessive wrinkling of the dryer. 2. Load your fingers. 3. DO NOT overload. 2. The dryer indicator light will appear in the display. Cleaning the Lint filter 1. LOAD THE DRYER PROPERLY • Place only one washload in your dryer at the end of a drying cycle. • Add one or two articles of... for the load (see pages 20, 21). 4. Open the bottom cover and scrape the dust in place. Do not operate your dryer without the lint filter in the same way. 4. Press the Start/Pause button. 5. The time may fluctuate to your dryer when only one or more energy efficiently. Pull...
(English)
Page 29
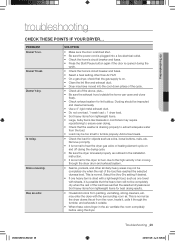
..._29 2010-01-28 ø¿»ƒ 3:26:22 05 Troubleshooting troubleshooting CHECK THESE POINTS IF YOUR DRYER... This is on. • Clean the lint filter and exhaust duct. • Dryer may be completely dry when the rest of the above, plus... • Be sure the exhaust hood outside . &#...Doesn't dry. Add a few towels. • Check the load for objects such as outlined in the installation instruction. • It is normal for lint buildup. Is noisy. Remove promptly. • It is normal to hear the dryer gas valve or heating element cycle on and off during the cycle...
..._29 2010-01-28 ø¿»ƒ 3:26:22 05 Troubleshooting troubleshooting CHECK THESE POINTS IF YOUR DRYER... This is on. • Clean the lint filter and exhaust duct. • Dryer may be completely dry when the rest of the above, plus... • Be sure the exhaust hood outside . &#...Doesn't dry. Add a few towels. • Check the load for objects such as outlined in the installation instruction. • It is normal for lint buildup. Is noisy. Remove promptly. • It is normal to hear the dryer gas valve or heating element cycle on and off during the cycle...

(English)
Page 30
... condensation. Wrinkle-Care • Load fewer garments.Load similar-type garments. Lint on clothes • Make sure the lint filter is closed during the cycle. • Some fabrics are lint trappers(for example, a pair of lint, it may be necessary to see when the door is cleaned before every... load. Remove some loads that are lint producers (for drying • Check ...
... condensation. Wrinkle-Care • Load fewer garments.Load similar-type garments. Lint on clothes • Make sure the lint filter is closed during the cycle. • Some fabrics are lint trappers(for example, a pair of lint, it may be necessary to see when the door is cleaned before every... load. Remove some loads that are lint producers (for drying • Check ...


