(English)
Page 7
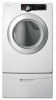
... Overview of the control panel 22 Child lock 23 Rack Dry (Optional Part) 24 Clean the lint filter 24 Load the dryer properly 24 Getting started CARE AND CLEANING 25 SPECIAL LAUNDRY TIPS 26 25 Control Panel 25 Tumbler 25 Powder coated tumbler 25 Dryer Exterior 25 Dryer Exhaust System 26...
... Overview of the control panel 22 Child lock 23 Rack Dry (Optional Part) 24 Clean the lint filter 24 Load the dryer properly 24 Getting started CARE AND CLEANING 25 SPECIAL LAUNDRY TIPS 26 25 Control Panel 25 Tumbler 25 Powder coated tumbler 25 Dryer Exterior 25 Dryer Exhaust System 26...
(English)
Page 15
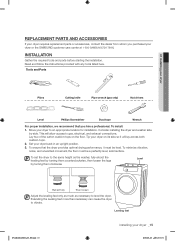
...feet more than necessary can cause the dryer to an appropriate location for installation. INSTALLATION Gather the required tools and parts before starting the installation. Move your dryer to vibrate. Leveling feet DV220AE-02810A-03_EN.indd 15 installing your dryer back in an upright... exhaust connections. This will lay across both cushion-tops. 2. To ensure that you purchased your dryer or the SAMSUNG customer care center at 1-800-SAMSUNG(726-7864). REPLACEMENT PARTS AND ACCESSORIES If your dryer requires replacement parts or accessories, contact the dealer from whom ...
...feet more than necessary can cause the dryer to an appropriate location for installation. INSTALLATION Gather the required tools and parts before starting the installation. Move your dryer to vibrate. Leveling feet DV220AE-02810A-03_EN.indd 15 installing your dryer back in an upright... exhaust connections. This will lay across both cushion-tops. 2. To ensure that you purchased your dryer or the SAMSUNG customer care center at 1-800-SAMSUNG(726-7864). REPLACEMENT PARTS AND ACCESSORIES If your dryer requires replacement parts or accessories, contact the dealer from whom ...
(English)
Page 17
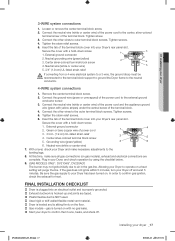
... block screw 4. Connect the neutral wire (white or center wire) of the power cord and the appliance ground wire (green with no gas leaks. Start your dryer 3-WIRE system connections 1. Tighten the strain relief screws. 6. With a level, check your Dryer to operate on with yellow stripes) under the central screw...
... block screw 4. Connect the neutral wire (white or center wire) of the power cord and the appliance ground wire (green with no gas leaks. Start your dryer 3-WIRE system connections 1. Tighten the strain relief screws. 6. With a level, check your Dryer to operate on with yellow stripes) under the central screw...
(English)
Page 21
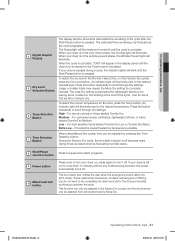
.... An indicator light will illuminate next to the desired dryness level. For permanent press, synthetics, lightweight cottons, or items labeled Tumble Dry Medium. Start/Pause 8 selection button Press to pause and restart programs. 9 Power button 10 Mixed load bell button Press once to turn it off. When ...can be selected from among Normal Dry, More Dry. Press the button repeatedly to turn your dryer is in the cycle after the Start/Pause button is best suited for lightweight fabrics or for more than 10 minutes without any buttons being touched, the power automatically turns ...
.... An indicator light will illuminate next to the desired dryness level. For permanent press, synthetics, lightweight cottons, or items labeled Tumble Dry Medium. Start/Pause 8 selection button Press to pause and restart programs. 9 Power button 10 Mixed load bell button Press once to turn it off. When ...can be selected from among Normal Dry, More Dry. Press the button repeatedly to turn your dryer is in the cycle after the Start/Pause button is best suited for lightweight fabrics or for more than 10 minutes without any buttons being touched, the power automatically turns ...
(English)
Page 23
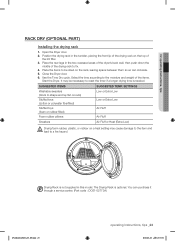
.... 4. You can circulate. 5. Place the rear legs in the two recessed areas of the dryer's back wall, then push down the middle of the items. Start the Dryer. Position the drying rack in this model. Close the Dryer door. 6. The Drying Rack is not supplied in the tumbler, placing the front...
.... 4. You can circulate. 5. Place the rear legs in the two recessed areas of the dryer's back wall, then push down the middle of the items. Start the Dryer. Position the drying rack in this model. Close the Dryer door. 6. The Drying Rack is not supplied in the tumbler, placing the front...
(English)
Page 24
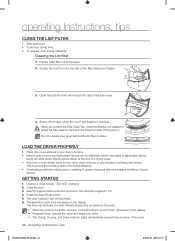
... illuminate. 6. This improves the tumbling action and drying efficiency. • Overloading restricts tumbling action, resulting in the display. GETTING STARTED 1. Scrape the dust from the top part of the dryer. 2. Press the Start/Pause button. 5. Pull the case-filter out of the filter using your dryer loosely - operating Instructions, tips CLEAN THE...
... illuminate. 6. This improves the tumbling action and drying efficiency. • Overloading restricts tumbling action, resulting in the display. GETTING STARTED 1. Scrape the dust from the top part of the dryer. 2. Press the Start/Pause button. 5. Pull the case-filter out of the filter using your dryer loosely - operating Instructions, tips CLEAN THE...

(English)
Page 27
... adequate water from the load. • Load may have moved into a live electrical outlet. • Check the home's circuit breaker and fuses. • Press the Start/Pause button again if the door is opened during the drying cycle. • Be sure the Dryer is leveled properly as the Dryer draws the...
... adequate water from the load. • Load may have moved into a live electrical outlet. • Check the home's circuit breaker and fuses. • Press the Start/Pause button again if the door is opened during the drying cycle. • Be sure the Dryer is leveled properly as the Dryer draws the...


