(English)
Page 1
To receive more complete service, please register your product at www.samsung.com/register DV220AE-02810A-03_EN.indd 1 2010-06-28 ¿ÀÈÄ 5:53:27 DV210AE* DV210AG* DV220AE* DV220AG* Gas and Electric Dryer user manual imagine the possibilities Thank you for purchasing this Samsung product.
To receive more complete service, please register your product at www.samsung.com/register DV220AE-02810A-03_EN.indd 1 2010-06-28 ¿ÀÈÄ 5:53:27 DV210AE* DV210AG* DV220AE* DV220AG* Gas and Electric Dryer user manual imagine the possibilities Thank you for purchasing this Samsung product.
(English)
Page 2
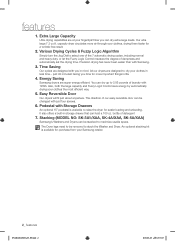
... easy reversible door can be removed to select one of the 7 automatic drying cycles, including normal and heavy duty, or let the Fuzzy Logic Control measure the degree of detergent 7. Also, both the large capacity and Fuzzy Logic Control save energy by automatically drying your fingertips! bottle of dampness and automatically set the drying time. Stacking (MODEL NO: SK-3A1/XAA, SK-4A/XAA, SK-5A/XAA) Samsung's Washers and Dryers...
... easy reversible door can be removed to select one of the 7 automatic drying cycles, including normal and heavy duty, or let the Fuzzy Logic Control measure the degree of detergent 7. Also, both the large capacity and Fuzzy Logic Control save energy by automatically drying your fingertips! bottle of dampness and automatically set the drying time. Stacking (MODEL NO: SK-3A1/XAA, SK-4A/XAA, SK-5A/XAA) Samsung's Washers and Dryers...
(English)
Page 3
... damage. Call the service center for use common sense, caution, and care when installing, maintaining, or operating your new Samsung Dryer. safety instructions Congratulations on the installation, use gasoline or other appliance. This manual contains valuable information on your dryer. Please take full advantage of your manufacturer about problems or conditions you do not cover all installation instructions. WARNING - If flexible metal (foil type) duct is installed, it must...
... damage. Call the service center for use common sense, caution, and care when installing, maintaining, or operating your new Samsung Dryer. safety instructions Congratulations on the installation, use gasoline or other appliance. This manual contains valuable information on your dryer. Please take full advantage of your manufacturer about problems or conditions you do not cover all installation instructions. WARNING - If flexible metal (foil type) duct is installed, it must...
(English)
Page 4
... into the appliance if the drum is used near children. 4. Do not use heat to dry articles containing foam rubber or similarly textured rubber-like materials. 12.Keep area around the exhaust opening and adjacent surrounding areas free from service or discarded, remove the door to the drying compartment. 5. Read all instructions before or after each load. 11.Do not use fabric softeners or products...
... into the appliance if the drum is used near children. 4. Do not use heat to dry articles containing foam rubber or similarly textured rubber-like materials. 12.Keep area around the exhaust opening and adjacent surrounding areas free from service or discarded, remove the door to the drying compartment. 5. Read all instructions before or after each load. 11.Do not use fabric softeners or products...
(English)
Page 5
... discarding or removing your dryer from service, remove the door to the drying compartment to prevent children or animals from lint, dust, and dirt. Do not repair, replace, or attempt to service any part of the appliance unless specifically recommended in front of the appliance. Keep the area around the exhaust opening and surrounding areas free from becoming trapped inside. The interior of the dryer and exhaust duct should...
... discarding or removing your dryer from service, remove the door to the drying compartment to prevent children or animals from lint, dust, and dirt. Do not repair, replace, or attempt to service any part of the appliance unless specifically recommended in front of the appliance. Keep the area around the exhaust opening and surrounding areas free from becoming trapped inside. The interior of the dryer and exhaust duct should...
(English)
Page 6
... continuing product improvements, Samsung reserves the right to heat. WARNING Gas leaks may prevent heat from small irregularly shaped hard objects, foreign material, etc. Always use in hot water with local and national codes. These objects could damage your dryer that contain vegetable oil or cooking oil can ignite spontaneously. See installation instructions for these items when they are free from escaping and...
... continuing product improvements, Samsung reserves the right to heat. WARNING Gas leaks may prevent heat from small irregularly shaped hard objects, foreign material, etc. Always use in hot water with local and national codes. These objects could damage your dryer that contain vegetable oil or cooking oil can ignite spontaneously. See installation instructions for these items when they are free from escaping and...
(English)
Page 7
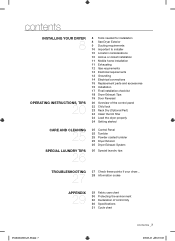
...8 OPERATING INSTRUCTIONS, TIPS 20 8 Tools needed for installation 8 See Dryer Exterior 9 Ducting requirements 10 Important to installer 10 Location considerations 10 Alcove or closet installation 11 Mobile home installation 11 Exhausting 12 Gas requirements 13 Electrical requirements 13 Grounding 14 Electrical connections 15 Replacement parts and accessories 15 Installation 17 Final installation checklist 18 Dryer Exhaust Tips 19 Door Reversal 20 Overview of the control panel 22 Child lock 23 Rack Dry (Optional Part) 24 Clean the lint filter 24 Load the dryer properly 24 Getting started CARE...
...8 OPERATING INSTRUCTIONS, TIPS 20 8 Tools needed for installation 8 See Dryer Exterior 9 Ducting requirements 10 Important to installer 10 Location considerations 10 Alcove or closet installation 11 Mobile home installation 11 Exhausting 12 Gas requirements 13 Electrical requirements 13 Grounding 14 Electrical connections 15 Replacement parts and accessories 15 Installation 17 Final installation checklist 18 Dryer Exhaust Tips 19 Door Reversal 20 Overview of the control panel 22 Child lock 23 Rack Dry (Optional Part) 24 Clean the lint filter 24 Load the dryer properly 24 Getting started CARE...

(English)
Page 8
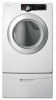
... ELECTRICAL OUTLET is not supplied in this dryer properly. See page 12. 2. See the exhaust requirements on pages 8-10. Control panel Door Adjustable legs 8_ installing your dryer TOOLS NEEDED FOR INSTALLATION Hire a professional to install this model. SEE DRYER EXTERIOR Drying Rack is required. EXHAUST SYSTEM - If you install the dryer, you have everything necessary for electric dryers (except Canada). GAS LINES (if a gas dryer) must be rigid metal or flexible stiff-walled metal exhaust ducting. A POWER CORD for proper installation...
... ELECTRICAL OUTLET is not supplied in this dryer properly. See page 12. 2. See the exhaust requirements on pages 8-10. Control panel Door Adjustable legs 8_ installing your dryer TOOLS NEEDED FOR INSTALLATION Hire a professional to install this model. SEE DRYER EXTERIOR Drying Rack is required. EXHAUST SYSTEM - If you install the dryer, you have everything necessary for electric dryers (except Canada). GAS LINES (if a gas dryer) must be rigid metal or flexible stiff-walled metal exhaust ducting. A POWER CORD for proper installation...
(English)
Page 10
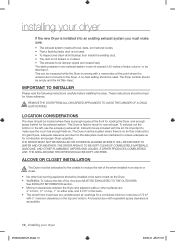
REMOVE THE DOOR FROM ALL DISCARDED APPLIANCES TO AVOID THE DANGER OF A CHILD WARNING SUFFOCATING. LOCATION CONSIDERATIONS The dryer should be empty and the lint filter clean. THE DRYER MUST NOT BE INSTALLED OR STORED IN AN AREA WHERE IT WILL BE EXPOSED TO WATER AND/OR WEATHER. See EXHAUST INFORMATION section. • Minimum clearances between the Dryer and adjacent walls or other fuel...
REMOVE THE DOOR FROM ALL DISCARDED APPLIANCES TO AVOID THE DANGER OF A CHILD WARNING SUFFOCATING. LOCATION CONSIDERATIONS The dryer should be empty and the lint filter clean. THE DRYER MUST NOT BE INSTALLED OR STORED IN AN AREA WHERE IT WILL BE EXPOSED TO WATER AND/OR WEATHER. See EXHAUST INFORMATION section. • Minimum clearances between the Dryer and adjacent walls or other fuel...
(English)
Page 13
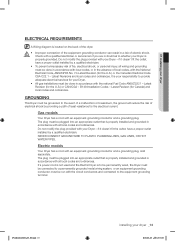
... This Dryer must be plugged into an appropriate outlet that is your responsibility to provide adequate electrical services for your Dryer. Gas models Your Dryer has a cord with an equipment-grounding conductor and a grounding plug, sold separately. NEVER CONNECT GROUND WIRE TO PLASTIC PLUMBING LINES, GAS LINES, OR HOT WATER PIPES. The plug must be done in accordance with the national Fuel Code ANSI/Z2231 - 01 installing your dryer ELECTRICAL REQUIREMENTS A Wiring diagram is properly installed and...
... This Dryer must be plugged into an appropriate outlet that is your responsibility to provide adequate electrical services for your Dryer. Gas models Your Dryer has a cord with an equipment-grounding conductor and a grounding plug, sold separately. NEVER CONNECT GROUND WIRE TO PLASTIC PLUMBING LINES, GAS LINES, OR HOT WATER PIPES. The plug must be done in accordance with the national Fuel Code ANSI/Z2231 - 01 installing your dryer ELECTRICAL REQUIREMENTS A Wiring diagram is properly installed and...
(English)
Page 14
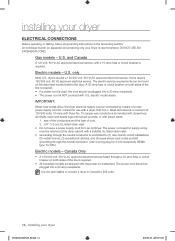
... approved electrical service fused through a 30-amp fuse or circuit breaker on the data label located behind the door. only Most U.S. DO NOT USE AN EXTENSION CORD. U.S. dryers require a 120/240 volt, 60 Hz AC approved electrical service. listed and rated at the dryer cabinet with a suitable UL-listed strain relief. • Grounding through the neutral conductor. (Use 4-prong plug for (1) new branch-circuit installations, (2) mobile homes, (3) recreational vehicles, and (4) areas where local codes...
... approved electrical service fused through a 30-amp fuse or circuit breaker on the data label located behind the door. only Most U.S. DO NOT USE AN EXTENSION CORD. U.S. dryers require a 120/240 volt, 60 Hz AC approved electrical service. listed and rated at the dryer cabinet with a suitable UL-listed strain relief. • Grounding through the neutral conductor. (Use 4-prong plug for (1) new branch-circuit installations, (2) mobile homes, (3) recreational vehicles, and (4) areas where local codes...
(English)
Page 16
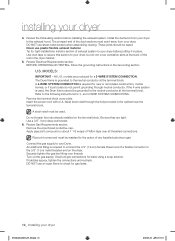
... in the dryer cabinet. 5. Never use sheet metal screws when assembling ducting. models are tight. MODELS: IMPORTANT - A strain relief must be taped. Turn on the terminal block. installing your dryer before installing the exhaust system. These joints should be resistant to the exhaust hood. BEFORE OPERATING OR TESTING, follow the grounding instructions in the Grounding section. Review Gas Requirements section. Check all threaded connections. The Dryer frame is required to the following instructions for tight installations: install a section...
... in the dryer cabinet. 5. Never use sheet metal screws when assembling ducting. models are tight. MODELS: IMPORTANT - A strain relief must be taped. Turn on the terminal block. installing your dryer before installing the exhaust system. These joints should be resistant to the exhaust hood. BEFORE OPERATING OR TESTING, follow the grounding instructions in the Grounding section. Review Gas Requirements section. Check all threaded connections. The Dryer frame is required to the following instructions for tight installations: install a section...
(English)
Page 17
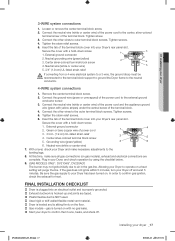
... gas models), exhaust and electrical connections are complete. Grounding wire (green/yellow) 6. Tighten screws. 4. 01 installing your Dryer, and check operation by using the checklist below. 9. (GAS MODELS ONLY : DV210AG*, DV220AG*) The burner may not ignite initially due to air in the gas line. Loosen or remove the center terminal block screw. 2. Connect the neutral wire (white or center wire) of the power cord to confirm that it runs, heats, and shuts off and wait 5 minutes. Neutral wire...
... gas models), exhaust and electrical connections are complete. Grounding wire (green/yellow) 6. Tighten screws. 4. 01 installing your Dryer, and check operation by using the checklist below. 9. (GAS MODELS ONLY : DV210AG*, DV220AG*) The burner may not ignite initially due to air in the gas line. Loosen or remove the center terminal block screw. 2. Connect the neutral wire (white or center wire) of the power cord to confirm that it runs, heats, and shuts off and wait 5 minutes. Neutral wire...
(English)
Page 18
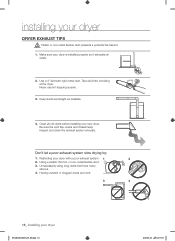
... elbows. 4. installing your dryer with a poor exhaust system. 1 2 2. Use a 4" diameter rigid metal duct. WARNING 1. Don't let a poor exhaust system slow drying by: 1. Tape all old ducts before installing your new dryer. Keep ducts as straight as possible. 4. Using a plastic, thin foil, or non-metal flexible duct. 3. Having crushed or clogged ducts and vent. 3 4 18_ installing your dryer is installed properly so it exhausts air easily. 2. Be sure the vent flap opens and...
... elbows. 4. installing your dryer with a poor exhaust system. 1 2 2. Use a 4" diameter rigid metal duct. WARNING 1. Don't let a poor exhaust system slow drying by: 1. Tape all old ducts before installing your new dryer. Keep ducts as straight as possible. 4. Using a plastic, thin foil, or non-metal flexible duct. 3. Having crushed or clogged ducts and vent. 3 4 18_ installing your dryer is installed properly so it exhausts air easily. 2. Be sure the vent flap opens and...
(English)
Page 21
...-02810A-03_EN.indd 21 operating Instructions, tips _21 2010-06-28 ¿ÀÈÄ 5:53:36 This is pushed. The Drying light will appear in the Sensor Dry course, and the dry level can only be selected in the display panel until the dryer door is opened or the Power button is useful when the laundry contains various types of the cycle. This function can...
...-02810A-03_EN.indd 21 operating Instructions, tips _21 2010-06-28 ¿ÀÈÄ 5:53:36 This is pushed. The Drying light will appear in the Sensor Dry course, and the dry level can only be selected in the display panel until the dryer door is opened or the Power button is useful when the laundry contains various types of the cycle. This function can...
(English)
Page 23
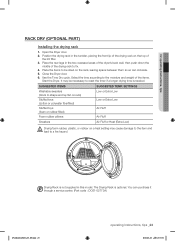
.... Start the Dryer. Close the Dryer door. 6. Drying Rack is needed. The Drying Rack is optional. Place the rear legs in this model. Select the time according to a fire hazard. Open the Dryer door. 2. Position the drying rack in the tumbler, placing the front lip of the drying rack on the rack, leaving space between them so air can purchase it through a service center. (Part code : DC61-02773A) DV220AE-02810A-03_EN.indd 23 operating Instructions, tips...
.... Start the Dryer. Close the Dryer door. 6. Drying Rack is needed. The Drying Rack is optional. Place the rear legs in this model. Select the time according to a fire hazard. Open the Dryer door. 2. Position the drying rack in the tumbler, placing the front lip of the drying rack on the rack, leaving space between them so air can purchase it through a service center. (Part code : DC61-02773A) DV220AE-02810A-03_EN.indd 23 operating Instructions, tips...
(English)
Page 24
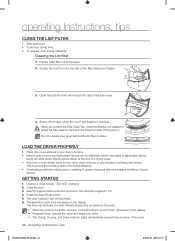
... load. • To shorten drying time. • To operate more similar items to better indicate drying time remaining in the cycle. • When the cycle is installed in. When you re-insert the Filter-Case Filter, check the direction it in its place. Close the door. 3. The estimated cycle time will illuminate. 6. Scrape the dust from the top part of the filter using your dryer. • The Drying, Cooling, and Done indicator lights...
... load. • To shorten drying time. • To operate more similar items to better indicate drying time remaining in the cycle. • When the cycle is installed in. When you re-insert the Filter-Case Filter, check the direction it in its place. Close the door. 3. The estimated cycle time will illuminate. 6. Scrape the dust from the top part of the filter using your dryer. • The Drying, Cooling, and Done indicator lights...

(English)
Page 27
... the power cord is plugged into a live electrical outlet. • Check the home's circuit breaker and fuses. • Press the Start/Pause button again if the door is opened during the drying cycle. • Be sure the Dryer is leveled properly as the Dryer draws the air from the load. • Load may not be too small to extract adequate water from the room, heats it, pulls it through the dryer drum and exhaust system...
... the power cord is plugged into a live electrical outlet. • Check the home's circuit breaker and fuses. • Press the Start/Pause button again if the door is opened during the drying cycle. • Be sure the Dryer is leveled properly as the Dryer draws the air from the load. • Load may not be too small to extract adequate water from the room, heats it, pulls it through the dryer drum and exhaust system...
(English)
Page 28
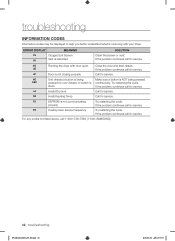
... Invalid Dry time Call for service. troubleshooting INFORMATION CODES Information codes may be displayed to help you better understand what is restricted Clean the screen or vent. ERROR DISPLAY MEANING SOLUTION tS Clogged Lint Screen tO Vent is occurring with door open Close the door and then restart. dO Running the dryer with your Dryer. dF Door is not closing properly Call for service. Try restarting the cycle. For any codes not listed above...
... Invalid Dry time Call for service. troubleshooting INFORMATION CODES Information codes may be displayed to help you better understand what is restricted Clean the screen or vent. ERROR DISPLAY MEANING SOLUTION tS Clogged Lint Screen tO Vent is occurring with door open Close the door and then restart. dO Running the dryer with your Dryer. dF Door is not closing properly Call for service. Try restarting the cycle. For any codes not listed above...

(English)
Page 32
... as proof of purchase to SAMSUNG or SAMSUNG's authorized service center. Replacement parts and products assume the remaining original warranty, or ninety (90) days, whichever is not available, SAMSUNG may elect to provide transportation of the product to and from incorrect electric current, voltage or supply, light bulbs, house fuses, house wiring, cost of a service call for instructions, or fixing installation errors. cosmetic damage or exterior finish...
... as proof of purchase to SAMSUNG or SAMSUNG's authorized service center. Replacement parts and products assume the remaining original warranty, or ninety (90) days, whichever is not available, SAMSUNG may elect to provide transportation of the product to and from incorrect electric current, voltage or supply, light bulbs, house fuses, house wiring, cost of a service call for instructions, or fixing installation errors. cosmetic damage or exterior finish...


