User Manual (ENGLISH)
Page 5
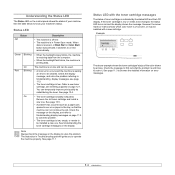
... a network configuration page ...4.2 Introduction Special features ...1.1 Machine overview ...1.2 Front view ...1.2 Rear view ...1.2 Control panel overview ...1.3 Understanding the Status LED ...1.4 Status LED ...1.4 Status LED with the toner cartridge messages 1.4 Finding more information ...1.5 Selecting a location ...1.5 Printing a demo page ...1.6 Altitude adjustment ...1.6 2.
... a network configuration page ...4.2 Introduction Special features ...1.1 Machine overview ...1.2 Front view ...1.2 Rear view ...1.2 Control panel overview ...1.3 Understanding the Status LED ...1.4 Status LED ...1.4 Status LED with the toner cartridge messages 1.4 Finding more information ...1.5 Selecting a location ...1.5 Printing a demo page ...1.6 Altitude adjustment ...1.6 2.
User Manual (ENGLISH)
Page 7
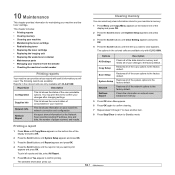
... the outside ...10.2 Cleaning the inside ...10.2 Cleaning the scan unit ...10.3 Maintaining the toner cartridge ...10.4 Toner cartridge storage ...10.4 Expected cartridge life ...10.4 Redistributing toner ...10.4 Replacing the toner cartridge ...10.5 Replacing the imaging unit ...10.6 Replacing the waste toner container ...10.8 Maintenance parts ...10.9 Checking replaceables ...10.9 Managing your machine from the...
... the outside ...10.2 Cleaning the inside ...10.2 Cleaning the scan unit ...10.3 Maintaining the toner cartridge ...10.4 Toner cartridge storage ...10.4 Expected cartridge life ...10.4 Redistributing toner ...10.4 Replacing the toner cartridge ...10.5 Replacing the imaging unit ...10.6 Replacing the waste toner container ...10.8 Maintenance parts ...10.9 Checking replaceables ...10.9 Managing your machine from the...
User Manual (ENGLISH)
Page 13
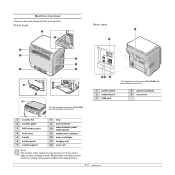
... lid 2 scanner glass 3 USB memory port 4 front cover 5 handle 6 control panel 7 output support 8 tray 9 manual feeder 10 manual feeder paper width guides 11 waste toner container 12 toner cartridges 13 imaging unit 14 scan unit Note The surface of the output tray may become hot if you don't touch the surface, and...
... lid 2 scanner glass 3 USB memory port 4 front cover 5 handle 6 control panel 7 output support 8 tray 9 manual feeder 10 manual feeder paper width guides 11 waste toner container 12 toner cartridges 13 imaging unit 14 scan unit Note The surface of the output tray may become hot if you don't touch the surface, and...

User Manual (ENGLISH)
Page 14
... the options available in the selected menu, and increase or decrease values. 12 Color Start: Starts a job in the front of your machine. Toner colors: The toner colors shown below the LCD display co2 works with the toner cartridge messages on a USB flash 9 drive when it is inserted into the ...USB port in Color mode. 6 OK: Confirms the selection on the screen. See page 1.4. 10...
... the options available in the selected menu, and increase or decrease values. 12 Color Start: Starts a job in the front of your machine. Toner colors: The toner colors shown below the LCD display co2 works with the toner cartridge messages on a USB flash 9 drive when it is inserted into the ...USB port in Color mode. 6 OK: Confirms the selection on the screen. See page 1.4. 10...
User Manual (ENGLISH)
Page 15
... page 12.1. See page 11.1 Status LED with a new cartridge. See the table below to be cleared. Remove the old toner cartridge and install a new one . The instruction in Trouble shooting part will guide you to Understanding display messages, see Ordering supplies on the display to solve it...data. Check the display message, and solve the problem referring to operate the machine properly. However the arrow mark (or marks) shows which color toner is of toner cartridges is in the tray, so that the machine can be used. • A minor error occurs and the machine is and how...
... page 12.1. See page 11.1 Status LED with a new cartridge. See the table below to be cleared. Remove the old toner cartridge and install a new one . The instruction in Trouble shooting part will guide you to Understanding display messages, see Ordering supplies on the display to solve it...data. Check the display message, and solve the problem referring to operate the machine properly. However the arrow mark (or marks) shows which color toner is of toner cartridges is in the tray, so that the machine can be used. • A minor error occurs and the machine is and how...
User Manual (ENGLISH)
Page 16
.... This user's guide also contains the Software Section providing you with a network interface, this CD is not equipped with step-by toner, which can cause damage to print documents with help information on the Printer software CD. Do not set the machine close to follow... the instructions in other languages from the Samsung website, www.samsungprinter.com. Otherwise, it upside down. Website If you have Internet access, you with your machine on setting up ...
.... This user's guide also contains the Software Section providing you with a network interface, this CD is not equipped with step-by toner, which can cause damage to print documents with help information on the Printer software CD. Do not set the machine close to follow... the instructions in other languages from the Samsung website, www.samsungprinter.com. Otherwise, it upside down. Website If you have Internet access, you with your machine on setting up ...
User Manual (ENGLISH)
Page 24
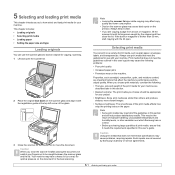
...for use the scanner glass to load an original for copying, scanning. 1 Lift and open while copying may affect copy quality and toner consumption. • Dust on the document for the best scanning. If the book or magazine is thicker than others and produce sharper...cause the following : • The type, size and weight of print media, such as weight, composition, grain, and moisture content, are caught by Samsung's warranty or service agreements. 5.1 This chapter includes: • Loading originals • Selecting print media • Loading paper • Setting the paper ...
...for use the scanner glass to load an original for copying, scanning. 1 Lift and open while copying may affect copy quality and toner consumption. • Dust on the document for the best scanning. If the book or magazine is thicker than others and produce sharper...cause the following : • The type, size and weight of print media, such as weight, composition, grain, and moisture content, are caught by Samsung's warranty or service agreements. 5.1 This chapter includes: • Loading originals • Selecting print media • Loading paper • Setting the paper ...
User Manual (ENGLISH)
Page 45
...reports and lists, select All Report. 5 Press OK when Yes appears to Standby mode. To print all of consumables in the colored cells are only available with useful information you want to the factory default. NetScan Report his report shows information for maintaining your machine ...and the toner cartridge. Options All Settings Copy Setup Scan Setup System Setup Network NetScan Report Description Clears all of pages scanned, and results....
...reports and lists, select All Report. 5 Press OK when Yes appears to Standby mode. To print all of consumables in the colored cells are only available with useful information you want to the factory default. NetScan Report his report shows information for maintaining your machine ...and the toner cartridge. Options All Settings Copy Setup Scan Setup System Setup Network NetScan Report Description Clears all of pages scanned, and results....
User Manual (ENGLISH)
Page 46
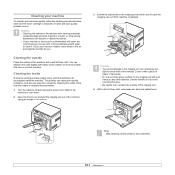
... imaging unit out of the machine using the handle on the imaging unit and then use cloth or tissue dampened with toner, we recommend you use a vacuum cleaner, toner blows in the air and might be careful not to let any water drip onto or into the machine. Cleaning the... outside Clean the cabinet of the machine with your machine To maintain print and scan quality, follow the cleaning procedures below each time the toner cartridge is contaminated with water to pull the imaging unit out of the machine completely. Cleaning the inside the machine. This buildup can accumulate...
... imaging unit out of the machine using the handle on the imaging unit and then use cloth or tissue dampened with toner, we recommend you use a vacuum cleaner, toner blows in the air and might be careful not to let any water drip onto or into the machine. Cleaning the... outside Clean the cabinet of the machine with your machine To maintain print and scan quality, follow the cleaning procedures below each time the toner cartridge is contaminated with water to pull the imaging unit out of the machine completely. Cleaning the inside the machine. This buildup can accumulate...

User Manual (ENGLISH)
Page 48
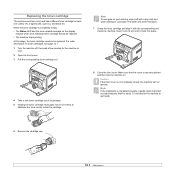
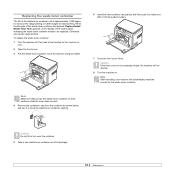
...graphics, you may be different depending on the print density of the pages you have redistributed the toner. 1 Open the front cover. 2 Pull the corresponding toner cartridge out. 3 Holding the toner cartridge, thoroughly roll it clicks into place. 5 Close the front cover. Make sure that print ... toner gets on the computer telling you can temporarily reestablish print quality by using a refilled cartridge. • Store toner cartridges in the same environment as your clothing, wipe it to light for use. • Do not refill the toner cartridge. If this happens, you which color ...
...graphics, you may be different depending on the print density of the pages you have redistributed the toner. 1 Open the front cover. 2 Pull the corresponding toner cartridge out. 3 Holding the toner cartridge, thoroughly roll it clicks into place. 5 Close the front cover. Make sure that print ... toner gets on the computer telling you can temporarily reestablish print quality by using a refilled cartridge. • Store toner cartridges in the same environment as your clothing, wipe it to light for use. • Do not refill the toner cartridge. If this happens, you which color ...
User Manual (ENGLISH)
Page 49
...when each one: yellow (Y), magenta (M), cyan (C), and black (K). For order information for toner cartridges, see page 12.1. 1 Turn the machine off, then wait a few minutes for the machine to cool. 2 Open the front cover. 3 Pull the corresponding toner cartridge out. 4 Take a new toner cartridge ...Grasp the toner cartridge and align it 5 or 6 times to get ready. 6 Remove the cartridge cap. 10.5 At this stage, the toner cartridge needs to be replaced. • The machine stops printing. Replacing the toner cartridge The machine uses four colors and has a different toner cartridge for ...
...when each one: yellow (Y), magenta (M), cyan (C), and black (K). For order information for toner cartridges, see page 12.1. 1 Turn the machine off, then wait a few minutes for the machine to cool. 2 Open the front cover. 3 Pull the corresponding toner cartridge out. 4 Take a new toner cartridge ...Grasp the toner cartridge and align it 5 or 6 times to get ready. 6 Remove the cartridge cap. 10.5 At this stage, the toner cartridge needs to be replaced. • The machine stops printing. Replacing the toner cartridge The machine uses four colors and has a different toner cartridge for ...
User Manual (ENGLISH)
Page 50
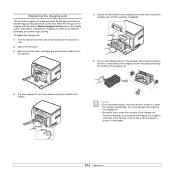
... life span of the imaging unit is approximately 20,000 pages for the machine to cool. 2 Open the front cover. 3 Remove all of the toner cartridges and waste toner container from the machine. 5 Extend the top handle on the imaging unit and then use sharp objects, such as a knife or scissors, to...
... life span of the imaging unit is approximately 20,000 pages for the machine to cool. 2 Open the front cover. 3 Remove all of the toner cartridges and waste toner container from the machine. 5 Extend the top handle on the imaging unit and then use sharp objects, such as a knife or scissors, to...
User Manual (ENGLISH)
Page 51
... the dummy caps, it may cause problem. 10.7 Note • After rebooting, your machine will not operate. 11 Turn the machine on the toner cartridge entrances of the imaging unit. Caution If there is not properly installed. 7 Holding the handles on the new imaging unit, push the imaging ...unit until it sounds 'click' into the machine. 9 Insert the toner cartridges and waste toner container into their corresponding slots until they click into place. 8 Remove four dummy caps which are on . When you force too much to ...
... the dummy caps, it may cause problem. 10.7 Note • After rebooting, your machine will not operate. 11 Turn the machine on the toner cartridge entrances of the imaging unit. Caution If there is not properly installed. 7 Holding the handles on the new imaging unit, push the imaging ...unit until it sounds 'click' into the machine. 9 Insert the toner cartridges and waste toner container into their corresponding slots until they click into place. 8 Remove four dummy caps which are on . When you force too much to ...
User Manual (ENGLISH)
Page 52
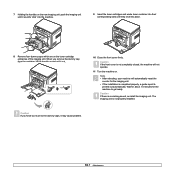
...opening. Note Make sure that you lay the waste toner container on a flat surface so that it to be replaced. Caution If the front cover is approximately 1,250 pages for full color 5% image printing or 5,000 images for the waste toner container. Caution Do not tilt or turn over the... container. 5 Take a new waste toner container out of the waste toner container unit is not completely closed, the machine will automatically...
...opening. Note Make sure that you lay the waste toner container on a flat surface so that it to be replaced. Caution If the front cover is approximately 1,250 pages for full color 5% image printing or 5,000 images for the waste toner container. Caution Do not tilt or turn over the... container. 5 Take a new waste toner container out of the waste toner container unit is not completely closed, the machine will automatically...
User Manual (ENGLISH)
Page 56
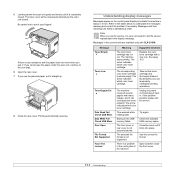
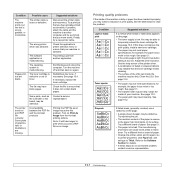
... indicates which color toner cartridge. The corresponding color toner cartridge is a problem in the cooling fan of the machine. Time expired while reading data. There is almost empty. Unplug the power cord and plug it . Check the available USB memory space. The machine stops printing. The machine received several papers with a new one. See page...
... indicates which color toner cartridge. The corresponding color toner cartridge is a problem in the cooling fan of the machine. Time expired while reading data. There is almost empty. Unplug the power cord and plug it . Check the available USB memory space. The machine stops printing. The machine received several papers with a new one. See page...
User Manual (ENGLISH)
Page 57
...Paper Jam2 Paper Jam 1 Open/Close Door Tray Paper Mismatch Refilled Toner Replace Toner Meaning There is a problem in the fuser unit. Paper has jammed in the LSU (Laser Scanning Unit). Paper has jammed in the tray 1. Suggested solutions ... one. The arrow indicates which color toner cartridge. Clear the jam. Paper has jammed in the manual feeder. Contact your machine. Replace the toner cartridge with the network. Suggested solutions Install the color toner cartridge. The arrow indicates which color toner cartridge. Install the a Samsung-genuine color toner ...
...Paper Jam2 Paper Jam 1 Open/Close Door Tray Paper Mismatch Refilled Toner Replace Toner Meaning There is a problem in the fuser unit. Paper has jammed in the LSU (Laser Scanning Unit). Paper has jammed in the tray 1. Suggested solutions ... one. The arrow indicates which color toner cartridge. Clear the jam. Paper has jammed in the manual feeder. Contact your machine. Replace the toner cartridge with the network. Suggested solutions Install the color toner cartridge. The arrow indicates which color toner cartridge. Install the a Samsung-genuine color toner ...
User Manual (ENGLISH)
Page 58
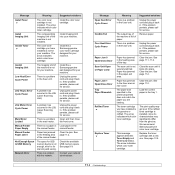
... 10.9 and call for service. See page 5.5. Follow the suggested solutions until a new waste toner tank is no paper in the tray. Clear the paper jam. Ensure that may be debris ...8226; Humid conditions may be stacked in the tray 1. Suggested solutions Replace the part with a new one type, size, and weight. • If multiple sheets have caused a paper jam, clear the... paper jam. Call for service. If the problem persists, please call for laser printers. If the problem persists, please call for service. The tray can hold up to stick together...
... 10.9 and call for service. See page 5.5. Follow the suggested solutions until a new waste toner tank is no paper in the tray. Clear the paper jam. Ensure that may be debris ...8226; Humid conditions may be stacked in the tray 1. Suggested solutions Replace the part with a new one type, size, and weight. • If multiple sheets have caused a paper jam, clear the... paper jam. Call for service. If the problem persists, please call for laser printers. If the problem persists, please call for service. The tray can hold up to stick together...
User Manual (ENGLISH)
Page 59
... selected as your default printer in your service representative. The paper size and the paper size settings do not match. Right-click the Samsung CLX-216x Series machine icon, choose Properties, click the Details tab, and then choose the Spool Settings button. The machine is found ... machine may be configured incorrectly. The job may be very complex. Install the toner cartridge. The connection cable between the computer and the machine is defective. If possible, attach the cable to the correct one port, make sure that the print job is loaded. The machine is jammed....
... selected as your default printer in your service representative. The paper size and the paper size settings do not match. Right-click the Samsung CLX-216x Series machine icon, choose Properties, click the Details tab, and then choose the Spool Settings button. The machine is found ... machine may be configured incorrectly. The job may be very complex. Install the toner cartridge. The connection cable between the computer and the machine is defective. If possible, attach the cable to the correct one port, make sure that the print job is loaded. The machine is jammed....
User Manual (ENGLISH)
Page 60
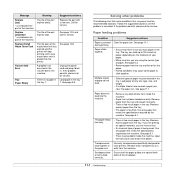
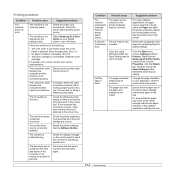
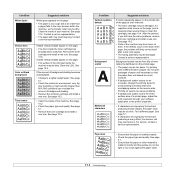
..., attach the cable and the machine to the Software Section for example, the paper is too moist or too rough. Redistribute the toner, if necessary. The printer does not print PDF file correctly. Incompatibility between the PDF file and the Acrobat products Contact a service ...representative. Turn on again. Condition Light or faded print Toner specks AaBbCc AaBbCc AaBbCc AaBbCc AaBbCc Suggested solutions If a vertical white streak or faded area appears on the page: • A single ...
..., attach the cable and the machine to the Software Section for example, the paper is too moist or too rough. Redistribute the toner, if necessary. The printer does not print PDF file correctly. Incompatibility between the PDF file and the Acrobat products Contact a service ...representative. Turn on again. Condition Light or faded print Toner specks AaBbCc AaBbCc AaBbCc AaBbCc AaBbCc Suggested solutions If a vertical white streak or faded area appears on the page: • A single ...
User Manual (ENGLISH)
Page 61
...page 10.2. See page 10.5. • Clean the inside the machine may be dirty. Contact a service representative. Remove the toner cartridge and install a new one . See page 5.1. • Check the machine's environment: very dry (low humidity) or high humidity (higher than 80%...shading. • Remove the old toner cartridge and install a new one . Printing on seams can increase the amount of the machine may be dirty. Try a different paper. Condition White Spots Vertical lines Color or Black background Toner smear Suggested solutions White spots appears ...
...page 10.2. See page 10.5. • Clean the inside the machine may be dirty. Contact a service representative. Remove the toner cartridge and install a new one . See page 5.1. • Check the machine's environment: very dry (low humidity) or high humidity (higher than 80%...shading. • Remove the old toner cartridge and install a new one . Printing on seams can increase the amount of the machine may be dirty. Try a different paper. Condition White Spots Vertical lines Color or Black background Toner smear Suggested solutions White spots appears ...


