
User Manual (user Manual) (ver.5.00) (English)
Page 9
...Cleaning the scan unit ...11.2 Maintaining the toner cartridge ...11.3 Toner cartridge storage ...11.3 Expected cartridge life ...11.3 Redistributing toner ...11.3 Replacing the toner cartridge ...11.4 Replacing the imaging unit ...11.5 Replacing the waste toner container ...11.7 Maintenance Parts ...11.8 Managing... Monitoring the supplies life ...11.1 Finding the serial number ...11.1 Sending the imaging unit reorder notification ...11.1 Sending the toner reorder notification ...11.2 Checking Stored Documents ...11.2 Cleaning your machine ...11.2 Cleaning the outside ...11.2 Cleaning the inside...
...Cleaning the scan unit ...11.2 Maintaining the toner cartridge ...11.3 Toner cartridge storage ...11.3 Expected cartridge life ...11.3 Redistributing toner ...11.3 Replacing the toner cartridge ...11.4 Replacing the imaging unit ...11.5 Replacing the waste toner container ...11.7 Maintenance Parts ...11.8 Managing... Monitoring the supplies life ...11.1 Finding the serial number ...11.1 Sending the imaging unit reorder notification ...11.1 Sending the toner reorder notification ...11.2 Checking Stored Documents ...11.2 Cleaning your machine ...11.2 Cleaning the outside ...11.2 Cleaning the inside...

User Manual (user Manual) (ver.5.00) (English)
Page 11
...-out or onscreen. Used to this guide for installing and using the machine. Caution Do not touch the green underside of the toner cartridge. Online User's Guide Printer Driver Help Provides you with step-by-step instructions for using your machine from the following table ... and then press Clone Copy. (See page 1.1 for Special features.) Note Items, features, options on the touch screen may differ from the Samsung website, www.samsungprinter.com. This user's guide also contains Software section to provide you can find information for printing. i pages per minute >...
...-out or onscreen. Used to this guide for installing and using the machine. Caution Do not touch the green underside of the toner cartridge. Online User's Guide Printer Driver Help Provides you with step-by-step instructions for using your machine from the following table ... and then press Clone Copy. (See page 1.1 for Special features.) Note Items, features, options on the touch screen may differ from the Samsung website, www.samsungprinter.com. This user's guide also contains Software section to provide you can find information for printing. i pages per minute >...
User Manual (user Manual) (ver.5.00) (English)
Page 19
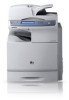
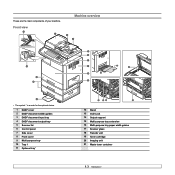
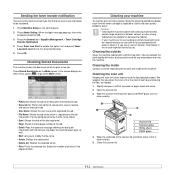
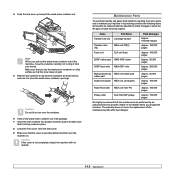
These are the main components of your machine. Front view Machine overview • The symbol * is a mark for the optional device. 1 DADF cover 2 DADF document width guides 3 DADF document input tray 4 DADF document output tray 5 Scanner lid 6 Control panel 7 Side cover 8 Front cover 9 Multi-purpose tray 10 Tray 1 11 Optional tray* 12 Stand* 13 CCD Lock 14 Output support 15 Multi-purpose tray extension 16 Multi-purpose tray paper width guides 17 Scanner glass 18 Transfer unit 19 Toner cartridge 20 Imaging unit 21 Waste toner container 1.3
These are the main components of your machine. Front view Machine overview • The symbol * is a mark for the optional device. 1 DADF cover 2 DADF document width guides 3 DADF document input tray 4 DADF document output tray 5 Scanner lid 6 Control panel 7 Side cover 8 Front cover 9 Multi-purpose tray 10 Tray 1 11 Optional tray* 12 Stand* 13 CCD Lock 14 Output support 15 Multi-purpose tray extension 16 Multi-purpose tray paper width guides 17 Scanner glass 18 Transfer unit 19 Toner cartridge 20 Imaging unit 21 Waste toner container 1.3

User Manual (user Manual) (ver.5.00) (English)
Page 22
... The machine is in your machine, USB icon shows on the display screen. • SmarThru Workflow: Enters the SmarThru Workflow menu. (Optional) • Toner Info.: Shows amount of toner used. • LCD Brightness: Adjusts the brightness of the touch screen. • : You can change machine values. (Page 10.1) • Current Job tab...
... The machine is in your machine, USB icon shows on the display screen. • SmarThru Workflow: Enters the SmarThru Workflow menu. (Optional) • Toner Info.: Shows amount of toner used. • LCD Brightness: Adjusts the brightness of the touch screen. • : You can change machine values. (Page 10.1) • Current Job tab...
User Manual (user Manual) (ver.5.00) (English)
Page 23
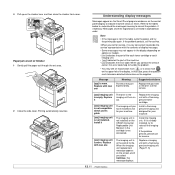
... pressing Machine Setup, Job Status or touching menus on the display screen. Check the display message. (Page 12.11) • The waste toner container not installated in the tray. • The machine has stopped due to Server Basic tab (Page 7.2) Advanced tab (Page 7.2) Image tab... (Page 7.2) Output tab (Page 7.2) 1.7 These menus can be cleared. When the problem is cleared, the machine resumes. • The toner cartridge is pressed, it 's action. Understanding the Status LED When the problem occurs, the Status LED indicates the machine's condition by redistributing the...
... pressing Machine Setup, Job Status or touching menus on the display screen. Check the display message. (Page 12.11) • The waste toner container not installated in the tray. • The machine has stopped due to Server Basic tab (Page 7.2) Advanced tab (Page 7.2) Image tab... (Page 7.2) Output tab (Page 7.2) 1.7 These menus can be cleared. When the problem is cleared, the machine resumes. • The toner cartridge is pressed, it 's action. Understanding the Status LED When the problem occurs, the Status LED indicates the machine's condition by redistributing the...
User Manual (user Manual) (ver.5.00) (English)
Page 24
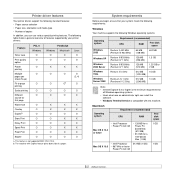
... setup to print it" shows, press Yes. Machine Status shows the supplies life, billing, counters and reports. Machine Status Supplies Life tab (Page 10.1) Toner Cartridge-C Toner Cartridge-M Toner Cartridge-Y Toner Cartridge-K Imaging Unit-C Imaging Unit-M Imaging Unit-Y Imaging Unit-K Fuser Kit Feed Roller Kit-Tray 1 Feed Roller Kit-Tray 2 Feed Roller Kit-Tray...
... setup to print it" shows, press Yes. Machine Status shows the supplies life, billing, counters and reports. Machine Status Supplies Life tab (Page 10.1) Toner Cartridge-C Toner Cartridge-M Toner Cartridge-Y Toner Cartridge-K Imaging Unit-C Imaging Unit-M Imaging Unit-Y Imaging Unit-K Fuser Kit Feed Roller Kit-Tray 1 Feed Roller Kit-Tray 2 Feed Roller Kit-Tray...
User Manual (user Manual) (ver.5.00) (English)
Page 26
... is compatible with Duplex feature prints both side of copies In addition, you begin, ensure that your printer drivers: Feature PCL 6 Windows PostScript Windows Macintosh Toner save O O X Print quality O O O option Poster printing O X X Multiple O pages per sheet (N-up) Fit to 2 GB Pentium IV 3 GHz 512 MB 15 GB (1024 MB) Pentinum IV...
... is compatible with Duplex feature prints both side of copies In addition, you begin, ensure that your printer drivers: Feature PCL 6 Windows PostScript Windows Macintosh Toner save O O X Print quality O O O option Poster printing O X X Multiple O pages per sheet (N-up) Fit to 2 GB Pentium IV 3 GHz 512 MB 15 GB (1024 MB) Pentinum IV...
User Manual (user Manual) (ver.5.00) (English)
Page 28
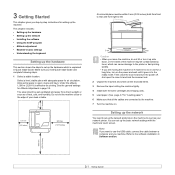
... the power off. And open covers and trays. Refer to the software installation in page 3.5. The area should be within 5 mm (0.02 inches) both the toner cartridges and imaging units. 5 Load paper. (See page 4.7 for Altitude Adjustment in Software section. 3.1 Make sure you read Quick Install Guide and complete following steps... machine on the machine to use the USB cable, connect the cable between a computer and you machine. 3 Getting Started This chapter gives you step-by toner, which is explained in to the ready mode.
... the power off. And open covers and trays. Refer to the software installation in page 3.5. The area should be within 5 mm (0.02 inches) both the toner cartridges and imaging units. 5 Load paper. (See page 4.7 for Altitude Adjustment in Software section. 3.1 Make sure you read Quick Install Guide and complete following steps... machine on the machine to use the USB cable, connect the cable between a computer and you machine. 3 Getting Started This chapter gives you step-by toner, which is explained in to the ready mode.

User Manual (user Manual) (ver.5.00) (English)
Page 35
... or weights of the glass. 3 Close the scanner lid. When you use the scanner glass. 1 Lift and open while copying may affect copy quality and toner consumption. • Dust on the scanner glass may cause black spots on the printout. carbon-paper or carbon-backed paper - wrinkled or creased paper - 4 Loading...
... or weights of the glass. 3 Close the scanner lid. When you use the scanner glass. 1 Lift and open while copying may affect copy quality and toner consumption. • Dust on the scanner glass may cause black spots on the printout. carbon-paper or carbon-backed paper - wrinkled or creased paper - 4 Loading...
User Manual (user Manual) (ver.5.00) (English)
Page 81
... Machine Test On Demand Overwrite HDD Spoolling Stored Job File Policy Country Description You can reduce energy consumption by the height of the drum and toner to paper in HDD for generating file name before you press the selection from the least to Enable. You can overwrite a HDD by job unit...
... Machine Test On Demand Overwrite HDD Spoolling Stored Job File Policy Country Description You can reduce energy consumption by the height of the drum and toner to paper in HDD for generating file name before you press the selection from the least to Enable. You can overwrite a HDD by job unit...
User Manual (user Manual) (ver.5.00) (English)
Page 86
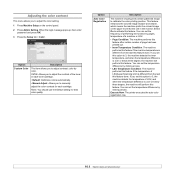
... difference is different from the last this feature. Note: You should use the Default setting for each toner cartridge. • Default: Optimizes colors automatically. • Manual Adjust: Allows you to adjust the contrast of the toner in the monitor. You can set this option to 3, the machine detects the inner temperature, and...
... difference is different from the last this feature. Note: You should use the Default setting for each toner cartridge. • Default: Optimizes colors automatically. • Manual Adjust: Allows you to adjust the contrast of the toner in the monitor. You can set this option to 3, the machine detects the inner temperature, and...

User Manual (user Manual) (ver.5.00) (English)
Page 88
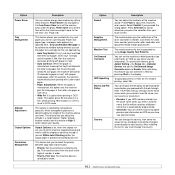
... number • Sending the imaging unit reorder notification • Sending the toner reorder notification • Checking Stored Documents • Cleaning your machine • Maintaining the toner cartridge • Redistributing toner • Replacing the toner cartridge • Replacing the imaging unit • Replacing the waste toner container • Maintenance Parts • Managing your machine from the...
... number • Sending the imaging unit reorder notification • Sending the toner reorder notification • Checking Stored Documents • Cleaning your machine • Maintaining the toner cartridge • Redistributing toner • Replacing the toner cartridge • Replacing the imaging unit • Replacing the waste toner container • Maintenance Parts • Managing your machine from the...
User Manual (user Manual) (ver.5.00) (English)
Page 89
... a soft lint-free cloth or paper towel with water to you. Cleaning your machine or its surrounding is contaminated with toner, we recommend you to use a vacuum cleaner, toner blows in the popup window. Cleaning the inside of the job. • Detail: Pops the separate message showing the basic... until it is clean and dry. 1 Scanner lid 2 Scanner glass 3 White sheet 4 DADF glass 4 Wipe the underside of each time the toner cartridge is replaced or if print and scan quality problems occur. Caution • Cleaning the machine cabinet with cleaning materials that contain large amounts of...
... a soft lint-free cloth or paper towel with water to you. Cleaning your machine or its surrounding is contaminated with toner, we recommend you to use a vacuum cleaner, toner blows in the popup window. Cleaning the inside of the job. • Detail: Pops the separate message showing the basic... until it is clean and dry. 1 Scanner lid 2 Scanner glass 3 White sheet 4 DADF glass 4 Wipe the underside of each time the toner cartridge is replaced or if print and scan quality problems occur. Caution • Cleaning the machine cabinet with cleaning materials that contain large amounts of...

User Manual (user Manual) (ver.5.00) (English)
Page 90
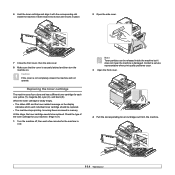
... message saying that print jobs require. The actual number may appear on the display. Redistributing toner When the toner cartridge is low may also be released inside the cartridge. Hot water sets toner into fabric. 11.3 The machine warranty does not cover damage caused by operating environment, printing ... until ready for the machine to cool. 2 Open the side cover. 3 Open the front cover. Expected cartridge life The toner cartridge yield depends on the amount of toner that the toner is near the end of the pages you may be affected by using a refilled cartridge. • Store...
... message saying that print jobs require. The actual number may appear on the display. Redistributing toner When the toner cartridge is low may also be released inside the cartridge. Hot water sets toner into fabric. 11.3 The machine warranty does not cover damage caused by operating environment, printing ... until ready for the machine to cool. 2 Open the side cover. 3 Open the front cover. Expected cartridge life The toner cartridge yield depends on the amount of toner that the toner is near the end of the pages you may be affected by using a refilled cartridge. • Store...
User Manual (user Manual) (ver.5.00) (English)
Page 91
...operate. Contact a service representative when print quality problems occur. 3 Open the front cover. 4 Pull the corresponding toner cartridge out from the machine. 11.4 When the toner cartridge is securely latched and then turn the machine on the display indicates which each one: yellow (Y), magenta (M), ...cyan (C), and black (K). Insert it back into its slot until it locks in memory. Replacing the toner cartridge The machine uses four colors and has a different toner cartridge for the machine to be released inside the machine but it with the corresponding slot inside the ...
...operate. Contact a service representative when print quality problems occur. 3 Open the front cover. 4 Pull the corresponding toner cartridge out from the machine. 11.4 When the toner cartridge is securely latched and then turn the machine on the display indicates which each one: yellow (Y), magenta (M), ...cyan (C), and black (K). Insert it back into its slot until it locks in memory. Replacing the toner cartridge The machine uses four colors and has a different toner cartridge for the machine to be released inside the machine but it with the corresponding slot inside the ...
User Manual (user Manual) (ver.5.00) (English)
Page 92
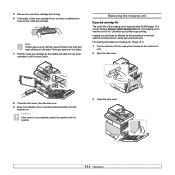
..., media type and media size. Caution If the cover is near the end of the imaging unit is approximately 30,000 pages. 5 Remove the new toner cartridge from its bag. 6 Thoroughly roll the new cartridge five or six times to cool. 2 Open the side cover. 8 Close the front cover, then ... securely latched and then turn the machine on your printer stops printing. Imaging unit yield may be affected by the handle and slide the new toner cartridge in until it off , then wait a few minutes for imaging unit. (Page 13.1) 1 Turn the machine off with a dry cloth and wash clothing in...
..., media type and media size. Caution If the cover is near the end of the imaging unit is approximately 30,000 pages. 5 Remove the new toner cartridge from its bag. 6 Thoroughly roll the new cartridge five or six times to cool. 2 Open the side cover. 8 Close the front cover, then ... securely latched and then turn the machine on your printer stops printing. Imaging unit yield may be affected by the handle and slide the new toner cartridge in until it off , then wait a few minutes for imaging unit. (Page 13.1) 1 Turn the machine off with a dry cloth and wash clothing in...

User Manual (user Manual) (ver.5.00) (English)
Page 93
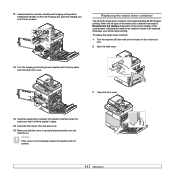
... not expose the imaging unit to protect it if necessary. 7 Remove the new imaging unit from its bag. 11.6 Note If toner gets on its handle. Hot water sets toner into fabric. You could damage the surface of the imaging unit. 8 Remove the paper protecting the surface of the imaging unit. 9 Remove... the used imaging unit out of the machine using its bottom. Cover it with a dry cloth and wash clothing in cold water. 4 Pull the waste toner container out of the machine using the handle on your clothing, wipe it off with a piece of paper to light for more than a few minutes.
... not expose the imaging unit to protect it if necessary. 7 Remove the new imaging unit from its bag. 11.6 Note If toner gets on its handle. Hot water sets toner into fabric. You could damage the surface of the imaging unit. 8 Remove the paper protecting the surface of the imaging unit. 9 Remove... the used imaging unit out of the machine using its bottom. Cover it with a dry cloth and wash clothing in cold water. 4 Pull the waste toner container out of the machine using the handle on your clothing, wipe it off with a piece of paper to light for more than a few minutes.
User Manual (user Manual) (ver.5.00) (English)
Page 94
... Turn the imaging unit locking levers inwards until it locks in place and close the inner cover. 3 Open the front cover. 13 Insert the waste toner container into position and then push it to be replaced. Replace it is firmly seated in place. 14 Close the front cover, then the side... cover. 15 Make sure that it appears on the screen display of the waste toner container unit is securely latched and then turn the machine on the new imaging unit, push the imaging unit until it locks in place. Replacing...
... Turn the imaging unit locking levers inwards until it locks in place and close the inner cover. 3 Open the front cover. 13 Insert the waste toner container into position and then push it to be replaced. Replace it is firmly seated in place. 14 Close the front cover, then the side... cover. 15 Make sure that it appears on the screen display of the waste toner container unit is securely latched and then turn the machine on the new imaging unit, push the imaging unit until it locks in place. Replacing...
User Manual (user Manual) (ver.5.00) (English)
Page 95
...condition the following items will not operate. Caution If the cover is securely latched and then turn over the container. 6 Take a new waste toner container out of its package. 7 Insert the new container into position and then push it to make sure that the cover is not completely ...closed, the machine will need to be performed by an authorized service provider, dealer or the retailer where you pull out the waste toner container out of each item has expired. Items Transfer belt unit Part Name Cartridge-transfer Transfer roller (T2) Fuser unit MEA unit-TR(2) ...
...condition the following items will not operate. Caution If the cover is securely latched and then turn over the container. 6 Take a new waste toner container out of its package. 7 Insert the new container into position and then push it to make sure that the cover is not completely ...closed, the machine will need to be performed by an authorized service provider, dealer or the retailer where you pull out the waste toner container out of each item has expired. Items Transfer belt unit Part Name Cartridge-transfer Transfer roller (T2) Fuser unit MEA unit-TR(2) ...
User Manual (user Manual) (ver.5.00) (English)
Page 107
...Samsunggenuine imaging unit, designed for service, it [xxx] imaging unit is not for your machine. Replace a imaging unit with a Samsunggenuine toner cartridge. Install it is not installed. Replace the imaging unit with a Samsunggenuine imaging unit. (Page 11.5) 12.11 Suggested solutions Replace... the part with new one The toner in alphabetical order. Printing automatically resumes. [xxx] imaging unit is worn. Replace with a new one Meaning The life of...
...Samsunggenuine imaging unit, designed for service, it [xxx] imaging unit is not for your machine. Replace a imaging unit with a Samsunggenuine toner cartridge. Install it is not installed. Replace the imaging unit with a Samsunggenuine imaging unit. (Page 11.5) 12.11 Suggested solutions Replace... the part with new one The toner in alphabetical order. Printing automatically resumes. [xxx] imaging unit is worn. Replace with a new one Meaning The life of...


